Wild Rice Salad with Apples and Pecans Delightful Dish

Looking to spice up your meals? Dive into my Wild Rice Salad with Apples and Pecans! This dish bursts with flavor and crunch, making it a perfect blend of healthy and tasty. You’ll learn how to cook wild rice, make a tangy dressing, and combine fresh ingredients into a delightful salad. Let’s explore this energizing recipe that’s sure to impress your family and friends!
Ingredients
Wild Rice
Wild rice is the star of this dish. Use 1 cup of wild rice for a hearty base. It has a slightly nutty flavor and a chewy texture. This grain is packed with nutrients and adds a nice contrast to the salad. Use either water or vegetable broth, about 2 cups, to cook the rice. The broth can add extra flavor.
Vegetables and Fruits
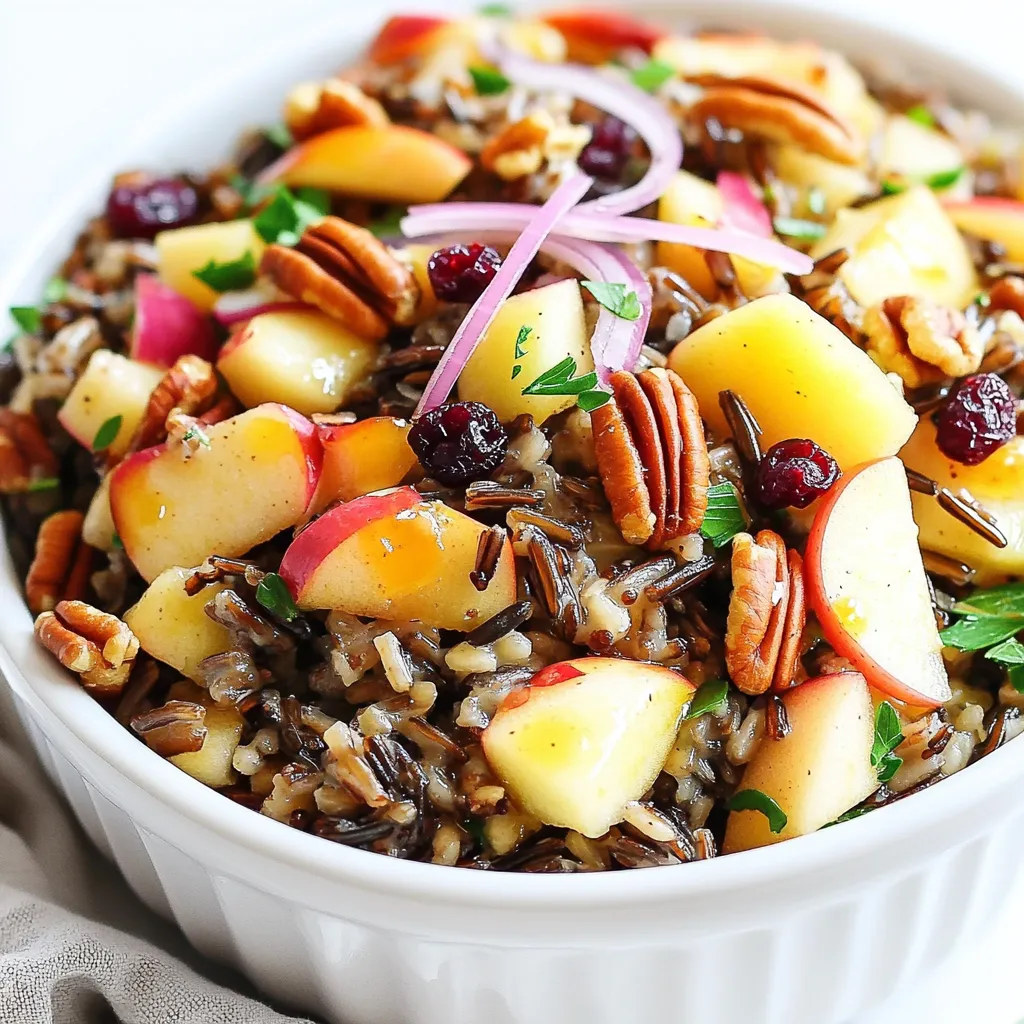
For this salad, you need a few key fruits and veggies:
- 1 large tart apple, like Granny Smith, diced
- ½ cup pecans, toasted and roughly chopped
- ½ cup dried cranberries
- ¼ cup red onion, finely diced
- ¼ cup fresh parsley, chopped
The apple adds a crisp, sweet note. The pecans bring crunch and a rich taste. Dried cranberries add a pop of color and sweetness. The red onion gives a mild bite, while parsley adds freshness.
Dressing Components
The dressing ties all the flavors together. You will need:
- 2 tablespoons olive oil
- 2 tablespoons apple cider vinegar
- 1 tablespoon pure maple syrup
- Salt and pepper to taste
The olive oil provides a smooth base. Apple cider vinegar adds tang, while maple syrup gives a hint of sweetness. Adjust salt and pepper to your liking. This dressing is simple but very effective in lifting the dish.
Step-by-Step Instructions
Cooking the Wild Rice
To cook wild rice, start by boiling two cups of water or vegetable broth. Use a medium saucepan for this. Once the water reaches a full boil, add one cup of wild rice. Then reduce the heat to low. Cover the pot with a lid. Let it simmer for about 40 to 45 minutes. The rice will become tender and the grains will split open when done. After cooking, drain any extra liquid. Spread the rice on a large plate to cool. This cooling step is key to keeping the salad fresh.
Making the Dressing
Next, grab a small mixing bowl. Combine two tablespoons of olive oil with two tablespoons of apple cider vinegar. Add one tablespoon of pure maple syrup, along with salt and pepper to taste. Whisk these ingredients together until they blend well. This dressing adds a nice zing to the salad. Set it aside for a moment so the flavors can mix and become more delicious.
Combining and Serving the Salad
Now, it’s time to put everything together. In a large mixing bowl, combine the cooled wild rice, diced tart apple, and toasted pecans. Add in the dried cranberries, finely chopped red onion, and fresh parsley. Use a spatula to mix these ingredients gently. Make sure everything is evenly combined. Drizzle the dressing over the salad mixture. Toss everything together using a gentle folding motion. This ensures all the ingredients are coated in the dressing.
After mixing, cover the salad with plastic wrap or a lid. Chill it in the fridge for at least 30 minutes. This cooling time helps the flavors meld beautifully. When ready to serve, present the salad in a large bowl. You can garnish it with extra chopped parsley and a few more pecans for crunch. Enjoy!
Tips & Tricks
Best Cooking Techniques for Wild Rice
To cook wild rice perfectly, start with the right water ratio. Use two cups of water or vegetable broth for every cup of wild rice. Bring the liquid to a boil before adding the rice. This step helps the rice cook evenly. Lower the heat to a simmer, cover, and let it cook for 40 to 45 minutes. Check the rice at 40 minutes. The grains should split open and feel tender. If not, let it simmer for a few more minutes. Once done, drain any excess liquid and spread the rice on a plate to cool. This prevents the grains from clumping together.
Flavor Enhancements for the Dressing
For the dressing, use a mix of olive oil and apple cider vinegar. This combination adds a nice tang. I recommend adding a tablespoon of pure maple syrup for sweetness. The maple syrup balances the tartness of the vinegar. Feel free to tweak the salt and pepper to suit your taste. If you want extra flavor, try adding a pinch of garlic powder or a squeeze of lemon juice. These small changes can make a big difference in taste.
Presentation Ideas for Serving
When serving your wild rice salad, presentation matters. Use a large, colorful bowl to show off the salad’s vibrant colors. Garnish with extra chopped parsley on top. This adds a fresh touch. You can also sprinkle a few toasted pecans for added crunch. For a fun twist, serve the salad in individual bowls. This makes it easy for guests to enjoy. Remember, a beautiful presentation makes the dish even more inviting!

Variations
Adding Proteins: Chicken or Tofu
You can make this salad heartier by adding protein. Grilled chicken adds a savory touch. Dice it into small pieces and mix it in. If you prefer a plant-based option, try tofu. Use firm tofu, press it to remove water, then cube and sauté it. Both options pair well with the salad’s flavors and add more nutrition.
Alternative Nuts and Seeds
While pecans shine in this dish, other nuts or seeds can work too. Walnuts bring a similar crunch and rich taste. Almonds, sliced or slivered, add a nice texture. For a nut-free option, try sunflower seeds or pumpkin seeds. These alternatives provide a delightful crunch and a nutty flavor.
Different Fruits and Vegetables to Incorporate
Feel free to switch up the fruits and veggies in this salad. Pears or grapes can add a sweet twist. Roasted sweet potatoes or bell peppers can give warmth and color. Carrots, shredded or diced, add a nice crunch. Mixing in these ingredients can create a unique version of this salad every time you make it.
Storage Info
Refrigeration Guidelines
You should store wild rice salad in the fridge. Use an airtight container to keep it fresh. It stays good for about three to four days. Make sure you chill it quickly after serving. This helps to keep flavors strong and safe.
Freezing Tips
Freezing wild rice salad is not the best option. The apples and pecans do not freeze well. If you want to freeze it, leave out the fresh ingredients. You can freeze the wild rice and dressing separately for up to three months. Just mix everything fresh when you want to eat it.
Reheating Suggestions
Reheating wild rice salad is simple. You can eat it cold or at room temperature. If you prefer warm, heat it gently in a pan. Avoid using a microwave, as it can make the rice mushy. Add fresh apple and pecans after reheating for the best texture.
FAQs
How do I cook wild rice properly?
To cook wild rice, start by rinsing it under cold water. In a medium saucepan, bring 2 cups of water or vegetable broth to a boil. Add 1 cup of wild rice. Reduce the heat to low and cover. Let it simmer for 40-45 minutes until the rice is tender and the grains split open. After cooking, drain any extra liquid. Spread the rice on a plate to cool.
Can I make this salad ahead of time?
Yes, you can make this salad ahead of time. Prepare the salad completely and store it in the fridge. It tastes even better after the flavors mix. Chill it for at least 30 minutes before serving. You can make it a few hours or even a day in advance.
Is this salad gluten-free?
Yes, this salad is gluten-free. Wild rice is naturally gluten-free, making it a great choice for those with gluten sensitivities. Just ensure that all other ingredients, like broth and dressings, are gluten-free as well. Enjoy this tasty salad without worry!
This blog post covered the key ingredients, which include wild rice, fresh veggies, and delicious dressings. I gave you step-by-step instructions for cooking, mixing, and serving the salad. We also explored tips for cooking wild rice and enhancing flavor. I shared fun variations with proteins and other ingredients. Plus, I provided storage info to keep your salad fresh.
Remember, you can always change up this salad to fit your taste. Enjoy making it your own!


![- 1 cup quinoa - 2 cups water or vegetable broth - 1 large cucumber, diced - 1 red bell pepper, diced - 1 cup cherry tomatoes, halved - 1/4 red onion, finely chopped - 1 cup fresh parsley, roughly chopped - 1/4 cup tahini - 2 tablespoons fresh lemon juice - 1 tablespoon extra virgin olive oil - 1 clove garlic, minced - Salt and freshly cracked pepper - 1/4 cup sunflower seeds - Chopped nuts (walnuts or almonds) The ingredients for your Lemon Tahini Quinoa Salad are fresh and colorful. Each one adds flavor and nutrition. Start with quinoa, which is the base of this dish. It is high in protein and gluten-free. For the salad, you need diced cucumber, red bell pepper, cherry tomatoes, red onion, and parsley. The cucumber gives crunch. The red bell pepper adds sweetness. Cherry tomatoes bring juiciness. The red onion gives a mild bite, while parsley adds a fresh taste. Next, let’s talk about the dressing. Tahini is a creamy paste made from sesame seeds. It gives richness to the salad. Lemon juice adds zing and brightness. Olive oil makes it smooth. Garlic adds depth of flavor. A pinch of salt and cracked pepper finishes it off. If you want more texture, try adding sunflower seeds or chopped nuts. They add crunch and healthy fats. This Lemon Tahini Quinoa Salad is easy to make and packed with good ingredients. You can find the Full Recipe to guide you through the steps. First, you need to cook the quinoa. Combine one cup of rinsed quinoa and two cups of water or vegetable broth in a medium saucepan. Bring the mixture to a rapid boil over medium-high heat. Once it boils, lower the heat and cover the pot. Let it simmer for about 15 minutes. The quinoa will soak up all the liquid and become fluffy. After cooking, remove it from heat and let it cool for a bit. While the quinoa cooks, you can prepare the dressing. In a small bowl, whisk together a quarter cup of tahini, two tablespoons of fresh lemon juice, one tablespoon of olive oil, and one clove of minced garlic. Mix until it becomes smooth and creamy. You can add salt and pepper to taste. Now it's time to make the salad. In a large mixing bowl, add one large diced cucumber, one diced red bell pepper, one cup of halved cherry tomatoes, one-fourth of a finely chopped red onion, and one cup of roughly chopped fresh parsley. Stir these ingredients together until they are well mixed. Next, add the cooled quinoa to the bowl with the veggies. Toss everything together gently so the ingredients blend well. Drizzle the tahini dressing over the salad and mix again. For a nice crunch, you can sprinkle a quarter cup of sunflower seeds or chopped nuts on top before serving. For the full recipe, refer to the earlier sections. Enjoy your fresh and flavorful Lemon Tahini Quinoa Salad! To make the best quinoa, start with rinsing it well. This removes any bitter coating. Use cold water and a fine mesh strainer. After rinsing, cook the quinoa in water or broth. Cooking this way adds a nice flavor. Once cooked, let it cool a bit. This helps it mix better with other ingredients. For a creamy dressing, whisk all ingredients together. Use a bowl that allows for easy mixing. If you find clumps, keep whisking until smooth. Adjust the lemon juice and tahini to match your taste. You may like it tangy or mild. Experiment to find your favorite balance. Presentation is key! Serve the salad in colorful bowls. This makes it more inviting and fun. Add lemon slices and fresh parsley on top for a pop of color. These garnishes not only look great but also add extra flavor. For a unique touch, use clear glasses to showcase the vibrant layers of the salad. Check the Full Recipe for more tips on serving! {{image_4}} You can easily boost the protein in your Lemon Tahini Quinoa Salad. Incorporate chickpeas for a hearty touch. These legumes add fiber and flavor. Diced grilled chicken also works well if you want meat. For those following a vegan diet, try tempeh or tofu. Both options soak up flavors and make the salad filling. Feel free to mix in various vegetables. Substitute or add bell peppers, carrots, or creamy avocado. These veggies add crunch and color. You can also use seasonal vegetables for extra freshness. Think of bright summer tomatoes or hearty winter squash. The key is to choose what you enjoy most. Spice up your salad with fun flavors. Add spices like cumin or paprika for a tasty twist. These spices bring warmth and depth to the dish. Fresh herbs like mint or cilantro can brighten things up, too. They add a burst of freshness that takes your salad to the next level. Store your Lemon Tahini Quinoa Salad in an airtight container in the fridge. This keeps it fresh and tasty. It’s best to eat it within 3-5 days. After this time, the flavors may fade, and veggies can lose their crunch. You can freeze quinoa salad if needed. Dress it before serving after you thaw it. Be aware that freezing may change the texture of some vegetables. It’s a good idea to use firmer veggies like bell peppers, as softer ones may not hold up well. I don’t recommend reheating salads. They taste best when served chilled. However, if you want to reheat, you can warm individual components like quinoa or cooked veggies. Just make sure to let them cool before mixing back into the salad. Enjoy the fresh, vibrant flavors! Yes, it's great for meal prep; just dress before serving. This salad stays fresh for days. You can cook the quinoa and chop the veggies in advance. When you are ready to eat, mix in the dressing. This way, the salad will taste fresh. Yes, quinoa is naturally gluten-free. It makes this salad a perfect choice for gluten-free diets. Always check that your other ingredients, like broth, are gluten-free too. This salad is friendly for many diets. You can add different vegetables, proteins, or dressings to suit your taste. Try adding chickpeas for protein or avocados for creaminess. You can also change the herbs or use a different dressing. The choices are endless! It can be a side dish or a main dish, served chilled or at room temperature. For a picnic, serve it cold. If you want a warm meal, let it sit for a bit. Dress it just before serving for the best flavor. Yes, other grains like farro or bulgur can be used as substitutes. Each grain brings a different taste and texture. You can experiment to find your favorite. Just cook them according to package directions. Check the [Full Recipe] for more details! This blog post covered how to make a tasty Lemon Tahini Quinoa Salad. You learned the main ingredients, cooking steps, and tips for perfecting the dish. Remember, feel free to add your favorite proteins or veggies. You can also make it ahead of time for meal prep. Enjoy this salad fresh and chilled for the best flavor. Experiment with it, and you'll find your perfect mix!](https://dishtreats.com/wp-content/uploads/2025/07/0131a3b2-a937-48f9-ad75-9f78e7be101a-768x768.webp)


![- 1 lb (450g) chicken breast, thinly sliced - 1 cup fresh Thai basil leaves, packed - 3 cloves garlic, minced - 2 red Thai chili peppers, thinly sliced (adjust based on your spice preference) For this dish, I prefer chicken breast. It cooks quickly and stays juicy. Fresh Thai basil gives this meal its unique flavor. Garlic adds a nice aroma, and Thai chili peppers bring heat. You can control the spice by adding more or less chili. - 2 tablespoons soy sauce - 1 tablespoon oyster sauce (or substitute with mushroom sauce for vegetarian) - 1 tablespoon fish sauce (or an extra tablespoon of soy sauce for vegetarian) - 1 teaspoon sugar (to balance flavors) - 1 tablespoon vegetable oil (for frying) These sauces are key to great taste. Soy sauce offers saltiness, while oyster and fish sauces add depth. Sugar balances the salty flavors, making everything taste better. - 1 bell pepper, sliced (your choice of color for visual appeal) - 1 small onion, sliced into thin wedges - Optional: other vegetables for added nutrition I like using bell pepper and onion for color and crunch. You can add other veggies like carrots or snap peas. They bring more nutrition and flavor, making the dish more vibrant. For the full recipe, refer to the [Full Recipe]. To start, you need to combine the chicken with the sauces. In a medium bowl, add the sliced chicken breast, soy sauce, oyster sauce, fish sauce, and sugar. Mix these ingredients well so the chicken gets all the flavor. Let it marinate for 15 minutes. This short time helps the chicken absorb the tasty sauces. Next, heat the vegetable oil in a large skillet or wok over medium-high heat. You want the oil to shimmer before adding anything. Then, add the minced garlic and sliced Thai chili peppers. Stir-fry them for about 30 seconds until they smell amazing. Be careful not to burn the garlic. Now, add the marinated chicken to the pan. Spread it out evenly for even cooking. Stir-fry for about 5 to 7 minutes. Cook until the chicken is no longer pink and has a nice brown color. After that, toss in the sliced bell pepper and onion. Stir-fry for another 3 to 4 minutes. This will make the vegetables tender but still crisp. Once the chicken and veggies are done, take the skillet off the heat. Gently fold in the fresh Thai basil leaves. They will wilt quickly from the heat and add a lovely aroma. Serve the dish hot, over a bed of fluffy jasmine rice. This rice complements the stir-fry well. Enjoy your Thai Basil Chicken Stir-Fry! For the full recipe, check out the details above. Using fresh ingredients makes a big difference. Fresh Thai basil gives a sweet and fragrant flavor to the dish. Always choose bright green basil leaves. They should smell strong and sweet. The chicken should be fresh, too. This keeps your stir-fry tasty and safe to eat. For the best flavor, cook on high heat. A hot pan helps to sear the chicken. This adds a nice caramel color and enhances the taste. When you add garlic and chili, cook them quickly. This brings out their strong flavors without burning them. You can change the heat level easily. If you want it milder, remove the seeds from the chili peppers. You can also use fewer peppers or substitute with sweet bell peppers. If you like a kick but want it less spicy, try adding sugar. It balances the heat. You can also use a bit of honey for sweetness without heat. Pair your Thai basil chicken stir-fry with jasmine rice. The rice absorbs the sauce well. You can also add a side of steamed veggies for extra nutrition. For garnishes, consider adding lime wedges or crushed peanuts. They add color and crunch. Fresh cilantro or extra basil leaves also make it pop. Enjoy your meal with these simple touches! For the full recipe, check out the details above. {{image_4}} For a vegetarian or vegan version, you can swap chicken for tofu or tempeh. These options give a nice texture. Use mushroom sauce instead of oyster sauce. It brings depth and umami flavor. For the fish sauce, simply add an extra tablespoon of soy sauce. This keeps the taste bold. To maintain flavor, marinate the tofu or tempeh just like chicken. Allow it to soak up the sauces. When cooking, make sure to press out excess moisture. This helps achieve that nice, crispy texture we all love. If you want to try something new, switch the chicken for shrimp or beef. Shrimp cooks quickly, so cut down the cooking time to about 3-4 minutes. Beef takes longer. Slice it thin and cook it for about 6-8 minutes. Remember, cooking times change based on what protein you use. Always make sure your protein is fully cooked before adding in the veggies. Want to shake things up? Add sauces like teriyaki or sriracha for an exciting twist. Teriyaki gives a sweet flavor, while sriracha adds heat. You can even mix both for a sweet and spicy kick. Feel free to experiment with herbs and spices too. Adding cilantro or mint can brighten the dish. Try a sprinkle of lime juice for an extra zest. These tiny changes can create a whole new taste experience. For the full recipe, check the section above. Enjoy cooking! To keep your Thai basil chicken stir-fry fresh, store it in an airtight container. Refrigerate the leftovers within two hours of cooking. If you want to save it longer, freeze the stir-fry. Make sure to cool it completely before freezing. This method helps retain flavor and texture. When you reheat your stir-fry, use a skillet for the best results. Heat it over medium warmth and stir often. This keeps the chicken juicy and prevents it from drying out. For rice, add a splash of water and cover it. This helps the rice steam and become fluffy again. In the fridge, your Thai basil chicken stir-fry lasts up to four days. If frozen, it can last for about three months. Always check for off smells or changes in color. If you see these, it's best to discard it for safety. Thai Basil Chicken Stir-Fry has roots in Thai street food. This dish reflects the vibrant flavors of Thai cuisine. It showcases fresh herbs, bold spices, and simple cooking techniques. Thai basil, known for its unique flavor, is key to this dish. It adds a sweet and slightly spicy note that enhances the chicken. This meal represents the balance of sweet, salty, and spicy tastes typical in Thai dishes. Each bite transports you to bustling markets in Thailand. Yes, you can prepare Thai basil chicken stir-fry in advance. Cook and store it in the fridge for up to three days. To keep it fresh, store it in an airtight container. When you are ready to eat, simply reheat it on the stove. This dish tastes even better the next day as flavors meld. Serve it over freshly cooked jasmine rice for a quick meal. If you cannot find Thai basil, you have options. Sweet basil or holy basil works well as a substitute. Sweet basil offers a milder flavor, while holy basil is spicier. You can also mix in a bit of mint for a fresh twist. While these substitutes change the taste slightly, they still create a tasty dish. Just remember, the flavor will differ from the original recipe. The spice level of Thai Basil Chicken Stir-Fry can vary. It depends on the number of Thai chili peppers you use. Typically, this dish has a mild to medium heat. If you prefer a milder dish, use fewer chilis or remove the seeds. For those who love heat, add extra chilis or a dash of hot sauce. Adjusting spice levels allows everyone to enjoy this flavorful meal. Thai Basil Chicken Stir-Fry is a simple yet flavorful dish. You learned about the key ingredients, like fresh basil and chicken. The step-by-step instructions make cooking easy, even for beginners. We explored tips to enhance flavor and adjust spice levels to suit your taste. You can even try fun variations with different proteins or herbs. Enjoy making it your own, and savor the fresh flavors. Every bite will bring joy to your table.](https://dishtreats.com/wp-content/uploads/2025/06/20a2f9de-1755-4b6a-ade1-393123d10e24-768x768.webp)