
If you’re looking for a quick, tasty meal, White Chicken Enchiladas are perfect for you! This simple recipe packs flavor and comfort in each bite. I’ll guide you through the easy steps to make a dish that delights everyone. Whether it’s a cozy family dinner or a fun gathering, these enchiladas will impress. Let’s get started and fill your kitchen with delicious aromas!
Why I Love This Recipe
- Deliciously Creamy: The combination of cream cheese and sour cream creates a rich and velvety texture that enhances the flavors of the chicken.
- Easy to Prepare: This recipe comes together quickly, making it perfect for busy weeknights or when entertaining guests.
- Customizable: You can easily adjust the spice level by adding more or fewer jalapeños, or even swapping in other ingredients like black beans or corn.
- Perfect for Leftovers: These enchiladas taste even better the next day, making them a great option for meal prep or leftovers.
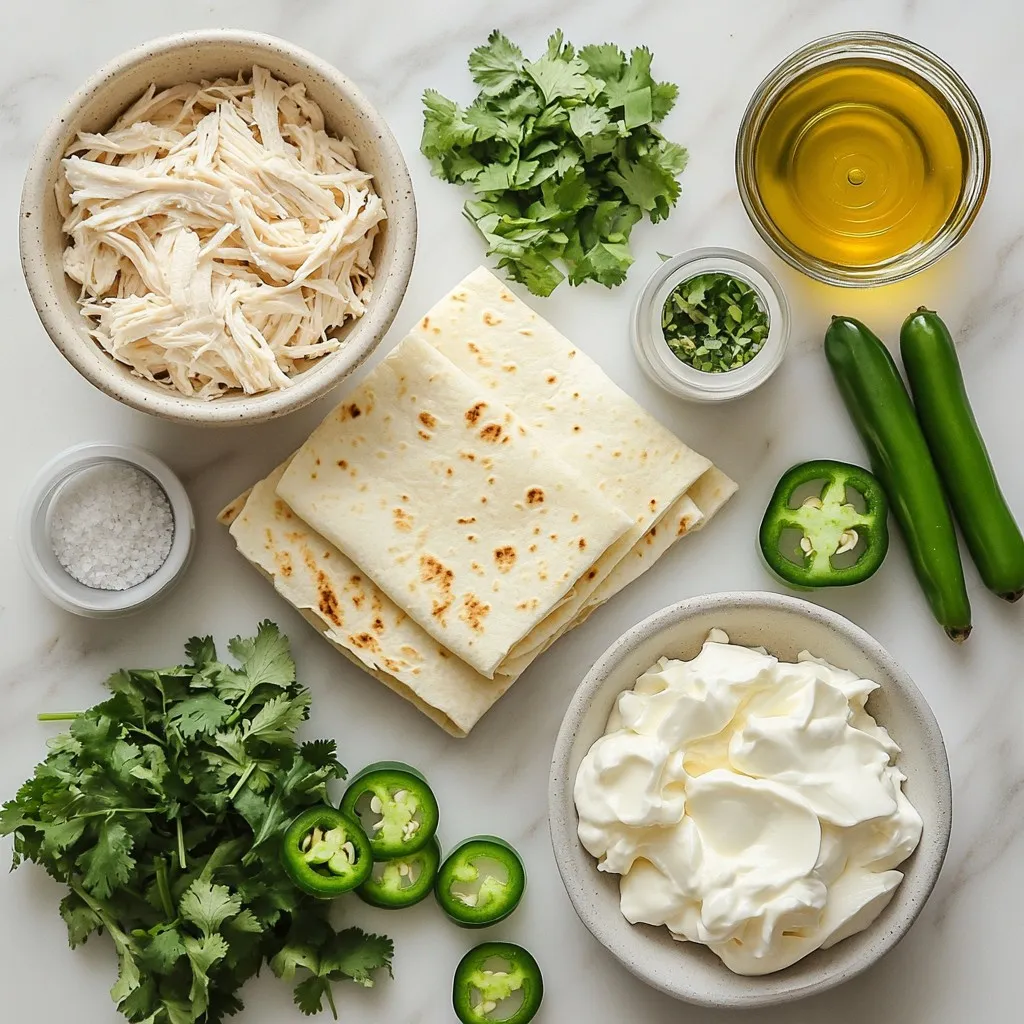
Ingredients
Main Ingredients
For creamy white chicken enchiladas, gather these key items:
– 2 cups cooked chicken, shredded
– 1 cup cream cheese, softened
– 1 cup sour cream
– 1 cup shredded Monterey Jack cheese, divided
– 1 cup green enchilada sauce
– 8 small flour tortillas
– 1 tablespoon olive oil
– 1 teaspoon garlic powder
– 1 teaspoon onion powder
– Salt and pepper to taste
Optional Ingredients
You can add more flavor with these options:
– 1-2 jalapeños, finely diced (adjust for spice)
– Fresh cilantro, chopped, for garnish
– Sliced green onions, for garnish
Notes on Ingredient Quality
Use high-quality chicken for the best taste. Fresh chicken makes a big difference. Choose cream cheese and sour cream that are full-fat for richer flavor. Look for Monterey Jack cheese that melts well. Always check your spices for freshness. Fresh herbs add a burst of taste and color.
Step-by-Step Instructions
Preheating the Oven
Start by preheating your oven to 350°F (175°C). This temperature helps melt the cheese and cook the enchiladas perfectly.
Preparing the Chicken Filling
In a large bowl, mix the shredded chicken, cream cheese, sour cream, and half of the cheese. Add the diced jalapeños, garlic powder, onion powder, and a pinch of salt and pepper. Stir well until the mixture is creamy and smooth.
Warming Tortillas
Warm the tortillas to make rolling easier. You can heat them in a dry skillet for 20-30 seconds on each side. Alternatively, microwave them for about 30 seconds until soft.
Assembling Enchiladas
Take a warm tortilla and place some chicken filling in the center. Roll it tightly from one end to the other and place it seam-side down in a greased 9×13 inch baking dish. Repeat for all tortillas.
Adding Sauce and Cheese
Pour the green enchilada sauce over the rolled tortillas, making sure they are well coated. Then, sprinkle the remaining shredded Monterey Jack cheese on top for a delicious cheesy layer.
Baking and Serving
Bake the dish in the preheated oven for 25-30 minutes. The cheese should be bubbly and golden brown. After baking, let it cool for 5 minutes before serving. Garnish with fresh cilantro and sliced green onions for extra flavor.
Tips & Tricks
Perfecting the Chicken Filling
To make the chicken filling creamy, mix it well. I use softened cream cheese and sour cream. This makes it smooth and rich. Add spices like garlic and onion powder for flavor. You can also adjust the heat with jalapeños. For a milder taste, use fewer jalapeños. If you want a kick, add more. Don’t forget to season with salt and pepper. A well-seasoned filling is key to great enchiladas.
How to Warm Tortillas Easily
Warming tortillas makes them soft and easy to roll. You can use a skillet or microwave. For the skillet, heat it on medium. Place the tortilla for 20-30 seconds on each side. This method gives them a nice texture. If you prefer the microwave, stack tortillas and wrap them in a damp paper towel. Heat for about 30 seconds. Either method works well, but warming is a must.
Avoiding Common Mistakes
Many people overfill their tortillas. This can make rolling hard. Use a generous, but not excessive, amount of filling. Seam-side down helps keep them closed. Another mistake is not preheating the oven. A hot oven is crucial for melting cheese perfectly. Lastly, don’t skip the sauce on top. It keeps the enchiladas moist and tasty. Follow these tips for the best white chicken enchiladas.
Pro Tips
- Use Rotisserie Chicken: For a quick preparation, consider using store-bought rotisserie chicken. It saves time and adds a rich flavor to your enchiladas.
- Customize Your Spice Level: Adjust the number of jalapeños based on your spice preference. You can also use mild green enchilada sauce if you want to tone down the heat.
- Experiment with Cheese: While Monterey Jack is traditional, feel free to mix in other cheeses like cheddar or pepper jack for added flavor and a different texture.
- Let It Rest: Allow the enchiladas to rest for a few minutes after baking. This helps the filling set, making them easier to serve and enjoy.
Variations
Vegetarian White Enchiladas
You can make a tasty vegetarian version of white enchiladas. Instead of chicken, use a mix of veggies like bell peppers, zucchini, and mushrooms. Sauté them in olive oil until soft. Mix these veggies with cream cheese, sour cream, and spices. This keeps the creamy texture while adding a fresh taste. Use the same green enchilada sauce and cheese. Roll them up just like the original recipe.
Spicy White Chicken Enchiladas
If you love heat, try spicy white chicken enchiladas. Start with the original recipe but add more jalapeños or even diced green chilies. You can also swap half of the Monterey Jack cheese for pepper jack cheese. This gives a nice kick. For an extra spicy sauce, mix in some hot sauce with the green enchilada sauce before pouring it over the rolled tortillas. Enjoy the heat!
Gluten-Free Options
For a gluten-free meal, use corn tortillas instead of flour tortillas. Corn tortillas work well and hold the filling nicely. Ensure your enchilada sauce is gluten-free too. Most store-bought sauces are, but it’s best to check. If you want to make your own sauce, blend tomatillos, garlic, and spices. This makes a bright and flavorful sauce that pairs well with the enchiladas.
These variations let you enjoy white chicken enchiladas in different ways. Feel free to mix and match based on your taste!
Storage Info
Storing Leftovers
To store leftover white chicken enchiladas, let them cool first. Then, place them in an airtight container. You can keep them in the fridge for about 3 to 4 days. If you want to keep them longer, freezing is a great option. Make sure to separate layers with parchment paper to avoid sticking.
Reheating Instructions
When you want to enjoy your leftovers, preheat your oven to 350°F (175°C). Place the enchiladas in an oven-safe dish. Cover them with foil to keep them moist. Heat for about 20 minutes or until they are warm throughout. You can also reheat them in the microwave. Just cover them with a damp paper towel and heat for 1 to 2 minutes. Check that they are hot all the way through.
Freezing Enchiladas for Later
To freeze enchiladas, wrap each one tightly in plastic wrap. Then, place them in a freezer-safe bag or container. They can last for up to 3 months in the freezer. When ready to eat, thaw them overnight in the fridge. Then, bake them at 350°F (175°C) until hot. This method keeps them tasty and ready for a quick meal!
FAQs
What can I use instead of chicken?
You can use cooked turkey, beans, or tofu as great substitutes. For turkey, shred it like you would chicken. Black beans or pinto beans can add a hearty texture. Tofu works well when you press and cube it. Each option brings its own flavor and makes the dish unique.
Can I prepare this recipe ahead of time?
Yes, you can prep these enchiladas ahead of time. Assemble them in the baking dish, cover tightly, and store in the fridge. Bake them within 24 hours for the best taste. If you want to prep further in advance, you can freeze them. Just add extra baking time when you cook them from frozen.
What sides pair well with white chicken enchiladas?
Several sides work nicely with these enchiladas. Consider serving them with zesty Mexican rice or a fresh garden salad. You might also enjoy black beans or corn for added flavor. Guacamole and tortilla chips can bring a fun crunch. Each side enhances your meal with extra taste and color.
This blog post covered all you need to make white chicken enchiladas. We explored key ingredients like chicken and tortillas. I shared step-by-step instructions for a perfect dish. You learned tips for making the filling and warming tortillas. We also discussed variations and how to store leftovers.
Use these ideas to impress your family with tasty meals. Enjoy your cooking journe


