Watermelon Feta Mint Salad Refreshing Summer Delight

Looking for a cool and tasty dish for summer? You’re in the right spot! Watermelon Feta Mint Salad is a perfect blend of sweet, salty, and fresh. It’s simple to make and packed with flavor. In this article, I’ll share easy steps, expert tips, and fun variations. Get ready to impress your friends with this refreshing delight! Let’s dive into the recipe!
Ingredients
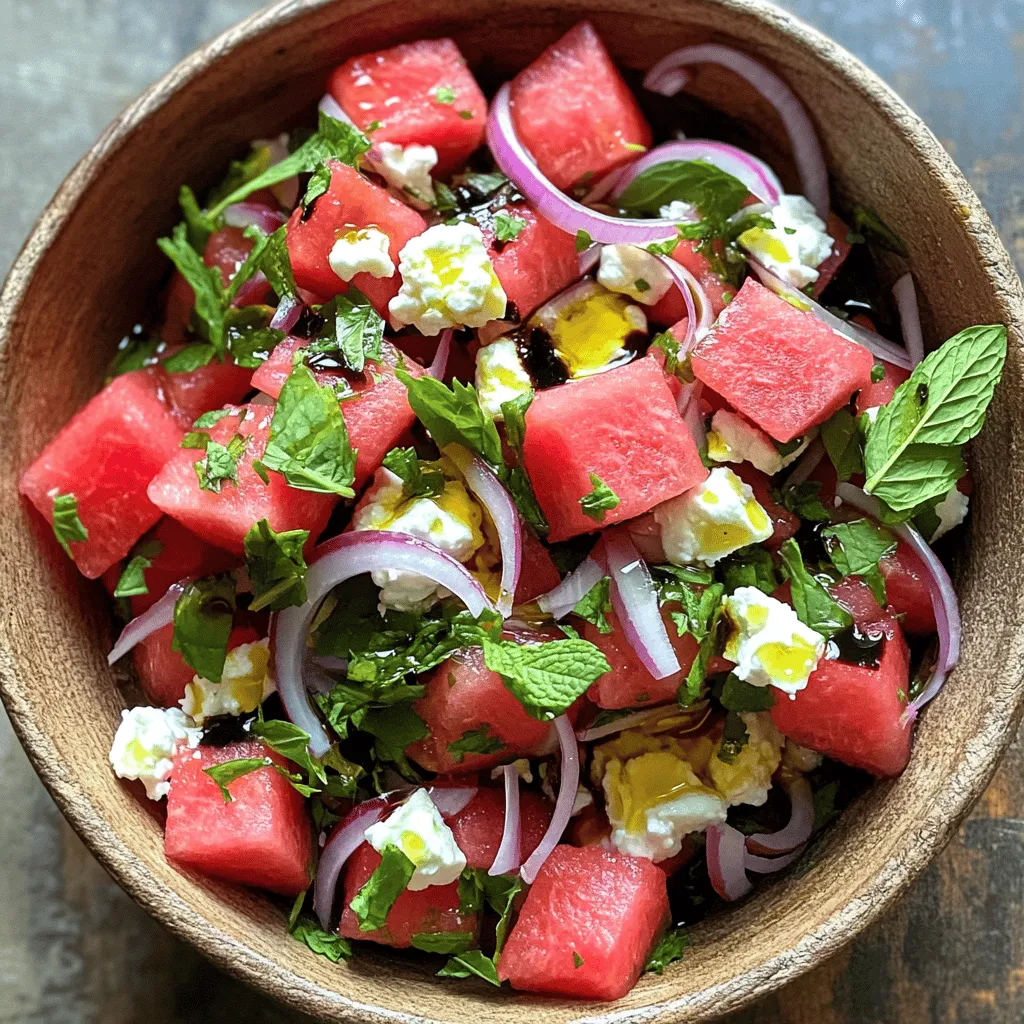
Fresh Ingredients Needed
- 4 cups watermelon, cut into bite-sized cubes
- 1 cup feta cheese, crumbled into small pieces
- 1/2 cup fresh mint leaves, finely chopped
- 1/4 cup red onion, paper-thin slices
- 2 tablespoons balsamic glaze, for drizzle
- 1 tablespoon extra virgin olive oil, for richness
- Sea salt and freshly cracked black pepper to taste
Tips for Choosing Ingredients
- Selecting ripe watermelon: Look for a watermelon that feels heavy for its size. The skin should have a dull finish and a yellow spot where it rested on the ground. This shows ripeness.
- Choosing flavorful feta cheese: Go for feta that is creamy and moist. Try to find feta packed in brine for the best taste. Crumbled feta works well in salads.
- Finding fresh mint leaves: Choose mint that looks bright and green. Avoid wilted or brown leaves. Fresh mint adds a burst of flavor and aroma to your salad.
Step-by-Step Instructions
Preparation Steps
- Preparing the watermelon cubes: Start by cutting the watermelon into bite-sized cubes. Make sure they are juicy and sweet for the best flavor.
- Crumbling the feta cheese: Next, take the feta cheese and crumble it into small pieces. This adds a creamy texture to the salad.
- Washing and chopping the mint leaves: Wash the fresh mint leaves thoroughly. Then, chop them finely to release their aroma and flavor.
Combining Ingredients
- Mixing watermelon and feta: In a large mixing bowl, combine the watermelon cubes and crumbled feta cheese. Toss them gently to mix without breaking the watermelon.
- Adding mint and red onion: Now, add the chopped mint leaves and the thinly sliced red onion. The onion adds a nice crunch and a bit of sharpness.
- Drizzling balsamic glaze and olive oil: Drizzle the balsamic glaze and olive oil over the salad. This will enhance the flavors and add a lovely shine.
Final Touches
- Gently folding the salad: Using a large spoon, gently fold the salad together. Be careful not to crush the watermelon cubes; they should stay whole and juicy.
- Seasoning with salt and pepper: Sprinkle some sea salt and freshly cracked black pepper over the top. This seasoning boosts all the flavors in your salad.
- Allowing the salad to rest: Let the salad sit at room temperature for about 10 minutes. This helps the flavors blend together beautifully before serving.Enjoy your refreshing delight!
Tips & Tricks
Perfecting Flavors
To make your Watermelon Feta Mint Salad shine, adjust seasoning to your taste. Start with a pinch of sea salt and freshly cracked black pepper. Mix well and taste. If it needs more flavor, add a bit more salt or pepper. Balancing sweetness with acidity is key. The balsamic glaze gives a sweet touch, while the olive oil adds richness. If you like it tangier, add more balsamic.
Presentation Ideas
When serving, think about how to make it pop. Use a large, shallow bowl or a platter. This gives your salad more space and looks lovely. For gatherings, serve it family-style so everyone can help themselves. Garnish with extra mint leaves on top. This adds a fresh look and a nice aroma. You can also sprinkle some crumbled feta on top for extra flair.
Enhancing the Salad
Want to add more flavor and texture? Try adding nuts for crunch. Walnuts or almonds work great. They give a nice bite and pair well with the soft watermelon and feta. You can also include citrus for brightness. Squeeze some fresh lime or lemon juice over the salad just before serving. This adds a zesty kick and brightens up the dish.

Variations
Dietary Adjustments
You can make this salad work for different needs. If you want a gluten-free option, you are in luck! All the ingredients in this dish are naturally gluten-free. Just make sure no gluten sneaks in from the balsamic glaze or any other dressings you use.
For vegan substitutes, swap the feta cheese with crumbled tofu. You can also use a cashew cheese for a creamy texture. This keeps the salad fresh and tasty while being plant-based.
Flavor Variations
Want to spice things up? Add sliced jalapeños for a kick! They bring heat that pairs well with the sweetness of watermelon. Start with a small amount, and add more to taste.
You can also get creative by mixing in other fruits. Try adding berries like blueberries or strawberries. They add a pop of color and sweetness that complements the other flavors well.
Seasonal Changes
When summer fades, you can still enjoy this salad. Use other melons like cantaloupe or honeydew. They have different flavors, and each brings its own charm.
In fall or winter, you might want to adjust ingredients. Swap fresh mint for fresh herbs like parsley or arugula. These herbs offer a different taste that works well with winter meals.
Experiment with these variations to keep your watermelon feta mint salad exciting!
Storage Info
Best Practices for Storage
To keep your watermelon feta mint salad fresh, store it well. Place any leftovers in an airtight container. This keeps the flavors and moisture locked in. Refrigerate the container right away. Do not leave it out at room temperature for long.
When you store the salad, avoid mixing it all together. Keep the dressing separate if you plan to eat it later. This prevents the watermelon from getting mushy. The feta and mint stay fresh longer this way too.
Shelf Life
The salad stays fresh for about 2 days in the fridge. After that, it may start to lose its crispness and taste. Check for signs of spoilage. Look for wilted mint leaves or a strong smell. If the salad looks slimy or off, it’s best to throw it away.
To enjoy your salad at its best, try to eat it within the first day. The flavors are bright and vibrant when it’s fresh.
FAQs
Common Questions about Watermelon Feta Mint Salad
Can I make this salad ahead of time?
You can make this salad a few hours early. Just keep it in the fridge. This keeps the salad fresh and cool. However, add the balsamic glaze right before serving. This keeps the watermelon from getting mushy.
What can I serve with this salad?
This salad pairs well with grilled meats. Try it with chicken, fish, or burgers. You can also serve it as a side for picnics or barbecues. It adds a great pop of color and flavor to any meal.
Is feta cheese healthy?
Feta cheese has some health benefits. It is lower in fat than many other cheeses. Feta also contains protein and calcium, which are good for your bones. Just remember to enjoy it in moderation.
Can I substitute ingredients in the recipe?
Yes! You can swap feta with goat cheese for a tangy twist. If you don’t like mint, try basil or cilantro. You can even use a different dressing, like lemon juice, to change the flavor.
Cooking and Preparation Questions
How to cut watermelon properly?
Start by washing the watermelon. Cut off both ends to create a flat base. Stand it up, then slice it in half. Cut each half into long strips, and then cube the strips. This gives you perfect bite-sized pieces.
What is the best way to serve the salad?
Serve the salad in a large bowl or platter. This makes it easy for everyone to help themselves. You can also use small cups for individual servings. Garnish with extra mint for a nice touch.
Can I add other herbs besides mint?
You can add other herbs if you want! Basil gives a sweet taste, while cilantro adds a fresh kick. Just make sure to chop them finely for the best flavor.
In this post, we explored a refreshing watermelon feta mint salad. We covered fresh ingredients, preparation steps, and tips for perfect flavor. You learned how to select ripe fruits and tasty cheese. I shared ways to adjust the recipe for dietary needs and seasonal changes.
Creating this salad is simple and fun. You can impress your friends with bright flavors and great presentation. Enjoy blending fresh tastes for a dish that is both unique and healthy. Just remember, the right ingredients make all the difference!


![- 1 pound Brussels sprouts - 3 tablespoons olive oil - 2 tablespoons maple syrup - 2 tablespoons balsamic vinegar - 1 teaspoon garlic powder - 1 teaspoon smoked paprika - Salt and pepper to taste - 1/4 cup chopped walnuts (optional) - 2 tablespoons grated Parmesan cheese (optional) To create crispy Brussels sprouts, start with fresh Brussels sprouts. Look for firm, small ones for the best taste. Trim the ends and cut each sprout in half. This helps them cook evenly and get crispy. Next, use olive oil to coat the sprouts. It adds flavor and helps them crisp up in the oven. Maple syrup and balsamic vinegar give the sprouts a sweet and tangy glaze. These flavors work great together! For seasonings, garlic powder and smoked paprika add depth. Adjust salt and pepper to match your taste. If you want to add crunch, use walnuts. Grated Parmesan cheese also makes a delicious topping. You can find the full recipe in the article. Enjoy the process, and get ready for a tasty side dish! - Preheat oven to 425°F (220°C). - Trim and halve the Brussels sprouts. Start by preheating your oven. This step is vital for a perfect roast. Next, take your Brussels sprouts and trim off the tough ends. Then, cut each sprout in half. This helps them cook evenly and get crispy. - Mixing oil and seasonings. - Tossing the Brussels sprouts to coat evenly. In a large bowl, pour in three tablespoons of olive oil. Add garlic powder, smoked paprika, salt, and pepper. Mix well. Now, toss in the halved Brussels sprouts. Use your hands to coat them evenly. Each sprout should be shiny and full of flavor. - Spread out on a baking sheet. - Roasting time and tips for even crispiness. Spread the Brussels sprouts in a single layer on a baking sheet. Make sure there’s space between them; this helps with crispiness. Roast them for 20-25 minutes. Halfway through, stir them around. This helps them brown evenly for that perfect crunch. - Whisking together maple syrup and balsamic vinegar. While the sprouts roast, it’s time to make the glaze. In a small bowl, mix two tablespoons of maple syrup with two tablespoons of balsamic vinegar. Whisk until combined. This glaze adds a sweet and tangy kick to the sprouts. - Drizzling glaze and optional toppings. - Return to oven for additional roasting. Once the Brussels sprouts are done roasting, take them out of the oven. Drizzle the maple balsamic glaze over them. Toss gently to coat each sprout. For extra flavor, sprinkle chopped walnuts and grated Parmesan cheese on top. Return the baking sheet to the oven for another 5 minutes to caramelize the glaze. Serve these crispy Brussels sprouts warm for the best taste. Full Recipe can be found in the earlier section for a complete guide. To get the best crispiness, space matters. Place your Brussels sprouts in a single layer on the baking sheet. This helps them roast evenly. If they touch, they will steam instead of crisp. Stirring is key, too. Halfway through cooking, give them a good stir. This ensures all sides get that golden brown color. You can boost flavor with simple spices. Try adding cayenne for heat or lemon zest for brightness. Fresh herbs like thyme or rosemary also work great. For toppings, consider adding crunchy nuts or cheese. Chopped walnuts or grated Parmesan cheese add fun textures and flavors. Avoid overcrowding your pan. If you pack the sprouts too tight, they won’t crisp up. They need room to breathe. Also, always preheat your oven. A hot oven starts the cooking process right. If the oven isn’t hot enough, you’ll lose that nice crunch. For the full recipe, check out the complete guide on making crispy Brussels sprouts with bacon! {{image_4}} You can make crispy Brussels sprouts without bacon. For a tasty vegetarian version, skip the bacon and add a mix of nuts. Try using walnuts or pecans for crunch. You can also sprinkle on some nutritional yeast to give it a cheesy flavor. Adding roasted chickpeas can boost protein and flavor, making it hearty. To change the taste, try new herbs or spices. Rosemary or thyme can add a lovely earthiness. You could also use chili flakes for some heat. For a fresh twist, add lemon or orange zest. The citrus brightens up the dish and makes it pop. You can squeeze fresh lemon juice over the sprouts after roasting for extra zing. Crispy Brussels sprouts pair well with meats like chicken, pork, or fish. Serve them as a side to grilled chicken for a balanced meal. If you want plant-based protein, try adding lentils or quinoa. This makes the dish more filling and nutritious. You can also toss in some cooked bacon if you like the flavor and want to keep the original dish vibe. For the full recipe, check out the details on how to make this delicious side dish! To keep your crispy Brussels sprouts fresh, you need to cool them well. Allow them to sit at room temperature for about 30 minutes. This prevents moisture buildup. After they cool, use airtight containers. Glass or plastic containers work great. Make sure they are sealed tightly to keep out air. Store them in the fridge for up to three days. When it’s time to enjoy your leftovers, reheating is key. Use an oven or an air fryer. Preheat the oven to 350°F (175°C). Spread the sprouts on a baking sheet. Heat them for about 10 to 15 minutes. This helps regain their crispiness. If using an air fryer, set it to 375°F (190°C) for about 5 to 7 minutes. To keep the sprouts crunchy, avoid using the microwave. The microwave makes them soggy, which is not ideal. Enjoy your tasty side dish again with these simple steps. For the full recipe, check out the detailed instructions above! To make crispy Brussels sprouts, follow these steps: 1. Preheat your oven to 425°F (220°C). 2. Trim and halve 1 pound of Brussels sprouts. 3. Mix 3 tablespoons of olive oil, 1 teaspoon of garlic powder, and 1 teaspoon of smoked paprika in a bowl. 4. Toss the halved sprouts in the oil mixture until they are well coated. 5. Spread the sprouts on a baking sheet in a single layer. 6. Roast them for 20-25 minutes, stirring halfway through. 7. Drizzle with a maple balsamic glaze and toss. 8. Return to the oven for 5 more minutes for extra flavor. This method gives you a delicious side dish with a crisp texture. You can use frozen Brussels sprouts, but they might not get as crispy. Frozen sprouts often have more moisture. This can lead to steaming instead of roasting. If you use them, thaw first and pat dry to help with crispiness. Fresh is always best for a crunchy bite. Crispy Brussels sprouts pair well with many dishes. Try serving them with: - Grilled chicken - Roasted pork - Quinoa salad - Baked salmon These options balance flavors and make for a hearty meal. Crispy Brussels sprouts last in the fridge for about 3-4 days. Store them in an airtight container. This helps keep them fresh and safe to eat. However, they may lose some crispiness over time. Yes, you can prep Brussels sprouts ahead of time. Trim and halve them and store in the fridge for up to 2 days. For cooking, roast them fresh for the best texture. If you need to reheat, use the oven to keep them crispy. For the complete recipe for crispy Brussels sprouts with bacon, check out the [Full Recipe]. In this blog post, we explored how to make crispy Brussels sprouts. You learned about the key ingredients, from Brussels sprouts to maple syrup. We covered easy step-by-step instructions, tips for crispiness, and ways to customize flavors. Remember, good cooking involves attention to detail and a dash of creativity. With the right techniques, you can enjoy this tasty dish at home. Now, go ahead and try making it for yourself!](https://dishtreats.com/wp-content/uploads/2025/06/4d1da713-6118-4ecf-9fc1-c93df0ff8318-768x768.webp)
![- 8 oz rotini or fusilli pasta - 1 cup cherry tomatoes, halved - 1 cucumber, diced - 1 cup Kalamata olives, pitted and halved - 1/2 red onion, finely chopped - 1 bell pepper, diced - 1 cup feta cheese, crumbled - 1/4 cup fresh parsley, chopped - 1/4 cup extra virgin olive oil - 3 tablespoons red wine vinegar - 1 teaspoon dried oregano - Salt and pepper, to taste - Substitute red wine vinegar with apple cider vinegar - Add other vegetables like bell peppers or spinach This salad bursts with color and flavor. The main ingredients bring freshness. Each bite is full of crunch and zest. The pasta holds the dressing well, creating a tasty mix. The dressing is simple but packs a punch. Extra virgin olive oil adds richness. Red wine vinegar gives a tangy taste. Dried oregano adds a hint of earthiness. Salt and pepper enhance all the flavors. Want to mix it up? Try adding apple cider vinegar instead of red wine vinegar. You can also throw in extra veggies like spinach. This salad is flexible and lets your creativity shine. For the full recipe, check out the Zesty Greek Pasta Salad with Feta & Olives. To start, bring salted water to a rolling boil. Add 8 ounces of rotini or fusilli pasta. Cook for 8-10 minutes until al dente. Once cooked, drain the pasta in a colander. Rinse it under cold water to stop the cooking. Set the drained pasta aside for later. While your pasta cooks, wash and chop your vegetables. Use 1 cup of cherry tomatoes, 1 cucumber, 1/2 red onion, and 1 bell pepper. Dice these into bite-sized pieces. Also, chop 1/4 cup of fresh parsley. Once chopped, place all the vegetables into a large mixing bowl. This creates a colorful and fresh base for your salad. Now it’s time to mix things! Add the cooled pasta and 1 cup of Kalamata olives to the bowl of vegetables. This combination adds a nice salty flavor. In a separate bowl, prepare the dressing. Mix together 1/4 cup of olive oil, 3 tablespoons of red wine vinegar, and 1 teaspoon of dried oregano. Add salt and pepper to taste. Whisk until well combined. Drizzle the dressing over the pasta and vegetable mixture. Gently fold in 1 cup of crumbled feta cheese. Make sure all the ingredients are evenly coated with the dressing. This step is key for great flavor in every bite. Cover the salad with plastic wrap or a lid. Place it in the refrigerator for 30 minutes. This chilling time helps the flavors meld together. You can serve your pasta salad cold or at room temperature. For the full recipe, check out the details above. Serve your Greek pasta salad in a vibrant bowl for visual appeal. A colorful dish draws people in. You can also use individual plates for a fresh look. Garnish each serving with extra feta and parsley. This adds a pop of color and flavor. Let your salad chill longer in the fridge. This helps the flavors blend and deepen. If you love herbs, try adding basil or dill. Fresh herbs boost the taste and aroma. Prep your ingredients in advance. Chop vegetables and cook the pasta ahead of time. This makes assembly quick and easy. When storing leftovers, use an airtight container. It keeps the salad fresh and tasty for days. For the best flavor, consume within three to five days. {{image_4}} There are many fun ways to switch up your Easy Greek Pasta Salad. Try a Mediterranean twist for a new taste. Here are some ideas: - Add sun-dried tomatoes for a sweet, tangy flavor. - Toss in artichoke hearts for extra texture. - For protein, add grilled chicken or chickpeas. Both options make it filling. If you need to change the recipe for your diet, here are some tips: - Use gluten-free pasta to make it gluten-free. - For a vegan option, skip the feta cheese or try a vegan substitute. Enjoy seasonal ingredients by mixing in fresh veggies: - In summer, add zucchini for a crunchy touch. - Use roasted vegetables for deeper flavors. Roasting brings out their natural sweetness. These variations keep your Easy Greek Pasta Salad fresh and exciting! Check out the [Full Recipe] for the base you can customize. To keep your Easy Greek Pasta Salad fresh, place it in an airtight container. You can store it in the refrigerator for about 3-5 days. This salad tastes best when you enjoy it fresh. I do not recommend freezing this salad. Freezing can change its texture, making it less enjoyable. If you prepare a large batch, store the dressing separately. This keeps the flavors bright and fresh. This pasta salad is best served cold. However, you can also enjoy it at room temperature. Before serving, gently toss the salad. This helps mix the flavors evenly throughout. For the full recipe, check back to the beginning. Yes, it can be prepared a day in advance for flavor enhancement. This allows all the tastes to blend and become more rich. Just keep it in the fridge until you are ready to serve. You can use vegan feta or other cheese alternatives. This makes the dish suitable for various diets. You might want to try a creamy cheese for a nice texture. Yes, it’s perfect for picnics and potlucks if kept properly chilled. The fresh ingredients hold up well. Just pack it in a cooler or insulated bag to keep it fresh. Consider adding grilled chicken, shrimp, or canned chickpeas. These options make the salad more filling. They also add great taste and texture to the mix. This salad combines fresh pasta with vibrant vegetables, feta, and a simple dressing. Using easy steps, you can create a delightful dish that's perfect for any gathering. Remember, you can adjust flavors and ingredients to fit your taste. Meal prep helps save time, and eating fresh is best. Enjoy your colorful pasta salad, whether at a picnic or a family dinner!](https://dishtreats.com/wp-content/uploads/2025/06/42921458-26d8-4100-967d-b17bfbbdb796-768x768.webp)

![- 1 lb large shrimp, peeled and deveined - 4 cloves garlic, minced - 3 tablespoons olive oil - 1 teaspoon red pepper flakes (adjust to taste) - 1 tablespoon fresh lemon juice - 1 tablespoon fresh parsley, finely chopped - Salt and freshly ground black pepper to taste - Lemon wedges for serving For this easy garlic shrimp dish, you need just a few fresh ingredients. The shrimp should be large, peeled, and deveined. This helps them cook evenly and taste great. Fresh garlic is key. It gives the dish a strong flavor. Olive oil adds richness. Red pepper flakes bring heat, but you can adjust this to fit your taste. Adding lemon juice brightens the dish. Fresh parsley adds color and a hint of earthiness. Salt and black pepper finish the flavor. Serve with lemon wedges for that extra zing. You can find the complete recipe [Full Recipe]. This meal is quick to make and perfect for any night! - Rinse and dry shrimp - Mince garlic - Prepare lemon and parsley Start by rinsing the shrimp under cold water. Make sure to remove any dirt. Once rinsed, use paper towels to dry the shrimp. This helps achieve a nice sear later. Next, mince the garlic into small pieces. This adds flavor to the dish. Finally, cut the lemon in half and chop the parsley finely. Set these aside for later. - Heat olive oil - Sauté garlic - Cook shrimp In a large skillet, pour in the olive oil. Heat it over medium-high heat. Wait until the oil shimmers but does not smoke. Then, add the minced garlic. Sauté it for about 30 seconds. Stir it often to avoid burning. You will smell a great aroma when it’s ready. Now, add the shrimp in a single layer. Sprinkle red pepper flakes, salt, and black pepper on top. Cook the shrimp for 2-3 minutes on each side. They should turn pink and opaque. - Add lemon juice - Garnish with parsley - Serve with lemon wedges When the shrimp are done, take the skillet off the heat. Squeeze lemon juice over the shrimp and toss them gently. This adds a bright flavor. Next, sprinkle the chopped parsley on top for color. Lastly, transfer the shrimp to a serving plate and arrange lemon wedges around them. This makes the dish look nice and inviting. For the full recipe, check the detailed instructions above. Drying shrimp is key. It ensures a nice sear and prevents steaming. After rinsing, pat them dry with paper towels. This simple step makes a big difference in texture. Adjusting spice levels is easy. If you like heat, add more red pepper flakes. For a milder dish, reduce the amount. You control the flavor profile, making it your own. For presentation, use a large shallow dish. Arrange the shrimp and garnish with lemon wedges and parsley. This makes your meal look inviting and fresh. Pair this dish with crusty bread. It’s perfect for soaking up the flavorful garlic oil. A crisp salad or rice also works well. For drinks, try a chilled white wine. It complements the shrimp beautifully. You can find the full recipe in the earlier sections of this article. {{image_4}} You can change the flavor of your easy garlic shrimp by adding fresh herbs. Basil and cilantro bring a bright taste. Just chop them finely and sprinkle them in at the end. You can also mix in vegetables. Bell peppers add crunch and color. Spinach wilts down and adds nutrients. You can sauté these with the garlic to infuse their flavors into the shrimp. Grilling shrimp is fun and gives a smoky flavor. To grill, thread the shrimp on skewers and brush them with olive oil and seasoning. Grill them for about 2-3 minutes on each side until they are pink. If you prefer oven-baking, preheat your oven to 400°F. Place the shrimp in a single layer on a baking sheet. Drizzle with olive oil and season them. Bake for about 8-10 minutes. They will turn pink and cook through. Both methods keep the dish simple and delicious. For the full recipe, check out the Sizzling Garlic Shrimp Delight 🦐. To keep your garlic shrimp fresh, use airtight containers. Glass or plastic containers work well. Make sure they seal tightly to lock in flavor. Store the shrimp in the fridge. They will last for up to two days. After that, the quality may drop. When reheating, use low heat to keep the shrimp tender. A skillet is great for this. Add a splash of olive oil to help restore moisture. Stir gently to avoid overcooking. If you prefer the microwave, use a microwave-safe dish. Heat for short bursts, checking often. This way, you keep that tasty garlic flavor intact. Yes, you can use frozen shrimp. Just remember to thaw them first. To thaw shrimp properly, place them in the fridge overnight or run them under cold water for about 10-15 minutes. Make sure to dry them well with paper towels. This step ensures they cook evenly. To adjust the spice level, you can add or reduce red pepper flakes. For a milder dish, use less than a teaspoon. You can also add more garlic for flavor without heat. If you want more spice, add extra red pepper flakes or some sliced jalapeños while cooking. Garlic shrimp pairs well with many sides. Here are a few options: - Steamed rice or quinoa for a filling meal - Crusty bread to soak up the garlic oil - A fresh green salad for crunch and color - Roasted vegetables for extra flavor and nutrition These sides will enhance your garlic shrimp and make it a complete meal. For the full recipe, check out the section above. This blog post shared a simple and tasty garlic shrimp recipe. We covered key ingredients, easy steps, and useful tips. You learned how to cook shrimp perfectly and adjust flavors to your liking. We also explored variations and storage tips. Now you can enjoy this dish and impress friends at dinner. With your new skills, shrimp night will be a hit! Get creative and have fun with the recipe. Enjoy cooking and delighting your taste buds!](https://dishtreats.com/wp-content/uploads/2025/06/4ce86a88-9fc6-4710-ba94-882bfeda746c-768x768.webp)
![Creating a Grilled Peach Caprese Salad is simple and fun. Here’s what you need: - Ripe peaches - Fresh mozzarella - Mixed greens - Cherry tomatoes - Fresh basil leaves - Balsamic glaze - Extra virgin olive oil - Salt and black pepper Each ingredient plays a key role in this dish. Ripe peaches bring sweetness. Fresh mozzarella adds creaminess. Mixed greens provide a nice crunch. Cherry tomatoes add color and flavor. Fresh basil contributes a fragrant touch. The balsamic glaze adds a tangy finish. Extra virgin olive oil enhances the taste. Lastly, salt and pepper bring everything together. For the full recipe, check out the steps to make this tasty salad. Trust me, your taste buds will thank you! - Preheat the grill to medium-high heat. This helps create great grill marks. - Ensure your grill grates are clean and lightly oiled. This prevents sticking. - Start by cutting the peaches in half and removing the pit. - Brush the cut sides of the peach halves with olive oil. This adds flavor and helps them grill well. - Place the peach halves cut side down on the grill. Grill for about 3-4 minutes. You want those nice grill marks. - Once they soften slightly, remove them. Let them cool for a couple of minutes. - Grab a large serving platter. Create a bed of mixed greens in the center. - Place the grilled peach halves on top of the greens. Spread them out for a nice look. - Next, add slices of fresh mozzarella around the peaches. Then scatter halved cherry tomatoes. - Tear fresh basil leaves and sprinkle them over the salad. This adds a lovely aroma. - Finally, drizzle balsamic glaze over the salad. Add salt and black pepper to taste. - For the best flavor, serve the salad right away. You can chill it a bit if you prefer. For the complete recipe, check out the [Full Recipe]. To get perfect grill marks on your peaches, heat your grill to medium-high. Brush the cut sides of each peach half with olive oil. This helps prevent sticking and adds flavor. Look for ripe peaches that yield slightly when pressed. They should be fragrant and have a bright color. Presentation matters! Try arranging your salad in a spiral pattern. You can also layer the ingredients in single servings. This makes each plate look special. Pair your salad with a crisp white wine or a light red. Both will enhance the flavors of the dish. Want to mix things up? Try using different dressings like a lemon vinaigrette or honey mustard. Fresh herbs like mint or dill can add a twist. You could also sprinkle some chili flakes for a little heat. These simple changes will keep your salad exciting. For the full recipe, check here: [Full Recipe]. {{image_4}} You can change up your Grilled Peach Caprese Salad by swapping fruits. Try using ripe nectarines or plums instead of peaches. These fruits provide a sweet touch and work well on the grill. You can also use strawberries or even grilled pineapple for a fun twist. For cheese, fresh mozzarella is the classic choice. However, you can try burrata for a creamier texture. Feta cheese adds a salty punch, while goat cheese gives a tangy flavor. Each cheese brings its own flair to the dish. To make this salad vegan, skip the cheese and use a plant-based alternative. Cashew cheese or tofu can work well. Drizzle a vegan balsamic glaze for that sweet touch. If you need a gluten-free option, this salad is naturally gluten-free. Just make sure your balsamic glaze is gluten-free as well. Enjoy fresh ingredients without any worries. For the best flavor, pick peaches in late summer. They are sweet and juicy in this season. In spring, try using asparagus or snap peas for a fresh crunch. In winter, roasted root vegetables like beets can replace fresh greens. Add some nuts for extra texture and flavor. Adapt your salad to fit the season and enjoy a fresh taste year-round. For the complete recipe of Grilled Peach Caprese Salad, check the Full Recipe. To keep your Grilled Peach Caprese Salad fresh, store it properly. First, separate the components. This way, the flavors stay bright and fresh. - Peaches: Place grilled peaches in a sealed container. Store them in the fridge for up to three days. - Salad Greens: Keep mixed greens in a dry, airtight container. This keeps them crisp and fresh. - Cheese and Tomatoes: Store mozzarella and cherry tomatoes in separate containers. This helps prevent sogginess. - Balsamic Glaze: Keep the glaze in a small jar. It can last for weeks in the fridge. You might wonder if you should reheat grilled peaches. I recommend enjoying them cold. Their flavor shines best this way. But if you prefer warm peaches, here’s how to heat them: - Microwave: Place peaches on a microwave-safe plate. Heat for about 10-20 seconds. Check them often to avoid overheating. - Stovetop: Heat a non-stick pan over low heat. Add a dash of olive oil and warm the peaches for a minute. For other salad ingredients, like mozzarella and tomatoes, it’s best to enjoy them cold too. Mixing warm and cold can lead to a fun flavor contrast in your dish. To make this dish, follow these simple steps: 1. Preheat your grill to medium-high heat. 2. Brush cut sides of halved peaches with olive oil. 3. Grill peach halves cut side down for 3-4 minutes. 4. On a platter, spread mixed greens for a base. 5. Place grilled peaches on top of the greens. 6. Add mozzarella slices and halved cherry tomatoes around the peaches. 7. Scatter torn basil leaves over the salad. 8. Drizzle balsamic glaze on top, then season with salt and pepper. 9. Serve right away or chill slightly before serving. Fresh mozzarella is the classic choice for Caprese salad. Its creamy texture balances the sweetness of grilled peaches. You can also try burrata for extra creaminess. Feta adds a tangy twist, while goat cheese can give a bold flavor. Choose based on your taste preferences to enhance your salad. You can prep parts of the salad ahead of time. Grill the peaches and store them in the fridge. Wash and dry the greens and tomatoes, keeping them fresh. Assemble everything just before serving to maintain flavor and texture. This way, your salad stays fresh and tasty. Check the [Full Recipe] for more details. This blog shared how to make a Grilled Peach Caprese Salad. You learned about choosing ripe peaches, grilling them, and assembling the salad. Tips on serving and variations helped you create your own version. Remember to store leftovers properly to keep them fresh. With these insights, you can enjoy a delicious, refreshing salad anytime. Trust that your skills will shine. Enjoy experimenting with flavors and ingredients to make it uniquely yours. Your summer gatherings will never be the same!](https://dishtreats.com/wp-content/uploads/2025/06/c765deb6-47e2-46b1-bbfc-9b058c8c2a51-768x768.webp)