Vegan Fudgy Black Bean Brownies Rich and Simple Treat

Looking for a guilt-free dessert that’s rich, fudgy, and easy to make? You’re in the right place! These Vegan Fudgy Black Bean Brownies pack all the chocolatey goodness you crave. Plus, they’re loaded with nutrients from black beans. I’ll guide you through simple steps and tips to create a treat that impresses everyone. No more boring brownies—let’s get baking your new favorite dessert!
Why I Love This Recipe
- Healthier Alternative: These brownies use black beans as a base, making them a nutritious option that’s high in fiber and protein.
- Decadent Flavor: Despite being vegan, these brownies are rich and fudgy, satisfying any chocolate craving without the guilt.
- Quick and Easy: With just a few simple ingredients and a quick blend in the food processor, you can have these brownies ready in no time.
- Customizable: You can easily adapt these brownies by adding nuts, dried fruit, or different types of nut butter to suit your taste.
Ingredients
Main ingredients for Vegan Fudgy Black Bean Brownies
To make these tasty brownies, you need just a few simple ingredients. Here’s what you’ll need:
- 1 can (15 oz) black beans, thoroughly rinsed and drained
- 1/2 cup almond butter (or your preferred nut/seed butter)
- 1/4 cup pure maple syrup
- 1/4 cup unsweetened cocoa powder
- 1/4 cup vegan chocolate chips (plus a handful for topping)
- 1 teaspoon vanilla extract
- 1/2 teaspoon baking powder
- 1/4 teaspoon fine sea salt
- 2 tablespoons almond milk (or any plant-based milk of choice)
These ingredients work together to create a rich and fudgy texture. The black beans give the brownies moisture and a nice base. Almond butter adds creaminess and helps bind everything.
Optional ingredients and substitutes
While the main ingredients are great, you can also switch things up. Here are some ideas:
- Use peanut butter instead of almond butter for a nutty flavor.
- Substitute maple syrup with agave syrup for a different sweetness.
- If you want a richer taste, add a splash of espresso or coffee.
- For added crunch, toss in chopped nuts or seeds.
Feel free to customize these brownies to match your tastes!
Nutritional benefits of key ingredients
These brownies not only taste good, but they also offer some health benefits:
- Black beans are packed with fiber, protein, and antioxidants. They can help with digestion and keep you full.
- Almond butter provides healthy fats and vitamin E, which is good for your skin.
- Cocoa powder is rich in flavonoids, which may help improve heart health.
- Maple syrup offers minerals like manganese and zinc, adding some natural sweetness.
This recipe is a delicious way to enjoy a treat while still being mindful of nutrition!

Step-by-Step Instructions
Prepping the oven and baking pan
First, I preheat the oven to 350°F (175°C). This step helps the brownies bake evenly. Next, I line an 8×8-inch baking pan with parchment paper. I let some paper hang over the sides. This makes it easy to lift the brownies out later.
Blending the ingredients
I grab my food processor and add the rinsed black beans, almond butter, and maple syrup. I also add cocoa powder and vanilla extract. I blend this mixture until it is smooth. I stop to scrape down the sides to mix all the ingredients well. Then, I add the baking powder, sea salt, and almond milk. I blend again until the mix is thick and fudgy. Lastly, I fold in the vegan chocolate chips. This ensures every bite is rich in flavor.
Baking and cooling process
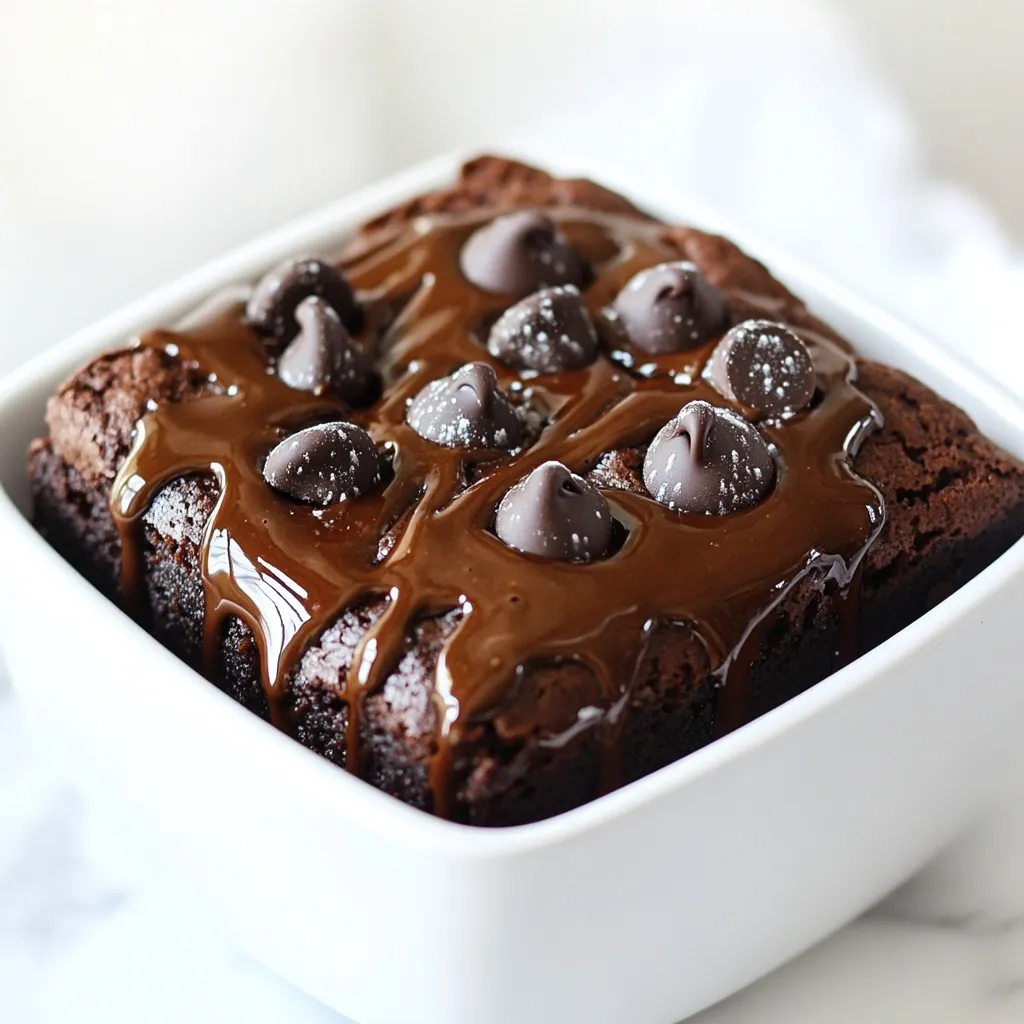
Now, I pour the brownie batter into the lined baking pan. I spread it out evenly and smooth the top. For a special touch, I sprinkle a handful of chocolate chips on top. I bake the brownies for 20-25 minutes. To check if they are done, I insert a toothpick into the center. If it comes out mostly clean, they are ready. I let them cool in the pan for about 10 minutes. Then, I lift them out using the parchment paper and let them cool completely on a wire rack before cutting them into squares.
Tips & Tricks
How to achieve the perfect fudgy texture
To get that rich, fudgy texture, blend the beans well. I use a food processor to make the mix smooth. This helps the black beans integrate into the batter. Don’t skip the almond butter; it adds creaminess. Use the right amount of cocoa powder too. Too little can make them taste bland, while too much can dry them out. Bake just until a toothpick comes out with a few moist crumbs. Letting them cool will help them set up perfectly.
Common mistakes to avoid
One mistake is overbaking. Keep an eye on the time. If you bake them too long, they become dry. Also, ensure the black beans are rinsed well. This removes the canning liquid that can alter the taste. Using too much cocoa powder can also make them too dense. If the batter feels too thick, add a bit more almond milk. Finally, don’t forget to fold in the chocolate chips gently. This keeps the brownies gooey and chocolatey.
Suggestions for serving and presentation
These brownies shine when served warm. Top them with dairy-free ice cream for a treat. A dusting of powdered sugar adds a nice touch too. For a fun twist, drizzle peanut butter or dark chocolate sauce on top. Cut them into small squares for easy sharing. You can even add some fresh berries on the side for color and flavor. Enjoy every delicious bite!
Pro Tips
- Use Black Beans for Moisture: The black beans add moisture and a rich texture, but ensure they are well-rinsed to avoid any unwanted bean flavor.
- Experiment with Nut Butters: Almond butter is great, but feel free to substitute with peanut butter or sunflower seed butter for a different flavor profile.
- Adjust Sweetness to Your Taste: If you prefer a sweeter brownie, add an extra tablespoon of maple syrup or sweetener of your choice to the batter.
- Cool Completely for Better Cutting: Allow the brownies to cool completely before cutting to achieve clean, neat squares without crumbling.

Variations
Flavor variations (add-ins and toppings)
You can make these brownies even better with fun add-ins. Try mixing in:
- 1/2 cup chopped nuts, like walnuts or pecans.
- 1/4 cup shredded coconut for a tropical twist.
- A teaspoon of espresso powder for a coffee kick.
- Dried fruit, like cherries or cranberries, for sweetness.
For toppings, you can sprinkle more chocolate chips on top before baking. You can also add a drizzle of nut butter or a dusting of cocoa powder once they cool. These small changes keep the recipe exciting!
Gluten-free options
This recipe is already gluten-free since it uses no flour. The main ingredient, black beans, adds protein and fiber. Just make sure your nut or seed butter is also gluten-free. Many brands are, but it’s good to check the label.
Using different types of nut or seed butter
You can switch up the nut or seed butter to change the flavor. Almond butter is great, but here are some other options:
- Cashew butter gives a creamy taste.
- Sunflower seed butter is perfect for nut-free diets.
- Peanut butter brings a classic flavor that many love.
Each option gives a unique twist to the brownies while keeping them rich and fudgy. Feel free to experiment and find your favorite!
Storage Info
How to store brownies for freshness
To keep your brownies fresh, store them in an airtight container. This helps block out air and moisture. You can place parchment paper between layers to prevent sticking. If you keep them at room temperature, they stay good for about three days. If you want to keep them longer, refrigerate them. The cold will help extend their shelf life to about a week.
Freezing and thawing instructions
You can also freeze your brownies for later. Cut them into squares first. Wrap each square tightly in plastic wrap. Place the wrapped brownies in a freezer-safe bag. They can last up to three months in the freezer.
To thaw, take the brownies out and let them sit at room temperature for about 30 minutes. You can also microwave them for about 10-15 seconds if you want them warm. Enjoy your fudgy treat any time!
FAQs
Can I taste the black beans in the brownies?
No, you cannot taste the black beans. They blend into the mix. The cocoa and almond butter give the brownies their rich flavor. Black beans add moisture and a fudgy texture. This makes the brownies delicious without any bean taste. You can enjoy a sweet treat without knowing they are in there!
How can I make these brownies refined sugar-free?
To make these brownies refined sugar-free, use pure maple syrup or dates. Maple syrup adds sweetness without refined sugars. If you prefer dates, blend them with the black beans. This gives a natural sweetness. You can also use coconut sugar as a substitute. This option is still sweet but less processed.
What are the health benefits of black beans in desserts?
Black beans offer many health benefits. They are high in fiber, which helps digestion. This fiber can also keep you feeling full longer. Black beans provide protein, which is great for muscle health. They have antioxidants that fight free radicals in the body. Plus, they contain essential vitamins and minerals, like iron and magnesium. Using black beans makes your dessert healthy and still tasty!
These Vegan Fudgy Black Bean Brownies are easy and delicious. We covered main and optional ingredients, showing their health benefits. I outlined the baking steps and shared tips for the best texture. You can try different flavors and store them well.
In conclusion, these brownies are a fun way to eat healthy. Enjoy making this tasty trea

Vegan Fudgy Black Bean Brownies
Ingredients
- 1 can black beans, thoroughly rinsed and drained (15 oz)
- 0.5 cup almond butter (or your preferred nut/seed butter)
- 0.25 cup pure maple syrup
- 0.25 cup unsweetened cocoa powder
- 0.25 cup vegan chocolate chips (plus a handful for topping)
- 1 teaspoon vanilla extract
- 0.5 teaspoon baking powder
- 0.25 teaspoon fine sea salt
- 2 tablespoons almond milk (or any plant-based milk of choice)
Instructions
- Begin by preheating your oven to 350°F (175°C). Line an 8x8-inch baking pan with parchment paper, allowing some overhang on the sides for easy removal later.
- In a food processor, combine the rinsed black beans, almond butter, maple syrup, cocoa powder, and vanilla extract. Process until the mixture is completely smooth, stopping to scrape down the sides as necessary to ensure everything is well blended.
- Next, add in the baking powder, sea salt, and almond milk. Blend again until the mixture is a thick, fudgy consistency and all ingredients are thoroughly incorporated.
- Using a spatula, gently fold in the vegan chocolate chips until they’re evenly distributed throughout the batter.
- Pour the prepared brownie batter into the lined baking pan, spreading it out evenly. Use your spatula to smooth the top for an even surface.
- For an extra touch of indulgence, sprinkle a handful of additional chocolate chips over the top of the batter.
- Bake the brownies in the preheated oven for 20-25 minutes. They’re done when a toothpick inserted into the center comes out mostly clean—don’t worry if a few moist crumbs cling to it, as they add to the fudgy texture.
- Allow the brownies to cool in the pan for about 10 minutes. Carefully lift them out using the parchment overhang and transfer to a wire rack to cool completely before cutting into squares.


![To make classic chocolate brownies, you need the following ingredients: - 1 cup (2 sticks) unsalted butter - 2 cups granulated sugar - 4 large eggs, at room temperature - 1 teaspoon pure vanilla extract - 1 cup all-purpose flour - 1 cup unsweetened cocoa powder - ½ teaspoon baking powder - ½ teaspoon sea salt - 1 cup semi-sweet chocolate chips - Optional: ½ cup chopped walnuts or pecans for added crunch You can use margarine if you need a butter alternative. For a deeper flavor, try using dark cocoa powder instead of regular cocoa. If you want to make this recipe gluten-free, swap the all-purpose flour with a gluten-free blend. Feel free to customize your brownies with these fun ideas: - Nuts: Consider using walnuts or pecans for extra texture. Almonds also work great. - Chocolate types: Mix semi-sweet and dark chocolate chips for rich flavor. - Flavor variations: Add a teaspoon of mint extract or some orange zest for a twist. These add-ins can enhance the taste and make your brownies unique. Mixing flavors can lead to exciting new experiences in every bite. To make the brownie batter, follow these steps: 1. Melt the butter: Start by melting 1 cup of unsalted butter in a medium saucepan over low heat. Stir often until it’s fully melted. 2. Add sugar: Once the butter is melted, remove it from the heat. Stir in 2 cups of granulated sugar until it looks smooth. 3. Add eggs: Crack 4 large eggs into the butter-sugar mix. Add them one at a time. Mix well after each egg, so the batter combines nicely. 4. Mix in vanilla: Add 1 teaspoon of pure vanilla extract. This gives the brownies a nice flavor. 5. Combine dry ingredients: In another bowl, sift together 1 cup of all-purpose flour, 1 cup of unsweetened cocoa powder, ½ teaspoon of baking powder, and ½ teaspoon of sea salt. This helps mix the dry ingredients well. 6. Fold dry into wet: Gently fold the dry mix into the wet mix. Use a spatula to combine until just mixed. Do not overmix, or the brownies won’t be fudgy. 7. Add chocolate chips: Toss in 1 cup of semi-sweet chocolate chips. If you like, add ½ cup of chopped walnuts or pecans for crunch. Mix until they are spread evenly in the batter. 8. Prepare the pan: Grease a 9x13-inch baking pan or line it with parchment paper. This makes it easy to remove the brownies later. 9. Pour batter: Pour the brownie batter into the pan. Use a spatula to spread it evenly. Now, it’s time to bake! 1. Preheat oven: Set your oven to 350°F (175°C). This ensures even baking. 2. Bake brownies: Place the pan in the oven. Bake for 30 to 35 minutes. 3. Check for doneness: To check, insert a toothpick into the center. It should come out with a few moist crumbs. If it’s wet, bake a little longer. Avoid overbaking for that perfect fudgy texture. After baking, let’s cool and cut the brownies. 1. Cool in the pan: Allow the brownies to cool in the pan for at least 15 minutes. This helps them firm up. 2. Transfer to wire rack: After 15 minutes, move the brownies to a wire rack. Let them cool completely before cutting. 3. Cutting tips: Use a sharp knife for clean cuts. Wipe the knife after each cut for neat squares. 4. Serving size: Cut into generous squares. Each piece should be a lovely bite of fudgy goodness. For a special touch, dust the brownies with powdered sugar before serving. Enjoy these delightful treats with a scoop of vanilla ice cream for extra indulgence. For the complete recipe, refer to the Full Recipe. To make the best fudgy brownies, focus on mixing. After melting the butter, stir in the sugar until smooth. Add eggs one at a time. Mix well after each egg. This helps create a rich texture. Don't overmix the dry and wet ingredients. Fold them gently just until combined. Common mistakes include overbaking and using too much flour. Overbaking leads to dry brownies. Aim for a toothpick with few moist crumbs. If you use too much flour, your brownies will be cake-like. Measure carefully for the best results. Brownies keep well at room temperature. Store them in an airtight container for up to five days. If you want to keep them longer, the fridge is a good option. Just remember, cold brownies can lose some flavor. To revive leftovers, warm them in the microwave for 10-15 seconds. This restores their fudgy goodness. You can also serve them with a scoop of ice cream for a tasty treat. For the full recipe, check out the [Full Recipe]. {{image_4}} For a gluten-free treat, try flourless brownies. You can use almond flour or ground oats instead of regular flour. These options add a nice texture and flavor. You should also reduce baking time. Check them after 25 minutes to avoid dryness. If you want a lighter version, use less sugar. You can swap half of the sugar with unsweetened applesauce. This keeps the brownies moist. For fats, use avocado or coconut oil. These substitutes make the brownies healthier but still tasty. To spice things up, add a dash of coffee or a pinch of sea salt. These flavors enhance the chocolate taste. You can also use extracts like almond or orange for a lovely twist. Just a little goes a long way in changing the flavor profile. Serving classic chocolate brownies is easy and fun. You can serve them warm with a scoop of ice cream. Vanilla ice cream works great, but try mint or coffee flavors for a twist. You can also top brownies with whipped cream. A sprinkle of chocolate shavings adds a nice touch. For a beautiful presentation, cut the brownies into squares. Place them on a decorative plate. Dust with powdered sugar for a fancy look. Add fresh berries or a sprig of mint beside each brownie. These details make the dish more appealing. Brownies are versatile and can be served in many ways. One fun idea is a brownie sundae. Start with a warm brownie, add a scoop of ice cream, and drizzle chocolate sauce on top. Finish with whipped cream and a cherry for a delightful treat. You can pair brownies with drinks too. A strong cup of coffee complements the rich chocolate flavor. Hot cocoa or milk also works well. For a unique twist, serve brownies with a side of fresh fruit. The sweetness of the fruit balances the rich brownies. For more ideas, check out the Full Recipe to explore all the delicious details! To check if your brownies are done, look for a few signs. The top should look set and slightly shiny. When you insert a toothpick in the center, it should come out with a few moist crumbs. This means your brownies are fudgy and perfect. If the toothpick comes out with wet batter, they need more time. Keep a close watch in the last few minutes of baking to avoid overbaking. Yes, you can freeze brownies! To freeze them, let them cool completely first. Cut your brownies into squares, then wrap each piece in plastic wrap. Place them in a freezer bag or container. They can last up to three months in the freezer. When you're ready to eat them, thaw them in the fridge overnight or at room temperature for a few hours. For neat cuts, use a sharp knife. First, let the brownies cool completely in the pan. For even cleaner cuts, wipe the knife with a damp cloth after each cut. This way, you have smooth edges. You can also use a pizza cutter for quick slicing. If you want, line your baking pan with parchment paper. This makes it easy to lift out the brownies for cutting. You’ve learned how to make classic chocolate brownies, from ingredients to serving tips. Whether you prefer fudgy or flourless, options abound to suit your taste. Remember, small changes can create big flavors. Experiment with add-ins or healthier swaps to make them your own. With these steps, you can enjoy delicious brownies any time. Happy baking!](https://dishtreats.com/wp-content/uploads/2025/07/8475203d-ada8-4920-a61c-065e4c50bd3f-768x768.webp)

![- 1 cup all-purpose flour - 2 tablespoons granulated sugar - 2 teaspoons baking powder - ½ teaspoon baking soda - ¼ teaspoon salt - 1 cup buttermilk - 1 large egg, lightly beaten - 2 tablespoons unsalted butter, melted - 2 teaspoons pure vanilla extract - 1 tablespoon ground cinnamon - 3 tablespoons brown sugar, packed - 1 cup powdered sugar - 3 tablespoons cream cheese, softened to room temperature - 2-3 tablespoons milk (to achieve desired icing consistency) When I make these pancakes, I always start with the dry ingredients. This step is key. I mix the flour, sugar, baking powder, baking soda, and salt in a bowl. It’s important to whisk these well. This ensures even rising and sweetness. Next, I move to the wet ingredients. I pour the buttermilk into a separate bowl. Then, I add the beaten egg, melted butter, and vanilla extract. Whisk until smooth. This mixture is crucial for the pancake’s fluffiness. Now, let's talk about the cinnamon filling. In a small bowl, I combine ground cinnamon and brown sugar. This mix gives the pancakes their sweet, spicy swirl. Finally, for the icing, I beat together powdered sugar and softened cream cheese. I add milk slowly until I reach the right consistency. Drizzling this icing over the warm pancakes is pure bliss. For the full recipe, check out the complete guide. Enjoy your cooking adventure! 1. In a mixing bowl, combine the all-purpose flour, granulated sugar, baking powder, baking soda, and salt. Mix well until the dry ingredients are blended. 2. Take another bowl and whisk together the buttermilk, the lightly beaten egg, melted butter, and vanilla extract. Make sure this mixture is smooth. 1. Gradually pour the wet ingredients into the bowl with the dry ingredients. Stir gently until just combined. It’s okay if there are a few lumps; this helps keep your pancakes fluffy. 2. Be careful not to overmix. Overmixing can make the pancakes tough. 1. In a small bowl, combine the ground cinnamon and packed brown sugar. Mix them well to combine. This mixture will create a sweet swirl in your pancakes. 1. Preheat a non-stick skillet or griddle over medium heat. Pour about ¼ cup of pancake batter onto the skillet for each pancake. 2. When the batter starts bubbling on the surface (about 1-2 minutes), sprinkle about a teaspoon of the cinnamon filling mixture onto the pancake before flipping it. 3. Flip the pancake carefully and cook for another 1-2 minutes, until golden brown. Repeat this process with the remaining batter and filling. 1. In a small bowl, mix the powdered sugar, softened cream cheese, and enough milk to reach your desired icing consistency. Blend until the mixture is smooth. Now you're ready to enjoy your delicious cinnamon roll pancakes! For precise measurements and more tips, check the Full Recipe. To make fluffy pancakes, avoid overmixing the batter. When you mix too much, the pancakes can turn tough. You want a few lumps in the batter; that is okay! Use fresh baking powder and baking soda. Old leavening agents may not make your pancakes rise well. Check the expiration date on the package to be sure. Heat is key when cooking pancakes. Adjust the heat as needed to prevent burning. If your skillet is too hot, the pancakes may burn on the outside and stay raw inside. A non-stick skillet helps with easy flipping. It also allows you to use less oil. Always preheat the skillet before pouring your batter. The icing makes these pancakes special. To achieve your desired thickness, adjust the milk quantity. Start with 2 tablespoons and add more if needed. Drizzle icing over warm pancakes for best results. The warmth helps the icing melt into the pancakes, making each bite delightful. {{image_4}} Cinnamon roll pancakes are fun! You can change them up in many ways. Let’s explore some tasty options. You can add chopped walnuts or pecans to the batter. This nutty addition gives a lovely crunch. It also adds healthy fats and protein. Just mix in about ½ cup of nuts before cooking. You will love the extra texture and flavor. Want a fruity twist? Add diced apples or berries to the batter. They add sweetness and freshness. Try using about 1 cup of fruit. Blueberries or chopped strawberries work great. Apples give a nice cinnamon flavor when cooked. Your pancakes will be more colorful and tasty! Feel free to experiment with spices. Adding nutmeg or cardamom can change the taste. Start with ¼ teaspoon of each spice. You will enjoy the new flavors. These spices pair well with cinnamon and make your pancakes special. For the complete recipe, check out the [Full Recipe]. Enjoy your cooking adventure! You can store leftover cinnamon roll pancakes in an airtight container. They will stay fresh in the refrigerator for up to 3 days. This keeps them moist and ready for a quick breakfast or snack. To freeze your pancakes, lay them in a single layer on a baking sheet. Once frozen, transfer them to a freezer-safe bag. This method keeps them from sticking together. You can pull out as many as you need later. When you are ready to enjoy your pancakes again, simply microwave or toast them. If you want to make them even better, add extra icing on top while they warm up. This gives them a fresh taste and makes them feel special again. Yes, you can use whole wheat or gluten-free flour. However, this may change the texture of your pancakes. Whole wheat flour adds a nutty flavor and denser texture. Gluten-free flour can make them lighter but may need extra moisture. To make these pancakes dairy-free, swap buttermilk for almond milk. Use a dairy-free butter alternative in the recipe. This ensures you keep the great taste while avoiding dairy. Cinnamon roll pancakes are delicious on their own. However, they pair well with fresh fruits, like strawberries or bananas. Whipped cream can add a light and fluffy touch. You can also drizzle on more maple syrup for added sweetness. For the full recipe, check out the details above. Cinnamon Roll Pancakes are simple and fun to make. We combined dry and wet ingredients with cinnamon filling for a tasty treat. Use tips for fluffiness, cooking, and icing to ensure success. You can customize these pancakes by adding nuts or fruits. Remember to store leftovers well for future enjoyment. Try new variations each time for a delightful twist. These pancakes can impress anyone and become a family favorite. Enjoy your cooking adventure!](https://dishtreats.com/wp-content/uploads/2025/06/80f0c7ad-2155-4787-b1f4-2bdd3b819c66-768x768.webp)
