Thai Basil Chicken Stir-Fry Simple and Flavorful Meal
![- 1 lb (450g) chicken breast, thinly sliced - 1 cup fresh Thai basil leaves, packed - 3 cloves garlic, minced - 2 red Thai chili peppers, thinly sliced (adjust based on your spice preference) For this dish, I prefer chicken breast. It cooks quickly and stays juicy. Fresh Thai basil gives this meal its unique flavor. Garlic adds a nice aroma, and Thai chili peppers bring heat. You can control the spice by adding more or less chili. - 2 tablespoons soy sauce - 1 tablespoon oyster sauce (or substitute with mushroom sauce for vegetarian) - 1 tablespoon fish sauce (or an extra tablespoon of soy sauce for vegetarian) - 1 teaspoon sugar (to balance flavors) - 1 tablespoon vegetable oil (for frying) These sauces are key to great taste. Soy sauce offers saltiness, while oyster and fish sauces add depth. Sugar balances the salty flavors, making everything taste better. - 1 bell pepper, sliced (your choice of color for visual appeal) - 1 small onion, sliced into thin wedges - Optional: other vegetables for added nutrition I like using bell pepper and onion for color and crunch. You can add other veggies like carrots or snap peas. They bring more nutrition and flavor, making the dish more vibrant. For the full recipe, refer to the [Full Recipe]. To start, you need to combine the chicken with the sauces. In a medium bowl, add the sliced chicken breast, soy sauce, oyster sauce, fish sauce, and sugar. Mix these ingredients well so the chicken gets all the flavor. Let it marinate for 15 minutes. This short time helps the chicken absorb the tasty sauces. Next, heat the vegetable oil in a large skillet or wok over medium-high heat. You want the oil to shimmer before adding anything. Then, add the minced garlic and sliced Thai chili peppers. Stir-fry them for about 30 seconds until they smell amazing. Be careful not to burn the garlic. Now, add the marinated chicken to the pan. Spread it out evenly for even cooking. Stir-fry for about 5 to 7 minutes. Cook until the chicken is no longer pink and has a nice brown color. After that, toss in the sliced bell pepper and onion. Stir-fry for another 3 to 4 minutes. This will make the vegetables tender but still crisp. Once the chicken and veggies are done, take the skillet off the heat. Gently fold in the fresh Thai basil leaves. They will wilt quickly from the heat and add a lovely aroma. Serve the dish hot, over a bed of fluffy jasmine rice. This rice complements the stir-fry well. Enjoy your Thai Basil Chicken Stir-Fry! For the full recipe, check out the details above. Using fresh ingredients makes a big difference. Fresh Thai basil gives a sweet and fragrant flavor to the dish. Always choose bright green basil leaves. They should smell strong and sweet. The chicken should be fresh, too. This keeps your stir-fry tasty and safe to eat. For the best flavor, cook on high heat. A hot pan helps to sear the chicken. This adds a nice caramel color and enhances the taste. When you add garlic and chili, cook them quickly. This brings out their strong flavors without burning them. You can change the heat level easily. If you want it milder, remove the seeds from the chili peppers. You can also use fewer peppers or substitute with sweet bell peppers. If you like a kick but want it less spicy, try adding sugar. It balances the heat. You can also use a bit of honey for sweetness without heat. Pair your Thai basil chicken stir-fry with jasmine rice. The rice absorbs the sauce well. You can also add a side of steamed veggies for extra nutrition. For garnishes, consider adding lime wedges or crushed peanuts. They add color and crunch. Fresh cilantro or extra basil leaves also make it pop. Enjoy your meal with these simple touches! For the full recipe, check out the details above. {{image_4}} For a vegetarian or vegan version, you can swap chicken for tofu or tempeh. These options give a nice texture. Use mushroom sauce instead of oyster sauce. It brings depth and umami flavor. For the fish sauce, simply add an extra tablespoon of soy sauce. This keeps the taste bold. To maintain flavor, marinate the tofu or tempeh just like chicken. Allow it to soak up the sauces. When cooking, make sure to press out excess moisture. This helps achieve that nice, crispy texture we all love. If you want to try something new, switch the chicken for shrimp or beef. Shrimp cooks quickly, so cut down the cooking time to about 3-4 minutes. Beef takes longer. Slice it thin and cook it for about 6-8 minutes. Remember, cooking times change based on what protein you use. Always make sure your protein is fully cooked before adding in the veggies. Want to shake things up? Add sauces like teriyaki or sriracha for an exciting twist. Teriyaki gives a sweet flavor, while sriracha adds heat. You can even mix both for a sweet and spicy kick. Feel free to experiment with herbs and spices too. Adding cilantro or mint can brighten the dish. Try a sprinkle of lime juice for an extra zest. These tiny changes can create a whole new taste experience. For the full recipe, check the section above. Enjoy cooking! To keep your Thai basil chicken stir-fry fresh, store it in an airtight container. Refrigerate the leftovers within two hours of cooking. If you want to save it longer, freeze the stir-fry. Make sure to cool it completely before freezing. This method helps retain flavor and texture. When you reheat your stir-fry, use a skillet for the best results. Heat it over medium warmth and stir often. This keeps the chicken juicy and prevents it from drying out. For rice, add a splash of water and cover it. This helps the rice steam and become fluffy again. In the fridge, your Thai basil chicken stir-fry lasts up to four days. If frozen, it can last for about three months. Always check for off smells or changes in color. If you see these, it's best to discard it for safety. Thai Basil Chicken Stir-Fry has roots in Thai street food. This dish reflects the vibrant flavors of Thai cuisine. It showcases fresh herbs, bold spices, and simple cooking techniques. Thai basil, known for its unique flavor, is key to this dish. It adds a sweet and slightly spicy note that enhances the chicken. This meal represents the balance of sweet, salty, and spicy tastes typical in Thai dishes. Each bite transports you to bustling markets in Thailand. Yes, you can prepare Thai basil chicken stir-fry in advance. Cook and store it in the fridge for up to three days. To keep it fresh, store it in an airtight container. When you are ready to eat, simply reheat it on the stove. This dish tastes even better the next day as flavors meld. Serve it over freshly cooked jasmine rice for a quick meal. If you cannot find Thai basil, you have options. Sweet basil or holy basil works well as a substitute. Sweet basil offers a milder flavor, while holy basil is spicier. You can also mix in a bit of mint for a fresh twist. While these substitutes change the taste slightly, they still create a tasty dish. Just remember, the flavor will differ from the original recipe. The spice level of Thai Basil Chicken Stir-Fry can vary. It depends on the number of Thai chili peppers you use. Typically, this dish has a mild to medium heat. If you prefer a milder dish, use fewer chilis or remove the seeds. For those who love heat, add extra chilis or a dash of hot sauce. Adjusting spice levels allows everyone to enjoy this flavorful meal. Thai Basil Chicken Stir-Fry is a simple yet flavorful dish. You learned about the key ingredients, like fresh basil and chicken. The step-by-step instructions make cooking easy, even for beginners. We explored tips to enhance flavor and adjust spice levels to suit your taste. You can even try fun variations with different proteins or herbs. Enjoy making it your own, and savor the fresh flavors. Every bite will bring joy to your table.](https://dishtreats.com/wp-content/uploads/2025/06/20a2f9de-1755-4b6a-ade1-393123d10e24.webp)
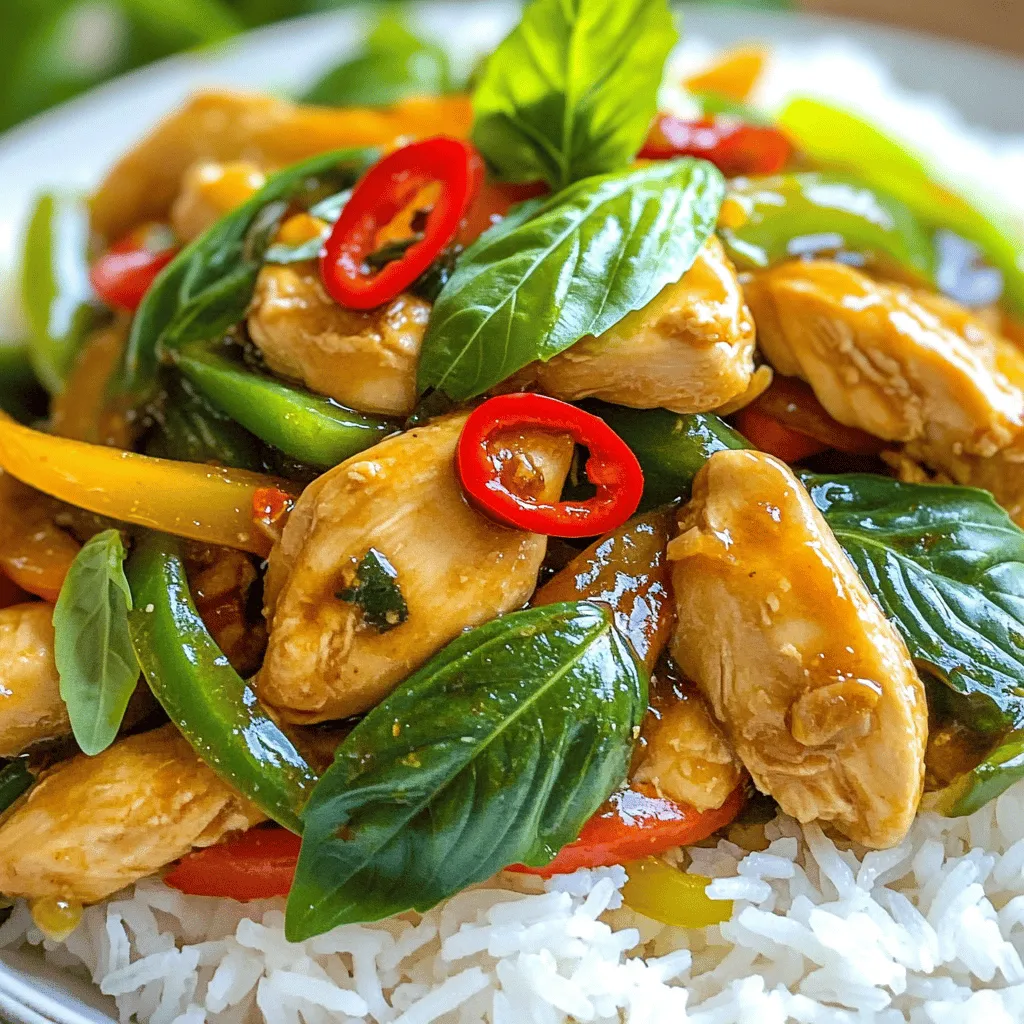
Looking for a quick and tasty meal? Thai Basil Chicken Stir-Fry might be your new go-to dish. This stir-fry is packed with fresh flavors, making it a fun and simple recipe to try. You can whip it up in no time, perfect for busy weeknights. Join me as I share easy steps, tips for great flavor, and fun variations to keep things interesting. Let’s dive into this delightful meal!
Ingredients
Main Ingredients for Thai Basil Chicken Stir-Fry
- 1 lb (450g) chicken breast, thinly sliced
- 1 cup fresh Thai basil leaves, packed
- 3 cloves garlic, minced
- 2 red Thai chili peppers, thinly sliced (adjust based on your spice preference)
For this dish, I prefer chicken breast. It cooks quickly and stays juicy. Fresh Thai basil gives this meal its unique flavor. Garlic adds a nice aroma, and Thai chili peppers bring heat. You can control the spice by adding more or less chili.
Sauces and Seasonings
- 2 tablespoons soy sauce
- 1 tablespoon oyster sauce (or substitute with mushroom sauce for vegetarian)
- 1 tablespoon fish sauce (or an extra tablespoon of soy sauce for vegetarian)
- 1 teaspoon sugar (to balance flavors)
- 1 tablespoon vegetable oil (for frying)
These sauces are key to great taste. Soy sauce offers saltiness, while oyster and fish sauces add depth. Sugar balances the salty flavors, making everything taste better.
Additional Vegetables
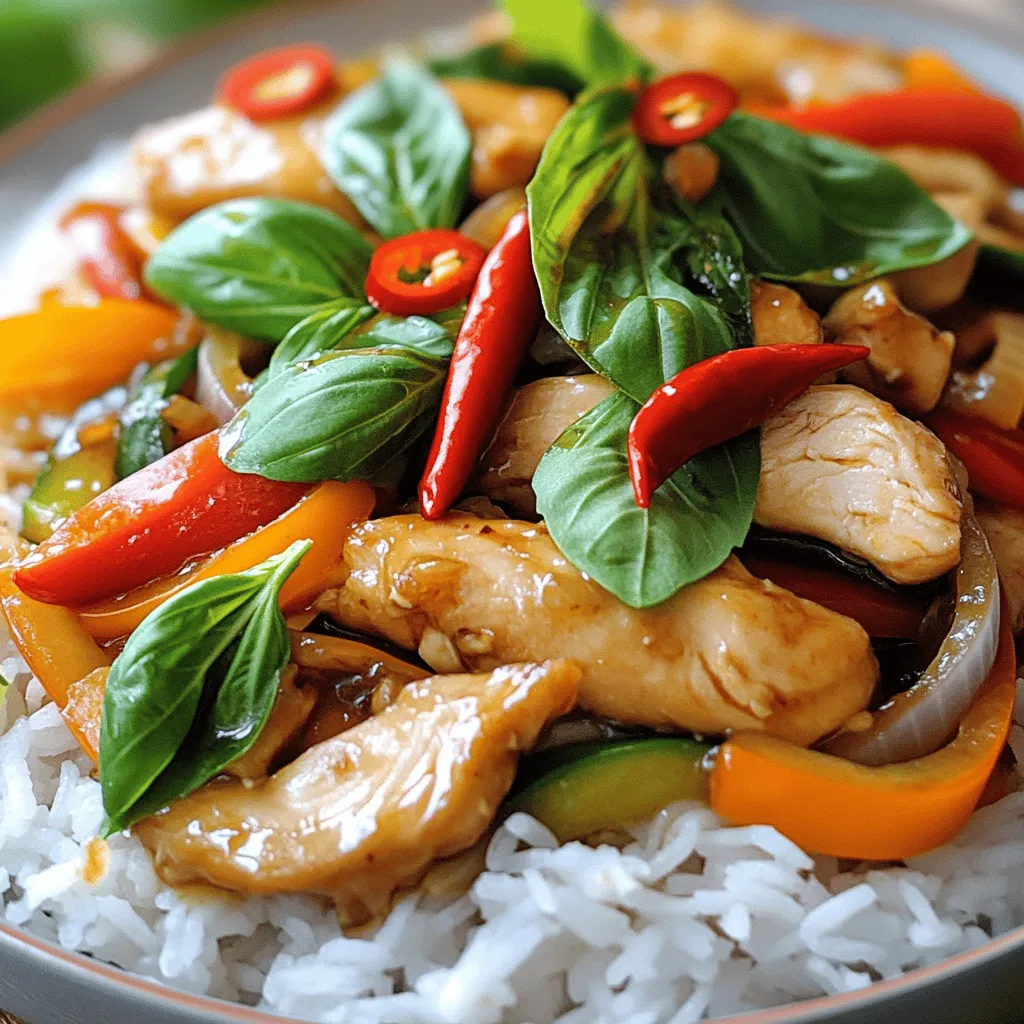
- 1 bell pepper, sliced (your choice of color for visual appeal)
- 1 small onion, sliced into thin wedges
- Optional: other vegetables for added nutrition
I like using bell pepper and onion for color and crunch. You can add other veggies like carrots or snap peas. They bring more nutrition and flavor, making the dish more vibrant.
Step-by-Step Instructions
Marinating the Chicken
To start, you need to combine the chicken with the sauces. In a medium bowl, add the sliced chicken breast, soy sauce, oyster sauce, fish sauce, and sugar. Mix these ingredients well so the chicken gets all the flavor. Let it marinate for 15 minutes. This short time helps the chicken absorb the tasty sauces.
Cooking Process
Next, heat the vegetable oil in a large skillet or wok over medium-high heat. You want the oil to shimmer before adding anything. Then, add the minced garlic and sliced Thai chili peppers. Stir-fry them for about 30 seconds until they smell amazing. Be careful not to burn the garlic.
Now, add the marinated chicken to the pan. Spread it out evenly for even cooking. Stir-fry for about 5 to 7 minutes. Cook until the chicken is no longer pink and has a nice brown color. After that, toss in the sliced bell pepper and onion. Stir-fry for another 3 to 4 minutes. This will make the vegetables tender but still crisp.
Finishing Touches
Once the chicken and veggies are done, take the skillet off the heat. Gently fold in the fresh Thai basil leaves. They will wilt quickly from the heat and add a lovely aroma. Serve the dish hot, over a bed of fluffy jasmine rice. This rice complements the stir-fry well. Enjoy your Thai Basil Chicken Stir-Fry!
Tips & Tricks
Achieving the Best Flavor
Using fresh ingredients makes a big difference. Fresh Thai basil gives a sweet and fragrant flavor to the dish. Always choose bright green basil leaves. They should smell strong and sweet. The chicken should be fresh, too. This keeps your stir-fry tasty and safe to eat.
For the best flavor, cook on high heat. A hot pan helps to sear the chicken. This adds a nice caramel color and enhances the taste. When you add garlic and chili, cook them quickly. This brings out their strong flavors without burning them.
Adjusting Spice Levels
You can change the heat level easily. If you want it milder, remove the seeds from the chili peppers. You can also use fewer peppers or substitute with sweet bell peppers.
If you like a kick but want it less spicy, try adding sugar. It balances the heat. You can also use a bit of honey for sweetness without heat.
Serving Suggestions
Pair your Thai basil chicken stir-fry with jasmine rice. The rice absorbs the sauce well. You can also add a side of steamed veggies for extra nutrition.
For garnishes, consider adding lime wedges or crushed peanuts. They add color and crunch. Fresh cilantro or extra basil leaves also make it pop. Enjoy your meal with these simple touches!

Variations
Vegetarian and Vegan Options
For a vegetarian or vegan version, you can swap chicken for tofu or tempeh. These options give a nice texture. Use mushroom sauce instead of oyster sauce. It brings depth and umami flavor. For the fish sauce, simply add an extra tablespoon of soy sauce. This keeps the taste bold.
To maintain flavor, marinate the tofu or tempeh just like chicken. Allow it to soak up the sauces. When cooking, make sure to press out excess moisture. This helps achieve that nice, crispy texture we all love.
Alternate Proteins
If you want to try something new, switch the chicken for shrimp or beef. Shrimp cooks quickly, so cut down the cooking time to about 3-4 minutes. Beef takes longer. Slice it thin and cook it for about 6-8 minutes.
Remember, cooking times change based on what protein you use. Always make sure your protein is fully cooked before adding in the veggies.
Flavor Twist Variations
Want to shake things up? Add sauces like teriyaki or sriracha for an exciting twist. Teriyaki gives a sweet flavor, while sriracha adds heat. You can even mix both for a sweet and spicy kick.
Feel free to experiment with herbs and spices too. Adding cilantro or mint can brighten the dish. Try a sprinkle of lime juice for an extra zest. These tiny changes can create a whole new taste experience.Enjoy cooking!
Storage Info
Storing Leftovers
To keep your Thai basil chicken stir-fry fresh, store it in an airtight container. Refrigerate the leftovers within two hours of cooking. If you want to save it longer, freeze the stir-fry. Make sure to cool it completely before freezing. This method helps retain flavor and texture.
Reheating Instructions
When you reheat your stir-fry, use a skillet for the best results. Heat it over medium warmth and stir often. This keeps the chicken juicy and prevents it from drying out. For rice, add a splash of water and cover it. This helps the rice steam and become fluffy again.
Shelf Life
In the fridge, your Thai basil chicken stir-fry lasts up to four days. If frozen, it can last for about three months. Always check for off smells or changes in color. If you see these, it’s best to discard it for safety.
FAQs
What is the origin of Thai Basil Chicken Stir-Fry?
Thai Basil Chicken Stir-Fry has roots in Thai street food. This dish reflects the vibrant flavors of Thai cuisine. It showcases fresh herbs, bold spices, and simple cooking techniques. Thai basil, known for its unique flavor, is key to this dish. It adds a sweet and slightly spicy note that enhances the chicken. This meal represents the balance of sweet, salty, and spicy tastes typical in Thai dishes. Each bite transports you to bustling markets in Thailand.
Can I make this recipe ahead of time?
Yes, you can prepare Thai basil chicken stir-fry in advance. Cook and store it in the fridge for up to three days. To keep it fresh, store it in an airtight container. When you are ready to eat, simply reheat it on the stove. This dish tastes even better the next day as flavors meld. Serve it over freshly cooked jasmine rice for a quick meal.
What can I substitute if I can’t find Thai basil?
If you cannot find Thai basil, you have options. Sweet basil or holy basil works well as a substitute. Sweet basil offers a milder flavor, while holy basil is spicier. You can also mix in a bit of mint for a fresh twist. While these substitutes change the taste slightly, they still create a tasty dish. Just remember, the flavor will differ from the original recipe.
How spicy is Thai Basil Chicken Stir-Fry?
The spice level of Thai Basil Chicken Stir-Fry can vary. It depends on the number of Thai chili peppers you use. Typically, this dish has a mild to medium heat. If you prefer a milder dish, use fewer chilis or remove the seeds. For those who love heat, add extra chilis or a dash of hot sauce. Adjusting spice levels allows everyone to enjoy this flavorful meal.
Thai Basil Chicken Stir-Fry is a simple yet flavorful dish. You learned about the key ingredients, like fresh basil and chicken. The step-by-step instructions make cooking easy, even for beginners. We explored tips to enhance flavor and adjust spice levels to suit your taste. You can even try fun variations with different proteins or herbs.
Enjoy making it your own, and savor the fresh flavors. Every bite will bring joy to your table.
![- 1 lb (450g) chicken breast, thinly sliced - 1 cup fresh Thai basil leaves, packed - 3 cloves garlic, minced - 2 red Thai chili peppers, thinly sliced (adjust based on your spice preference) For this dish, I prefer chicken breast. It cooks quickly and stays juicy. Fresh Thai basil gives this meal its unique flavor. Garlic adds a nice aroma, and Thai chili peppers bring heat. You can control the spice by adding more or less chili. - 2 tablespoons soy sauce - 1 tablespoon oyster sauce (or substitute with mushroom sauce for vegetarian) - 1 tablespoon fish sauce (or an extra tablespoon of soy sauce for vegetarian) - 1 teaspoon sugar (to balance flavors) - 1 tablespoon vegetable oil (for frying) These sauces are key to great taste. Soy sauce offers saltiness, while oyster and fish sauces add depth. Sugar balances the salty flavors, making everything taste better. - 1 bell pepper, sliced (your choice of color for visual appeal) - 1 small onion, sliced into thin wedges - Optional: other vegetables for added nutrition I like using bell pepper and onion for color and crunch. You can add other veggies like carrots or snap peas. They bring more nutrition and flavor, making the dish more vibrant. For the full recipe, refer to the [Full Recipe]. To start, you need to combine the chicken with the sauces. In a medium bowl, add the sliced chicken breast, soy sauce, oyster sauce, fish sauce, and sugar. Mix these ingredients well so the chicken gets all the flavor. Let it marinate for 15 minutes. This short time helps the chicken absorb the tasty sauces. Next, heat the vegetable oil in a large skillet or wok over medium-high heat. You want the oil to shimmer before adding anything. Then, add the minced garlic and sliced Thai chili peppers. Stir-fry them for about 30 seconds until they smell amazing. Be careful not to burn the garlic. Now, add the marinated chicken to the pan. Spread it out evenly for even cooking. Stir-fry for about 5 to 7 minutes. Cook until the chicken is no longer pink and has a nice brown color. After that, toss in the sliced bell pepper and onion. Stir-fry for another 3 to 4 minutes. This will make the vegetables tender but still crisp. Once the chicken and veggies are done, take the skillet off the heat. Gently fold in the fresh Thai basil leaves. They will wilt quickly from the heat and add a lovely aroma. Serve the dish hot, over a bed of fluffy jasmine rice. This rice complements the stir-fry well. Enjoy your Thai Basil Chicken Stir-Fry! For the full recipe, check out the details above. Using fresh ingredients makes a big difference. Fresh Thai basil gives a sweet and fragrant flavor to the dish. Always choose bright green basil leaves. They should smell strong and sweet. The chicken should be fresh, too. This keeps your stir-fry tasty and safe to eat. For the best flavor, cook on high heat. A hot pan helps to sear the chicken. This adds a nice caramel color and enhances the taste. When you add garlic and chili, cook them quickly. This brings out their strong flavors without burning them. You can change the heat level easily. If you want it milder, remove the seeds from the chili peppers. You can also use fewer peppers or substitute with sweet bell peppers. If you like a kick but want it less spicy, try adding sugar. It balances the heat. You can also use a bit of honey for sweetness without heat. Pair your Thai basil chicken stir-fry with jasmine rice. The rice absorbs the sauce well. You can also add a side of steamed veggies for extra nutrition. For garnishes, consider adding lime wedges or crushed peanuts. They add color and crunch. Fresh cilantro or extra basil leaves also make it pop. Enjoy your meal with these simple touches! For the full recipe, check out the details above. {{image_4}} For a vegetarian or vegan version, you can swap chicken for tofu or tempeh. These options give a nice texture. Use mushroom sauce instead of oyster sauce. It brings depth and umami flavor. For the fish sauce, simply add an extra tablespoon of soy sauce. This keeps the taste bold. To maintain flavor, marinate the tofu or tempeh just like chicken. Allow it to soak up the sauces. When cooking, make sure to press out excess moisture. This helps achieve that nice, crispy texture we all love. If you want to try something new, switch the chicken for shrimp or beef. Shrimp cooks quickly, so cut down the cooking time to about 3-4 minutes. Beef takes longer. Slice it thin and cook it for about 6-8 minutes. Remember, cooking times change based on what protein you use. Always make sure your protein is fully cooked before adding in the veggies. Want to shake things up? Add sauces like teriyaki or sriracha for an exciting twist. Teriyaki gives a sweet flavor, while sriracha adds heat. You can even mix both for a sweet and spicy kick. Feel free to experiment with herbs and spices too. Adding cilantro or mint can brighten the dish. Try a sprinkle of lime juice for an extra zest. These tiny changes can create a whole new taste experience. For the full recipe, check the section above. Enjoy cooking! To keep your Thai basil chicken stir-fry fresh, store it in an airtight container. Refrigerate the leftovers within two hours of cooking. If you want to save it longer, freeze the stir-fry. Make sure to cool it completely before freezing. This method helps retain flavor and texture. When you reheat your stir-fry, use a skillet for the best results. Heat it over medium warmth and stir often. This keeps the chicken juicy and prevents it from drying out. For rice, add a splash of water and cover it. This helps the rice steam and become fluffy again. In the fridge, your Thai basil chicken stir-fry lasts up to four days. If frozen, it can last for about three months. Always check for off smells or changes in color. If you see these, it's best to discard it for safety. Thai Basil Chicken Stir-Fry has roots in Thai street food. This dish reflects the vibrant flavors of Thai cuisine. It showcases fresh herbs, bold spices, and simple cooking techniques. Thai basil, known for its unique flavor, is key to this dish. It adds a sweet and slightly spicy note that enhances the chicken. This meal represents the balance of sweet, salty, and spicy tastes typical in Thai dishes. Each bite transports you to bustling markets in Thailand. Yes, you can prepare Thai basil chicken stir-fry in advance. Cook and store it in the fridge for up to three days. To keep it fresh, store it in an airtight container. When you are ready to eat, simply reheat it on the stove. This dish tastes even better the next day as flavors meld. Serve it over freshly cooked jasmine rice for a quick meal. If you cannot find Thai basil, you have options. Sweet basil or holy basil works well as a substitute. Sweet basil offers a milder flavor, while holy basil is spicier. You can also mix in a bit of mint for a fresh twist. While these substitutes change the taste slightly, they still create a tasty dish. Just remember, the flavor will differ from the original recipe. The spice level of Thai Basil Chicken Stir-Fry can vary. It depends on the number of Thai chili peppers you use. Typically, this dish has a mild to medium heat. If you prefer a milder dish, use fewer chilis or remove the seeds. For those who love heat, add extra chilis or a dash of hot sauce. Adjusting spice levels allows everyone to enjoy this flavorful meal. Thai Basil Chicken Stir-Fry is a simple yet flavorful dish. You learned about the key ingredients, like fresh basil and chicken. The step-by-step instructions make cooking easy, even for beginners. We explored tips to enhance flavor and adjust spice levels to suit your taste. You can even try fun variations with different proteins or herbs. Enjoy making it your own, and savor the fresh flavors. Every bite will bring joy to your table.](https://dishtreats.com/wp-content/uploads/2025/06/20a2f9de-1755-4b6a-ade1-393123d10e24-300x300.webp)


![To make Honey Mustard Chicken Thighs, you need simple, fresh ingredients. Here’s what you will need: - 4 bone-in chicken thighs, skin-on - 1/4 cup honey - 1/4 cup Dijon mustard - 2 tablespoons olive oil - 3 cloves garlic, minced - 1 teaspoon dried thyme - 1 teaspoon paprika - Salt and black pepper to taste - Fresh parsley for garnish These ingredients bring great flavor to your meal. The honey adds sweetness, while the Dijon mustard gives it a nice tang. Olive oil keeps the chicken juicy, and garlic boosts the taste. Dried thyme and paprika add depth, making every bite delicious. Don’t forget the parsley! It makes your dish look pretty and fresh. This recipe is quick and easy, perfect for any night. For the full instructions, check the Full Recipe. First, preheat your oven to 400°F (200°C). This heat will cook your chicken just right. In a small bowl, whisk together these ingredients: - 1/4 cup honey - 1/4 cup Dijon mustard - 2 tablespoons olive oil - 3 cloves garlic, minced - 1 teaspoon dried thyme - 1 teaspoon paprika - Salt and black pepper to taste Make sure to mix well. This creates a smooth and tasty marinade. Next, take your chicken thighs and place them in a large bowl or a resealable bag. Pour the marinade over the chicken. Ensure each piece is coated well. For the best flavor, let it marinate for at least 30 minutes. If you have more time, refrigerating it overnight works wonders. Now, heat a large oven-safe skillet over medium-high heat. Once hot, add the marinated chicken thighs, skin-side down. Sear them for about 5-7 minutes until the skin is golden brown. This step gives the chicken a nice crisp. After that, flip the thighs using tongs. Transfer the skillet to your preheated oven. Bake for 25-30 minutes. Check that the internal temperature reaches 165°F (75°C). If the juices run clear, the chicken is done. Once cooked, take the skillet from the oven and let the chicken rest for 5 minutes. This helps keep it juicy. Before serving, sprinkle some fresh parsley on top for a lovely finish. For the complete recipe, don't forget to check the [Full Recipe]. To get the best flavor, marinate the chicken thighs well. Use a large bowl or a resealable plastic bag for this. After mixing the marinade, pour it over the chicken. Make sure each piece is coated. For great results, let the chicken sit in the marinade for at least 30 minutes. You can also refrigerate it overnight. This extra time helps the flavors soak in deep. Cooking chicken thighs at the right temperature is key. Preheat your oven to 400°F (200°C). This hot oven cooks the chicken evenly and keeps it juicy. After searing the chicken for 5-7 minutes on the stovetop, transfer it to the oven. Bake for 25-30 minutes. Check the chicken's internal temperature. It should reach 165°F (75°C) for safe eating. Let it rest for 5 minutes before serving, which helps keep it moist. When serving, presentation matters. Place the chicken thighs on a white platter or a wooden board. Drizzle any leftover marinade over the top for added flavor. Garnish with fresh parsley for a pop of color. This simple touch makes the dish look more inviting. You can pair the chicken with roasted veggies or a fresh salad. These sides complement the sweet and tangy flavors of the honey mustard. For the full recipe, check out the details above. {{image_4}} You can change the sauce to fit your taste. Try using maple syrup instead of honey. This gives a unique sweetness. You can also mix in some soy sauce for a savory twist. If you like heat, add a dash of hot sauce or cayenne pepper. For a tangy flavor, consider apple cider vinegar. Each option adds a new layer to the dish. While chicken thighs are great, you can also use chicken breasts. They cook faster but stay moist if cooked right. Drumsticks are another option. They have lots of flavor and a nice crisp skin. You can even use a whole chicken, just adjust cooking time. Each cut brings its own charm to the recipe. For a full meal, add vegetables. Root veggies like carrots and potatoes roast well. Toss them in the marinade for extra flavor. You can also use green beans or broccoli. Place them in the skillet with the chicken. They will soak up the sauce and cook perfectly. This way, you have a tasty one-pan meal that's easy to serve. For the full recipe, check out the previous section. After cooking, let the chicken cool down. Place the chicken thighs in an airtight container. Store them in the fridge for up to three days. Make sure the temperature stays below 40°F (4°C). This keeps your chicken safe and tasty. If you want to store the chicken longer, freezing is a great option. Wrap each thigh tightly in plastic wrap. Then put them in a freezer-safe bag. You can freeze them for up to three months. Remember to label the bag with the date. When you are ready to enjoy leftovers, preheat your oven to 350°F (175°C). Place the chicken in a baking dish. Cover it with foil to keep it moist. Heat for about 20-25 minutes. You can also use a microwave, but it may dry the chicken out. For the best taste, the oven is the way to go. Enjoy your meal again! You should marinate honey mustard chicken thighs for at least 30 minutes. This allows the flavors to soak into the meat. If you have time, marinating overnight works even better. It deepens the taste and makes the chicken more tender. Yes, you can use boneless chicken thighs. They cook faster than bone-in thighs. Adjust the cooking time to about 20-25 minutes in the oven. Always check that the internal temperature reaches 165°F (75°C) for safety. Honey mustard chicken thighs pair well with many sides. Here are some ideas: - Steamed vegetables: Broccoli or green beans add color. - Rice or quinoa: Both soak up the sauce nicely. - Salad: A fresh green salad balances the meal. - Mashed potatoes: Creamy potatoes are a great comfort food option. You can find the full recipe to help you create this delicious meal. In this post, I shared ingredients and steps for making honey mustard chicken thighs. I provided tips for marinating and cooking this dish to enhance its flavor. You learned about variations and how to store leftovers properly. Remember, simple changes can make a big impact on taste. I encourage you to try these ideas for yourself. Enjoy cooking and delight in every bite!](https://dishtreats.com/wp-content/uploads/2025/06/0b4fb8df-5400-4b6b-9acb-490ad2d6fca7-768x768.webp)
