Teriyaki Salmon Rice Bowls Flavorful and Simple Recipe

Ready to dive into a delicious meal? These Teriyaki Salmon Rice Bowls are easy to make and packed with flavor! You’ll enjoy tender salmon, fluffy jasmine rice, and crisp veggies, all drizzled with a sweet and savory teriyaki sauce. Whether you’re cooking for yourself or your family, this recipe delivers a quick, tasty dinner everyone will love. Let’s get started on creating your new favorite dish!
Ingredients
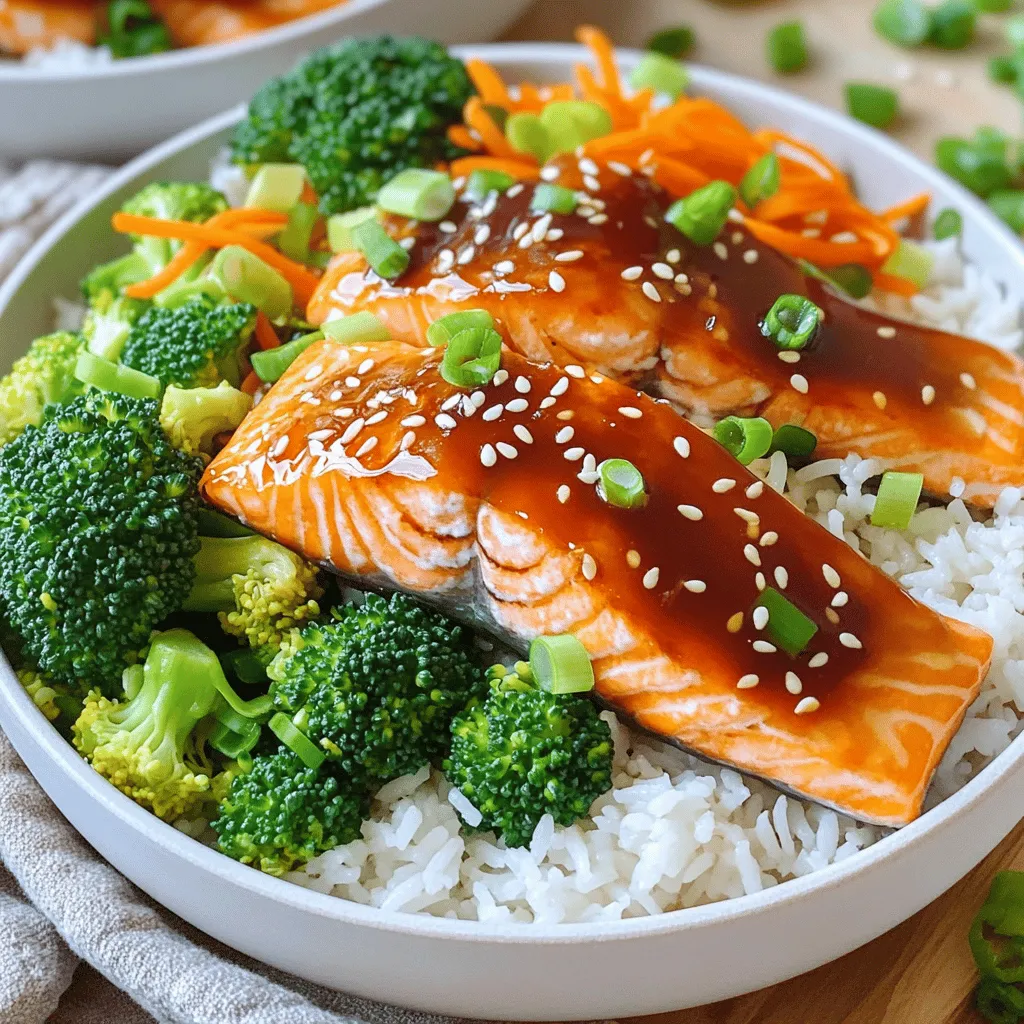
Main Ingredients for Teriyaki Salmon Rice Bowls
- 2 salmon fillets
- 2 cups cooked jasmine rice
- 1 cup broccoli florets
- 1/2 cup shredded carrots
- Teriyaki sauce components
Teriyaki Sauce Components
- 1/4 cup soy sauce
- 2 tablespoons honey
- 1 tablespoon rice vinegar
- 1 garlic clove, minced
- 1 teaspoon fresh ginger, grated
Garnishes and Serving Suggestions
- 1/4 cup green onions, thinly sliced
- Sesame seeds, for garnish
- Optional: Pickled ginger, for serving
I love how these ingredients come together. The salmon fillets are rich and flavorful. Jasmine rice provides a soft base. Broccoli and carrots add a nice crunch and color. The teriyaki sauce gives the dish a sweet and savory kick.
For the sauce, you need soy sauce for saltiness and umami. Honey adds sweetness, which balances the salty soy. Rice vinegar gives it a bit of tang. Garlic and ginger add depth and warmth. This mix creates a sauce you want to drizzle on everything!
Garnishes are key. Green onions add freshness and a mild onion flavor. Sesame seeds add a nutty crunch. Pickled ginger is optional, but it gives a nice zing. It cuts through the richness of the salmon.
Using these ingredients makes this dish easy and fun. You can enjoy it for lunch or dinner. Plus, it looks great on the table!
Step-by-Step Instructions
Preparing the Teriyaki Sauce
To make the teriyaki sauce, start by taking a bowl. In this bowl, whisk together these ingredients:
- 1/4 cup soy sauce
- 2 tablespoons honey
- 1 tablespoon rice vinegar
- 1 minced garlic clove
- 1 teaspoon grated fresh ginger
Keep whisking until everything blends well. This sauce is your secret flavor booster. Set it aside for now. You will use half to marinate the salmon.
Marinating the Salmon
Next, you will marinate the salmon. Place the salmon fillets in a shallow dish. Pour half of your teriyaki sauce over the salmon. Make sure each fillet is coated. Let the salmon sit and soak up the flavors for about 20 minutes. This step helps the fish absorb all that yummy taste.
Cooking the Rice and Broccoli
While the salmon marinates, you can cook the rice and broccoli. First, prepare 2 cups of jasmine rice according to the package directions. Cook it until fluffy and light.
For the broccoli, take 1 cup of florets. Steam them for about 4–5 minutes until they’re bright green and tender. This keeps the veggies fresh and crunchy.
Cooking the Salmon
Now it’s time to cook the salmon. Heat a non-stick skillet or a grill pan over medium heat. Once it’s hot, take the salmon out of the marinade. Place it in the skillet. Cook for about 4–5 minutes on each side. Remember to baste the salmon with the reserved teriyaki sauce. This adds flavor and helps it caramelize.
Assembling the Rice Bowls
After cooking, it’s time to build your rice bowls. Start with a generous scoop of jasmine rice in each bowl.
Next, layer on the ingredients. Top the rice with the steamed broccoli, shredded carrots, and a salmon fillet.
To finish, drizzle some of the remaining teriyaki sauce over the top. Add sliced green onions and sesame seeds for a nice touch.
For added flair, serve with a small dish of pickled ginger on the side. This makes your meal even more special. Enjoy!
Tips & Tricks
Perfecting Cooked Salmon
How do I check for doneness?
To check if your salmon is done, use a fork. Gently twist the fork at the thickest part of the fillet. If it flakes easily and looks opaque, it is ready. Cooking time is about 4-5 minutes on each side. Keep an eye on it. Overcooking makes it dry.
How do I achieve caramelization?
To get that golden crust, start with a hot skillet. After marinating, let the excess sauce drip off the salmon. This helps it caramelize better. Place it skin-side down for crispy skin. Baste with reserved sauce while cooking to enhance flavor.
Enhancing Flavor Profiles
What additional spices can I use?
Try adding a pinch of red pepper flakes for heat. You can also mix in sesame oil for a nutty taste. Fresh herbs like cilantro or basil can brighten the dish. Experiment to find your favorite combo.
How do I balance sweetness and umami?
The teriyaki sauce is sweet, so balance it with salt. You can add a splash of soy sauce or a pinch of salt. Taste as you go to achieve your desired flavor. Use less honey if you prefer a less sweet sauce.
Meal Prep Advice
How can I make this ahead for weeknight dinners?
Cook the rice and salmon in advance. Store them in separate containers. You can steam the broccoli ahead too. Just reheat everything before serving. This makes dinner quick and easy.
How do I store teriyaki sauce?
Keep any leftover teriyaki sauce in a sealed jar. It can stay in the fridge for up to a week. You can also freeze it in ice cube trays. This way, you can use small amounts as needed later.

Variations
Ingredient Swaps
You can switch out the salmon if you want. Try using chicken or tofu instead. Both are great options. They soak up the teriyaki sauce well. For rice, jasmine is classic, but brown rice works too. Quinoa is also a healthy choice. Each option offers a unique taste.
Teriyaki Sauce Variations
You can make your teriyaki sauce at home or buy it. Homemade tastes fresh and lets you adjust flavors. If you want a spicy kick, add sriracha. A little goes a long way. It adds warmth and depth to the dish without overpowering it.
Vegetable Alternatives
Feel free to mix in seasonal veggies. Zucchini, asparagus, or snap peas are nice choices. They add color and crunch. Bell peppers bring sweetness and brightness. You can even add mushrooms for an earthy taste. Keep it colorful for a fun meal.
Storage Info
Storing Leftovers
To keep your teriyaki salmon rice bowls fresh, store them in airtight containers. Divide the rice, salmon, and veggies into separate portions. This helps maintain their texture and flavor. Use the following tips:
- Let the salmon cool before storing.
- Keep the rice in a separate container.
- Store broccoli and carrots together.
- Use within three days for the best taste.
Freezing Techniques
You can freeze teriyaki salmon rice bowls for later meals. This is a great way to enjoy them again. Here’s how:
- Wrap each portion tightly in plastic wrap.
- Place wrapped portions in a freezer bag.
- Remove as much air as possible to prevent freezer burn.
- Use within one month for best flavor.
Reheating Instructions
Reheating your rice bowls can be easy and quick. Here are the best methods:
- For the microwave, place the rice and salmon in a bowl.
- Add a splash of water to keep it moist.
- Cover with a damp paper towel and heat for 1-2 minutes.
- For the oven, preheat to 350°F (175°C).
- Place the rice bowls in an oven-safe dish and cover with foil.
- Heat for about 15-20 minutes until warmed through.
This ensures your meal tastes fresh and delicious!
FAQs
Can I use frozen salmon for this recipe?
Yes, you can use frozen salmon. First, thaw the salmon in the fridge overnight. If you’re short on time, place it in a sealed bag and run it under cold water for about 30 minutes. Make sure it’s completely thawed before cooking for best results.
What can I substitute for soy sauce?
You can use tamari as a gluten-free option. Coconut aminos is another great substitute. Both options will give you a nice umami flavor without gluten.
How do I make this dish vegetarian?
To make Teriyaki Salmon Rice Bowls vegetarian, swap the salmon for tofu or tempeh. Both options will absorb the teriyaki sauce well and provide a good texture.
What is the best type of rice for Teriyaki Salmon Rice Bowls?
Jasmine rice is the best choice. It has a fragrant aroma and a slightly sticky texture. This helps it hold the sauce and complements the salmon well.
How long can leftovers be stored in the refrigerator?
You can store leftovers in an airtight container for up to three days. Make sure to let the food cool before sealing it. This helps maintain freshness and flavor.
This blog post covered all you need for Teriyaki Salmon Rice Bowls. We explored key ingredients, like salmon, rice, and veggies, plus the teriyaki sauce you can make at home. I shared step-by-step instructions, tips for peak flavor, and storage ideas. You can even customize the dish with different proteins and veggies.
Remember, cooking is about fun and creativity. Enjoy making this tasty meal and share it with others!


![- Firm tofu and its preparation Use 14 oz of firm tofu for this recipe. Press it for about 30 minutes to remove excess water. This step helps the tofu absorb the teriyaki sauce, making it more flavorful. Cut the tofu into 1-inch cubes for even cooking. - Marinade ingredients for teriyaki sauce The marinade is key to the dish's taste. For a simple teriyaki sauce, mix together: - 1/4 cup soy sauce - 2 tablespoons maple syrup - 1 tablespoon rice vinegar - 1 tablespoon sesame oil - 1 teaspoon minced garlic (about 2 cloves) - 1 teaspoon minced ginger (fresh preferred) This blend gives the skewers a sweet and savory profile. - Colorful vegetables to enhance the skewers Color matters! Use a mix of vegetables for a vibrant look and taste. I suggest: - 1 red bell pepper, cut into 1-inch chunks - 1 medium zucchini, sliced into 1/2-inch thick rounds - 1 red onion, cut into quarters These veggies not only add color but also texture and flavor. - Additional seasonings or garnishes Feel free to add sesame seeds for garnish. They add a nice crunch and look great. You can also sprinkle some fresh cilantro or green onions for extra flavor and color. - Suggestions for protein substitutions If you want to mix it up, consider other proteins. You can use tempeh or seitan for a similar texture. Chicken or shrimp works too, if you prefer meat. Just adjust the cooking time accordingly. For the complete recipe, refer to the [Full Recipe]. The ingredients listed here create a great base for the teriyaki grilled tofu skewers. Happy cooking! To make the teriyaki marinade, combine soy sauce, maple syrup, rice vinegar, sesame oil, minced garlic, and minced ginger in a bowl. Whisk until mixed well. This marinade adds deep flavors to the tofu. For great results, use firm tofu. Press it to remove excess water. This helps the tofu absorb the marinade. After mixing, gently add the cubed tofu. Toss carefully to coat without breaking it. Cover the bowl and let it sit in the fridge for at least 30 minutes. For a stronger taste, try marinating it overnight. If you use wooden skewers, soak them in water for 20 to 30 minutes. This simple step prevents burning on the grill. While the skewers soak, prepare your vegetables. Cut red bell pepper, zucchini, and red onion into bite-sized pieces. After soaking, take the skewers and assemble them. Start with a tofu cube, then add a piece of red bell pepper, followed by zucchini and red onion. Repeat this pattern until the skewer is filled. This creates a colorful and tasty mix. Preheat your grill to medium-high heat. This ensures even cooking for your skewers. Once heated, place the skewers on the grill. Cook them for 8 to 10 minutes. Use tongs to turn the skewers occasionally. This helps them cook evenly. In the last minute, brush any leftover teriyaki marinade over the skewers. This adds extra glaze and flavor. When done, carefully take the skewers off the grill. Let them cool for about a minute before serving. Enjoy your teriyaki grilled tofu skewers! For the full recipe, check the earlier section. To make your teriyaki marinade pop, use fresh ingredients. Fresh garlic and ginger add great taste. A longer marinating time gives deeper flavors. Aim for at least 30 minutes, but overnight is best. Common mistakes include not pressing the tofu well. If the tofu is too wet, it won’t absorb the marinade. Also, avoid using too much soy sauce, as it can overpower the dish. Balance is key. When grilling tofu, medium-high heat works best. This helps the tofu get a nice char. Don’t forget to turn the skewers often. This ensures even cooking on all sides. For veggies, keep an eye on cooking time. Overcooked veggies lose their crunch. Aim for tender but still crisp, which adds great texture. Style your dish neatly on a platter. Arrange the skewers in a fan shape for visual appeal. For garnishing, sprinkle sesame seeds over the skewers. Fresh cilantro or green onions also add color and flavor. Serve with steamed rice or a fresh salad to make a complete meal. For the full recipe, check out the detailed instructions above. {{image_4}} You can easily make these skewers with other proteins. Try using seitan or tempeh. Both absorb flavors well and work great. If you prefer legumes, marinated chickpeas can add a nice touch. These options keep the dish vegan while still being tasty. Want to spice things up? Add some sriracha or chili paste to the marinade. This adds heat and depth. You can also mix in some pineapple juice for a sweeter twist. Experimenting with different spices like smoked paprika or five-spice powder can also create unique flavors. Switch up the veggies based on the season. In spring, try asparagus or snap peas. For summer, zucchini and bell peppers shine. In fall, use mushrooms and butternut squash for a hearty taste. Winter calls for root vegetables like carrots or sweet potatoes. Each season brings fresh flavors to your skewers. To store leftover teriyaki grilled tofu skewers, place them in an airtight container. Make sure to let them cool down first. This step helps keep them fresh. Store the container in the fridge for up to three days. If you want to keep them longer, consider freezing. Just keep in mind that the texture may change. To reheat the skewers, the oven works best. Preheat it to 350°F (175°C). Place the skewers on a baking sheet. Heat them for about 10 minutes, or until warm. You can also use a microwave. Just heat for 30 seconds at a time, checking to avoid overcooking. Yes, you can freeze the skewers! Wrap them in plastic wrap and put them in a freezer bag. Squeeze out as much air as you can. They will stay good for about two months. When you're ready to eat, let them thaw in the fridge overnight. Then, reheat as mentioned above. This method keeps the flavor intact. Marinating tofu for at least 30 minutes gives it good flavor. If you want even more taste, let it sit overnight. The longer the tofu marinates, the better it absorbs the teriyaki sauce. Yes, you can use store-bought teriyaki sauce. It saves time and still tastes great. Just make sure to check the label for quality ingredients. These skewers pair well with steamed rice or a fresh green salad. You can also serve them with a side of grilled vegetables. For extra flavor, add a dollop of spicy mayo or a drizzle of extra teriyaki sauce. To stop skewers from sticking, oil the grill grates before cooking. You can also brush a little oil on the skewers. If using wooden skewers, soaking them in water helps too. This keeps them from burning and sticking. This blog post covered how to make tasty teriyaki grilled tofu skewers. We explored key ingredients like firm tofu, flavorful marinade, and vibrant veggies. I shared step-by-step instructions for marinating, preparing, and grilling the skewers. You learned tips to enhance the dish, like perfecting the marinade and improving presentation. In the end, these skewers are a fun and healthy meal. With simple ingredients and steps, you can enjoy grilling any time.](https://dishtreats.com/wp-content/uploads/2025/06/0e56396a-f5cd-46e1-b6b9-5b907260de8f-768x768.webp)


![To make Chicken Pesto Pasta Salad, you need fresh and tasty ingredients. Here’s what you will use: - 2 cups penne pasta - 1 cup cooked chicken breast, shredded - 1/2 cup cherry tomatoes, halved - 1/2 cup mozzarella balls, drained - 1/4 cup fresh basil leaves, chopped - 1/4 cup pesto sauce - 2 tablespoons extra virgin olive oil - Juice of 1 fresh lemon - Salt and black pepper to taste - Optional: 1/4 cup pine nuts, toasted Each ingredient brings its own flavor. The penne pasta serves as a great base. The chicken adds protein. Tomatoes give freshness, while mozzarella adds creaminess. You can change things up with add-ins. Here are some great options: - Spinach or arugula for extra greens - Bell peppers for crunch - Grated Parmesan cheese for a salty kick - Cooked bacon for a smoky flavor - Quinoa instead of pasta for a healthier twist Feel free to mix and match. Your salad can be unique each time you make it. When it comes to pesto, you have choices. You can use fresh homemade pesto or store-bought pesto. Fresh pesto tastes bright and bold. You can make it with basil, garlic, pine nuts, cheese, and olive oil. Store-bought pesto saves time but may have preservatives. Both options work well in your salad. I recommend trying fresh pesto if you have the time. It elevates the dish and adds a personal touch. For the full recipe, check out the [Full Recipe]. 1. Cook the Pasta: Start by boiling water in a large pot. Add salt for flavor. When it boils, add 2 cups of penne pasta. Cook until al dente, about 8-10 minutes. Drain the pasta and rinse it with cold water to cool it down. 2. Mix the Ingredients: In a big mixing bowl, add 1 cup of shredded cooked chicken, 1/2 cup of halved cherry tomatoes, and 1/2 cup of drained mozzarella balls. Use a spatula to mix them well. 3. Combine with Pasta: Add the cooled penne pasta to the bowl. Gently mix to combine everything. Be careful not to break the mozzarella balls. 4. Make the Dressing: In a small bowl, whisk together 1/4 cup of pesto sauce, 2 tablespoons of extra virgin olive oil, and the juice from 1 fresh lemon. Add a pinch of salt and black pepper. 5. Dress the Salad: Pour the dressing over the pasta salad. Use a spoon or tongs to toss everything gently. Make sure all the ingredients are coated. 6. Fold in Fresh Herbs: Add 1/4 cup of chopped fresh basil and optional 1/4 cup of toasted pine nuts. Gently fold them into the salad without bruising the basil. 7. Taste and Adjust: Taste your salad. If it needs more flavor, add more salt, pepper, or lemon juice. 8. Chill Before Serving: Cover the salad with plastic wrap. Let it chill in the fridge for at least 30 minutes. This helps the flavors mix well. - Use a large pot to give the pasta room to move. - Salt the water before adding pasta. This makes it taste better. - Stir the pasta often while it cooks to prevent sticking. - Always taste the pasta a minute before the time is up. It should be firm but not hard. Making the dressing is quick and easy. In just a few steps, you can create a burst of flavor. Start with fresh pesto sauce. If you like a creamier dressing, mix in some yogurt or sour cream. Always taste your dressing before adding it to the salad. Adjust the flavors based on your taste. This simple dressing brings the whole dish together and makes it shine. For the full recipe, check out the details above. Mixing ingredients well is key to flavor. Start with the pasta. Make sure it is cold before adding other items. This keeps everything fresh. Next, add the chicken, tomatoes, and mozzarella. Use a spatula to fold gently. This ensures the mozzarella stays whole. It adds nice pops of flavor to each bite. Taste your dish as you cook. Start with a pinch of salt and pepper. The lemon juice adds brightness, so taste it first. If it needs more zing, add another squeeze. Always remember that you can add more, but you can't take it out. This rule helps you control the flavors. For a great look, serve the salad in a big bowl. Layer the salad for a beautiful view. Add extra basil leaves on top. A sprinkle of toasted pine nuts adds crunch. This makes your dish eye-catching and fun. Enjoy serving this colorful salad at any gathering! You can find the full recipe in the main article. {{image_4}} You can boost your Chicken Pesto Pasta Salad with more veggies and proteins. Adding fresh spinach or arugula gives a nice crunch. Bell peppers add color and sweetness. Toss in some peas or zucchini for a nutritious kick. You can also swap chicken for shrimp, tofu, or chickpeas. This way, you can cater to different tastes and dietary needs. When it comes to ingredients, you have choices. Using homemade pesto elevates your dish. It tastes fresh and bright. You can easily make pesto with basil, nuts, olive oil, and garlic. If you’re short on time, store-bought pesto works too. Just pick a brand with simple, quality ingredients. This saves time without losing flavor. You can adjust this recipe for various diets. For a gluten-free option, use gluten-free pasta. Many brands offer great alternatives. If you want a vegan version, replace the chicken with chickpeas or roasted vegetables. Use a vegan pesto made from nuts and nutritional yeast instead of cheese. These swaps keep the dish tasty and satisfying for everyone. To store leftover chicken pesto pasta salad, place it in an airtight container. Make sure the lid seals tightly to keep the salad fresh. You can keep it in the fridge for up to three days. If you notice the salad looking dry, add a splash of olive oil or lemon juice before serving. This will help restore some moisture. Freezing pasta salad is not the best choice since the texture can change. If you do want to freeze it, separate the chicken and pasta from the veggies and dressing. Store each part in a freezer-safe bag or container. You can freeze it for up to one month. When ready, thaw it in the fridge overnight before serving. Reheating chicken pesto pasta salad is simple. If you have stored it in the fridge, serve it cold or at room temperature. If you prefer it warm, place it in a microwave-safe dish. Heat it for about 30 seconds at a time until it reaches your desired warmth. Be careful not to overheat, as it can make the pasta mushy. Always check the seasoning again after reheating and adjust as needed. You can use tofu, shrimp, or chickpeas as great chicken alternatives. Tofu gives a nice texture. Shrimp adds a seafood twist. Chickpeas provide protein and a hearty feel. You can also try cooked turkey or beef for a different taste. The key is to use a protein you enjoy. This salad stays fresh in the fridge for three to five days. Make sure to store it in an airtight container. The flavors will blend nicely as it sits. However, the longer it sits, the softer the pasta becomes. Yes, you can prepare this salad a day in advance. It tastes even better after the flavors meld overnight. Just keep it covered in the fridge. If you use fresh basil, add it right before serving to keep it vibrant. Check out the Full Recipe for complete details! This article covered how to make a tasty Chicken Pesto Pasta Salad. You learned about key ingredients, and how to cook pasta just right. I shared some helpful tips for mixing and serving. Remember, you can add veggies or change spices to fit your taste. Store leftovers well for future meals. This salad is great for lunch or a gathering. Enjoy your cooking and happy eating!](https://dishtreats.com/wp-content/uploads/2025/06/0440c548-7b14-481e-8658-8224512ec7fd-768x768.webp)