Teriyaki Chicken Rice Casserole Easy and Flavorful Dish

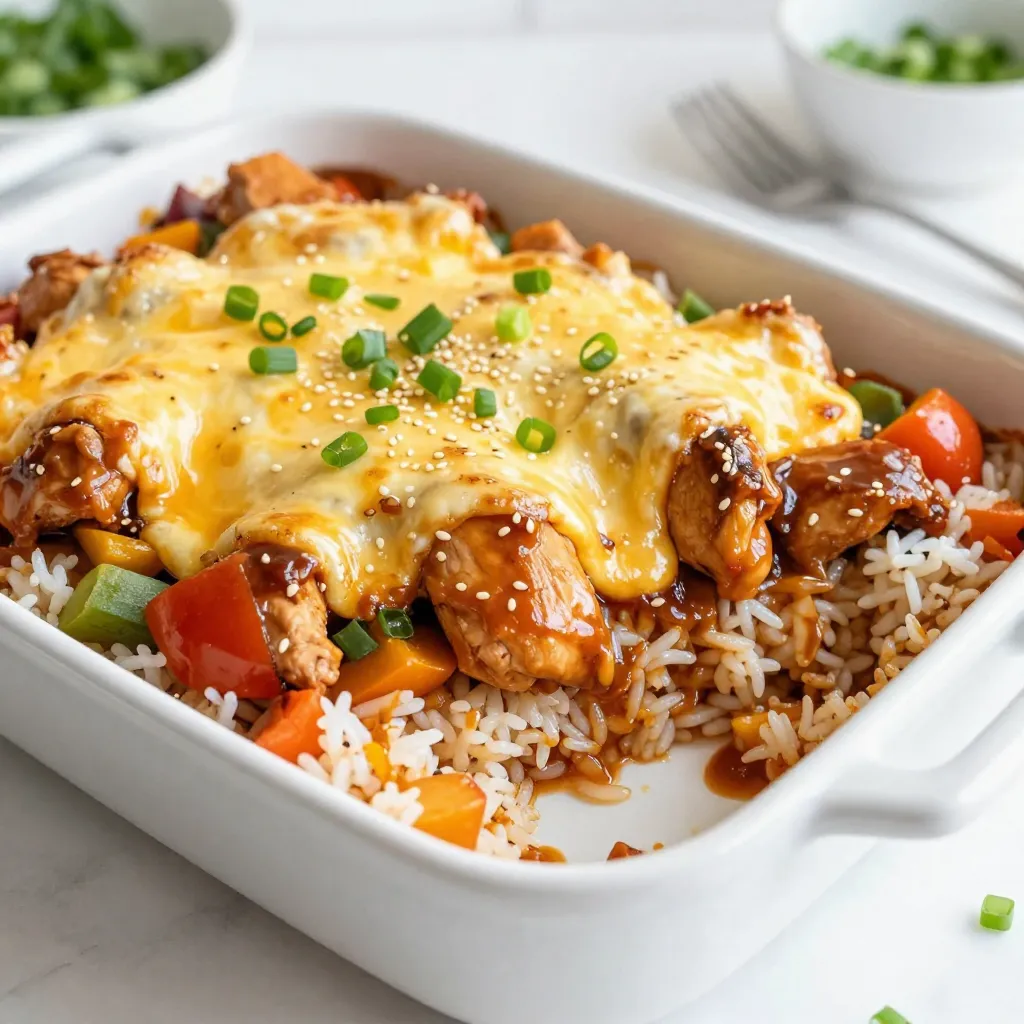
Looking for a quick and tasty meal? This Teriyaki Chicken Rice Casserole brings flavor and ease to your dinner table. Made with cooked jasmine rice, juicy chicken, and vibrant vegetables, it’s perfect for busy nights. With simple ingredients and easy steps, you’ll impress everyone at home. Dive into this recipe that’s comforting, satisfying, and ready to be enjoyed. Let’s get started on making your new favorite dish!
Why I Love This Recipe
- Quick and Easy: This casserole comes together in just a few simple steps, making it a perfect weeknight dinner option for busy families.
- Flavorful Combination: The teriyaki sauce, garlic, and ginger create a deliciously rich flavor that complements the chicken and vegetables beautifully.
- Cheesy Goodness: Topped with mozzarella cheese, this dish has a wonderful creamy texture that makes each bite satisfying and comforting.
- Customizable: You can easily swap out the vegetables or use different types of cheese, allowing you to tailor it to your family’s preferences.
Ingredients
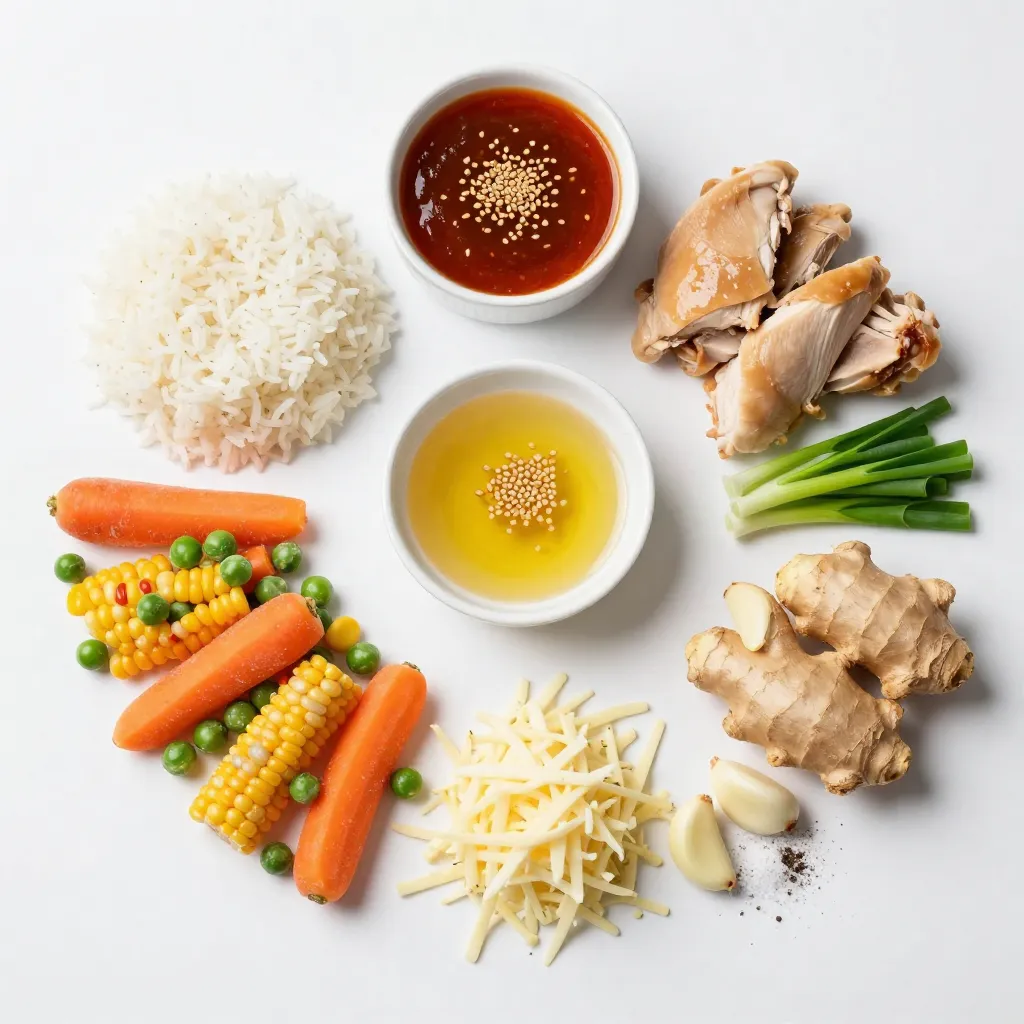
List of main ingredients
- 2 cups cooked jasmine rice
- 1 pound boneless, skinless chicken thighs, diced into bite-sized pieces
- 1 cup teriyaki sauce
- 1 cup frozen mixed vegetables
- 1 tablespoon sesame oil
Optional and substitute ingredients
- You can swap mozzarella cheese for cheddar. Cheddar adds a sharp taste.
- Fresh vegetables can be used instead of frozen. Fresh gives a brighter flavor.
- Use different oils if you prefer. Olive oil or avocado oil work well too.
Seasoning and flavor enhancers
- Fresh ginger gives a nice kick. It adds warmth and depth to your dish.
- Garlic is key for great flavor. Minced garlic enhances the overall taste.
- Add salt and pepper to taste. This helps balance the flavors well.
- For extra flair, use garnishes like sesame seeds and chopped green onions. They add a nice crunch and color.

Step-by-Step Instructions
Preparation steps
1. First, preheat your oven to 375°F (190°C). This warms the oven for baking.
2. Next, grab a large skillet. Heat 1 tablespoon of sesame oil over medium-high heat.
3. Once hot, add 1 pound of diced chicken thighs. Season with salt and pepper.
4. Sauté the chicken for 5-7 minutes. Look for a golden brown color and ensure it’s cooked through.
5. Now, add 1 tablespoon of freshly grated ginger and 2 cloves of minced garlic. Stir for 1-2 minutes until fragrant.
Combining the ingredients
1. In a large bowl, mix 2 cups of cooked jasmine rice with the chicken mixture.
2. Add 1 cup of frozen mixed vegetables. Stir until everything is well blended.
3. Transfer this colorful mix to a greased 9×13-inch casserole dish.
4. Top it with 1 cup of shredded mozzarella cheese, covering the whole dish.
Baking and serving
1. Place the casserole in the oven and bake for 25-30 minutes. Look for melted and bubbly cheese.
2. Once baked, take it out and let it cool for about 5 minutes. This helps the dish set.
3. Garnish with 2 chopped green onions and a sprinkle of sesame seeds for a nice finish.
Tips & Tricks
Cooking tips
- Ensuring perfectly cooked chicken: Use boneless, skinless chicken thighs. Cut them into bite-sized pieces for quick cooking. Sauté them until they are golden brown. This takes about 5-7 minutes. Make sure the chicken is cooked through to avoid any raw spots.
- Key points for flavor infusion: Always add ginger and garlic after browning the chicken. This keeps their flavors bright. Cook them for only 1-2 minutes until fragrant. Then, add the teriyaki sauce. This step helps the sauce soak into the chicken.
Serving suggestions
- What to serve alongside the casserole: I love to pair this dish with a fresh salad. A simple cucumber and carrot salad adds crunch. You can also serve it with steamed broccoli or snap peas for extra veggies.
- Ideal occasions for this dish: This casserole shines during family dinners or potlucks. It is easy to make and serves many people. You can also serve it on busy weeknights when you need a quick meal.
Leftover tips
- Reheating without losing texture: To reheat, place leftovers in a microwave-safe dish. Cover it with a damp paper towel. Heat in short bursts to keep the rice and chicken moist.
- Creative ways to repurpose leftovers: You can turn leftovers into a tasty stir-fry. Just add some fresh veggies and sauce in a pan. Stir-fry until heated through for a quick lunch or dinner.
Pro Tips
- Marinate the Chicken: For an even more flavorful dish, marinate the diced chicken thighs in the teriyaki sauce for at least 30 minutes before cooking. This will infuse the meat with richer flavors.
- Use Fresh Vegetables: If you have fresh vegetables on hand, feel free to substitute them for the frozen mixed vegetables. Broccoli, bell peppers, or snap peas add a delightful crunch and freshness.
- Experiment with Cheese: While mozzarella is a great choice, try using different types of cheese like gouda or pepper jack for a unique twist on flavor.
- Leftovers Make Great Lunches: This casserole keeps well in the fridge and can be reheated for a quick lunch. Just make sure to store it in an airtight container to maintain freshness.
Variations
Healthier adaptations
You can make this dish lighter by using less sauce. Try low-calorie teriyaki sauce. For a gluten-free option, use tamari instead of regular soy sauce. You can also swap jasmine rice for quinoa. Quinoa adds protein and is gluten-free.
Flavor profile adjustments
To add a kick, mix in sriracha or chili flakes. These spices bring heat and depth. For a sweet twist, add fresh pineapple chunks. Pineapple adds a bright flavor that works well with teriyaki.
Ingredient swaps
If you want a vegetarian meal, try using tofu or tempeh. Both options absorb flavors well. You can also use shrimp for a seafood version. Shrimp cooks quickly and adds a nice bite to the casserole.
Storage Info
Refrigeration guidance
To store leftovers, let the casserole cool first. Place it in an airtight container. This keeps it fresh and tasty. In the fridge, it lasts for about 3 to 4 days. When you want to eat it again, just reheat portions in the microwave or oven.
Freezing instructions
You can freeze this casserole, which is great for meal prep. First, let it cool completely. Then, cut it into portions and wrap each in plastic wrap. Place the wrapped pieces in a freezer-safe bag or container. When ready to eat, take it out and thaw overnight in the fridge. Reheat in the oven at 350°F (175°C) until hot.
Meal prep tips
To prepare in advance, cook the chicken and rice a day ahead. Store them separately. You can also mix the veggies and teriyaki sauce together. On busy nights, just combine everything and bake. This saves time and keeps dinner easy.
FAQs
What can I use instead of jasmine rice?
If you do not have jasmine rice, you can use basmati or brown rice. Basmati rice has a nice aroma and fluffy texture. Brown rice adds a nutty flavor and is more filling. Both options will work well in this casserole.
Can I make this recipe in advance?
Yes, you can make this recipe ahead of time. Cook the rice and chicken, then mix everything. Place it in the fridge for up to two days. When you are ready, just bake it.
Is teriyaki chicken rice casserole suitable for meal prep?
Absolutely! This casserole is great for meal prep. You can portion it out for lunches or dinners. It keeps well in the fridge for about five days. Just reheat in the oven or microwave.
Can I make this casserole vegetarian?
Yes, you can make this casserole vegetarian. Replace the chicken with tofu or tempeh. Use a vegetarian teriyaki sauce to keep the flavors. You will still enjoy a hearty and tasty dish.
This blog post explored the delicious teriyaki chicken rice casserole. We discussed key ingredients like cooked jasmine rice, chicken thighs, and rich teriyaki sauce. I provided step-by-step instructions to simplify your cooking. You learned helpful tips for flavor and serving, plus variations for healthier options.
Remember, cooking is all about joy and creativity. With these ideas, you can customize your casserole to fit your taste. Enjoy making this dish your own, and don’t hesitate to experiment with leftovers or new flavor

Teriyaki Chicken Rice Casserole
Ingredients
- 2 cups cooked jasmine rice
- 1 pound boneless, skinless chicken thighs, diced into bite-sized pieces
- 1 cup teriyaki sauce
- 1 cup frozen mixed vegetables
- 1 tablespoon sesame oil
- 2 pieces green onions, finely chopped
- 1 cup shredded mozzarella cheese
- 1 tablespoon fresh ginger, finely grated
- 2 cloves garlic, minced
- to taste salt and freshly ground pepper
- for garnish sesame seeds
Instructions
- Begin by preheating your oven to 375°F (190°C) to ensure it’s ready for baking.
- In a large skillet, heat the sesame oil over medium-high heat. Once hot, add the diced chicken thighs. Season generously with salt and freshly ground pepper. Sauté for about 5-7 minutes, or until the chicken is golden brown and cooked through, stirring occasionally for even cooking.
- Next, add the freshly grated ginger and minced garlic to the skillet. Sauté for an additional 1-2 minutes, allowing the aromatic flavors to infuse the chicken, until they become fragrant but not browned.
- Pour in the teriyaki sauce, stirring to ensure that all the chicken is evenly coated. Allow the mixture to simmer for 2-3 minutes, giving the sauce a chance to thicken slightly.
- In a large mixing bowl, combine the cooked jasmine rice, the teriyaki chicken mixture, and the frozen mixed vegetables. Stir thoroughly until all components are evenly blended and coated in the delicious sauce.
- Transfer this colorful mixture into a greased 9x13-inch casserole dish, spreading evenly. Top with the shredded mozzarella cheese, making sure to cover the entire surface for a cheesy finish.
- Place the casserole in the preheated oven and bake for 25-30 minutes, or until the cheese is melted, bubbly, and lightly golden.
- After baking, remove the casserole from the oven and let it cool for about 5 minutes. To serve, garnish with chopped green onions and a sprinkle of sesame seeds for added crunch and visual appeal.


![- 1 pre-made pizza dough - 1/2 cup fresh basil pesto - 1 cup shredded mozzarella cheese - 1 medium lemon (zested and juiced) - 1 cup cherry tomatoes, halved - 1/4 cup finely grated Parmesan cheese - 1 tablespoon extra-virgin olive oil - Salt and freshly ground black pepper to taste - Fresh basil leaves for garnish - Additional toppings (e.g., olives, peppers) - Alternative cheese options (feta, goat cheese) To make a great Lemon Basil Pesto Pizza, you need these ingredients. They work together to create a fresh, bright flavor. First, the pre-made pizza dough saves time and makes this recipe easy. You can find it in stores. Fresh basil pesto adds a rich, herby taste. It’s the star of this dish. Shredded mozzarella cheese melts beautifully. It gives that familiar cheesy texture we love. The lemon zest and juice bring a tangy punch. Cherry tomatoes add sweetness and color. Grated Parmesan cheese gives a nutty, salty flavor. The olive oil helps everything blend well. Salt and pepper round out the taste. For those who want to mix things up, you can add more toppings. Olives and peppers are great choices. You might also try different cheeses like feta or goat cheese for a twist. With these simple and tasty ingredients, you’re on your way to making a delightful pizza. For the full recipe and step-by-step guide, check out the [Full Recipe]. 1. Preheat your oven to 475°F (245°C). If you have a pizza stone, place it in the oven. This helps the crust cook evenly. If not, use a baking sheet. 2. Lightly flour a clean surface. Roll out the pizza dough to your desired thickness. Make sure it fits your baking surface. 3. Once rolled out, move the dough onto parchment paper. This will help you transfer the pizza later. 1. Spread the fresh basil pesto over the dough. Leave a half-inch border for the crust. 2. Sprinkle the shredded mozzarella cheese over the pesto. Make sure it covers the whole pizza. 3. Add the halved cherry tomatoes on top of the cheese. This adds color and flavor. 4. Drizzle the extra-virgin olive oil over everything. Season with salt and freshly ground black pepper to taste. 5. Zest the lemon and sprinkle it evenly on the pizza. This adds a fresh citrus aroma. 1. Slide the parchment paper with the pizza onto the preheated pizza stone or baking sheet. 2. Bake for about 12-15 minutes. Look for a golden brown crust and bubbling cheese. 3. Carefully take the pizza out of the oven. Drizzle fresh lemon juice over the top. 4. Sprinkle grated Parmesan cheese over the warm pizza. Add fresh basil leaves for garnish. 5. Use a sharp knife or pizza cutter to slice the pizza into wedges. Serve hot for the best taste. You can find the Full Recipe for this delicious Lemon Basil Pesto Pizza above. To get the best crust, I recommend using a pizza stone. It heats up and gives your pizza a crispy base. If you don’t have one, a baking sheet works too. Just make sure you preheat it well. Roll your pizza dough to the right thickness. Aim for about a quarter-inch thick. This allows for a nice rise and crunch without being too thin. For flavor, balance the saltiness with fresh lemon juice. A squeeze of lemon brightens up the taste. It makes the pizza feel fresh and lively. Use only fresh ingredients. Fresh basil, ripe tomatoes, and good cheese make a big difference. They add depth and vibrancy to your dish. When serving, place the pizza on a rustic wooden board. It adds a nice touch. You can also use a colorful platter for a fun look. Garnish with whole basil leaves and a lemon wedge. This makes it visually appealing and invites your guests to dig in. Serve it hot for the best taste! For the full recipe, check out the complete details above. {{image_4}} You can switch up the sauce for your pizza. Tomato sauce works well if you want a classic taste. You can also try a creamy white sauce. This adds a rich flavor that pairs nicely with lemon. Seasonal pesto is another fun option. You can make it with fresh herbs like parsley or cilantro. This gives a new twist to your dish. If you need a gluten-free pizza, several dough options are available. Many stores sell gluten-free pizza crusts. You can also make your own using almond flour or cauliflower. For those who follow a vegan diet, you can skip the cheese. There are many tasty vegan cheese substitutes. Look for brands made from nuts or soy for a creamy texture. Toppings can make your pizza unique. Popular choices include pepperoni, mushrooms, and bell peppers. Try mixing and matching your favorites. Seasonal vegetables add color and flavor. In summer, fresh zucchini or bell peppers work well. In winter, roasted butternut squash or kale can be a great choice. Don't be afraid to get creative with your toppings! To keep your Lemon Basil Pesto Pizza fresh, let it cool to room temperature. This step is key to avoid moisture buildup. Wrap each slice in plastic wrap or aluminum foil. You can also place them in an airtight container. This helps retain flavor and texture. Store the pizza in the fridge for up to three days. For best results, enjoy it within this time frame. When it's time to eat leftovers, you can use either an oven or a microwave. The oven is best for maintaining crispiness. Preheat your oven to 375°F (190°C). Place the pizza on a baking sheet and heat for about 10 minutes. This warms it up well without making it soggy. If you choose the microwave, place a slice on a microwave-safe plate. Add a cup of water next to it. This helps keep the crust from getting too chewy. Heat in 30-second intervals until warm. But remember, the microwave won't keep it crispy. For the best taste, the oven is your friend! Use these tips to enjoy your pizza even after the first delightful slice. For the full recipe, check out the complete article. To make your own basil pesto, you need a few simple ingredients. Combine fresh basil, garlic, pine nuts, Parmesan cheese, and olive oil in a food processor. Blend until smooth. Adjust the taste with salt and pepper. This mix adds great flavor to your pizza. Yes, you can freeze lemon basil pesto pizza. First, let the pizza cool completely. Then, wrap it in plastic wrap and place it in a freezer bag. It can last for up to three months. When you are ready to eat, bake it straight from the freezer. This makes a quick meal! Several side dishes pair well with lemon basil pesto pizza. Here are some of my favorites: - A light green salad with vinaigrette - Garlic bread for a crunchy side - Roasted vegetables for added flavor These sides balance the pizza's taste and make for a complete meal. To cut your pizza into even slices, use a sharp pizza cutter or knife. Start by cutting it in half, then cut each half into smaller sections. Aim for 8 slices for a standard pizza. This way, everyone gets a fair share! You can find high-quality pre-made pizza dough at many grocery stores. Look in the refrigerated section or the freezer aisle. Some local pizzerias also sell their dough. If you want a special option, check out artisan bakeries. They often have fresh dough made with quality ingredients. In this pizza guide, we covered essential ingredients, step-by-step instructions, and useful tips. You learned how to customize your pizza and store leftovers. Remember, fresh ingredients make a big difference in taste. If you try different toppings or variations, have fun with it! I believe cooking should be enjoyable and creative. Follow these steps, and you’ll create delicious pizza every time. Enjoy your cooking adventure!](https://dishtreats.com/wp-content/uploads/2025/06/c2cede7a-626b-4fd1-91be-1b09c425b287-768x768.webp)
![To make crispy cauliflower tacos, gather these key ingredients: - 1 head of cauliflower, separated into bite-sized florets - 1 cup panko breadcrumbs - 1 teaspoon smoked paprika - 1 teaspoon garlic powder - 1 teaspoon onion powder - 1/2 teaspoon cayenne pepper (adjust to your spice level) - Salt and pepper to taste - 1 cup all-purpose flour - 1 cup plant-based milk (or regular milk) - Corn tortillas (for assembling the tacos) - 1 ripe avocado, sliced - 1 cup shredded red cabbage - Fresh cilantro, for garnishing - Lime wedges, for serving You can swap some ingredients based on your needs. Here are some ideas: - Use gluten-free flour instead of all-purpose flour. - Replace panko with crushed cornflakes for a different crunch. - Try almond milk or oat milk instead of plant-based milk. - Use different spices, like chili powder or cumin, for a unique flavor. To make your tacos even more delicious, consider these toppings: - Fresh salsa for a burst of flavor. - Pickled onions for a tangy kick. - Crumbled feta or queso for creaminess. - Radish slices for added crunch. - A drizzle of hot sauce for some heat. For the full recipe, refer back to the earlier section. Enjoy creating your crispy cauliflower tacos! Start by preheating your oven to 425°F (220°C). This ensures even cooking and crispiness. Next, take your head of cauliflower and separate it into bite-sized florets. Make sure the pieces are not too big. Smaller florets cook faster and get crispier. Now, let’s set up your breading station. Get three bowls in a row. In the first bowl, add one cup of all-purpose flour. In the second bowl, pour one cup of plant-based milk (or regular milk). In the third bowl, mix one cup of panko breadcrumbs with one teaspoon of smoked paprika, one teaspoon of garlic powder, one teaspoon of onion powder, and half a teaspoon of cayenne pepper. Add salt and pepper to taste. Stir the breadcrumbs well to spread the spices evenly. Once your cauliflower is ready and your breading station is set, it’s time to coat the florets. Dip each floret into the flour first. Make sure it’s fully coated, then shake off the excess. Next, dip the floret into the plant-based milk, letting any extra drip off. Finally, roll it in the breadcrumb mixture, pressing gently. Place the breaded florets on a lined baking sheet, leaving space between them. Now, slide the baking sheet into your preheated oven. Bake for 25-30 minutes. Flip the florets halfway through to ensure they brown evenly. When they turn golden and crispy, they’re ready! Enjoy your crispy cauliflower tacos with all the tasty toppings from the Full Recipe. To get that crunch, the key is the panko breadcrumbs. They create a light and crispy coating. Make sure to coat each cauliflower floret well. When you bake them, place them evenly on the sheet. This allows hot air to circulate, making them crispier. Spice up your tacos with smoked paprika and cayenne pepper. They add a nice kick. You can also mix in herbs like cumin or oregano for extra depth. Don't forget to season with salt and pepper. Taste the breadcrumbs before coating the cauliflower to ensure they are flavorful. For the best serving experience, warm your corn tortillas before filling them. This makes them pliable and tasty. Layer your tacos with fresh avocado and shredded cabbage. Top with chopped cilantro and a squeeze of lime for brightness. For an extra treat, serve with a side of salsa or hot sauce. If you want the full recipe, check out the Crispy Cauliflower Tacos section. {{image_4}} You can easily make these tacos vegan. Use plant-based milk instead of regular milk. For the breading, stick to vegan-friendly panko breadcrumbs. This keeps the flavor and crunch you want. To make these tacos gluten-free, swap regular flour with a gluten-free all-purpose blend. Gluten-free panko will also work well for the breading. This way, everyone can enjoy these tasty tacos. You can change the flavor of your tacos. For a spicy kick, add more cayenne pepper or some chili powder. If you prefer sweet, try adding a drizzle of agave syrup or honey. For a savory twist, consider using smoked paprika or a dash of soy sauce in the batter. Each variation brings a new taste adventure to your table. To store leftover tacos, place them in an airtight container. Separate the crispy cauliflower and tortillas if you can. This keeps the tortillas from getting soggy. Store in the fridge for up to three days. When you are ready to eat, you can reheat them for the best taste. To reheat, place the cauliflower on a baking sheet. Preheat your oven to 350°F (175°C). Bake for about 10-15 minutes until crispy again. For the tortillas, heat them in a dry pan for a minute on each side. This helps to keep them warm and flexible. If you want to freeze the tacos, wrap each taco tightly in plastic wrap. Place them in a freezer-safe bag to avoid freezer burn. They can last up to a month in the freezer. When ready to eat, thaw them overnight in the fridge and reheat as mentioned above. Enjoy the great taste even after storage! For the full recipe, refer back to the beginning of the article. To make your cauliflower tacos crispier, follow these tips: - Use Panko Breadcrumbs: They are lighter and create a better crunch than regular breadcrumbs. - Double Coat: For extra crunch, dip the florets in flour, then milk, and roll in breadcrumbs twice. - Bake at High Heat: Ensure your oven is at 425°F (220°C) for that golden finish. - Don’t Crowd the Pan: Space the florets on the baking sheet. This helps them crisp all over. - Flip Regularly: Halfway through baking, flip the florets to cook evenly. By using these steps, you'll achieve a wonderfully crispy texture every time. Yes, you can use different tortillas! Here are some options: - Flour Tortillas: These are soft and great for holding fillings. - Whole Wheat Tortillas: A healthier choice with more fiber. - Lettuce Wraps: For a low-carb option, try using large lettuce leaves. - Taco Shells: Crunchy taco shells add a fun twist. Choose the tortilla that fits your taste and dietary needs. Pair your crispy cauliflower tacos with these delicious side dishes: - Mexican Rice: Fluffy rice with spices complements the tacos well. - Black Beans: A protein-rich side that adds flavor and nutrition. - Guacamole: Creamy and fresh, it’s always a hit. - Corn Salad: A sweet and tangy salad brightens the meal. - Grilled Vegetables: Charred veggies bring a smoky flavor that pairs nicely. These sides will enhance your taco experience and create a full, flavorful feast. For the complete recipe, check out the [Full Recipe]. This blog covered ingredients, steps, tips, variations, and storage for cauliflower tacos. You learned how to prep, bread, and bake for that perfect crunch. I shared useful flavor boosts and serving ideas. You can explore vegan and gluten-free options to suit your needs. Finally, I provided storage tips to keep leftovers fresh. Cauliflower tacos are fun and flexible. Enjoy making them your own!](https://dishtreats.com/wp-content/uploads/2025/07/b9e73b78-f0ec-4a59-80bf-257d8f9aee98-768x768.webp)


