
Looking for a refreshing meal that boosts your energy? My Summer Berry Spinach Salad checks all the boxes! Packed with colorful fruits, creamy feta, and crunchy almonds, this salad is a feast for your taste buds. It’s healthy, easy to make, and perfect for hot summer days. Follow my simple steps, and you’ll impress everyone at your next gathering. Let’s dive into the vibrant flavors and tasty ingredients!
Why I Love This Recipe
- Fresh and Vibrant: This salad features a delightful mix of fresh spinach and seasonal berries, creating a refreshing dish perfect for warm days.
- Textural Harmony: With the creamy feta, crunchy almonds, and juicy berries, every bite offers a wonderful contrast of textures.
- Easy to Prepare: In just 15 minutes, you can whip up this salad, making it a quick and healthy option for any meal.
- Customizable: This recipe is versatile; you can swap ingredients based on your preference or what’s in season.
Ingredients
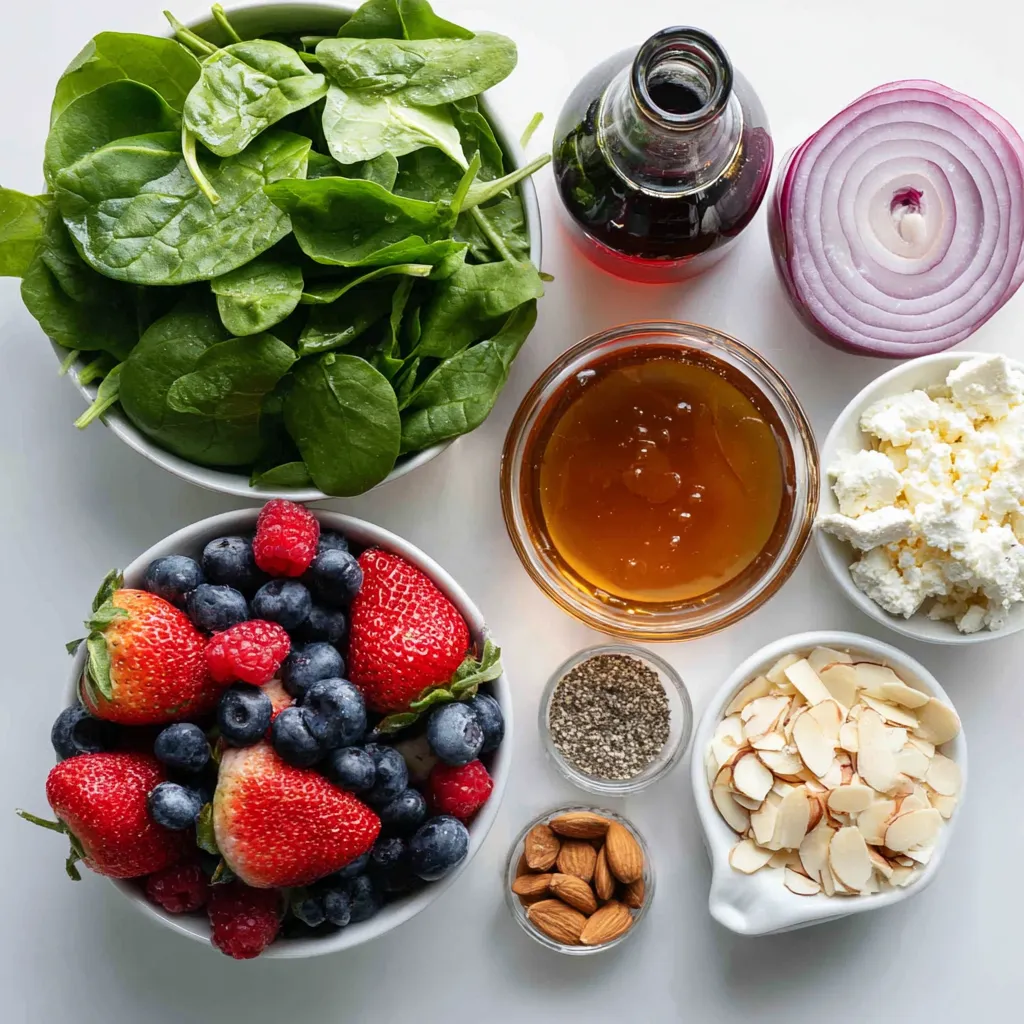
Fresh Produce
– 4 cups fresh spinach
– 1 cup mixed berries (strawberries, blueberries, raspberries)
Dairy and Nuts
– 1/2 cup crumbled feta cheese
– 1/4 cup sliced almonds
Dressings and Seasonings
– 1/4 cup balsamic vinaigrette dressing
– 1 tablespoon honey
– Salt and freshly ground black pepper
For a great salad, use fresh, high-quality ingredients. Start with fresh spinach. It gives the salad a nice base. Use bright, colorful mixed berries. Strawberries, blueberries, and raspberries work well together. They add sweetness and a pop of color.
Next, crumbled feta cheese adds creaminess. It pairs perfectly with the berries. The salty flavor of the feta contrasts nicely with the sweet berries. For a bit of crunch, add sliced almonds. They bring texture and nutty flavor.
Now for the dressing! A balsamic vinaigrette gives the salad a tangy kick. Mixing in honey adds a hint of sweetness. The balance of flavors will make your taste buds dance. Finally, sprinkle salt and pepper to taste. These simple seasonings enhance all the flavors.
With these fresh ingredients, your Summer Berry Spinach Salad will be both energizing and healthy!
Step-by-Step Instructions
Preparing the Salad Base
Start by washing 4 cups of fresh spinach. Use cold water to clean the leaves well. After washing, dry the spinach using a salad spinner or paper towels. This step removes extra water and makes the salad crisp. Next, place the spinach in a large bowl. Now, it’s time to add those vibrant berries. Scatter 1 cup of mixed berries over the spinach. Use slices of strawberries, whole blueberries, and plump raspberries. This mix adds color and flavor.
Adding Creaminess and Crunch
Now, let’s make this salad even better. Sprinkle 1/2 cup of crumbled feta cheese over the berries. The feta gives a creamy touch that balances the sweet berries. Then add 1/4 cup of sliced almonds. These almonds add a nice crunch. The mix of textures makes every bite exciting.
Making the Dressing
In a small bowl, whisk together 1/4 cup of balsamic vinaigrette and 1 tablespoon of honey. This dressing adds sweetness and tang. Whisk until it gets thick and smooth. A good dressing ties all the flavors together, so make sure to mix well.
Combining Ingredients
Gently drizzle the dressing over the salad. Aim for even coverage on all the greens and berries. Then, carefully toss the salad. Do this gently so the berries stay whole. Finally, taste the salad and add salt and freshly ground black pepper. Adjust the seasoning to your liking. This simple step makes a big difference in flavor. Enjoy your delicious Summer Berry Spinach Salad!
Tips & Tricks
Serving Suggestions
To serve this salad in style, use a large wooden bowl. This adds a rustic touch that feels warm and inviting. Garnish the top with a few whole berries and extra sliced almonds. This makes the salad look bright and colorful. It invites everyone to dig in. You can also use clear glass bowls to show off the vibrant colors.
Enhancing Flavor
If you want to adjust the sweetness, add more honey to the dressing. For a bit more zing, you can add a splash of lemon juice. If the salad feels too tart, a pinch of sugar can balance the taste. You can also change the texture by adding crunchy toppings. Try sunflower seeds or pumpkin seeds for a different feel.
Preparing Ahead of Time
Meal prep can save you time. You can wash and dry the spinach earlier in the day. Keep it in a sealed container in the fridge. You can also pre-slice the berries, but keep them separate. Mix the dressing ahead of time too. Store it in a small jar and shake it before use. This way, your salad is ready in minutes!
Pro Tips
- Freshness is Key: Always use the freshest spinach and berries to ensure your salad is vibrant and packed with flavor.
- Customize Your Nuts: Feel free to substitute the almonds with walnuts or pecans for a different flavor and crunch.
- Make-Ahead Dressing: Prepare the balsamic vinaigrette in advance and store it in the fridge for an easy, quick assembly later.
- Chill Before Serving: For a refreshing experience, refrigerate the salad for about 15 minutes before serving to let the flavors meld.
Variations
Seasonal Additions
You can make your Summer Berry Spinach Salad even more exciting by adding seasonal fruits. Consider adding peaches or nectarines in late summer. Their sweet and juicy flavor pairs well with the berries. Apples in fall also add a crunchy texture. You can try different combinations to keep your salad fresh and fun.
Dietary Adjustments
If you want to make this salad dairy-free, skip the feta cheese. You can add avocado for a creamy feel. For nut-free options, leave out the sliced almonds. Try using sunflower seeds or pumpkin seeds instead. They add a nice crunch without nuts. Both options keep the salad tasty and safe for everyone.
Flavor Infusions
Changing the dressing can give this salad a new twist. Try a citrus vinaigrette with lemon and olive oil for a zesty kick. You can also use a creamy ranch or a spicy chipotle dressing for a bold flavor. Toppings like grilled chicken or quinoa can make it more filling. Experimenting with dressings and toppings keeps your salad interesting every time you make it.
Storage Info
Storing Leftovers
To keep your Summer Berry Spinach Salad fresh, store it in an airtight container. Make sure to place it in the fridge right after serving. This helps lock in the flavors and keeps the greens crisp. If you have extra dressing, store it separately. This will prevent the salad from getting soggy.
Reheating/Serving
This salad is best served cold. If you want to enjoy it later, do not heat it. Instead, just take it out of the fridge and let it sit for a few minutes. This way, you can enjoy the fresh taste of the berries and the crunch of the almonds.
Storage Duration
The salad stays fresh for about 1 to 2 days in the fridge. After that, the spinach may wilt, and the berries may lose their flavor. If you notice any signs of spoilage, it’s best to toss it out. Always check freshness before eating.
FAQs
Can I make this salad ahead of time?
Yes, you can make this salad ahead of time. To keep it fresh, store the spinach and berries separately. This keeps the spinach from wilting. You can prepare the dressing in advance too. Just mix the balsamic vinaigrette and honey. Combine everything just before serving for the best taste.
What other fruits can I include in this salad?
You can add many fruits to this salad. Kiwi adds a fun twist. Sliced peaches or nectarines work well too. Even diced apples can add crunch. Just keep the mix colorful and fresh!
Is this salad gluten-free?
Yes, this salad is gluten-free. All the ingredients are safe for those with gluten issues. Always check labels when buying dressings. Some may have gluten, so it’s good to be careful.
How can I make my own balsamic vinaigrette?
Making your own balsamic vinaigrette is easy. Here’s a simple recipe:
– 1/4 cup balsamic vinegar
– 1/2 cup olive oil
– 1 teaspoon Dijon mustard
– Salt and pepper to taste
Whisk the vinegar, mustard, salt, and pepper together. Slowly add the olive oil while whisking until it’s smooth. This dressing is tasty on many salads!
This blog post outlined a delightful salad made with fresh spinach, mixed berries, and feta cheese. You learned step-by-step how to prepare, dress, and serve this vibrant dish. Tips on presentation, flavor adjustments, and meal prep help enhance your experience. You can also explore variations to fit your dietary needs. Remember, this salad is easy to customize and store. It stays fresh in the fridge for a few days. Enjoy experimenting with new flavors and ingredients to make it your ow


