Strawberry Pretzel Salad Cups Delightful and Simple Treat

If you’re looking for a fun and tasty dessert, Strawberry Pretzel Salad Cups are your answer! These delightful treats blend salty pretzels, creamy cheese, and fresh strawberries into one perfect bite. In this blog post, I will guide you step-by-step on how to make these easy-to-follow cups, along with tips for delicious variations and storage. Let’s dive in and turn a classic recipe into an impressive dessert for any occasion!
Ingredients
List of Ingredients for Strawberry Pretzel Salad Cups
- 1 cup crushed pretzels
- 1/2 cup unsalted butter, melted
- 1/4 cup granulated sugar
- 8 oz cream cheese, softened
- 1 cup powdered sugar
- 1 cup whipped topping (such as Cool Whip)
- 2 cups fresh strawberries, hulled and sliced
- 1 cup strawberry gelatin powder
- 2 cups boiling water
- 1 cup cold water
To make Strawberry Pretzel Salad Cups, you need simple ingredients. First, crushed pretzels form the base. They give a salty crunch. You mix them with melted butter and sugar. This mixture makes a tasty crust.
Next, you need cream cheese. It gives a rich and creamy layer. Powdered sugar sweetens this mix. Whipped topping adds lightness. Together, they create a smooth filling.
The star of the show is fresh strawberries. They add bright flavor and color. Strawberry gelatin powder helps set the dessert. You mix it with boiling water, then cold water. This mixture becomes a sweet layer over the cream cheese.
Gather your ingredients. They come together to make a fun and tasty treat. Enjoy the mix of salty pretzels and sweet strawberry goodness!
Step-by-Step Instructions
Preheating and Preparing the Crust
First, preheat your oven to 350°F (175°C). This helps the crust bake perfectly. In a medium bowl, mix 1 cup of crushed pretzels, 1/2 cup of melted butter, and 1/4 cup of granulated sugar. Stir until the pretzels are well-coated. Next, press this mixture firmly into the bottom of a greased muffin tin. Bake for about 10 minutes until it’s slightly golden. Let the crust cool completely before adding the filling.
Making the Cream Cheese Mixture
While the crust cools, grab another bowl. Beat 8 oz of softened cream cheese with 1 cup of powdered sugar. Mix until smooth and creamy. Now, gently fold in 1 cup of whipped topping, like Cool Whip. This will make your mixture light and fluffy.
Assembling the Dessert Cups
Now it’s time to prepare the strawberry layer. In a medium bowl, dissolve 1 cup of strawberry gelatin powder in 2 cups of boiling water. Stir until fully dissolved. Then, add 1 cup of cold water and mix well. Allow this mixture to cool slightly, then fold in 2 cups of hulled and sliced strawberries.
Next, spoon a layer of the cream cheese mixture into each muffin cup. Smooth the tops with a spatula. Carefully pour the strawberry mixture over the cream cheese layer in each cup, ensuring it’s evenly distributed.
Cover the muffin tin with plastic wrap and refrigerate for at least 4 hours. This allows the gelatin to set and hold its shape. Once set, gently run a knife around the edges to loosen the cups. Place them on a nice serving platter to impress your guests.
Tips & Tricks
Tips for Perfecting Your Strawberry Pretzel Salad Cups
- How to avoid a soggy crust
To keep the crust crispy, bake it until golden brown. Let the crust cool before adding the cream cheese layer. This step keeps moisture from making the crust soggy.
- Ensuring even distribution of layers
When adding the cream cheese mixture, use a spatula to spread it evenly. For the strawberry layer, pour gently to cover the cream cheese. This way, each cup has a balanced taste.
Presentation Suggestions
- Creative garnish ideas for serving
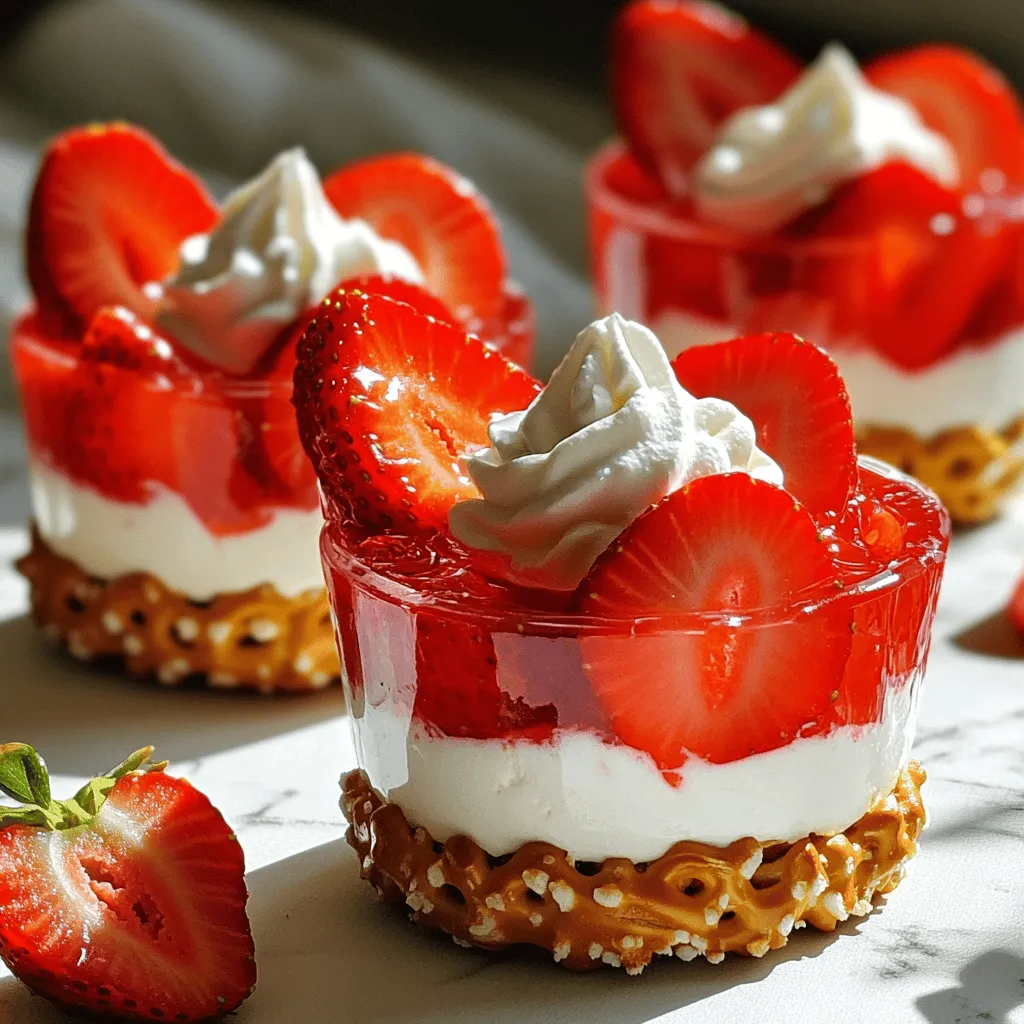
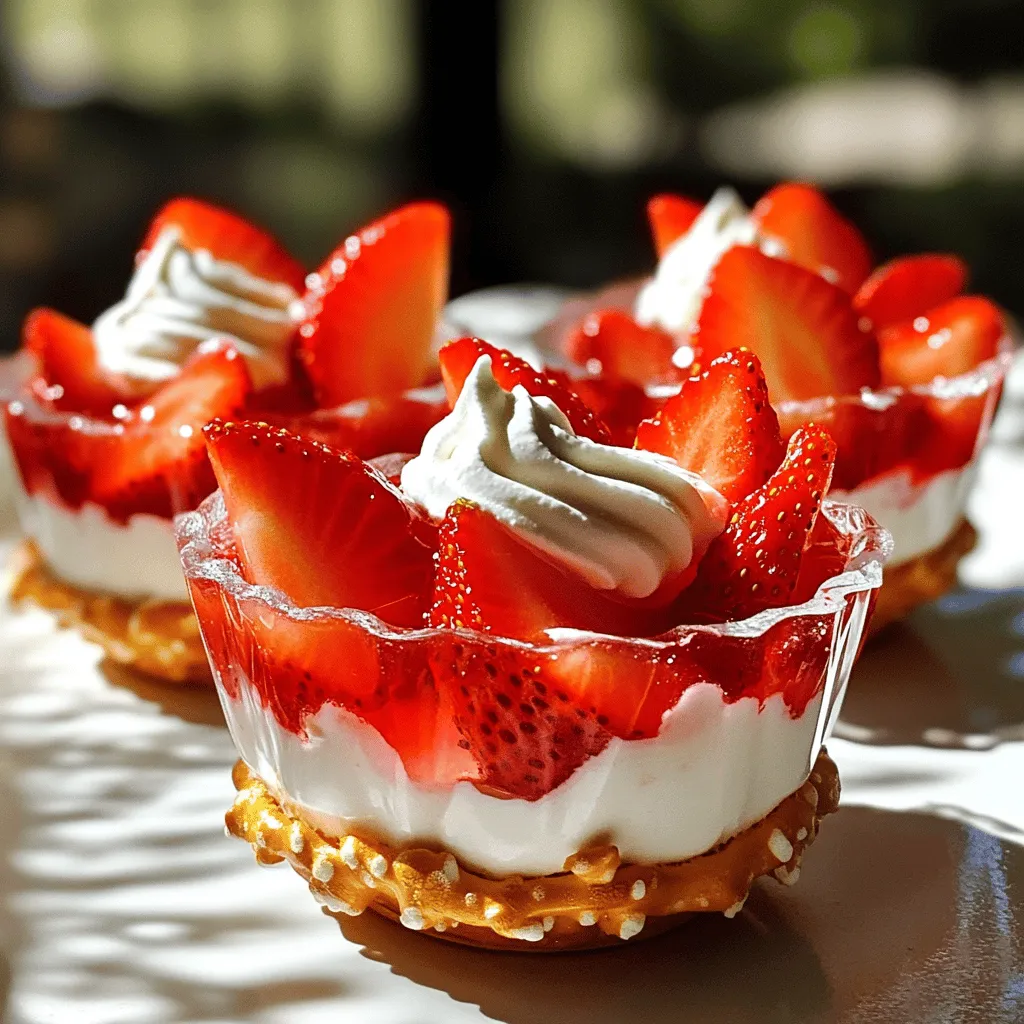
Top each cup with extra strawberry slices or a dollop of whipped topping. A sprinkle of crushed pretzels adds a nice crunch, making each cup pop.
- Choosing the right serving platter
Use a colorful or decorative platter to display your cups. A fun serving dish draws attention and makes your dessert look even more inviting.

Variations
Ingredient Substitutions
You can switch out the cream cheese if you want. Try using Greek yogurt for a lighter option. Silken tofu is a great vegan choice too. For whipped topping, you can use coconut cream. It adds a nice flavor and is dairy-free.
If you want to change the fruit, strawberries are not the only option. Blueberries, raspberries, or peaches can also work well. Each fruit brings a different taste and color. You can mix and match fruits for fun flavors.
Flavor Variations
Get creative with the gelatin! Instead of strawberry, you can try raspberry or peach gelatin. Each one brings a unique twist. You can also use sugar-free gelatin if you’re looking to cut calories.
Want to add a little more fun? Sprinkle some chocolate chips on top. Drizzling melted chocolate can also be tasty. It adds a sweet touch and looks great too! You can even mix in nuts for crunch.
Storage Info
How to Store Leftover Cups
To keep your Strawberry Pretzel Salad Cups fresh, place them in a sealed container. This helps keep moisture out. Store them in the fridge for up to three days. If you don’t plan to eat them soon, avoid adding fresh strawberries on top. This will help keep them from getting soggy.
Freezing Tips
Can you freeze Strawberry Pretzel Salad Cups? Yes, you can freeze them. However, the texture will change a bit. To freeze, wrap each cup tightly in plastic wrap. Then, place them in a freezer bag. This way, they stay safe from freezer burn. When you’re ready to eat, take them out and thaw them in the fridge overnight. Do not refreeze them after thawing. Enjoy your sweet treat!
FAQs
What is Strawberry Pretzel Salad Cups?
Strawberry Pretzel Salad Cups are sweet and salty. They have three main layers. The bottom layer is a crunchy pretzel crust. The middle layer is a creamy mix of cream cheese and whipped topping. The top layer is a vibrant strawberry gelatin filled with fresh strawberries. Each cup is a delightful bite of flavor and texture.
Can I make these ahead of time?
Yes, you can make these cups a day or two ahead. Just prepare the cups and store them in the fridge. Cover them well with plastic wrap. This keeps them fresh and tasty. Making them ahead saves time for parties or gatherings.
How long do they take to set?
These cups need about four hours in the fridge to set. I recommend making them in the morning for an evening event. The gelatin layer should feel firm when ready to serve. You can also check by gently touching the top.
What do I do if I want to make a larger batch?
You can easily double the recipe for larger gatherings. Use two muffin tins instead of one. Just remember to adjust your cooking times if needed. Keep an eye on your crusts while baking. They should still be golden and crisp.
Strawberry Pretzel Salad Cups are a fun and tasty treat. We covered ingredients, step-by-step instructions, and helpful tips. You learned how to assemble and store these delicious dessert cups. Experiment with flavors and ingredients to make them your own. These cups are perfect for parties or a sweet snack. Enjoy creating and sharing this delightful dessert!


![- 2 cups watermelon, diced into bite-sized cubes - 1 cup fresh pineapple, diced - 1 cup ripe mango, peeled and diced - 1 cup strawberries, hulled and sliced - 1 cup plump blueberries - 1 tablespoon pure honey - 2 tablespoons freshly squeezed lime juice - 1 teaspoon finely grated lime zest - Fresh mint leaves, for a lovely garnish When picking fruits, look for bright colors and firm textures. Choose watermelon that feels heavy for its size. Make sure the skin is smooth and free from blemishes. For pineapple, smell the base; a sweet scent means it's ripe. Ripe mangoes should yield slightly when you press them. Strawberries should be bright red, without white tips. Pick blueberries that are firm and plump, with a deep color. This fruit salad is not just tasty; it’s also packed with nutrients. Watermelon is hydrating and low in calories. Pineapple provides vitamin C and enzymes that aid digestion. Mango is rich in antioxidants and vitamins A and C. Strawberries boost heart health due to their high fiber and vitamin C content. Blueberries are known for their powerful antioxidants. The honey adds a natural sweetness, while lime juice helps with vitamin C and adds a zesty kick. Each bite not only delights your taste buds but also nourishes your body. First, gather all your fruits. You will need watermelon, pineapple, mango, strawberries, and blueberries. Wash each fruit well to remove any dirt. Dice the watermelon into cubes. Cut the pineapple and mango into small pieces. Hull and slice the strawberries. Finally, add the blueberries. Place all the fruit into a large mixing bowl. Be gentle while mixing to keep the fruit intact. In a separate small bowl, combine one tablespoon of honey with two tablespoons of freshly squeezed lime juice. Add one teaspoon of finely grated lime zest for extra flavor. Whisk the mixture together until it is smooth and well-blended. This honey lime dressing will add a sweet and tangy flavor to your salad. Now, drizzle the honey lime dressing over the fruit. Make sure to cover every piece of fruit for the best taste. Use a gentle motion to toss the salad. This helps the dressing coat all the fruit without mashing it. Let the salad sit for about 10 minutes. This resting time allows the flavors to blend well. When ready to serve, garnish with fresh mint leaves. This adds a lovely touch to your fruit salad. Enjoy your Honey Lime Fruit Salad Delight! For a full recipe, visit the [Full Recipe]. Cutting fruit can be fun and easy. Start with a sharp knife for safety. For watermelon, slice it in half. Then, cut each half into thick wedges. Remove the rind and dice the flesh into cubes. Pineapple is best peeled and cored first. Cut the fruit into thick slices, then dice. For strawberries, remove the green tops and slice them. Keep your cuts even for a pretty look. You can add more fun to the salad. Try adding a splash of orange juice. This will give it a citrus twist. You can also mix in a pinch of cinnamon for warmth. Chopped nuts like almonds or walnuts add crunch. If you like creamy, add a dollop of yogurt. These extra flavors make the salad pop! Make your fruit salad shine with great presentation. Use a clear glass bowl to show off the colors. You can layer the fruits for a rainbow effect. Garnish with mint leaves on top for a fresh touch. A few extra blueberries scattered around add visual flair. Serve with colorful spoons for added fun. Remember, we eat with our eyes first! {{image_4}} You can switch up fruits in your Honey Lime Fruit Salad. Try using peaches or nectarines for a juicy twist. Grapes add a nice pop, and kiwi brings a tart flavor. You might also add oranges for an extra citrus kick. Mix and match based on your taste! Change your fruit salad with the seasons. In summer, use berries and stone fruits for freshness. Fall is great for apples and pears, while winter calls for citrus fruits like clementines and grapefruits. Spring gives you the chance to add strawberries and rhubarb for a bright taste. Add nuts or seeds for a crunchy texture. Almonds and walnuts are perfect options. If you prefer seeds, sprinkle in some pumpkin or sunflower seeds. These additions not only improve texture, but they also boost the nutrition of your salad. Enjoy the added flavor and health benefits! Store leftover honey lime fruit salad in an airtight container. This keeps the fruit fresh and tasty. If you can, eat it within a day or two. The longer it sits, the softer the fruit may get. I recommend using glass or plastic containers with tight-fitting lids. These help lock in moisture and prevent spills. If you have smaller portions, use smaller containers for easy access. The salad stays fresh for about two days in the fridge. Keep it away from foods with strong odors. To refresh the taste, add a little more honey or lime juice before serving. If you notice any browning, remove those pieces before enjoying. For the full recipe, make sure to check the main article! Yes, you can make Honey Lime Fruit Salad a few hours ahead. However, I recommend serving it fresh. If you prepare it too early, the fruit may get soft and lose its crunch. If you decide to make it ahead, store it in the fridge. This keeps it cool and fresh. Just remember to add the dressing right before serving to keep the fruit juicy. The best fruits for Honey Lime Fruit Salad are those that are ripe and sweet. I love using: - Watermelon - Pineapple - Mango - Strawberries - Blueberries These fruits blend well together, creating a vibrant and tasty mix. You can also try using kiwi or grapes for extra flavor. The key is to choose fruits that you enjoy and that are in season. Yes, you can use another sweetener if you prefer. Options include agave syrup or maple syrup. These sweeteners work great in the dressing. Just keep in mind that the flavor may change slightly. I suggest starting with the same amount as the honey. You can always adjust it to your taste. For a sugar-free option, consider using a sugar substitute that you like. In this blog post, we explored how to make a tasty Honey Lime Fruit Salad. We discussed the key ingredients, tips for selecting fresh fruits, and the nutritional benefits they offer. You learned step-by-step instructions for preparation, dressing, and serving. We also shared tips for cutting fruits and enhancing flavor. Plus, variations for using different fruits and tips for storage were provided. Creating this salad is simple and rewarding. Enjoy it yourself or share it with friends. It’s a fun and healthy treat everyone will love.](https://dishtreats.com/wp-content/uploads/2025/07/a7fe8aa9-0619-4c4c-8a63-94d099c8a4d2-768x768.webp)


![To make this delightful chilled peach soup, gather these main ingredients: - 4 ripe peaches, peeled and pitted - 1 cup plain Greek yogurt - 1 cup almond milk - 2 tablespoons honey (or maple syrup for a vegan option) - Juice of 1 lemon - 1 teaspoon vanilla extract - A pinch of salt These ingredients create a creamy and fruity flavor. The ripe peaches give sweetness and vibrancy. Greek yogurt adds creaminess and protein. Almond milk keeps it light and smooth. Honey or maple syrup sweetens it naturally. Lemon juice brightens the taste, while vanilla adds warmth. For an extra touch, consider these garnishes: - Fresh mint leaves for garnish - Crushed pistachios for topping (optional) Mint leaves add a fresh burst of flavor and color. Crushed pistachios give a nice crunch and a nutty taste. You can easily swap out some ingredients if needed: - Use coconut yogurt instead of Greek yogurt for a dairy-free version. - Substitute regular milk for almond milk if you prefer. - Adjust the sweetener; agave nectar works well too. - Try adding a splash of orange juice for a different citrus note. These substitutions help you customize the soup to your taste or dietary needs. You still get a refreshing and delicious chilled peach soup with any of these changes. For the full recipe, visit the [Full Recipe]. Start by washing the peaches well. Peeling them is next. Use a sharp knife to cut the peaches into small, even chunks. This helps them blend smoothly. Remove the pits and add the chopped peaches to your blender. Now, it’s time to mix everything. Add the Greek yogurt, almond milk, honey, lemon juice, vanilla extract, and a pinch of salt to the blender with the peaches. Each ingredient enhances the flavor and texture of the soup. Blend the mixture on high speed. You want it to be smooth and creamy. If you like a little texture, pulse the blender a few times instead of blending non-stop. This gives you control over the final consistency. Taste the soup. If it needs more sweetness or tang, add more honey or lemon juice. Once blended, pour the soup into a bowl or pitcher. Cover it tightly and place it in the fridge for at least two hours. This chilling time allows flavors to mix well. When ready to serve, stir the soup again. Pour it into bowls and garnish with fresh mint leaves and crushed pistachios. For a fancy touch, use chilled bowls. This chilled peach soup is perfect for a light dessert or starter. For the full recipe, check out the details above! To select the best peaches, look for ripe, fragrant fruit. They should have a slight give when you gently press them. Avoid peaches with bruises or soft spots. Choosing freestone peaches makes your prep easier. These peaches separate cleanly from the pit. You can tweak the flavor of your chilled peach soup. If you want it sweeter, add more honey or maple syrup. For more tartness, squeeze in more lemon juice. Always taste as you go. This way, you find the perfect balance for your palate. When blending, start on low speed, then increase. This helps break down the peaches evenly. If you like some texture, pulse the blender a few times instead of blending fully. For a creamier soup, blend longer. Always check the consistency before serving. You want it smooth but not too thin. For more detailed steps, check the Full Recipe. {{image_4}} You can easily make this soup vegan. Just swap Greek yogurt for coconut yogurt. It adds a nice creaminess. Use maple syrup instead of honey for sweetness. You can also try different plant-based milk. Almond, oat, or soy milk work well too. This way, everyone can enjoy a tasty bowl of chilled peach soup. Want to spice it up? Add a pinch of cinnamon or ginger for warmth. These spices can add depth to the sweet peaches. Fresh herbs can make it even better. Try basil or rosemary for a unique twist. Just a small amount can change the flavor profile completely. To change the texture, consider using different fruits. Add diced mango or berries for a fruity crunch. You can also mix in some chia seeds for a fun texture. Blending in some silken tofu can make the soup creamier. Each variation brings a new taste and feel to your chilled peach soup. For the full recipe, check out the details above. Store leftover chilled peach soup in an airtight container. This keeps the soup fresh. Make sure to cool it first before sealing. If you don’t have a container, you can use plastic wrap. Just cover the bowl tightly. Chilled peach soup lasts about 3 to 5 days in the fridge. After that, it may lose its flavor and freshness. Always check for signs of spoilage before eating. If it smells sour or changes color, it's best to toss it. You can freeze chilled peach soup for up to 3 months. Pour it into freezer-safe containers, leaving some space at the top. This allows for expansion when frozen. To enjoy later, thaw it in the fridge overnight. Stir well before serving to restore its smooth texture. For the full recipe, see the section above. Serve chilled peach soup in a bowl or a small glass. I love using chilled bowls for that extra touch. You can drizzle a bit of almond milk on top. A mint leaf adds a great pop of color. This soup works well as a light starter or a refreshing dessert. Yes, you can use frozen peaches. Just make sure they are thawed first. This keeps the soup smooth and creamy. Frozen peaches may change the taste slightly, but they still taste great. Chilled peach soup is quite healthy. It has ripe peaches, Greek yogurt, and almond milk. These ingredients offer vitamins, protein, and healthy fats. The honey adds natural sweetness, making it a tasty and nutritious choice. Enjoy it without guilt! You can mix in other fruits like berries or mangoes. Simply chop them up and blend them with peaches. Adjust the sweetness to match the fruit you choose. This gives you a unique flavor every time. Enjoy experimenting with seasonal fruits for variety! Chilled peach soup is a refreshing treat. We covered the main ingredients, like fresh peaches, and how to blend them for the best flavor. I shared tips on choosing, storing, and even varying the recipe for vegan options. Remember, this soup is easy to make and fun to try. Enjoy exploring different flavors or garnishes to suit your taste. Now, it’s time to make your own chilled peach soup and savor each bite!](https://dishtreats.com/wp-content/uploads/2025/07/cde2237f-ab80-4fd7-9ae6-23109d9f52c0-768x768.webp)
