Strawberry Lemonade Cupcakes Delicious and Simple Treat

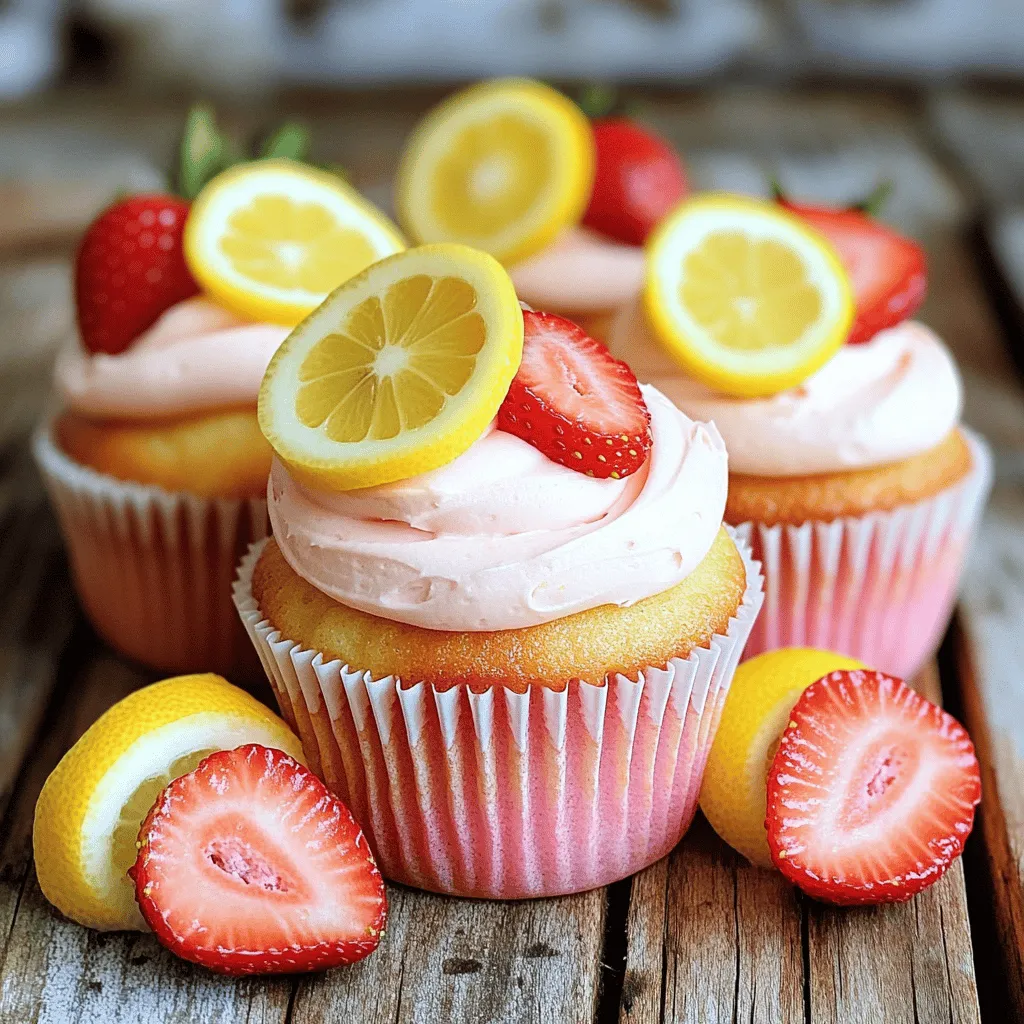
If you’re craving a sweet treat that bursts with flavor, look no further! Strawberry Lemonade Cupcakes are a simple and delicious choice. These cupcakes are bright, refreshing, and perfect for any occasion. With just a few basic ingredients and easy steps, you’ll impress friends and family with your baking skills. Let’s dive into this fun recipe and create a dessert that’s sure to delight!
Ingredients
Detailed List of Ingredients
To make delicious strawberry lemonade cupcakes, gather the following items:
- 1 ½ cups all-purpose flour
- 1 cup granulated sugar
- ½ cup unsalted butter, softened to room temperature
- 2 large eggs
- ½ cup buttermilk, at room temperature
- ¼ cup freshly squeezed lemon juice (about 1 large lemon)
- Zest of 1 large lemon
- 1 teaspoon baking powder
- ½ teaspoon baking soda
- ¼ teaspoon salt
- 1 cup fresh strawberries, pureed (about 6-8 strawberries)
- 1 teaspoon vanilla extract
- For the Frosting:
- 1 cup powdered sugar
- 4 oz cream cheese, softened to room temperature
- 2 tablespoons milk, as needed for consistency
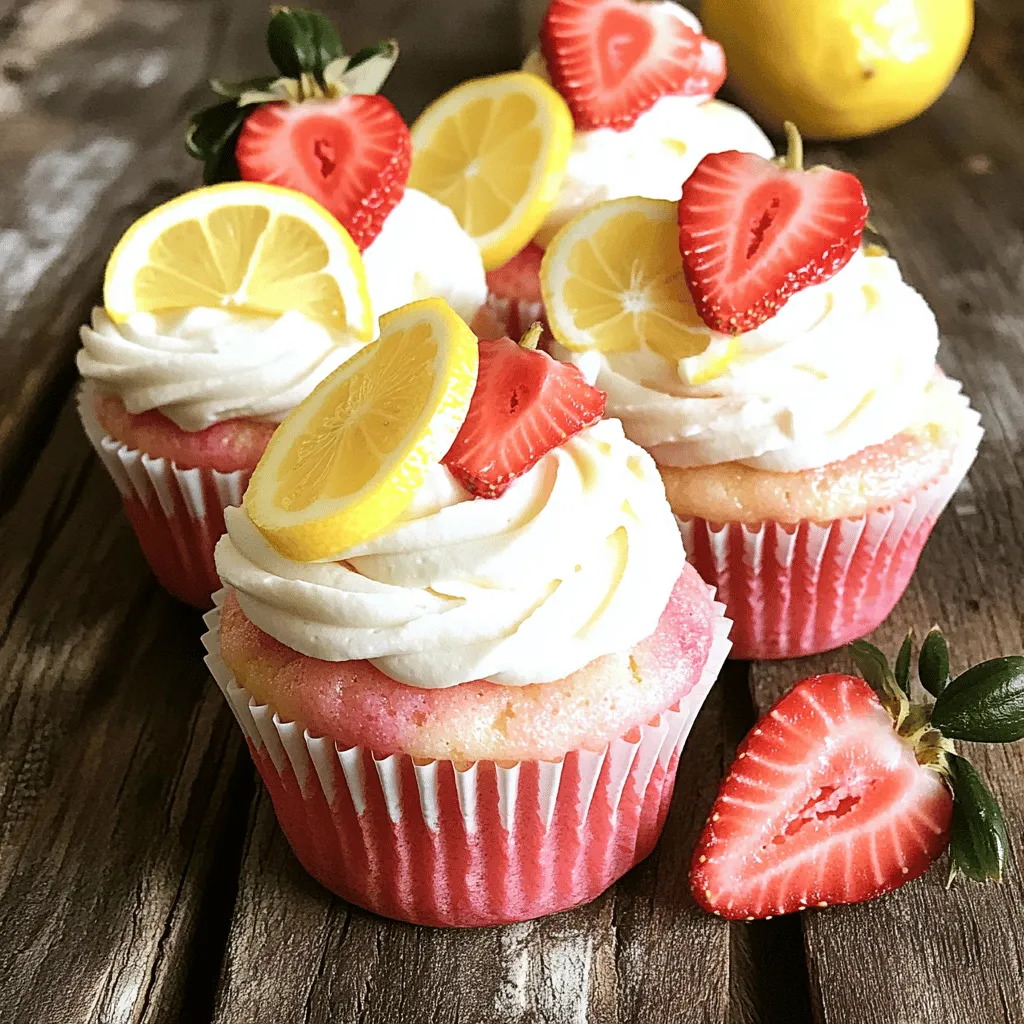
- Fresh strawberries and lemon slices for garnish (optional)
These ingredients combine to create a delightful treat. Each one plays a role in the final flavor and texture. The all-purpose flour gives structure, while the butter adds richness. The eggs help bind everything together. Buttermilk makes the cupcakes soft and moist. Fresh lemon juice and zest bring brightness, balancing the sweetness of the sugar. The strawberry puree adds a lovely color and flavor, making these cupcakes special.
When it comes to frosting, the cream cheese adds a tangy note that pairs perfectly with the cupcakes. The powdered sugar sweetens it up nicely. Adjust the milk to get the right frosting texture for spreading or piping.
These simple ingredients make a big impact, creating cupcakes that are fresh, fun, and full of flavor.
Step-by-Step Instructions
Preheating the Oven and Preparing the Muffin Tin
First, you need to preheat your oven. Set it to 350°F (175°C). This is the perfect temperature for baking your cupcakes. Next, take a muffin tin and line it with cupcake liners. Make sure the liners fit well. This helps the cupcakes come out easily after baking.
Mixing the Batter
Start by creaming the butter and sugar. In a large bowl, mix ½ cup of softened butter and 1 cup of granulated sugar. Use an electric mixer on medium speed. Beat until the mixture is light and fluffy, about 3-4 minutes.
Now, incorporate the eggs. Add 2 large eggs, one at a time. Mix well after adding each egg. This step helps to bind the batter. Next, mix in the wet ingredients. Pour in ½ cup of buttermilk, ¼ cup of fresh lemon juice, the zest of 1 lemon, and 1 teaspoon of vanilla extract. Mix on low speed until everything is just combined.
Combining Dry Ingredients and Baking
In a separate bowl, whisk together the dry ingredients. Combine 1 ½ cups of all-purpose flour, 1 teaspoon of baking powder, ½ teaspoon of baking soda, and ¼ teaspoon of salt. Make sure these are evenly mixed.
Gradually add the dry mix to the wet batter. Mix on low speed until just combined. Avoid overmixing; this keeps your cupcakes light. Now, fold in 1 cup of strawberry puree gently. This gives your batter a lovely pink color.
Once mixed, fill the cupcake liners. Pour the batter into the tins, filling each about 2/3 full. This allows space for the cupcakes to rise.
Finally, bake them. Place the muffin tin in the oven and bake for 18-20 minutes. Check their doneness with a toothpick. It should come out clean or with a few moist crumbs. When done, let the cupcakes cool in the pan for about 5 minutes. Then, transfer them to a wire rack to cool completely before frosting.
Tips & Tricks
Achieving the Perfect Cupcake Texture
To get the best cupcake texture, avoid overmixing your batter. When you combine your wet and dry ingredients, mix just until they are blended. Overmixing makes cupcakes tough. This is key for light and fluffy cupcakes.
Ensure your oven is at the right temperature. Preheat it to 350°F (175°C) before baking. An oven that’s too hot or too cold can ruin your cupcakes. Use an oven thermometer to check the real temperature.
Frosting Techniques
For creamy frosting, use softened cream cheese and powdered sugar. Mix them until smooth. If the frosting is too thick, add milk in small amounts. This helps you get a nice, spreadable texture.
When decorating, use a spatula or a piping bag. A piping bag gives a pretty look. Top with fresh strawberries or lemon slices to make them pop. Arrange the cupcakes on a nice platter to show off their beauty.
Flavor Enhancements
You can add lemon zest for a stronger lemon flavor. Just mix in a bit more zest when you combine wet ingredients. This gives your cupcakes an extra zing.
If you want to try alternate sweeteners, use honey or agave syrup. These can work well in place of sugar. Make sure to adjust the amount, as they are sweeter than regular sugar.

Variations
Strawberry Lemonade Cupcake Variations
You can make these cupcakes even more fun by adding other fruits. Raspberries and blueberries work great with the strawberry lemonade mix. They add a burst of flavor and color. Just be sure to chop them small. This helps them mix well into the batter.
If you need a gluten-free option, use gluten-free flour instead of all-purpose flour. Many brands offer good substitutes that work well in baking. This way, everyone can enjoy these tasty treats.
Frosting Variations
While the cream cheese frosting is delightful, you can switch it up! Try a whipped cream frosting. It’s light and fluffy, perfect for summer. Just whip heavy cream with some sugar and vanilla until it holds peaks.
Another delicious option is lemon buttercream. Mix softened butter with powdered sugar and fresh lemon juice. This will give you a bright, tangy flavor that pairs perfectly with your cupcakes.
Serving Suggestions
These cupcakes are perfect for any occasion. Pair them with a refreshing glass of lemonade or iced tea for a fun treat. The flavors complement each other well.
They also make a great addition to birthday parties or summer picnics. Serve them on a nice platter with fresh strawberries and lemon slices. This adds a lovely touch and makes your table look inviting!
Storage Info
Best Storage Practices
To keep your strawberry lemonade cupcakes fresh, store them at room temperature. Place them in an airtight container. This helps maintain their soft texture and flavor. Avoid leaving them uncovered; they can dry out quickly.
If you use frosting, be careful. Cream cheese frosting needs special care. Store frosted cupcakes in the fridge if you won’t eat them right away. This keeps the frosting from spoiling. Just remember to let them sit at room temperature for a bit before serving.
Freezing Cupcakes
You can freeze your cupcakes for later enjoyment. First, let them cool completely. Then, wrap each cupcake in plastic wrap. This prevents freezer burn and keeps them fresh. Place the wrapped cupcakes in a freezer-safe bag or container.
To thaw, simply take them out and leave them at room temperature. It usually takes a few hours. If you want to frost them after thawing, wait until they are fully thawed. This way, the frosting will stick better.
Shelf Life
Strawberry lemonade cupcakes stay fresh for about 3 to 4 days at room temperature. If stored in the fridge, they can last up to a week. Freezing extends their life to about 3 months. Just keep track of how long they have been stored. This ensures every bite is delicious and fresh!
FAQs
How do I know when the cupcakes are done baking?
To check if your cupcakes are done, use a toothpick. Insert it into the center of a cupcake. If it comes out clean or with a few moist crumbs, they’re ready. You can also look for a golden color on top and a springy texture when you lightly press on them. These signs show that the cupcakes are baked perfectly.
Can I make these cupcakes ahead of time?
Yes, you can make these cupcakes ahead of time. Bake them and let them cool completely. Store them in an airtight container at room temperature for up to two days. You can also freeze them for up to three months. Just wrap each cupcake in plastic wrap and place them in a freezer bag. When you’re ready to serve, thaw them at room temperature.
What can I substitute for buttermilk?
If you don’t have buttermilk, don’t worry! You can easily make a substitute. Mix one cup of milk with one tablespoon of vinegar or lemon juice. Let it sit for about five minutes. You can also use plain yogurt or sour cream. Just thin them with a little milk to get the right consistency. These options work well and keep your cupcakes moist and tasty.
We covered all the key details for making delicious strawberry lemonade cupcakes. From gathering your ingredients to tips on baking and frosting, I shared everything needed for success. Remember to store your cupcakes well for the best taste. Experiment with variations and serving ideas to impress others. Enjoy the baking process and the sweet results. Happy baking!


![- 1/2 cup rolled oats - 1 tablespoon cocoa powder - 1 tablespoon peanut butter - 1 cup almond milk - 1 tablespoon maple syrup - 1/2 teaspoon vanilla extract - A pinch of salt To create a bowl of chocolate peanut butter overnight oats, you need simple ingredients. Start with rolled oats; they act as the base. Cocoa powder adds rich chocolate flavor. Peanut butter gives a smooth, nutty taste. Use almond milk as a creamy liquid. Maple syrup sweetens the dish naturally. A touch of vanilla extract enhances the flavors. Finally, a pinch of salt brings everything together. - Sliced bananas - Chocolate chips - Crushed peanuts - Assorted fresh berries You can elevate your oats with fun toppings. Sliced bananas add sweetness and texture. Chocolate chips bring extra chocolate goodness. Crushed peanuts offer a nice crunch. Fresh berries brighten the dish with color and flavor. Choose your favorites or mix them up for a tasty treat. For the complete recipe, check out the [Full Recipe]. - Step 1: Combine dry ingredients in a bowl. In a medium mixing bowl, add 1/2 cup rolled oats and 1 tablespoon cocoa powder. Stir these together. This mix gives your oats a deep chocolate flavor. - Step 2: Whisk together wet ingredients separately. In another bowl, mix 1 cup almond milk, 1 tablespoon peanut butter, 1 tablespoon maple syrup, 1/2 teaspoon vanilla extract, and a pinch of salt. Make sure the peanut butter blends in well. - Step 3: Mix dry and wet ingredients thoroughly. Pour the wet mix over the dry oats. Stir with a spoon until every oat is coated. This step ensures creamy and rich oats. - Step 4: Transfer mixture to a jar or container. Carefully spoon the mixed oats into a clean jar. Choose a jar with a lid for best results. - Step 5: Seal and refrigerate overnight. Close the lid tightly. Place the jar in the fridge. Let it chill overnight or for at least 4 hours. The oats will soak up the flavors and soften. - Step 6: Stir before serving. When you’re ready to eat, take the jar out of the fridge. Stir the oats well. If they seem thick, add a little more milk to loosen them up. - Step 7: Add your choice of toppings. Top your oats with sliced bananas, chocolate chips, crushed peanuts, or fresh berries. These toppings add fun flavors and textures to your dish. Enjoy your creamy, chocolatey breakfast! For the full recipe, check out the complete guide. - For creamier oats, use whole milk or a milk alternative. - Allow oats to soak longer for a softer texture. Using whole milk adds richness. If you prefer a lighter option, almond or oat milk works well too. The key is to find what you love. Soaking longer lets the oats absorb more liquid. This makes them softer and more enjoyable to eat. - Try different nut butters like almond or cashew. - Experiment with sweeteners like agave or stevia. Feel free to swap peanut butter with almond or cashew butter for new flavors. Each nut butter brings its own taste. Use different sweeteners to find your perfect balance. Agave has a light flavor, while stevia is sugar-free. - Serve in a clear jar for visual appeal. - Drizzle extra peanut butter on top. Serving in a clear jar lets everyone see those delicious layers. It makes your dish look fancy! A drizzle of peanut butter on top adds a nice touch. It makes it more inviting and tasty. For an added twist, include colorful toppings like fresh berries or chocolate chips. Enjoy crafting your perfect chocolate peanut butter overnight oats! For the complete recipe, check the Full Recipe section. {{image_4}} You can switch up your chocolate peanut butter overnight oats with fun flavors. - Chocolate Banana Overnight Oats: Mash a ripe banana into the mix. The banana adds natural sweetness and a creamy texture. - Mocha Peanut Butter Overnight Oats: Add a teaspoon of instant coffee or espresso powder. This gives your oats a rich coffee flavor. Got dietary needs? No problem! You can easily modify this recipe. - Gluten-free option: Use certified gluten-free oats. This way, everyone can enjoy a tasty breakfast. - Vegan alternative: Swap regular milk for almond milk or oat milk. Use maple syrup or agave for sweetness. Change your oats with the seasons for exciting new tastes. - Adding pumpkin spice for fall: Mix in a teaspoon of pumpkin spice. This brings warmth and a cozy flavor to your oats. - Incorporating fresh berries in summer: Toss in some strawberries or blueberries. Fresh fruit brightens up your oats and adds nutrients. These variations keep your breakfast fun and exciting! You can find the full recipe here to make your own delicious creation. To keep your chocolate peanut butter overnight oats fresh, use an airtight container. This helps prevent moisture and odors from mixing in. Store the container in the refrigerator. Your oats will stay good for up to 5 days. This means you can make a batch and enjoy it throughout the week. Can you freeze overnight oats? Yes, you can freeze them! Freezing is a great way to save extra servings. Just make sure to use a freezer-safe container. How to thaw overnight oats for future use: To thaw, move the container to the fridge the night before you want to eat them. This will help them thaw slowly and evenly. You can also use the microwave if you’re in a hurry. Just heat it in short bursts, stirring in between. Best methods to reheat if desired: If you prefer warm oats, reheat them in the microwave. Place your oats in a microwave-safe bowl and cover it. Heat for 30 seconds, then stir. Repeat until warm enough. You can also reheat on the stove. Just add a splash of milk to a saucepan and warm it over low heat, stirring often. Enjoy your delicious oats however you like! What is the texture of overnight oats supposed to be? Overnight oats should be creamy and thick. They absorb the liquid overnight. This makes them soft but not mushy. You want a nice balance. If they seem too watery, add less milk next time. Can I use steel-cut oats instead of rolled oats? Yes, but steel-cut oats will need more time to soak. They take longer to soften. I recommend soaking them overnight to get a good texture. You may need to adjust the liquid and soaking time. How can I make my overnight oats thicker or creamier? To make your oats thicker, use less milk. You can also add chia seeds. They help absorb liquid and add fiber. Another tip is to let them sit longer in the fridge. Are overnight oats healthy? Yes, overnight oats are very healthy. They offer fiber and protein. This can help keep you full. They also provide vitamins and minerals. Plus, they are low in sugar if you control the toppings. What are the nutritional benefits of using peanut butter? Peanut butter adds healthy fats and protein. It helps keep your energy up. It also has vitamins like E and B. Just make sure to choose a natural peanut butter with no added sugar. What to pair with chocolate peanut butter overnight oats? You can pair them with fresh fruit. Bananas and berries taste great. Nuts or seeds also add a nice crunch. For extra sweetness, consider a drizzle of honey or maple syrup. Can overnight oats be eaten warm? Yes, you can eat them warm if you like. Just heat them gently in the microwave. Add a splash of milk to keep them creamy. Enjoy your warm treat any time of the day! You can create tasty and healthy overnight oats with simple ingredients. We discussed the main ingredients, preparation steps, and optional toppings. You learned tips for customization, serving, and storing your oats. Remember, you can adjust flavors and textures to suit your taste. Try different ingredients and enjoy your meals. Keep experimenting with toppings and variations. This way, overnight oats will always feel new and exciting. Enjoy every delicious bite and make it your own!](https://dishtreats.com/wp-content/uploads/2025/07/90d151b9-6d0c-4c1c-ba31-37512e57091e-768x768.webp)
![To make a tasty and moist chocolate zucchini bread, gather these simple ingredients: - 1 medium zucchini, finely grated - 1 cup whole wheat flour - 1/2 cup unsweetened cocoa powder - 1/2 teaspoon baking soda - 1/2 teaspoon baking powder - 1/4 teaspoon salt - 1/2 cup pure maple syrup or honey - 1/4 cup unsweetened applesauce - 2 large eggs - 1 tablespoon vanilla extract - 1/2 cup dark chocolate chips (optional) - 1/4 cup chopped walnuts or pecans (optional) These ingredients help create a rich flavor and moist texture. The grated zucchini adds moisture without a strong taste. Whole wheat flour makes the bread hearty and healthy. Cocoa powder gives it that delicious chocolate flavor. Sweeteners like maple syrup or honey ensure the bread stays moist and sweet. Applesauce also adds moisture while cutting down on fat. The eggs help bind everything together. Optional items like dark chocolate chips can add extra richness. Walnuts or pecans bring a nice crunch. You can adjust the recipe to suit your taste. For the full recipe, refer to [Full Recipe]. 1. Preheat your oven to 350°F (175°C). Prepare a 9x5-inch loaf pan. You can grease it lightly or line it with parchment paper. This will help with easy removal once it’s baked. 2. In a large mixing bowl, combine the finely grated zucchini, maple syrup (or honey), unsweetened applesauce, eggs, and vanilla extract. Whisk them together until blended. 3. In a separate bowl, gently whisk the whole wheat flour, cocoa powder, baking soda, baking powder, and salt. Make sure they mix well to avoid clumps. 1. Gradually add the dry ingredients into the wet mixture. Stir just until combined. Avoid over mixing to keep the bread light and fluffy. 2. If you like, gently fold in dark chocolate chips and chopped walnuts or pecans. These add a nice crunch and rich flavor. 3. Carefully pour the batter into the prepared loaf pan. Use a spatula to smooth the top for an even bake. 1. Bake in the preheated oven for 45-50 minutes. Test doneness by inserting a toothpick into the center. It should come out clean or with a few moist crumbs. 2. Once baked, remove the bread from the oven. Let it cool in the pan for about 10 minutes. Then, transfer it to a wire rack to cool completely. For the full recipe, check out the details provided earlier. Enjoy your baking! To make your chocolate zucchini bread perfect, mix well but don’t overdo it. Overmixing can lead to a tough loaf. Stir the batter until just combined. This keeps the bread soft and moist. Accurate measurements matter too. Use a kitchen scale for the best results if you have one. If not, make sure to level off your measuring cups. If you want to switch up the flour, try using almond flour. It gives a nice flavor and works well in this recipe. For sweeteners, you can use agave syrup or coconut sugar. Both options keep the bread tasty and healthy. Just use the same amount as maple syrup or honey. Serve your zucchini bread warm for the best taste. Slice it and dust with powdered sugar for a pretty look. You can also spread nut butter on top for a yummy twist. Pair it with a glass of milk or a cup of tea. These drinks enhance the rich flavors of the bread. For the full recipe, check out the earlier section. {{image_4}} For those with dietary needs, you can easily adapt this recipe. - Gluten-free options: Use a gluten-free flour blend. It works well in this recipe. Just make sure it has a good mix of starch and protein. - Vegan alternatives: Replace the eggs with flax eggs. Mix one tablespoon of ground flaxseed with three tablespoons of water. Let it sit for five minutes until it thickens. You can also switch the honey with agave syrup or another plant-based sweetener. These changes keep the bread tasty while meeting different needs. You can enhance the flavor of your chocolate zucchini bread. - Adding spices like cinnamon or nutmeg: A teaspoon of cinnamon or nutmeg brings warmth. These spices pair well with chocolate and add depth to the flavor. - Incorporating other mix-ins like dried fruit: Try adding dried cherries, cranberries, or even raisins. They add sweetness and chewiness. Mix in about half a cup for the best results. These variations make your bread unique and fun! For the full recipe, check out the details above. To keep your chocolate zucchini bread fresh, store it correctly. Wrap the cooled bread tightly in plastic wrap or aluminum foil. This keeps moisture in and prevents it from drying out. Place it in an airtight container for extra protection. You can store it at room temperature for about three days. If you want to keep it longer, freezing works great. To freeze chocolate zucchini bread, slice it first. Wrap each slice in plastic wrap. Then, place the wrapped slices in a freezer-safe bag. This way, you can grab a slice whenever you want a treat. It can stay fresh in the freezer for up to three months. When you’re ready to enjoy your chocolate zucchini bread, warming it up adds to the taste. The best way to heat it is in the microwave. Place a slice on a microwave-safe plate, cover it with a paper towel, and heat for 15-20 seconds. This keeps the bread moist. You can also reheat it in the oven. Preheat the oven to 350°F (175°C). Wrap the bread in foil to prevent it from getting dry. Heat for about 10-15 minutes. This method helps keep the texture soft and warm. For the best taste, enjoy your chocolate zucchini bread within three days if stored at room temperature. If frozen, try to eat it within three months for the best flavor. To keep zucchini bread moist, use fresh zucchini. Grate it finely to release its juice. Adding unsweetened applesauce or pure maple syrup also helps boost moisture. - Bake at the right temperature. Too high can dry it out. - Don’t overmix the batter. This keeps the bread tender. - Cover the bread with foil if it browns too fast. Yes, you can use frozen zucchini. Just let it thaw and drain excess water first. Frozen zucchini works well but may change the texture slightly. - Fresh zucchini offers the best flavor and moisture. - If you have frozen, make sure to squeeze out the water. - Using frozen is a great way to reduce waste. Check for doneness with a toothpick. Insert it into the center of the bread. If it comes out clean or with a few moist crumbs, it’s done. - The edges will pull away from the pan slightly. - The top should look set and spring back when you touch it. - Baking time is usually 45-50 minutes, but ovens vary. For the complete method to make this treat, check out the Full Recipe! You’ve learned how to make delicious chocolate zucchini bread. We covered the main ingredients, step-by-step instructions, and helpful tips. Remember, precise measurements and mixing are key to success. You can also explore variations to match your tastes and dietary needs. Store your bread properly for long-lasting freshness. With these insights, you’ll enjoy baking and sharing this treat. Dive in and enjoy the process!](https://dishtreats.com/wp-content/uploads/2025/06/124341aa-b5ba-4a17-ada7-3bb78900324d-768x768.webp)


