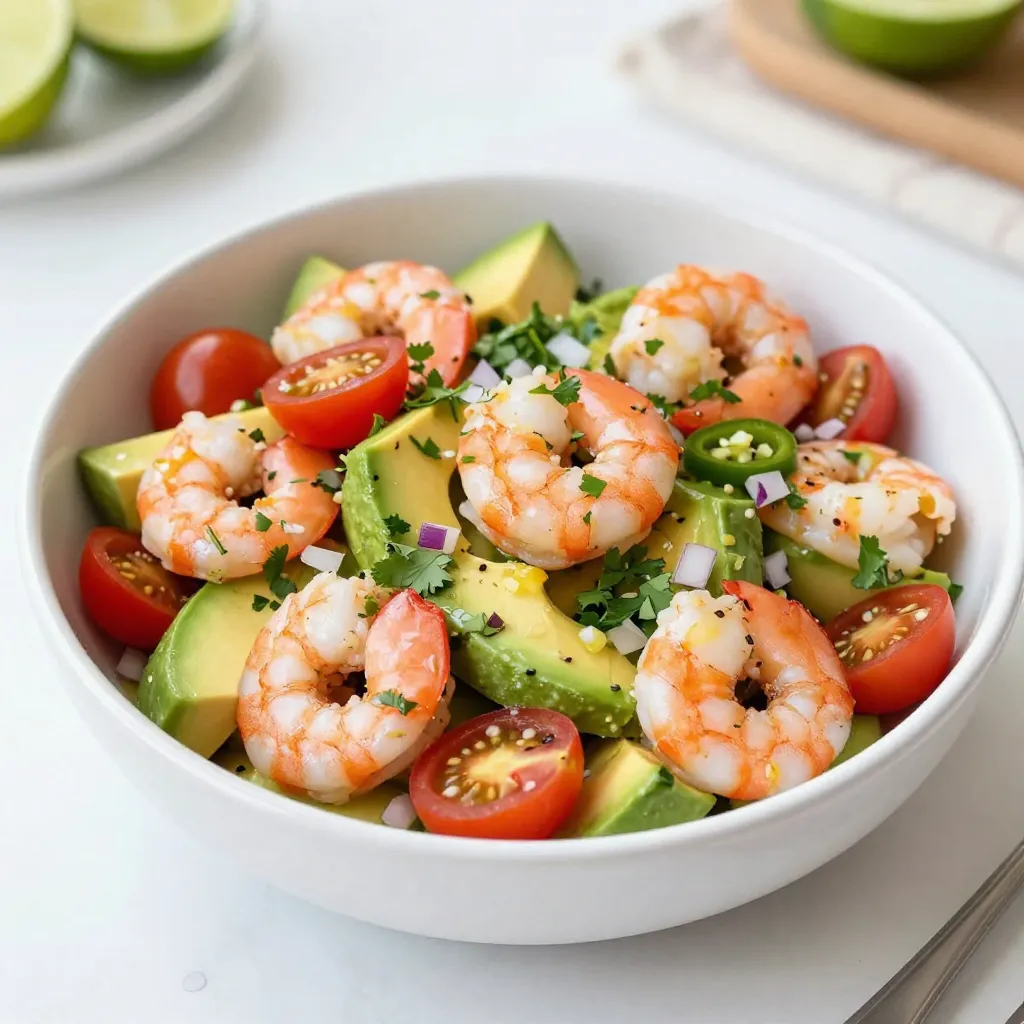
Looking for a fresh and tasty dish that packs a punch? Let me introduce you to Spicy Shrimp Avocado Salsa! This vibrant blend of shrimp, avocado, and bright flavors is sure to impress at your next gathering. Whether you enjoy it as a dip or a topping, my easy recipe will guide you step-by-step to create this unforgettable delight. Let’s dive right into making this delicious and healthy treat!
Why I Love This Recipe
- Fresh and Flavorful: This recipe combines fresh ingredients like shrimp and avocado that create a vibrant and refreshing dish.
- Quick to Prepare: With just 30 minutes from start to finish, it’s perfect for a quick weeknight meal or spontaneous gatherings.
- Versatile Serving Options: Enjoy it as a dip with tortilla chips, or use it as a topping for grilled fish or tacos for added zest.
- Healthful Ingredients: This dish is packed with protein and healthy fats, making it not just delicious but nutritious too!
Ingredients
Main Ingredients
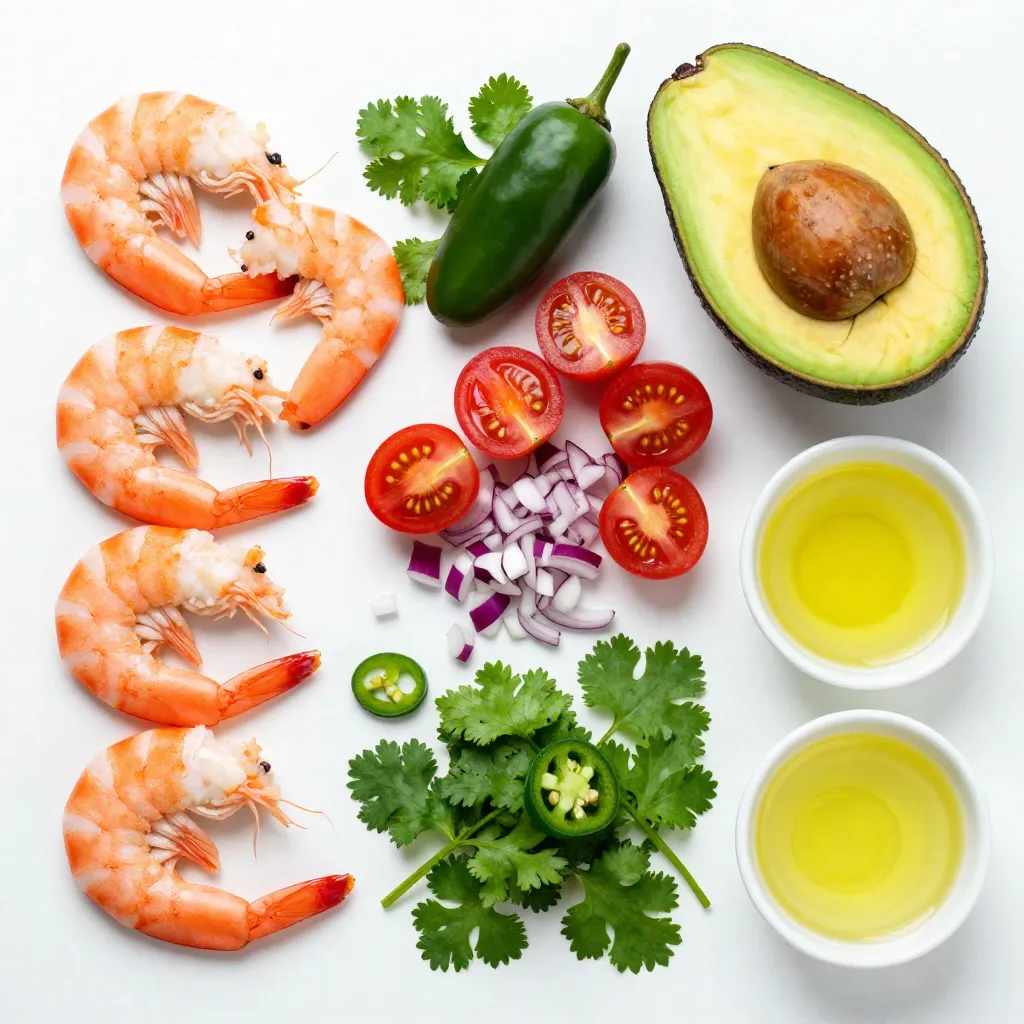
– 1 lb medium shrimp, peeled and deveined
– 1 ripe avocado, diced
– 1 cup cherry tomatoes, halved
Additional Ingredients
– 1/4 cup red onion, finely chopped
– 1 jalapeño, minced
– 1/4 cup fresh cilantro, chopped
Seasoning and Dressing
– 2 tablespoons lime juice
– 1 tablespoon olive oil
– Salt and black pepper to taste
For this Spicy Shrimp Avocado Salsa, you need fresh, quality ingredients. The shrimp brings a sweet, sea flavor. The avocado adds creaminess, while the cherry tomatoes add a pop of color and taste. Red onion gives a crisp bite, and jalapeño adds a nice heat. Fresh cilantro brightens the salsa with its herb taste.
The lime juice and olive oil tie everything together. These flavors balance well, making each bite fresh and exciting. You can adjust the salt and pepper to your liking. Make sure to use ripe avocado and juicy tomatoes for the best taste. Enjoy preparing this delightful dish!
Step-by-Step Instructions
Preparation of Shrimp
First, you need to marinate the shrimp. In a medium bowl, mix the shrimp with olive oil, salt, and pepper. Toss the shrimp well to cover them. Let them sit for about 10 minutes. This step helps bring out the shrimp’s flavor.
Next, heat a non-stick skillet over medium-high heat. When the pan is hot, add the marinated shrimp in a single layer. Cook them for 2 to 3 minutes on each side. The shrimp should turn pink and opaque when done. Once cooked, remove them from the heat and let them cool a bit.
Mixing the Salsa
Now it’s time to mix your salsa. In a large bowl, combine diced avocado, halved cherry tomatoes, chopped red onion, and minced jalapeño. Stir gently to combine the veggies. Be careful not to mash the avocado.
Once the shrimp cools, chop them into bite-sized pieces. Add the shrimp to the bowl with the other ingredients. Gently fold everything together using a spatula. This helps keep the avocado intact.
Final Touches
To finish, drizzle the mixture with fresh lime juice. Sprinkle chopped cilantro over the top. Toss everything gently again. Adjust the salt and pepper to your taste.
For the best flavor, serve the salsa right away. You can also chill it for up to one hour. Enjoy it with tortilla chips or as a topping for grilled fish.
Tips & Tricks
Best Practices for Cooking Shrimp
How to know when shrimp are perfectly cooked?
Shrimp cook fast. When they turn pink and curl into a C shape, they are done. This usually takes about 2-3 minutes on each side. If they feel firm to the touch and are opaque, that’s a good sign.
Tips for marinating shrimp effectively:
To get great flavor, marinate shrimp for about 10 minutes. Use olive oil, salt, and pepper. This simple mix brings out the shrimp’s taste. You can also add lime juice for a zesty kick. Just remember, don’t marinate too long, or they can become tough.
Serving Suggestions
Best accompaniments for Spicy Shrimp Avocado Salsa:
Serve this salsa with crispy tortilla chips for a fun snack. You can also top grilled fish or shrimp tacos with it. It adds a fresh and zesty flavor to many dishes.
Presentation ideas for a beautiful serving:
Use a decorative bowl to hold the salsa. Add a sprinkle of cilantro on top for color. Serve with lime wedges on the side for extra zest. This makes the dish look and taste even better!
Flavor Enhancement
Recommendations for additional spices or ingredients:
Want to spice it up? Try adding garlic powder or smoked paprika. You can also mix in some diced mango for a sweet twist. These add layers of flavor that elevate the dish.
How chilling can improve flavor:
Chilling the salsa for an hour helps the flavors blend. This makes each bite tastier. The cold also gives a refreshing contrast to the warm tortilla chips. So, if you have time, chill it before serving!
Pro Tips
- Marinate for Maximum Flavor: Allow the shrimp to marinate for at least 10 minutes before cooking. This enhances the flavor and tenderness of the shrimp, making every bite delicious.
- Choose Ripe Avocados: Ensure that your avocado is perfectly ripe for the best texture and flavor. It should yield slightly to gentle pressure when squeezed.
- Fresh Ingredients Matter: Use the freshest ingredients available, especially the lime juice and cilantro. Freshness greatly enhances the overall taste of the salsa.
- Serve Immediately: For the best flavor and texture, serve the salsa immediately after preparing. If you need to store it, keep it covered in the refrigerator for no more than an hour to avoid browning of the avocado.
Variations
Ingredient Swaps
You can switch out shrimp or avocado if you want. Try using cooked chicken or tofu for a tasty twist. For those who prefer a veggie option, replace the shrimp with black beans or chickpeas. Instead of avocado, use diced mango or peaches for a sweet touch. These swaps keep the dish fresh and exciting!
Different Serving Styles
You can serve this salsa in many ways. Enjoy it as a dip with crispy tortilla chips for a fun snack. Use it as a topping on grilled fish or chicken to add flavor. You can also mix it into salads for extra crunch. Try spreading it on tacos for a spicy kick.
Adjusting Spice Levels
Want to control the heat? Start with half of the jalapeño and taste it first. You can always add more if you like it spicier. If you want a different taste, try using diced serrano peppers or a sprinkle of cayenne. For a milder option, leave out the jalapeño altogether. This way, you can make it perfect for everyone!
Storage Info
Storing Leftovers
To store leftovers, put the salsa in an airtight container. Make sure to seal it well to keep air out. Place it in the refrigerator right away. This keeps it fresh and safe to eat. For best results, eat the leftovers within two days.
To maintain freshness, avoid mixing the salsa with chips or other foods. This prevents sogginess. When you want to enjoy it again, serve only the amount you need.
Freezing Options
Can Spicy Shrimp Avocado Salsa be frozen? Yes, but it’s best to freeze only the shrimp. The avocado and other fresh ingredients don’t freeze well.
To freeze cooked shrimp, let them cool first. Then, place them in a freezer-safe bag. Remove as much air as possible before sealing. Store the bag in the freezer for up to three months.
Shelf Life
How long does the salsa last in the fridge? Freshly made salsa lasts about 2 to 3 days in the refrigerator.
Signs that salsa has gone bad include a sour smell or strange colors. If you see any mold, throw it away. Always check before eating any leftovers.
FAQs
Can I make this recipe ahead of time?
Yes, you can prepare this salsa ahead of time. I recommend making the shrimp and mixing the veggies a few hours before serving. Doing this allows the flavors to blend well. To keep the avocado fresh, wait to mix it in until just before you serve. You can store the salsa in the fridge, covered tightly. Just be careful not to let it sit too long to avoid browning.
What can I use instead of shrimp?
If you want a different protein, try scallops or crab. Both options taste great in this salsa. For a vegetarian choice, use cooked black beans or chickpeas. They add protein and a nice texture. You can even use grilled zucchini or mushrooms for a fun twist. Each option brings its own unique flavor.
How do I make this recipe spicier?
To heat things up, use more jalapeño or add a splash of hot sauce. You can also try adding diced serrano peppers for an extra kick. If you love heat, sprinkle in some cayenne pepper or crushed red pepper flakes. These additions can really amp up the spice level and add depth to the salsa.
This blog covered making a tasty Spicy Shrimp Avocado Salsa. You learned about key ingredients, how to prepare shrimp, and tips for serving. I highlighted variations and storage info to keep your salsa fresh.
Enjoy this dish with friends or family at your next meal. Experiment with your own twists to suit your taste. Remember, cooking is all about fun and flavor! Enjoy every bit


