Spicy Peanut Ramen Flavorful and Easy Weeknight Meal

Craving a quick, flavorful meal? Spicy Peanut Ramen is your answer! This dish combines rich peanut flavors with just the right amount of heat. It’s easy to make and perfect for busy weeknights. In this post, I’ll share simple steps to create a tasty bowl of ramen that you can customize to your liking. Let’s dive into the ingredients and get cooking!
Why I Love This Recipe
- Quick and Easy: This recipe comes together in just 20 minutes, making it perfect for busy weeknights.
- Flavor Packed: The combination of creamy peanut butter and sriracha creates a rich and spicy sauce that coats the noodles beautifully.
- Customizable: You can easily adjust the spice level or add your favorite vegetables to make this dish your own.
- Healthy Ingredients: With plenty of veggies and a wholesome broth, this ramen is both satisfying and nutritious.
Ingredients
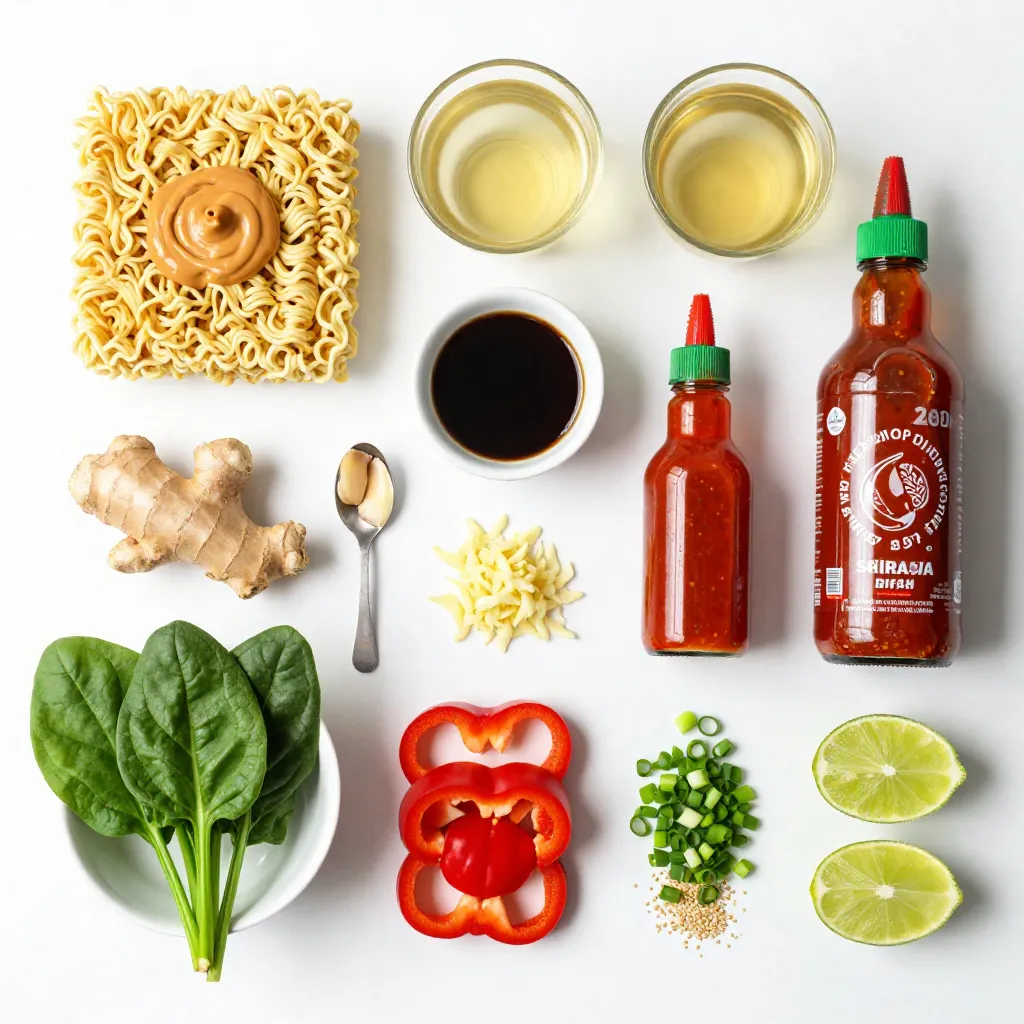
Complete List of Ingredients
To make Spicy Peanut Ramen, gather these ingredients:
- 200g ramen noodles
- 2 tablespoons creamy peanut butter
- 1 tablespoon toasted sesame oil
- 2 cups vegetable broth (homemade or store-bought)
- 1 tablespoon low-sodium soy sauce
- 1 tablespoon sriracha (adjust to your spice preference)
- 1 teaspoon freshly grated ginger
- 2 cloves garlic, finely minced
- 1 red bell pepper, thinly sliced into strips
- 1 cup baby spinach, rinsed
- 2 green onions, finely chopped
- Toasted sesame seeds for garnish
- Lime wedges for serving
Substitutions for Common Ingredients
You can swap out some items if needed:
- Use any noodles instead of ramen.
- Almond or cashew butter works in place of peanut butter.
- Any cooking oil can replace sesame oil.
- Use chicken or beef broth if you prefer.
- For a gluten-free option, use tamari instead of soy sauce.
- You can also use chili paste instead of sriracha for heat.
Nutritional Information
This dish is not just tasty; it is nutritious too. Each serving offers:
- Calories: Approximately 450
- Protein: 15g
- Carbohydrates: 60g
- Fat: 18g
- Fiber: 6g
- Vitamin A: 70% of your daily needs
- Iron: 15% of your daily needs
Enjoying Spicy Peanut Ramen means you get a meal full of flavor and nutrients.

Step-by-Step Instructions
Cooking the Noodles
First, grab a pot and fill it with water. Bring the water to a boil. Add the ramen noodles. Cook them according to the package directions until they are al dente. This usually takes about 3 to 4 minutes. Once done, drain the noodles in a colander. Place them in a bowl and set aside.
Sautéing the Aromatics
Next, take a medium saucepan and heat 2 tablespoons of toasted sesame oil over medium heat. When the oil is warm, add 2 cloves of minced garlic and 1 teaspoon of freshly grated ginger. Sauté these for about 1 minute. You want to smell that great aroma. Be careful not to burn them, or the flavor will turn bitter.
Preparing the Spicy Peanut Sauce
Now, it’s time to make the spicy peanut sauce. Toss in 1 thinly sliced red bell pepper and cook for another 2 to 3 minutes. The peppers should be tender, but still bright and colorful. Pour in 2 cups of vegetable broth, 1 tablespoon of low-sodium soy sauce, and 1 tablespoon of sriracha. Add 2 tablespoons of creamy peanut butter next. Stir everything until the peanut butter dissolves into a smooth sauce. Let it simmer for about 2 to 3 minutes. This allows all the flavors to mix well.
Combining and Serving
It’s almost time to eat! Gently fold the cooked ramen noodles and 1 cup of rinsed baby spinach into the saucepan. Toss everything together, making sure the noodles are well-coated in the spicy peanut sauce. The spinach should wilt down a bit. Once combined, remove the saucepan from the heat. Serve the ramen hot in bowls. Top each bowl with chopped green onions and a sprinkle of toasted sesame seeds. Don’t forget to add lime wedges on the side for a fresh burst of flavor!
Tips & Tricks
How to Perfect the Texture of Noodles
To get the best noodles, start with a pot of boiling water. Add the ramen noodles and cook until they are al dente. This usually takes about three to four minutes. Don’t overcook them! Drain the noodles and rinse them quickly under cold water. This stops the cooking and keeps them firm. Toss them with a little sesame oil to keep them from sticking.
Adjusting Spice Levels
If you want to change the spice level, add less sriracha for a milder dish. You can also add more if you like it hot! Another tip is to serve lime wedges on the side. A squeeze of lime can balance the heat. You can also add sliced jalapeños for extra kick.
Presentation Tips for Serving
To make your ramen look great, use deep bowls. Place the noodles in the center. Arrange the red bell pepper and spinach on top. Sprinkle chopped green onions and toasted sesame seeds for color. Add lime wedges on the side for a pop of freshness. This makes your meal look as good as it tastes!
Pro Tips
- Use Fresh Ingredients: Fresh vegetables and herbs will enhance the flavors of your ramen and provide a vibrant color contrast.
- Adjust the Spice Level: Feel free to add more or less sriracha according to your heat preference. You can also use chili flakes for a different flavor profile.
- Perfectly Cooked Noodles: Make sure to cook the ramen noodles just until al dente, as they will continue to soften when combined with the sauce.
- Garnish for Flavor: Don’t skip the toasted sesame seeds and lime wedges; they add both texture and a fresh burst of flavor to your dish.
Variations
Vegan and Gluten-Free Alternatives
You can easily make this dish vegan and gluten-free. For the broth, choose a vegetable broth without gluten. You can use tamari instead of soy sauce for a gluten-free option. Instead of peanut butter, try sunflower seed butter for a nut-free version. This keeps the creamy texture and flavor while making it safe for everyone.
Adding Proteins (e.g., chicken, tofu)
Adding proteins makes your ramen heartier. For chicken, use cooked, shredded meat. Just stir it in when you add the noodles. If you prefer tofu, use firm tofu cut into cubes. Sauté the tofu until golden brown before adding it to the sauce. This adds flavor and a nice texture.
Different Vegetable Combinations
Feel free to mix up the veggies! You can use broccoli, snap peas, or carrots for added crunch. Mushrooms add a nice umami flavor. You can also toss in some kale or bok choy for extra nutrients. Just remember to adjust the cooking time so they stay crisp and fresh.
Storage Info
How to Store Leftovers
To store leftovers, let your Spicy Peanut Ramen cool. Place it in a sealed container. Keep the container in the fridge. Your ramen will stay fresh for up to three days. Make sure to separate any toppings, like green onions and lime wedges. This helps keep everything fresh.
Reheating Instructions
When you’re ready to eat, take the ramen out of the fridge. Pour it into a pot. Add a splash of vegetable broth or water to help with moisture. Heat it on medium-low, stirring often. This keeps the noodles from sticking together. You can also use the microwave. Heat it in short bursts, stirring in between, until it’s hot.
Freezing Tips for Meal Prep
To freeze your Spicy Peanut Ramen, first cool it completely. Place it in an airtight container or freezer bag. It can last up to three months in the freezer. To reheat, let it thaw overnight in the fridge. Then, follow the reheating instructions above. Enjoy your meal prep!
FAQs
What can I substitute for peanut butter?
If you need a substitute for peanut butter, try almond butter or sunflower seed butter. Both options work well in this recipe. They give a similar creamy texture and taste. You can also use tahini, which is made from sesame seeds. It adds a nutty flavor, too.
Can I make this dish in advance?
Yes, you can make this dish in advance. Cook the ramen and store it separately from the sauce and veggies. This keeps the noodles from getting mushy. Store each part in airtight containers in the fridge. When you’re ready to eat, heat the sauce and mix it with the noodles and veggies.
Is Spicy Peanut Ramen spicy?
The spice level of Spicy Peanut Ramen can be adjusted. The sriracha adds heat, but you can use more or less depending on your taste. If you prefer mild flavors, use a small amount of sriracha or leave it out. You can always add hot sauce to your bowl later if you want more spice.
This blog post covers all you need to make Spicy Peanut Ramen. We looked at key ingredients and how to swap them out. I shared clear steps to cook the dish and gave tips for perfecting noodles and spice levels. You learned about tasty variations, how to store leftovers, and answered common questions.
Now, you can enjoy this fun recipe that fits your taste. With these details, I hope you feel ready to create your own delicious bowl. Enjoy every bit

Spicy Peanut Ramen
Ingredients
- 200 g ramen noodles
- 2 tablespoons creamy peanut butter
- 1 tablespoon toasted sesame oil
- 2 cups vegetable broth
- 1 tablespoon low-sodium soy sauce
- 1 tablespoon sriracha
- 1 teaspoon freshly grated ginger
- 2 cloves garlic
- 1 red bell pepper thinly sliced
- 1 cup baby spinach
- 2 green onions finely chopped
- 1 tablespoon toasted sesame seeds
- 1 lime wedges for serving
Instructions
- Bring a pot of water to a boil and cook the ramen noodles according to the package instructions until they are al dente. Drain the noodles and set them aside in a bowl.
- In a medium saucepan, heat the toasted sesame oil over medium heat. Once the oil is warm, add the minced garlic and grated ginger. Sauté for about 1 minute until they release a fragrant aroma, being careful not to burn them.
- Toss in the sliced red bell pepper and sauté for an additional 2-3 minutes until the peppers are slightly tender but still vibrant in color.
- Pour in the vegetable broth, soy sauce, and sriracha. Add the creamy peanut butter and stir well until the peanut butter is fully dissolved, creating a smooth and cohesive sauce. Let it simmer for 2-3 minutes to allow the flavors to meld together.
- Gently fold the cooked ramen noodles and baby spinach into the saucepan, tossing them in the spicy peanut sauce until the noodles are thoroughly coated and the spinach has wilted.
- Remove the saucepan from heat and serve the ramen hot in bowls. Garnish each bowl with chopped green onions and a sprinkle of toasted sesame seeds. Provide lime wedges on the side for an extra hit of freshness!


. To make One-Pan Garlic Herb Salmon, I start by gathering all my ingredients. This way, I avoid running around the kitchen. I always preheat my oven to 400°F (200°C). This ensures the salmon cooks evenly. I make sure to have a large baking dish or a lined baking sheet ready for the salmon. 1. First, I whisk together the olive oil, garlic, oregano, thyme, smoked paprika, salt, and pepper in a mixing bowl. This creates a tasty marinade. 2. Next, I place the salmon fillets skin-side down in the baking dish. I use a brush or spoon to coat each fillet with the marinade. I want to make sure each piece is well covered. 3. I then arrange lemon slices, halved cherry tomatoes, and zucchini around the salmon. I drizzle any leftover marinade over the veggies for extra flavor. 4. After that, I transfer the dish to the oven and bake for 12 to 15 minutes. The salmon should flake easily when done, and the veggies should look vibrant. 5. Once cooked, I take the dish out and let it rest for a few minutes. This helps the flavors blend better. 6. Just before serving, I sprinkle fresh parsley on top for a nice touch. To get the best salmon, I recommend using high-quality fillets. Fresh salmon tastes better than frozen. Keep an eye on the cooking time. Overcooking can dry out the fish. If you like crispy skin, place the salmon skin-side up under the broiler for the last minute. This gives it a nice crunch. If you're looking for the full recipe, check out the Full Recipe section. Enjoy your meal! To get crispy skin on your salmon, dry it well before cooking. Pat the skin with paper towels to remove moisture. This step helps the skin crisp up nicely. Use high-quality olive oil in your marinade. This oil helps the skin get golden and crunchy. Bake the salmon skin-side down, and avoid flipping it. This keeps the skin intact and crispy. For added flavor, try using fresh herbs instead of dried. Fresh parsley or dill adds a bright taste. Lemon zest is another great addition. It brings a fresh zing that pairs well with salmon. You can also add a splash of white wine to the baking dish. This adds depth to the sauce and enhances the overall flavor. One common mistake is overcrowding the pan. Make sure each salmon fillet has space around it. This helps the heat circulate and cook evenly. Another mistake is not checking for doneness. Salmon should flake easily with a fork. If you overcook it, it may become dry. Lastly, don’t skip the resting step after baking. Letting it rest helps the juices redistribute, leading to a juicier fillet. For the complete recipe, check out the Full Recipe section. {{image_4}} You can change up the veggies in this dish. Try using asparagus, bell peppers, or broccoli. These vegetables cook well and add color. They also provide different flavors. For a twist, add spinach or kale near the end of cooking. This keeps them bright and fresh. This recipe is naturally gluten-free and dairy-free. If you need to avoid gluten, ensure your ingredients are certified gluten-free. You can use coconut oil instead of olive oil for a different flavor. This keeps the dish healthy and tasty. You can cook this salmon in several ways. Besides baking, try grilling it for a smoky taste. To do this, preheat your grill and cook the salmon on medium heat. You can also pan-sear it on the stovetop. Just heat a non-stick pan and cook the salmon for about 4-5 minutes per side. Each method gives you a unique flavor and texture. For the full recipe, check out the One-Pan Garlic Herb Salmon Delight. After you enjoy your One-Pan Garlic Herb Salmon, store leftovers quickly. Place the salmon and veggies in an airtight container. This keeps them fresh and tasty. Make sure to cool them to room temperature before sealing. Store in the fridge for up to three days. If you want to keep it longer, freezing is a great option. When you're ready to eat leftovers, avoid the microwave if you can. It can dry out the salmon. Instead, preheat your oven to 350°F (175°C). Place the salmon and veggies on a baking sheet. Cover them with foil to keep moisture in. Heat for about 10 to 15 minutes, or until warm. You can also reheat in a skillet over low heat, adding a bit of olive oil to keep it moist. Freezing is a smart way to save your One-Pan Garlic Herb Salmon. To freeze, wrap each salmon fillet in plastic wrap, then place them in a freezer-safe bag. Remove as much air as possible before sealing. The veggies can go in the same bag or a separate one. This meal can last in the freezer for up to three months. When you're ready to eat, thaw it overnight in the fridge before reheating. Enjoy! You can tell salmon is cooked when it flakes easily with a fork. The fish should change from translucent to a light pink color. The internal temperature should reach 145°F (63°C). Always use a food thermometer for the best results. Yes, you can use frozen salmon! Just make sure to thaw it first. Place the salmon in the fridge overnight or use a quick method by sealing it in a bag and running it under cold water. This keeps the fish safe and helps it cook evenly. You can serve this dish with many sides. Try steamed rice, quinoa, or a fresh salad. Roasted vegetables pair well too. For a full meal, consider serving garlic bread or a light pasta. You can find the Full Recipe for One-Pan Garlic Herb Salmon here, which gives a complete picture of this delightful dish. In this blog post, we explored the best ingredients for making One-Pan Garlic Herb Salmon. I shared quality recommendations, possible substitutions, and step-by-step cooking instructions. You learned tips for achieving crispy skin and enhancing flavors. We discussed variations using different vegetables and cooking methods, along with storage and reheating tips. Remember, cooking salmon can be easy and fun. Stick to the tips and enjoy your meal! Check out the full recipe for detailed steps.](https://dishtreats.com/wp-content/uploads/2025/06/57d74547-3b02-425a-a5fa-1ca9189b97a5-768x768.webp)
![To make this dish, you need a few key items. These ingredients work together for great flavor. Here’s what you will need: - 4 chicken thighs, bone-in and skin-on - 1/4 cup honey - 1/4 cup low-sodium soy sauce - 4 cloves garlic, finely minced - 1 tablespoon fresh ginger, grated - 1 teaspoon sesame oil - 1 tablespoon olive oil - Salt and freshly ground black pepper to taste While the main ingredients shine, you can add optional items for extra flavor. Try using these to enhance your dish: - A splash of rice vinegar for acidity - A pinch of red pepper flakes for heat - Fresh herbs like cilantro or parsley for freshness Presentation matters when serving food! Beautiful garnishes make a dish pop. Here’s what to top your chicken with: - 2 green onions, finely sliced - Sesame seeds for a crunchy finish First, grab a medium mixing bowl. Add 1/4 cup honey, 1/4 cup low-sodium soy sauce, 4 minced garlic cloves, 1 tablespoon of grated ginger, and 1 teaspoon of sesame oil. Whisk them together until mixed well. This sweet and savory blend will become your marinade and glaze. It infuses the chicken thighs with tasty flavor. Next, season the chicken thighs. Use salt and freshly ground black pepper on both sides. Heat 1 tablespoon of olive oil in a large skillet over medium-high heat. Once hot, place the chicken thighs skin-side down. Let them sear for about 6-8 minutes. You want that skin golden brown and crispy. This step adds great texture and taste. After searing, flip the chicken thighs. Pour the honey garlic mixture over them. Let it simmer gently, coating the chicken in flavor. Cover the skillet and reduce the heat. Cook for 15-20 minutes until the chicken reaches 165°F (75°C) inside. When the chicken is ready, remove the lid. Turn the heat back up to medium-high. Let the sauce simmer for 5 minutes, stirring often. This will thicken the sauce, helping it stick to the chicken. Once thickened, take the skillet off the heat. Allow the chicken to rest for a few minutes. This lets the juices settle, keeping the meat tender. Serve the chicken on a platter, drizzling the sauce over the top. Add a sprinkle of sliced green onions and sesame seeds for a bright finish. Enjoy your Honey Garlic Chicken Thighs! For the full recipe, refer to [Full Recipe]. To get crispy skin, start with bone-in, skin-on chicken thighs. Pat the skin dry with paper towels. This step removes moisture and helps the skin crisp up nicely. Heat olive oil in a hot skillet before adding the chicken. Sear it skin-side down for 6-8 minutes. Resist the urge to move the chicken too much. Let it cook undisturbed for a golden crust. For tender chicken, season it well with salt and pepper. This enhances flavor and locks in moisture. When cooking, keep an eye on the internal temperature. Aim for 165°F (75°C) to ensure it’s fully cooked. Let the chicken rest after cooking. This lets the juices settle back in, making each bite juicy and satisfying. Honey garlic chicken pairs well with several sides. Try serving it with steamed rice for a classic combo. The rice soaks up the tasty sauce. You can also serve it with a fresh green salad. The crunch of the veggies complements the soft chicken perfectly. Roasted vegetables add color and flavor, making for a well-rounded meal. For the full recipe, check out [Full Recipe]. {{image_4}} You can change the taste of honey garlic chicken thighs by swapping some ingredients. For a fruitier twist, try using maple syrup instead of honey. This will give your dish a rich, deep flavor. You can also replace soy sauce with coconut aminos for a gluten-free option. If you like citrus, add some fresh orange juice to the marinade. It brightens the flavor and adds a zesty note. While chicken thighs are juicy, you can use other cuts too. Chicken breasts work well if you prefer leaner meat. Just remember, they may dry out faster, so watch the cooking time. Drumsticks are another tasty option. They are fun to eat and stay moist during cooking. Whichever cut you choose, make sure it is about the same size for even cooking. Want some heat? It's easy to spice things up! Add red pepper flakes or sriracha to the marinade for a kick. You can also use fresh jalapeños or chili paste for a bolder flavor. Adjust the amount based on your heat tolerance. If you love spicy food, this will make your honey garlic chicken thighs truly exciting. For the full recipe, check out the [Full Recipe]. Store your honey garlic chicken thighs in an airtight container. Make sure to let them cool to room temperature first. They will stay fresh in the fridge for up to 3 days. This keeps the flavors intact and ensures the chicken remains juicy. To reheat, place the chicken thighs in a skillet over low heat. Cover the skillet to keep moisture in. Heat until warmed through, about 5-10 minutes. You can also microwave them, but cover the dish to prevent drying out. You can freeze the chicken thighs for later use. Wrap each thigh in plastic wrap, then place them in a freezer bag. They will last for about 2-3 months in the freezer. Thaw them in the fridge overnight before reheating. This method keeps the chicken tasty and tender. For the full recipe, refer to the section above. You should cook chicken thighs for about 20-25 minutes. Start by searing them for 6-8 minutes on the skin side. Then, flip them over and pour the sauce on top. Cover the skillet and let them simmer for 15-20 minutes. This method helps keep the meat juicy and full of flavor. Yes, you can use boneless chicken thighs. They will cook faster than bone-in thighs. Sear them for about 5-7 minutes on each side. Make sure to check their internal temperature. It should reach 165°F (75°C) to be safe to eat. The best way to check if the chicken is done is with a meat thermometer. Insert it into the thickest part of the thigh. When it reads 165°F (75°C), the chicken is ready. You can also cut into the meat. If the juices run clear, it’s cooked. To adjust the sweetness, add more honey for a sweeter taste. If you want it less sweet, add more soy sauce or a splash of vinegar. Taste the sauce as you go. This way, you can find the perfect balance for your dish. For the full recipe, please check the [Full Recipe]. Honey garlic chicken thighs are simple and tasty. We covered the key ingredients and optional marinades. You learned how to prepare the marinade and cook the chicken. I shared tips for crispy skin, tender meat, and delicious sides. We also explored variations and storage tips to keep your meals fresh. When you try this recipe, it will impress your family and friends. Enjoy the rich flavors and make it your own!](https://dishtreats.com/wp-content/uploads/2025/06/32d13aa5-8be9-48e3-be5a-1699ade8ce81-768x768.webp)


