Spicy Korean Beef Bowls Flavorful and Easy Recipe

Craving a tasty meal that’s quick and easy? You’re in the right spot! Spicy Korean Beef Bowls blend rich flavors and simple steps. This dish features ground beef, fresh veggies, and the star ingredient—gochujang. With just a few key items, you can whip up a delightful dinner. Get ready to fill your kitchen with amazing aromas and enjoy a dish that everyone will love! Let’s dive into this flavorful recipe!
Ingredients
Key Ingredients Overview
The Spicy Korean Beef Bowls use simple yet bold ingredients. Each one adds layers of flavor. You will need ground beef, gochujang, and fresh vegetables. These items work together to create a tasty meal.
Ground Beef and Alternatives
Ground beef is the star of this dish. It cooks quickly and absorbs flavors well. You can also use ground turkey or chicken if you prefer. For a meatless option, try crumbled tofu or tempeh. Both options work well with the sauce.
Importance of Gochujang
Gochujang is a key ingredient in this recipe. It is a Korean red chili paste that brings heat and depth. The paste is made from red chili powder, glutinous rice, fermented soybeans, and salt. This blend adds umami and sweetness to the dish. Adjust the amount of gochujang to fit your spice preference. A little goes a long way!
Step-by-Step Instructions
Preparing the Aromatics
Start with the aromatics to build a great base. In a large skillet, warm 1 tablespoon of sesame oil over medium heat. Once it’s hot, add 3 cloves of minced garlic and 1-inch grated ginger. Sauté them for about 1 minute. You want to smell that delicious aroma fill your kitchen.
Cooking the Ground Beef
Next, raise the heat to medium-high. Add 1 pound of ground beef to the skillet. Use a spatula to break apart the meat as it cooks. You want it browned and fully cooked, which takes about 5 to 7 minutes. After cooking, drain any extra grease from the skillet. This keeps your dish from being too oily.
Combining the Sauce Ingredients
Now, it’s time to add some flavor. Add 1 tablespoon of gochujang, 2 tablespoons of soy sauce, 1 tablespoon of brown sugar, and 1 tablespoon of rice vinegar to the beef. Stir well so every piece of beef gets coated in the sauce. Let it simmer for about 2 to 3 minutes. This helps the flavors mix together nicely.
Stir-Frying the Vegetables
While the beef simmers, grab another pan. Stir-fry 1 cup of mixed vegetables over medium heat. Use bell peppers, carrots, and snap peas for a colorful mix. Cook them for about 4 to 5 minutes. You want them tender but still crisp and bright.
Assembling the Bowls
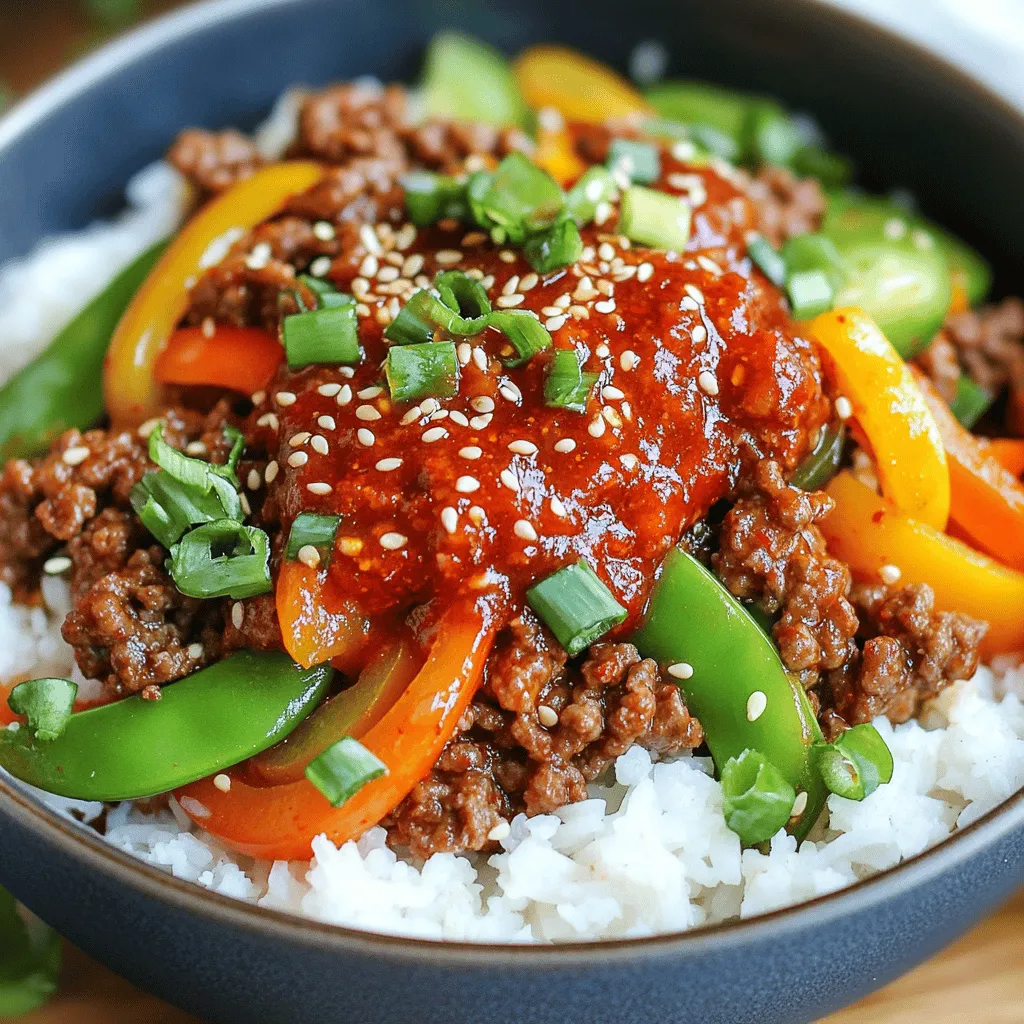
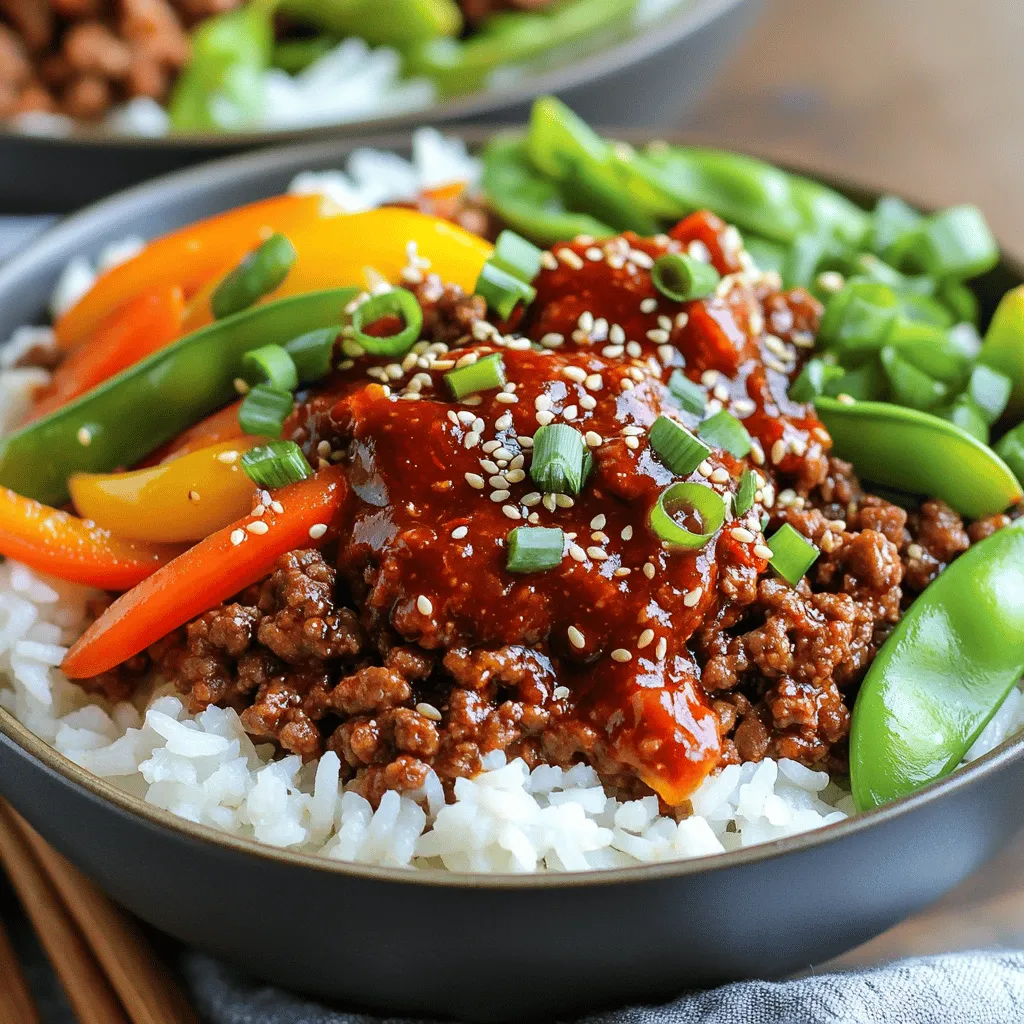
Now, let’s put it all together. In each bowl, add a big scoop of cooked jasmine rice. Top it with the spicy ground beef mixture. Then, add a portion of the sautéed vegetables on top. To finish, sprinkle chopped green onions and sesame seeds over everything. Serve these bowls right away. Enjoy the warmth and flavor!
Tips & Tricks
Achieving Authentic Flavors
To bring out the best flavors in your Spicy Korean Beef Bowls, use fresh ingredients. Fresh garlic and ginger make a huge difference. They add a bright taste that dried versions just can’t match. Gochujang is key here. It gives the dish its signature heat and depth. If you want to elevate the flavor even more, add a splash of sesame oil at the end. This gives a nutty finish that enhances the whole dish.
Cooking Tips for Perfectly Cooked Beef
When cooking ground beef, keep the heat at medium-high. This helps the beef brown well. Use a spatula to break it apart as it cooks. This way, it cooks evenly without clumping. Make sure to drain any excess grease. Leaving too much fat can make the dish greasy. Lastly, let the beef simmer with the sauce for a few minutes. This allows the flavors to blend perfectly.
Storage Tips for Leftovers
If you have leftovers, store them in an airtight container. They can last in the fridge for about three days. To reheat, warm them gently in a pan over low heat. This keeps the beef tender and avoids drying it out. You can also freeze the beef mixture for up to three months. Just make sure to label it with the date. When you’re ready to eat, let it thaw overnight in the fridge before reheating. For a quick meal, serve it over fresh rice or noodles.

Variations
Alternative Proteins
You can switch the ground beef for other meats. Ground turkey or chicken work well. Both have a lighter taste that still pairs nicely with the sauce. If you prefer beef, try flank steak or sirloin, cutting it into thin strips. This adds a different texture to your dish. You can also cook these options in the same way as the beef in the recipe.
Vegetarian Adaptation
For a vegetarian twist, use tofu or tempeh. Both soak up flavors and give a protein boost. Start by pressing the tofu to remove excess moisture. Then, cut it into cubes. Cook the cubes in sesame oil until golden brown. You can add mushrooms for a meaty texture. This way, you keep the dish hearty and satisfying while staying meat-free.
Different Vegetable Combinations
Feel free to mix up your veggies! Broccoli, zucchini, and snap peas add color and crunch. You can also try bok choy or cabbage for a unique flavor. Just remember to stir-fry them until they are tender-crisp. This keeps them vibrant and tasty. Get creative! Use whatever you have on hand, and make each bowl your own.
Storage Info
How to Store Leftovers
To store leftovers, first let them cool. Place the beef and veggies in an airtight container. You can keep it in the fridge for up to three days. If you want to store it longer, freeze the mixture. It will last up to three months in the freezer.
Reheating Instructions
When you’re ready to eat, take the beef bowl out. If it’s frozen, let it thaw overnight in the fridge. To reheat, use a microwave-safe dish. Heat it in the microwave for about 1-2 minutes. Stir halfway through to ensure even heating. You can also reheat it in a skillet over medium heat. This adds a nice texture back to the beef.
Meal Prep Ideas
Meal prep is simple with this recipe. You can cook a larger batch of beef and veggies. Divide them into individual portions for easy lunches. Pair them with rice or noodles for variety. You can mix and match your favorite vegetables too. This way, you can enjoy Spicy Korean Beef Bowls all week long!
FAQs
Can I make Spicy Korean Beef Bowls in advance?
Yes, you can make Spicy Korean Beef Bowls ahead of time. Cook the beef and store it in the fridge. This keeps well for about three days. Just reheat it on the stove when you’re ready to eat. You can also cook the rice in advance. Just keep it in an airtight container. This way, meal prep becomes easy.
What can I substitute for gochujang?
If you don’t have gochujang, you can use another chili paste. Sriracha is a good option. Mix it with a bit of sugar to mimic the sweetness of gochujang. Another choice is a mix of miso and chili powder. Both options give a nice kick to your dish.
How spicy are Spicy Korean Beef Bowls?
The spice level of these bowls can vary. Gochujang is spicy but also sweet. If you like heat, use more gochujang. If you prefer less spice, reduce the amount. You can always adjust it to your taste.
What should I serve with Spicy Korean Beef Bowls?
These bowls pair well with simple sides. Try serving them with steamed broccoli or kimchi for a classic touch. You can also add pickled vegetables for more flavor. A side of egg rolls would make a nice addition too. For a complete meal, serve with a refreshing cucumber salad.
In this blog post, I shared how to make Spicy Korean Beef Bowls. We looked at key ingredients like ground beef and gochujang that add flavor. I provided steps for cooking, plus tips for authentic taste and perfect beef. Variations let you use different proteins and veggies. Finally, I offered storage info and answers to common questions.
Making these bowls can be easy and fun. Try it out, enjoy, and share your results!


![- 8 oz spaghetti or fettuccine pasta - 2 boneless, skinless chicken breasts - 1 cup basil pesto (homemade or store-bought) - 1/2 cup heavy cream - 1/4 cup cherry tomatoes, halved - 1/4 cup freshly grated Parmesan cheese - Fresh basil leaves for garnish - Salt and freshly ground black pepper, to taste - 2 tablespoons extra virgin olive oil Gather these ingredients before you start cooking. The pasta and chicken form the base of your dish. The creamy pesto sauce adds rich flavor. The cherry tomatoes bring a burst of freshness. The Parmesan cheese tops it off with a salty kick. Fresh basil leaves make it look gorgeous. Using fresh ingredients makes a big difference. If you have the time, try making your own pesto. It’s simple and tastes amazing. You can adjust the flavors to your liking. You can also swap the pasta type if you want. Just keep in mind that different shapes may change how the sauce clings to the pasta. For the chicken, you want it juicy and tender. The seasoning is key here. Use good quality olive oil, salt, and pepper. This will help keep the flavor bright and fresh. Once you have everything, you’ll be ready to make a delicious meal. If you want the full recipe, check out the complete guide for step-by-step instructions. Start by boiling a large pot of water. Add a good amount of salt to the water. This will help flavor the pasta. Once the water is boiling, add your spaghetti or fettuccine. Cook it until it is al dente, which means it should be firm to the bite. This usually takes around 8-10 minutes. When done, drain the pasta. Make sure to save about 1/2 cup of the pasta water for later. While the pasta cooks, get ready to season the chicken. Sprinkle salt and pepper on both sides of the chicken breasts. Heat 2 tablespoons of olive oil in a large skillet over medium heat. When the oil is hot, add the chicken. Cook each side for about 6-7 minutes. You want the chicken to turn a nice golden brown. Check that the juices run clear when you cut into it. Once cooked, take the chicken out of the skillet and let it rest for a few minutes. Then, slice it into thin strips. In the same skillet, lower the heat to medium-low. Add your basil pesto to the pan and stir it. You want to warm it through but not burn it. After about a minute, slowly pour in 1/2 cup of heavy cream. Stir it all together until it is well mixed and heated, which should take about 2-3 minutes. Now, add the cooked pasta to the skillet with your creamy pesto sauce. Toss the pasta gently to make sure it gets coated evenly. If the sauce looks too thick, add a little of the reserved pasta water. This will help you reach your desired creamy consistency. To finish, fold in the halved cherry tomatoes and the sliced chicken. Stir everything together for another 2 minutes. This will warm the chicken and tomatoes through. Finally, sprinkle freshly grated Parmesan cheese on top. Toss it lightly to mix. For a bright touch, garnish with fresh basil leaves before serving. For a full recipe, check out the details above! You can use homemade or store-bought pesto for this dish. Homemade pesto gives you full control over flavors, but store-bought saves time. If you want a stronger basil taste, simply add more fresh basil leaves to your mix. For a milder flavor, blend in more nuts or cheese. This helps balance the taste to your liking. To keep your chicken juicy, avoid overcooking it. Cook chicken breasts in a hot skillet for 6-7 minutes on each side. The internal temperature should reach 165°F. Rest the chicken for a few minutes before slicing. This helps the juices stay inside. You can make your sauce thicker or lighter based on your taste. For a richer sauce, use more heavy cream. If you want a lighter option, try half-and-half or low-fat milk. Adding a splash of pasta water helps adjust the sauce's thickness too. This way, you can achieve the perfect creamy texture for your chicken pesto pasta. For the Full Recipe, check out the detailed instructions to create this delightful dish! {{image_4}} Adding vegetables to your Chicken Pesto Pasta makes it even better. It boosts flavor and nutrition. Seasonal veggies like spinach or bell peppers work great. Spinach adds a nice green color. Bell peppers give a sweet crunch. You can toss them in during the last few minutes of cooking. This way, they stay bright and fresh. If you need gluten-free pasta, you have choices! You can use rice pasta or chickpea pasta. These options taste great and cook well. Just follow the package instructions. Cooking times may differ, so keep an eye on them. You want your pasta to be tender but not mushy. Not in the mood for chicken? Try shrimp or tofu instead! Shrimp cooks fast and adds a nice twist. Just sauté them until they turn pink. Tofu is a fantastic plant-based option. Make sure to press it first to remove extra water. Adjust cooking times based on what you choose. This keeps your dish delicious and exciting. For the full recipe, check out the [Full Recipe]. Store any leftovers in the fridge. Use a tight-sealing container to keep your chicken pesto pasta fresh. Glass containers work well, as do plastic ones. Make sure to let it cool down before putting it away. It stays good in the fridge for up to three days. To freeze your chicken pesto pasta, pack it in an airtight container or freezer bag. Remove as much air as possible. This helps prevent freezer burn. You can freeze it for up to three months. Just label the bag with the date so you remember when you froze it. When reheating, use the microwave or stovetop. If using the microwave, heat in short bursts. Stir between each burst to ensure even warming. On the stovetop, add a splash of water or cream to keep it moist. This helps keep the creaminess intact. Enjoy your meal again as if it were fresh! To make chicken pesto pasta from scratch, follow these basic steps: 1. Cook the pasta. Boil water in a large pot, add salt, and cook your choice of spaghetti or fettuccine until al dente. 2. Prepare the chicken. Season boneless chicken breasts with salt and pepper. Sear them in olive oil until golden brown. 3. Make the sauce. In the same skillet, mix basil pesto with heavy cream until warm and creamy. 4. Combine. Toss the cooked pasta with the sauce and sliced chicken. Adjust the sauce with reserved pasta water if needed. 5. Serve. Garnish with cherry tomatoes, Parmesan cheese, and fresh basil. You can find the full recipe above for a detailed guide. Yes, you can make chicken pesto pasta ahead of time. Here are some tips: - Cooked pasta and sauce. Prepare the chicken and sauce, then store them separately from the pasta. This keeps them fresh. - Refrigerate. Store in airtight containers in the fridge for up to three days. - Freeze. For longer storage, freeze the chicken and sauce. Use within two months for best flavor. - Reheat. When ready, reheat the chicken and sauce. Cook the pasta fresh to keep it al dente. Chicken pesto pasta pairs well with various side dishes. Consider these suggestions: - Garlic bread. A warm, crispy slice complements the creamy pasta. - Salad. A light green salad with a tangy vinaigrette balances the richness of the dish. - Roasted vegetables. Seasonal veggies add color and nutrients to the meal. Chicken pesto pasta can be a healthy option. Here’s why: - Protein. Chicken provides lean protein, which is vital for muscle health. - Basil and olive oil. These ingredients are rich in antioxidants and healthy fats. - Pasta. Whole-grain pasta offers fiber, which aids digestion. - Portion control. Adjust the serving size to fit your dietary needs. Absolutely! You can use various pasta types. Here are some alternatives: - Whole wheat pasta. Adds extra fiber and nutrients. - Gluten-free pasta. Great for those with gluten sensitivities. - Zoodles. Spiralized zucchini for a low-carb option. - Penne or rigatoni. These shapes hold the sauce well, providing a satisfying bite. In this post, I covered how to make a delicious chicken pesto pasta. We discussed the main ingredients and their roles, along with simple steps for cooking. I also shared tips for perfecting your dish and exciting variations to try. In closing, this recipe is easy and flexible, letting you customize flavors. Whether you choose to add veggies or change proteins, your meal will impress. Enjoy this tasty dish and make it your own!](https://dishtreats.com/wp-content/uploads/2025/06/ae0d281d-adb6-406a-8a42-58bd8911a0b3-768x768.webp)
. It takes about 20 minutes to cook garlic butter steak bites. You spend 10 minutes prepping the ingredients and another 10 minutes cooking them. This quick cook time makes it easy to enjoy a tasty meal in no time. Yes, you can use other cuts of steak. Ribeye, filet mignon, or flank steak work well. Just remember to adjust the cooking time based on the cut you choose. Each cut has its own flavor and texture, so pick one you like best. You can serve garlic butter steak bites with various sides. Here are some great options: - Creamy mashed potatoes - Sautéed vegetables like green beans or broccoli - Fresh salad with light dressing - Crispy garlic bread These sides add flavor and balance to your meal. You can also use toothpicks for easy serving at parties or gatherings. For more ideas, check out the Full Recipe for garlic butter steak bites. It offers tips on presentation and other serving suggestions. In this post, we covered how to make garlic butter steak bites using simple ingredients. You learned about the key steps, from preparing the steak to combining it with garlic butter. We also shared tips for cooking and presented flavor variations to try. Finally, we discussed storage tricks and answered common questions. Keep this recipe handy for a quick and tasty meal. Enjoy your cooking and the delicious bites you create!](https://dishtreats.com/wp-content/uploads/2025/06/daf37226-e56f-491f-87e9-6665894a306e-768x768.webp)
![- 4 bone-in, skin-on chicken thighs - 1/4 cup honey - 4 cloves garlic, finely minced - 2 tablespoons soy sauce - 1 tablespoon apple cider vinegar - 1 tablespoon extra virgin olive oil - 1 teaspoon freshly grated ginger - 1/2 teaspoon ground black pepper - Salt, to taste - Chopped green onions and toasted sesame seeds For this recipe, I focus on fresh ingredients. The chicken thighs give a rich flavor. Honey and garlic bring sweetness and zest. Soy sauce adds depth, while apple cider vinegar provides a nice tang. Extra virgin olive oil keeps everything moist and tasty. I love the hint of ginger in this dish. It adds a warm note that enhances the glaze. The black pepper gives a slight kick, balancing the sweetness. For the finishing touch, green onions and sesame seeds add color and crunch. These ingredients work together to create a delightful meal. You can find the full recipe for Honey Garlic Glazed Chicken Thighs at the end of this article. Enjoy cooking! In a medium bowl, whisk together the honey, minced garlic, soy sauce, apple cider vinegar, olive oil, grated ginger, black pepper, and a pinch of salt. Make sure the mixture is smooth and well-blended. This marinade is the key to great flavor. Next, place the chicken thighs in a large zip-lock bag or a shallow dish. Pour the marinade over the chicken. Ensure each piece is well coated. Seal the bag or cover the dish tightly. Refrigerate for at least 1 hour, though overnight is best for deep flavor. Preheat your oven to 400°F (200°C). This heat ensures a crispy skin. Remove the chicken from the marinade, saving some for later. Place the chicken skin-side up on a baking tray lined with parchment paper. Bake for 30-35 minutes. The chicken is ready when its internal temperature hits 165°F (74°C) and the skin is golden and crispy. To get that perfect crispy skin, you need to start with dry chicken. Pat the chicken thighs dry with paper towels. This helps remove excess moisture. Also, make sure your oven is hot before baking. Preheat it to 400°F (200°C). Place the chicken skin-side up on a lined baking tray. This position allows the skin to crisp up nicely. Finally, don't cover the chicken while it bakes. This keeps the skin exposed to the heat for better crispiness. Marinating time is key for flavor. I recommend at least one hour for good taste. If you have time, let the chicken marinate overnight. This allows the flavors to soak in deeply. Use a zip-lock bag for easy marinating. Just remember to seal it well, so the marinade doesn’t leak. A longer marinating time helps tenderize the meat, making it juicy and flavorful. For the glaze, you want a syrupy texture. After baking, take the leftover marinade and heat it in a saucepan. Simmer it over medium heat for about 5-7 minutes. Stir it occasionally to prevent sticking. The goal is to reduce the liquid until it thickens. This will create a lovely glaze that clings to the chicken. If it’s too thick, add a splash of water to loosen it. {{image_4}} You can easily boost flavor with fresh herbs. Use rosemary, thyme, or parsley. Chop them finely and mix them into the marinade. This adds a vibrant taste that pairs well with the honey and garlic. Fresh herbs also add a nice pop of color to your dish. Just remember to adjust the amount based on your taste. For a kick, add red pepper flakes into your marinade. Start with a pinch and taste as you go. This small change can take your dish from sweet to spicy. The heat balances well with the honey's sweetness. Serve with a side of cooling yogurt or sour cream to tame the spice. It creates a fun contrast. Grilling gives this dish a smoky flavor that is hard to beat. Before grilling, marinate the chicken as usual. Preheat your grill to medium heat. Cook the thighs skin-side down for the first few minutes. Flip them for an even char. Use the reserved marinade to baste while grilling. This method ensures a tasty glaze that sticks to the chicken. Enjoy the delicious, crispy skin with that smoky flavor! For the complete recipe, check the [Full Recipe]. To keep your honey garlic glazed chicken thighs fresh, store them promptly. Place the cooled chicken in an airtight container. This will help keep the flavors intact. Be sure to eat the leftovers within three to four days for the best taste and safety. To freeze your chicken thighs, first let them cool completely. Wrap each thigh tightly in plastic wrap, then place them in a freezer-safe bag. This method helps avoid freezer burn. You can keep them frozen for up to three months. When ready to eat, thaw the chicken in the fridge overnight for best results. To reheat chicken thighs, use the oven to keep them juicy. Preheat your oven to 350°F (175°C). Place the chicken on a baking sheet and cover it with foil. This will trap steam and keep the meat moist. Heat for about 15 to 20 minutes, or until the chicken is warm. Enjoy the great taste all over again! For more details, check the Full Recipe. For the best flavor, you should marinate chicken thighs for at least 1 hour. But if you can, marinate them overnight. This allows the flavors to soak deep into the meat. A longer marination time helps the chicken become tender and full of taste. Yes, you can use other cuts of chicken. Chicken breasts work well, but they may dry out faster. If you prefer, you can also use bone-in chicken legs. These alternatives will still absorb the honey garlic flavor, making your dish just as tasty. You can pair this dish with many sides. Here are some great options: - Steamed rice or jasmine rice - Roasted vegetables, like broccoli or carrots - A fresh garden salad with a light vinaigrette - Mashed potatoes for a creamy side - Quinoa for a healthy grain option These sides will complement the savory taste of the chicken and make your meal more satisfying. For the full recipe, check out the [Full Recipe] section. This blog post covered how to make delicious Honey Garlic Glazed Chicken Thighs. You learned about the key ingredients, step-by-step cooking methods, and helpful tips for the best results. We also explored tasty variations and safe storage advice. Enjoying this dish can add flavor to your meals. Whether you choose to grill it or try a spicy twist, these chicken thighs will impress. Keep experimenting, and make this recipe your own!](https://dishtreats.com/wp-content/uploads/2025/07/b9cba3e0-ee7f-4dbf-9eac-9b8411a1c4fd-768x768.webp)

![- 1 lb beef sirloin, thinly sliced against the grain - 1 medium onion, finely chopped - 2 cloves garlic, minced - 8 oz mushrooms, sliced (cremini or button) - 1 cup beef broth (preferably low-sodium) - 1 cup sour cream (or Greek yogurt for a lighter option) - 2 tablespoons all-purpose flour - 2 tablespoons olive oil - 1 teaspoon Dijon mustard - Salt and freshly ground black pepper to taste - 12 oz egg noodles (or your favorite pasta) The beef sirloin is the star of the dish. It should be tender and flavorful. Use fresh onions and garlic to build a tasty base. The mushrooms add a nice earthiness. A good beef broth gives depth to the sauce. The sour cream adds creaminess and tang. If you want a lighter dish, Greek yogurt works well too. - Greek yogurt instead of sour cream - Alternative pasta types If you do not have sour cream, Greek yogurt is a great swap. It gives a similar creamy texture while being a bit healthier. You can also try different pasta types, like fettuccine or penne, based on your preference. - 1 teaspoon Dijon mustard - Salt and freshly ground black pepper - Fresh parsley, finely chopped for garnish Dijon mustard adds a subtle kick and depth of flavor. Salt and pepper are key for bringing out the taste in all the ingredients. A sprinkle of fresh parsley on top makes the dish look bright and fresh. It is a simple way to enhance the visual appeal. - Start by boiling salted water in a large pot. - Once boiling, add 12 oz of egg noodles. - Cook them until al dente, following package instructions. - When ready, drain the noodles and set them aside. - Toss the noodles with a drop of olive oil to keep them from sticking. - Heat 2 tablespoons of olive oil in a large skillet over medium-high heat. - Add 1 lb of thinly sliced beef sirloin to the hot pan. - Season the beef with salt and freshly ground black pepper. - Cook for about 3 to 4 minutes until the beef is browned. - Use a slotted spoon to remove the beef and place it on a plate. - In the same skillet, add the remaining olive oil. - Once hot, stir in 1 medium chopped onion and 2 minced garlic cloves. - Sauté for 2 to 3 minutes until the onion is soft and clear. - Next, add 8 oz of sliced mushrooms, cooking for another 4 to 5 minutes. - When the mushrooms are golden, sprinkle 2 tablespoons of flour over the mix. - Slowly pour in 1 cup of beef broth, whisking constantly. - Keep stirring until the mixture thickens, about 3 to 4 minutes. - Lower the heat to medium-low, then stir in 1 cup of sour cream. - Add 1 teaspoon of Dijon mustard for extra flavor. - Return the beef to the skillet, mixing well in the sauce. - Warm it through for 2 to 3 minutes without boiling. - Taste and adjust the seasoning as needed. - For plating, place a generous portion of noodles on each plate. - Ladle the creamy beef stroganoff over the noodles. - Finish by garnishing with finely chopped fresh parsley. - This adds a pop of color and freshness to your dish. For the full recipe, check out the [Full Recipe]. Enjoy this comforting meal! To make a smooth sauce, avoid lumps. When you add flour, stir it well before adding beef broth. This will help mix everything perfectly. Keep the heat low. You want to see gentle bubbles, not a rolling boil. A simmer will thicken your sauce without breaking it down. Slice your beef against the grain. This makes it tender and easy to chew. If you cut with the grain, the beef will be tough. Pay attention to the mushrooms too. Cook them until they are golden brown. This brings out their flavor and gives a nice texture. About 4-5 minutes should do the trick. Serve your beef stroganoff in shallow bowls. This allows the sauce to spread out and look rich. Add a sprinkle of fresh parsley on top for color. A bit of greenery makes the dish pop. It also adds a fresh taste to each bite. {{image_4}} You can make a tasty vegetarian beef stroganoff. Simply swap the beef for mushrooms or tofu. Mushrooms give a great, meaty flavor. Tofu adds protein and absorbs the sauce well. For a creamy mushroom stroganoff, follow these steps: - Use 16 oz of sliced mushrooms instead of beef. - Cook the mushrooms until they are soft and browned. - Add 1 cup of vegetable broth instead of beef broth. - Stir in the same sour cream for creaminess. If you want a lighter option, try using chicken or turkey. Both cook quickly and taste great in stroganoff. Use diced chicken breast or turkey breast instead of beef. Adjust the cooking time to about 5-7 minutes. Ensure the chicken or turkey is cooked through before adding the sauce. To elevate the flavor, consider adding Worcestershire sauce or a splash of red wine. These ingredients add depth and richness. You can also include fresh herbs like thyme or rosemary. They bring a nice aroma and complement the creamy sauce. A teaspoon of Worcestershire sauce or a ¼ cup of red wine can make a big difference. After enjoying your beef stroganoff, you may have some leftovers. Store them in an airtight container. Refrigerate the stroganoff within two hours of cooking. It will stay fresh for about three to four days. When you reheat, warm it gently over low heat. This keeps the sauce creamy. Stir often to avoid burning. You can also use a microwave. Heat it in short bursts, stirring in between. This method helps the dish heat evenly. If you want to keep beef stroganoff longer, freezing is a great option. To freeze, let the dish cool completely. Then, transfer it to a freezer-safe container. Leave some space at the top for expansion. Seal it tightly to prevent freezer burn. For thawing, the best method is overnight in the fridge. This keeps the flavor and texture nice. If you need it fast, you can use the microwave. Set it to defrost and check every few minutes. After thawing, reheat as I mentioned before, ensuring it warms evenly. You can find the full recipe for this comforting dish above. Enjoy every bite! You can enjoy Classic Beef Stroganoff with several tasty sides. Here are some great options: - Steamed green beans - Roasted broccoli - Mashed potatoes - A fresh garden salad - Garlic bread Each side adds a nice touch. Steamed veggies give color and crunch. Mashed potatoes soak up the sauce well. A salad offers a refreshing contrast. Classic Beef Stroganoff lasts about 3 to 4 days in the fridge. Store it in an airtight container. Always cool the dish before sealing it up. Check for any signs of spoilage before eating. If it smells off or looks strange, throw it away. Yes, you can prepare parts of Classic Beef Stroganoff ahead of time. Cook the beef and sauce, then store them separately from the noodles. When you’re ready to eat, heat the beef and sauce. Cook the noodles fresh for best results. This way, you keep everything tasty and warm. Classic Beef Stroganoff is not gluten-free due to the flour in the sauce. You can make it gluten-free by using cornstarch or gluten-free flour. Be sure to check that your beef broth and noodles are also gluten-free. This way, everyone can enjoy this delicious meal. For the full recipe, check my earlier section. You learned about the key ingredients for Classic Beef Stroganoff, including beef sirloin and egg noodles. We discussed how to cook the noodles, sauté the beef, and prepare a rich sauce. You also saw tips for perfecting the dish and its various options for customization, like vegetarian alternatives. In summary, you can make a delicious meal everyone will enjoy. Remember, cooking is about creativity. Feel free to experiment with flavors and ingredients until it’s just right for you. Enjoy your cooking journey!](https://dishtreats.com/wp-content/uploads/2025/06/f14c56cb-cc13-4cc3-a3ff-e0f76ee8bdb9-768x768.webp)