Spicy Kimchi Fried Rice Savory and Flavorful Meal

Are you ready to spice up your meal with a delightful twist? Spicy Kimchi Fried Rice is a savory, flavorful dish that combines the tang of kimchi and the warmth of gochujang. Whether you’re a busy parent or a kitchen novice, this easy recipe will impress everyone at your table. Grab your ingredients, and let’s dive into creating this vibrant, comforting meal that’s sure to awaken your taste buds!
Why I Love This Recipe
- Bold Flavors: This dish is packed with bold and spicy flavors from the kimchi and gochujang that bring every bite to life.
- Quick and Easy: With just a few ingredients and a short cooking time, this recipe is perfect for busy weeknights or a quick lunch.
- Customizable: You can easily adjust the spice level or add proteins like chicken or tofu to make it your own.
- Comfort Food: There’s something incredibly comforting about fried rice, and this spicy twist makes it even more enjoyable!
Ingredients
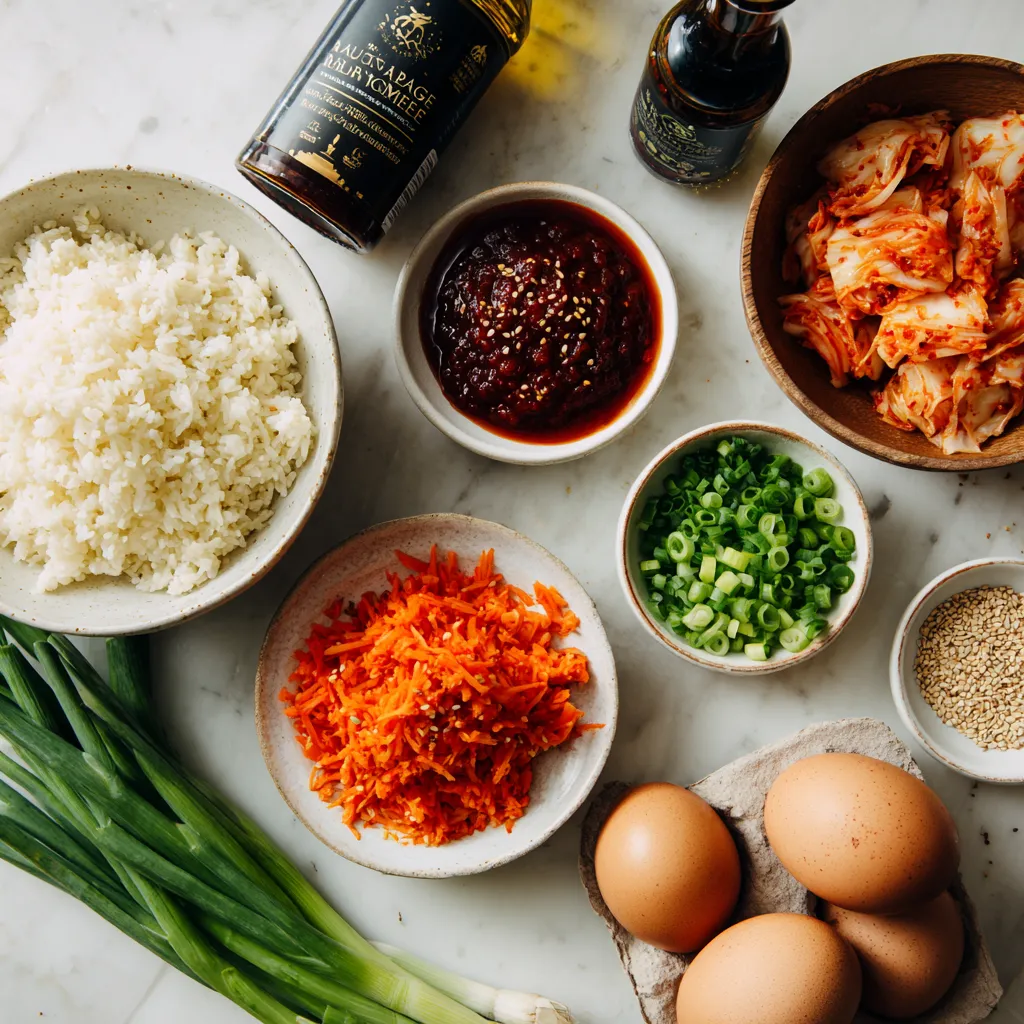
Essential Ingredients
- 2 cups cooked rice (preferably chilled day-old rice)
- 1 cup kimchi, coarsely chopped
- 1/2 cup green onions, chopped (for garnish)
- 1/2 cup carrots, finely diced
Cooking Essentials
- 2 tablespoons vegetable oil
- 1 tablespoon gochujang (Korean chili paste)
- 1 tablespoon soy sauce (preferably low-sodium)
- 1 teaspoon sesame oil
Optional Add-ins
- Eggs (2 large)
- Salt and freshly cracked black pepper to taste
- Toasted sesame seeds for garnish
In this recipe, I focus on fresh and bold flavors. Chilled day-old rice works best. It gives the dish a nice texture. The kimchi adds a spicy kick. I love using gochujang for heat and depth. Soy sauce brings out the savory notes. Sesame oil adds a nutty aroma that ties it all together.
Feel free to customize your dish. Eggs add richness. You can also toss in any veggies you have. Carrots provide sweetness and crunch. Green onions are perfect for garnish, adding a fresh touch.
This dish is fun to make and easy to share. You can adjust spice levels to your liking. If you want more heat, add extra gochujang. Enjoy this savory meal any day of the week!

Step-by-Step Instructions
Preparing the Ingredients
- Heat the vegetable oil in a skillet or wok over medium heat.
- Sauté the diced carrots until soft, about 3-4 minutes.
Combining Key Ingredients
- Add the coarsely chopped kimchi and cook until heated through, about 2-3 minutes.
- Incorporate the chilled rice, breaking up clumps for even mixing.
Finalizing the Dish
- Push the rice mixture to one side and crack the eggs into the empty space.
- Scramble the eggs until fully set, then mix them into the rice.
- Add gochujang, soy sauce, and sesame oil, stirring well to coat the rice.
- Adjust the seasoning with salt and freshly cracked black pepper to taste.
- Fold in the chopped green onions, saving some for garnish.
Tips & Tricks
Achieving the Right Spice Level
To make your dish just right, adjust the gochujang. If you love heat, add more. If you prefer mild flavors, use less. You can also serve extra gochujang on the side. This way, each person can spice up their meal as they like.
Cooking Tips for Perfect Fried Rice
When making fried rice, always use day-old rice. It helps the texture stay firm and prevents clumping. Also, make sure your skillet is hot before you add any ingredients. A hot skillet gives your fried rice a nice sear and flavor.
Presentation Suggestions
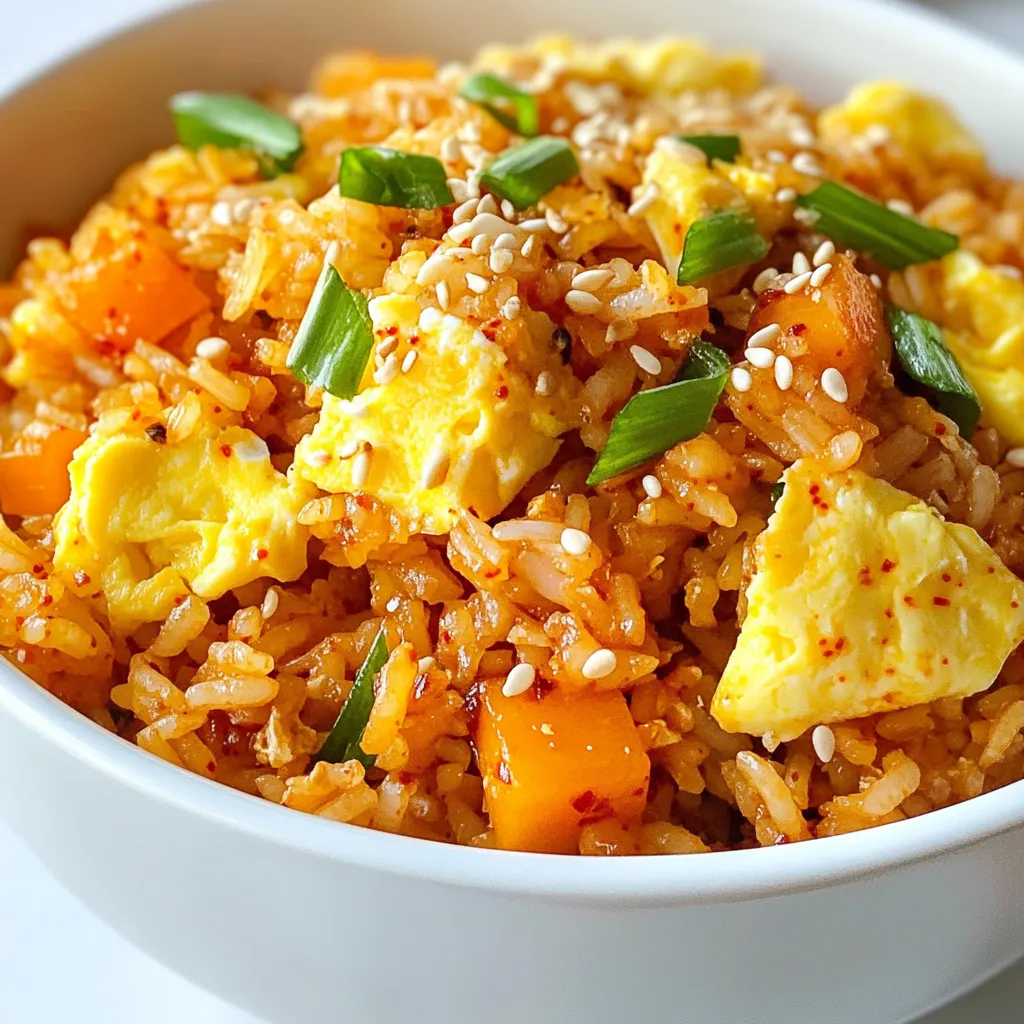
Serve your spicy kimchi fried rice in colorful bowls or plates. This makes the meal more inviting. For an extra touch, garnish with reserved green onions and a sprinkle of sesame seeds. These small details make a big difference in how your dish looks and tastes.
Pro Tips
- Use Day-Old Rice: Chilled, day-old rice helps achieve the perfect texture for fried rice, preventing it from becoming mushy.
- Adjust the Spice: Feel free to modify the amount of gochujang based on your heat preference. Start with less and add more if you like it spicier!
- Fresh Ingredients: Using fresh kimchi and vegetables enhances the flavor and texture of the dish, making it even more delicious.
- Garnish Smartly: Garnish with toasted sesame seeds and extra green onions right before serving for an appealing presentation and added crunch.

Variations
Protein Alternatives
You can add diced chicken, beef, or tofu for extra protein. These options make the dish heartier. If you want a seafood twist, try using shrimp. They cook quickly and pair well with the flavors in the rice.
Vegetable Mix-ins
Adding bell peppers, peas, or corn can bring new flavors to your fried rice. These veggies not only add taste but also a pop of color. Seasonal vegetables like zucchini or spinach can enhance freshness. They make the dish more vibrant and healthy.
Spice Level Enhancements
To boost the heat, experiment with adding chili flakes. This simple step can take your dish to the next level. You can also consider topping your fried rice with a spicy sauce or oil. This adds an extra layer of flavor that spicy food lovers will enjoy.
Storage Info
Refrigeration Tips
Store leftover kimchi fried rice in an airtight container. It can last up to 3-4 days in the fridge. This is great news if you want to enjoy this dish later. Just remember to cool it down before sealing.
Reheating Instructions
Reheat in a skillet over medium heat for the best texture. This keeps the rice nice and fluffy. If you need it faster, microwave it with a splash of water. This helps prevent the rice from drying out.
Freezing Options
Freeze portions in airtight bags for up to 2 months. This is perfect for meal prep! When you’re ready to eat, thaw it in the refrigerator before reheating. This method keeps the flavors fresh and tasty.
FAQs
Can I use fresh rice instead of day-old rice?
Using day-old rice is preferred for better texture, but fresh rice can be used in a pinch with some adjustments. If you use fresh rice, spread it out on a tray. Let it cool and dry for about 30 minutes. This helps prevent clumping when you fry it.
What makes kimchi fried rice spicy?
The spiciness comes from gochujang, a Korean chili paste, along with the heat from the kimchi itself. Gochujang adds a deep flavor and heat. The fermented kimchi also has a kick, making the dish bold and exciting.
Is spicy kimchi fried rice healthy?
It’s a wholesome dish packed with vegetables, but can be tailored to be healthier with lower-sodium sauces and additional veggies. You can add more carrots or green onions for extra nutrients. Using less oil and low-sodium soy sauce makes it even better.
What can I serve with spicy kimchi fried rice?
Serve with cucumber slices or a crisp salad for a refreshing contrast. The coolness of the cucumbers balances the heat of the rice. You can also add pickled radishes for a tangy twist.
This blog post covered how to make delicious kimchi fried rice. We discussed essential ingredients, cooking steps, and tips for the best results. Remember to use day-old rice for the best texture. Feel free to customize it with your favorite protein or veggies. Kimchi fried rice is tasty and easy to store. Enjoy experimenting with flavors and ingredients. You’re now ready to create your own perfect dis

Spicy Kimchi Fried Rice Delight
Ingredients
- 2 cups cooked rice (preferably chilled day-old rice for best texture)
- 1 cup kimchi, coarsely chopped
- 0.5 cup green onions, chopped (set aside some for garnishing)
- 0.5 cup carrots, finely diced
- 2 tablespoons vegetable oil (or any neutral oil)
- 1 tablespoon gochujang (Korean chili paste, adjust to taste)
- 1 tablespoon soy sauce (use low-sodium for a healthier option)
- 1 teaspoon sesame oil
- 2 large eggs
- to taste Salt and freshly cracked black pepper
- for garnish Toasted sesame seeds
Instructions
- Begin by heating the vegetable oil in a large skillet or wok over medium heat. Ensure the oil is shimmering but not smoking.
- Add the finely diced carrots and sauté for approximately 3-4 minutes, stirring occasionally, until they soften and become slightly translucent.
- Next, incorporate the chopped kimchi into the skillet, and continue to cook for an additional 2-3 minutes. This step allows the kimchi to infuse its flavor into the mixture.
- Once the kimchi is heated through, add the cooked rice to the skillet. Gently break up any clumps with a spatula and mix everything together thoroughly, ensuring an even distribution of vegetables and kimchi throughout the rice.
- Push the rice mixture to one side of the skillet, creating space on the other side. Crack the two eggs into this empty side and scramble them. Cook until fully set, then fold the scrambled eggs into the rice mixture.
- Drizzle in the gochujang, soy sauce, and sesame oil. Stir well to ensure the rice is evenly coated with the sauces, and adjust the seasoning with salt and pepper to your preference.
- Once everything is well mixed and heated through, remove the skillet from heat. Gently fold in the chopped green onions, reserving a portion for garnish.


![For One Pot Fiesta Rice, you need: - 1 cup long-grain rice - 2 cups vegetable broth - 1 can (15 oz) black beans, drained and rinsed - 1 cup corn kernels (choice of fresh, frozen, or canned) - 1 red bell pepper, diced - 1 green bell pepper, diced - 1 small onion, finely chopped - 2 cloves garlic, minced These ingredients create a base full of colors and flavors. The rice absorbs all the tasty broth, making it fluffy and delicious. The black beans add protein, while the corn and peppers provide sweetness and crunch. You will also need: - 1 teaspoon ground cumin - 1 teaspoon chili powder - Salt and pepper to taste These spices give the dish its kick. Cumin adds warmth, while chili powder brings a bit of heat. Adjust the salt and pepper to balance the flavors just right. To finish off your meal, use: - Fresh cilantro, chopped (for garnish) - Lime wedges (for serving) Cilantro adds freshness, and lime juice brightens the dish. Together, they enhance the fiesta feel. The combination of these ingredients makes this dish not just tasty but also visually appealing. You can find the full recipe to guide you through the cooking process. - Heat olive oil and sauté onion and garlic. - Add diced bell peppers. Start by heating one tablespoon of olive oil in a large pot over medium heat. Once hot, add the finely chopped onion and minced garlic. Sauté for about three to four minutes. You want the onion to become soft and clear. The garlic will fill your kitchen with a lovely aroma. Next, toss in your diced red and green bell peppers. Cook them for two to three more minutes. Stir occasionally until they soften and brighten in color. - Incorporate spices and rice. - Simmer with vegetable broth. Now it's time to spice things up! Sprinkle in one teaspoon each of ground cumin and chili powder. Stir well to mix the spices into the onion and pepper mixture. Let them cook for one minute. This step helps release their rich flavors. Next, add one cup of long-grain rice to the pot. Stir it thoroughly so each grain gets coated with the mixture. Now, pour in two cups of vegetable broth. Turn the heat up to bring it to a boil. Once boiling, reduce the heat to low. Cover the pot and let it simmer for about 15 to 20 minutes. Do not lift the lid during this time; you want to keep the steam in. - Add black beans and corn. - Season and fluff. - Presentation tips. When the rice is tender and all the liquid is gone, gently fold in one can of drained black beans and one cup of corn. Allow the mixture to heat through for about five minutes on low heat. Afterward, taste your dish and season with salt and pepper as needed. Use a fork to fluff the rice gently, mixing all the ingredients together. For a beautiful presentation, serve the fiesta rice in bright bowls. Top with fresh cilantro and add lime wedges on the side. This adds a zesty touch and makes your meal look vibrant. Enjoy the colorful feast you've created! You can find the Full Recipe for more details. To prevent rice from sticking, rinse the rice before cooking. This step removes excess starch. After rinsing, dry the rice with a towel. This helps the grains stay separate. Next, use the right water ratio. For every cup of rice, use two cups of liquid. The right ratio keeps the rice fluffy. Simmering time is key for perfect rice. After bringing the pot to a boil, reduce the heat. Cover the pot tightly and let it simmer. Avoid lifting the lid during cooking. This keeps the steam inside, which is crucial. Allowing it to simmer for 15-20 minutes ensures even cooking. For an extra kick, try adding spices like paprika or oregano. These spices blend well with the base flavors. You can also add a pinch of cayenne for heat. Fresh ingredients like diced tomatoes or jalapeños work great too. Top your fiesta rice with fresh avocado or sour cream. It adds creaminess and balances the spice. Using pre-cooked ingredients saves time. You can find canned black beans and corn at the store. These options cut down your prep time significantly. You can also use pre-chopped veggies from the store. This helps you skip the chopping step. Quick prep ideas include using frozen vegetables. They cook fast and still taste fresh. Keep them on hand for busy nights. You can even prepare the rice ahead of time. Just reheat it when you're ready to serve. For the full recipe, check [Full Recipe]. {{image_4}} You can easily customize One Pot Fiesta Rice with protein. Try adding chicken or shrimp. For chicken, use bite-sized pieces and cook them first. Add them back in with the beans and corn. Shrimp cooks quickly, so toss them in during the last few minutes. They should turn pink when done. If you want a vegetarian dish, consider adding tofu or tempeh. Both soak up flavors well. Cut them into small cubes and sauté them with the veggies. You can also use extra beans to boost protein. Want a spicy kick? Add jalapeños to the mix. Dice them finely and sauté with the onions and garlic. This will give your dish a nice heat. Adjust the amount to fit your taste. For a Southwest edition, swap out black beans for pinto or kidney beans. You can also add diced tomatoes or corn salsa for a fresh taste. These small changes can make a big difference in flavor. If you're looking for alternatives to long-grain rice, try quinoa or cauliflower rice. Quinoa is packed with protein and cooks in about the same time. Rinse it well before cooking to remove any bitterness. Cauliflower rice is a great low-carb option. It cooks faster, so reduce your liquid and cooking time. You don't want it mushy. For a nuttier flavor, brown rice is another option. Just know it will take longer to cook, so adjust your time and liquid accordingly. These substitutes keep your meals fresh and exciting! Store your One Pot Fiesta Rice in an airtight container. It stays fresh for 3 to 5 days. Check for any signs of spoilage before using leftovers. To keep the rice at its best, let it cool down before sealing it. This helps prevent moisture build-up, which can cause mushy rice. You can freeze portions of One Pot Fiesta Rice for later. Use freezer-safe bags or containers. Make sure to remove as much air as possible to avoid freezer burn. It will last up to 3 months in the freezer. When you're ready to eat, thaw it overnight in the fridge. For quick meals, you can microwave frozen rice straight from the freezer. To reheat, place the rice in a pot with a splash of water. Cover and warm it over low heat. Stir occasionally to heat evenly. If it seems dry, add a bit more water. You can also microwave it. Just add a little water and cover it. After reheating, taste and adjust the flavors. You may want to add a squeeze of lime or a sprinkle of fresh cilantro for a burst of flavor. Can I use brown rice instead of white? Yes, you can use brown rice. It takes longer to cook. Add about 10-15 minutes to the cooking time. You may also need to add more broth to keep it moist. How do I adjust the recipe for more servings? To make more servings, simply double the ingredients. Use a larger pot to fit everything. Cooking time may not change much, but check the rice to be sure. What are the best side dishes to serve with One Pot Fiesta Rice? Some great sides include grilled veggies, avocado slices, or a fresh salad. You could also serve it with tortilla chips for a crunchy contrast. How to tell when the rice is cooked? The rice is ready when it has absorbed all the liquid. It should look fluffy and tender. You can taste a grain to check if it’s done. Can I substitute vegetable broth with chicken broth? Yes, chicken broth works well. It adds a different flavor that many people enjoy. Just make sure to choose low-sodium broth if you watch your salt intake. What is the calorie count per serving? Each serving has about 250 calories. This can vary based on additional toppings or sides added. Are there any allergens in this recipe? This recipe is generally free from common allergens. However, check the labels on canned goods for potential allergens. If you are sensitive to beans or corn, be cautious. This blog covered a simple recipe for One Pot Fiesta Rice. We explored ingredients like long-grain rice, black beans, and fresh veggies. I shared tips on cooking techniques and storage methods. You can enjoy many variations to suit your taste. Whether you prefer chicken, shrimp, or a spicy twist, the options are endless. This dish is easy to make and great for leftovers. Enjoy your cooking adventure!](https://dishtreats.com/wp-content/uploads/2025/07/eb10aa28-84d4-4922-bf2e-e4835b83e1a4-768x768.webp)
![To make Indian-spiced chickpea stew, you need fresh and flavorful ingredients. This stew brings warmth and comfort to your table. Here’s what you’ll need: - Canned chickpeas: 2 cups, thoroughly drained and rinsed - Vegetables and aromatics: - 1 medium onion, finely chopped - 2 cloves garlic, minced - 1 tablespoon fresh ginger, grated - Spices and liquids: - 1 can (14 oz) diced tomatoes with juice - 1 can (14 oz) coconut milk - 2 cups vegetable broth - 1 tablespoon curry powder - 1 teaspoon ground cumin - 1 teaspoon turmeric powder - 1/2 teaspoon red chili powder (adjust according to your heat preference) - 1 tablespoon olive oil - Salt and freshly ground black pepper, to taste - Fresh cilantro, chopped (for garnishing) These ingredients create a rich base for your stew. The chickpeas provide protein and texture. The diced tomatoes add acidity and sweetness. Coconut milk gives a creamy touch. Each spice brings its own unique flavor. You can find the full recipe [here]. Enjoy cooking! 1. Sautéing the aromatics Start by heating olive oil in a large pot over medium heat. Add the chopped onion and cook until it turns soft and golden. This should take around five minutes. Then, mix in minced garlic and grated ginger. Cook for one more minute, stirring often. You want to smell the lovely aroma from the garlic and ginger. 2. Adding spices and liquids Next, sprinkle in the curry powder, ground cumin, turmeric powder, and red chili powder. Stir until the onion is coated with these spices. Let them cook for two minutes. This step makes the flavors pop! Now, pour in the diced tomatoes with their juice, followed by the creamy coconut milk and vegetable broth. Mix everything well to combine. 3. Simmering the stew Gently fold in the rinsed chickpeas. Add salt and black pepper to taste. Bring the stew to a gentle simmer. Once simmering, lower the heat, cover the pot, and let it cook for 20 to 25 minutes. Stir occasionally to keep it from sticking. After cooking, taste and tweak the seasoning. If you want it thicker, mash a few chickpeas against the pot. Garnish with fresh cilantro before serving. Enjoy your delicious Indian-spiced chickpea stew! For the full recipe, refer back to the ingredients section. - Ensuring the perfect texture: To get that creamy and thick stew, you should mash some chickpeas. This adds a nice body. Stir gently while mashing to keep some whole. - Adjusting spice levels: If you want more heat, add more red chili powder. Start with a little, then taste and add more if needed. For less spice, cut the chili powder in half. - Enhancing flavor with garnishes: Fresh cilantro adds color and brightness to the stew. Just chop it up and sprinkle it on top before serving. You can also add a squeeze of lime for extra zing. These tips will help you craft a comforting dish. For the complete cooking process, check the Full Recipe. {{image_4}} You can easily change this stew to fit your taste. - Using different legumes or vegetables: If you don’t have chickpeas, try black beans or lentils. You can also add sweet potatoes, carrots, or spinach for more nutrients. - Dairy-free options: The coconut milk gives a rich taste, but you can swap it with almond or soy milk. This keeps the stew creamy without dairy. - Additional spices to suit taste: If you want more heat, add cayenne pepper or fresh chili. For a different flavor, try garam masala or coriander. Play around with spices to find your perfect blend. Feel free to explore these options! Every change can make your stew unique and delicious. Want to try the original? Check out the Full Recipe for the classic dish. To keep your Indian-spiced chickpea stew fresh, let it cool first. This step is key. Place the pot on a cool surface. Give it about 30 minutes to reach room temperature. Use airtight containers for storage. Glass containers work well. They keep the flavors locked in. You can also use plastic containers, but make sure they are BPA-free. When ready to reheat, take the stew from the fridge. Pour it into a pot. Heat it on medium-low. Stir often to stop it from sticking. If it seems thick, add a splash of vegetable broth or water. Heat until it's warm, about 5 to 10 minutes. For safe eating, ensure it reaches at least 165°F. This way, you'll enjoy the stew's warmth and flavor again! For the full recipe, check out the Spicy Indian Chickpea Stew 🥘. Yes, you can freeze this stew. Let it cool first. Then, put it in a safe container. Leave some space at the top for expansion. It stays good for about three months. To thicken your stew, mash some chickpeas. Use the back of a spoon against the pot. You can also simmer it longer. This helps reduce the liquid and makes it thicker. You can serve this stew with rice or naan. Both soak up the flavors well. A side salad or yogurt adds a nice touch too. Enjoy experimenting with different pairings! For the complete recipe, check out the [Full Recipe]. This blog post covered how to make a tasty Indian-spiced chickpea stew. We explored key ingredients like canned chickpeas, various vegetables, and spices. I shared step-by-step instructions for cooking, along with helpful tips for texture and flavor. You learned about fun ingredient variations and how to store leftovers properly. In conclusion, this stew is simple to make and packed with flavor. Feel free to get creative with your ingredients. Enjoy your cooking!](https://dishtreats.com/wp-content/uploads/2025/06/561fcdd4-13bb-4dd2-b7b4-b44f6a9d9028-768x768.webp)


![- 12 ounces of spaghetti or linguine - 4 cups of vegetable broth - 1 tablespoon of olive oil - 6 cloves of garlic, finely minced - 1 teaspoon of red pepper flakes - Zest of 1 lemon - Juice of 2 fresh lemons - 1 cup of cherry tomatoes, halved - 1 cup of fresh spinach leaves - 1/2 cup of grated Parmesan cheese - Salt and freshly ground black pepper to taste - Fresh parsley, chopped for garnish Gathering the right ingredients is key for One-Pot Lemon Garlic Pasta. Each item plays a role in creating a bright and tasty dish. The spaghetti or linguine serves as the base. The vegetable broth gives it depth and flavor. Olive oil adds richness, while garlic brings a punch. Red pepper flakes add just a hint of heat. Next, the lemon zest and juice bring brightness. Cherry tomatoes offer sweetness and color. Fresh spinach adds a pop of green and nutrition. Parmesan cheese gives a creamy finish. Finally, don’t forget salt and pepper to enhance all the flavors. - Use nutritional yeast instead of Parmesan cheese for a vegan option. - Try gluten-free pasta like brown rice or quinoa pasta. If you want to make this dish vegan, swap out the cheese for nutritional yeast. It adds a similar nutty flavor without dairy. For those who need gluten-free options, plenty of pasta choices exist. You can use brown rice or quinoa pasta for a tasty alternative. This recipe stays flexible while keeping its delicious essence. Enjoy exploring these options as you cook! First, heat one tablespoon of olive oil in a large pot over medium heat. Once the oil is hot, add six cloves of finely minced garlic and one teaspoon of red pepper flakes. Sauté this mix for about one to two minutes. Stir it often to avoid burning the garlic. Burnt garlic can ruin the flavor of your dish. Next, pour in four cups of vegetable broth. Then, add the zest of one lemon and the juice of two fresh lemons. Stir gently to mix everything well. The lemon adds a bright flavor that makes this dish special. Now, bring the mixture to a rolling boil. Carefully add twelve ounces of spaghetti or linguine. Make sure the pasta is fully submerged in the broth. This helps it cook evenly. Reduce the heat to a gentle simmer. Cook the pasta while stirring occasionally for about ten to twelve minutes. You want it to be al dente, which means it should be firm to the bite. Most of the liquid should be absorbed by now. After the pasta is cooked, add one cup of halved cherry tomatoes and one cup of fresh spinach. Cook for an additional two to three minutes. Stir until the spinach wilts and the tomatoes soften slightly. Remove the pot from the heat. Stir in half a cup of grated Parmesan cheese. This will give your pasta a creamy texture. Taste it and season with salt and freshly ground black pepper as needed. Allow the pasta to rest for a couple of minutes in the pot. This helps it thicken slightly before serving. For the full recipe, check out the details provided above. Enjoy your flavorful one-pot lemon garlic pasta! To cook pasta al dente, follow these steps: - Use plenty of water for boiling. - Check the pasta package for cooking times. - Taste a piece a minute before the time is up. To avoid burnt garlic, do this: - Keep the heat at medium. - Stir the garlic often. - As soon as it smells good, move to the next step. If you want a zesty kick, add more lemon juice. - Start with an extra half lemon. - Taste and add more if needed. To balance spices, try adding fresh herbs. - Basil or thyme work well. - Chop them finely and mix in before serving. For best pairings, serve with a crisp salad. - A simple green salad brightens the meal. - Garlic bread makes a great side, too. For a nice presentation, use shallow bowls. - Garnish with parsley and extra cheese. - A sprinkle of red pepper flakes adds color. Check the Full Recipe for more details and tips on making this dish shine! {{image_4}} You can make One-Pot Lemon Garlic Pasta even more filling by adding protein. Grilled chicken is a great choice. Just slice it thin and mix it in before serving. Shrimp is another tasty option. Simply cook the shrimp in the pot for a few minutes until they turn pink. If you want a plant-based option, try chickpeas. They are easy to add and packed with protein. Use a can of chickpeas, rinse them, and stir them in with the pasta. They will soak up the lemon flavor and add a nice texture. Using seasonal vegetables can brighten your dish. Fresh veggies add color and nutrition. In spring, consider asparagus or peas. In summer, zucchini or bell peppers work well. You can also substitute spinach with kale or arugula. These greens offer a different taste and texture. Just chop them and add them in the last few minutes of cooking. You can change the sauce to suit your taste. For a creamy lemon sauce, add a splash of cream after cooking. This gives the pasta a rich flavor. If you prefer a dairy-free option, use coconut milk instead. Another way to deepen the flavor is by adding a splash of white wine. Pour it in before the broth. This adds a nice depth that complements the lemon. Just let it cook down for a minute before adding the rest of the ingredients. These variations will keep your One-Pot Lemon Garlic Pasta exciting and new each time you make it. For the complete recipe, check out [Full Recipe]. You can store One-Pot Lemon Garlic Pasta in the fridge for about three days. To keep it fresh, place it in an airtight container. When reheating, add a splash of water or broth to prevent it from drying out. Heat it gently on the stove or in the microwave, stirring often. This keeps the pasta creamy and tasty. If you want to freeze One-Pot Lemon Garlic Pasta, let it cool completely first. Transfer it to a freezer-safe container. It can last for up to three months in the freezer. When you are ready to eat, move it to the fridge to thaw overnight. Reheat it on the stove with a little broth or water. This helps regain its original texture and flavor. Enjoy your meal without fuss! I recommend using spaghetti or linguine for this dish. These shapes cook well and absorb the lemon-garlic flavors nicely. You can also try fettuccine or thin spaghetti if you like. Choose your favorite type based on what you have at home. Yes! You can use gluten-free pasta like brown rice or chickpea pasta. These options hold up well in the dish and taste great. Be sure to check the cooking time, as gluten-free pasta may vary. If you want less heat, simply reduce the red pepper flakes. You can start with half a teaspoon and add more if you want. You can also replace them with a pinch of black pepper for flavor without the heat. This pasta pairs well with a fresh salad or garlic bread. A simple green salad with lemon vinaigrette adds a nice touch. You can also serve it with grilled vegetables or a light protein like chicken or shrimp. Enjoy your meal! This blog post shared a simple recipe for One-Pot Lemon Garlic Pasta. You learned about the key ingredients, including pasta, broth, and fresh veggies. I offered tips on cooking techniques, flavor enhancements, and ways to add protein. You also found storage tips and answers to common questions. This dish is easy to make and great for any meal. Enjoy experimenting with your favorite ingredients and variations!](https://dishtreats.com/wp-content/uploads/2025/07/777f1442-06da-446c-8bc8-b5c2e5ded698-768x768.webp)