Spicy Garlic Edamame Flavorful and Easy Snack Recipe

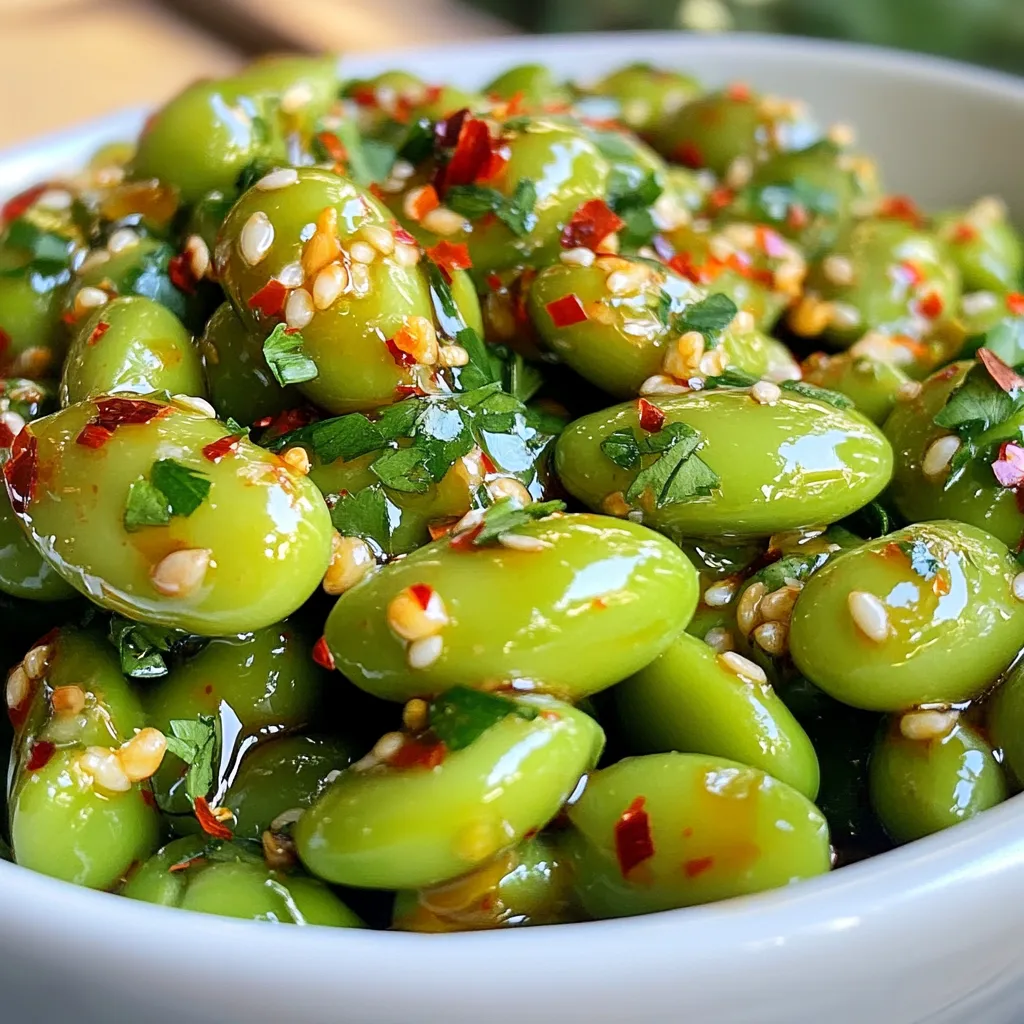
Are you ready to spice up your snack game? My Spicy Garlic Edamame recipe combines the nutty flavor of edamame with aromatic garlic and a kick of heat. It’s simple to make and takes just minutes. Whether you want a quick snack or a tasty appetizer, this dish ticks all the boxes. Follow along for a step-by-step guide to enjoying a flavorful and healthy treat that will impress your taste buds!
Why I Love This Recipe
- Quick and Easy: This recipe takes just 15 minutes to prepare, making it an ideal choice for a last-minute snack or side dish.
- Flavor Packed: The combination of garlic, red pepper flakes, and soy sauce creates a bold flavor that elevates simple edamame to a delightful dish.
- Healthy and Nutritious: Edamame is a great source of protein and fiber, making this dish not only tasty but also a healthy option.
- Customizable: You can easily adjust the spice level or add additional toppings like cilantro or green onions to suit your taste.
Ingredients
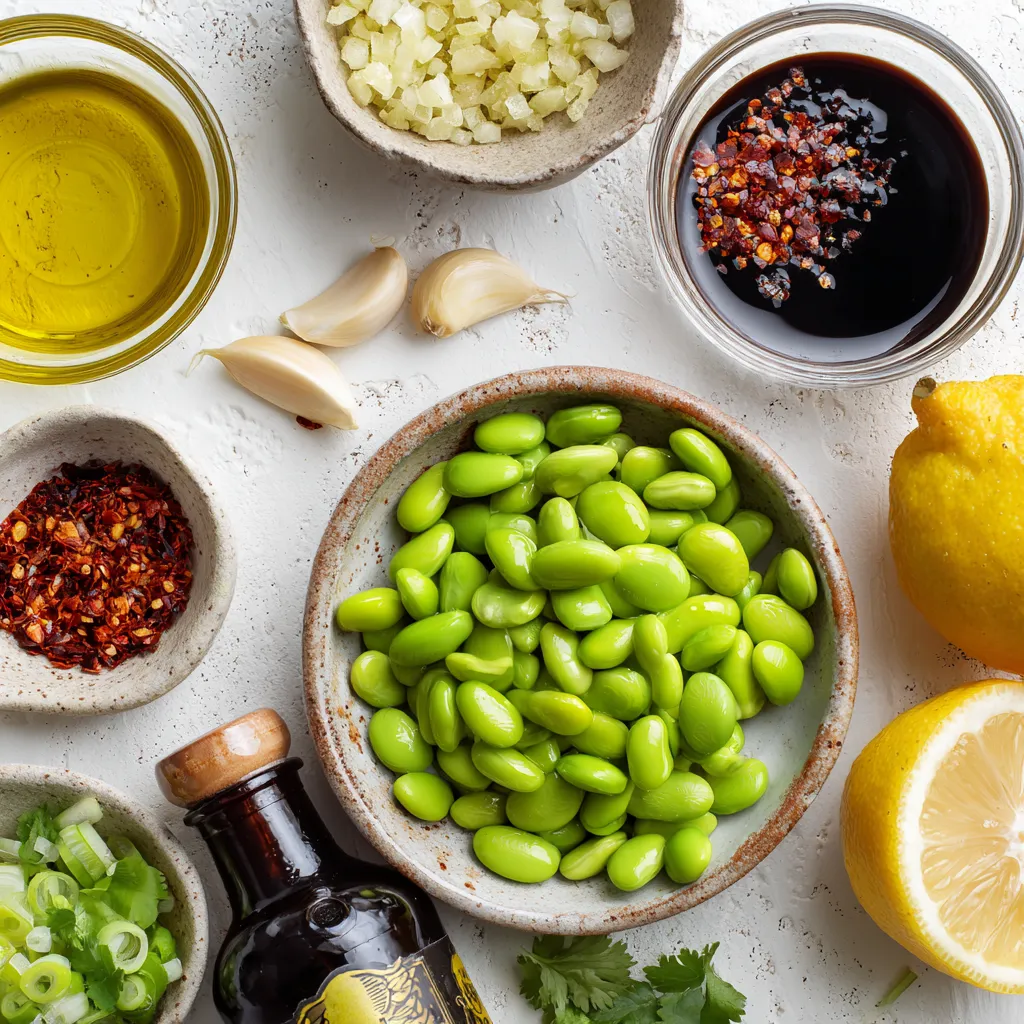
To make spicy garlic edamame, gather these simple ingredients:
- 2 cups shelled edamame (fresh or frozen)
- 4 cloves of garlic, finely minced
- 2 tablespoons extra virgin olive oil
- 1 teaspoon red pepper flakes
- 1 tablespoon soy sauce (or tamari for gluten-free)
- 1 teaspoon toasted sesame oil
- 1 tablespoon freshly squeezed lemon juice
- Sea salt, to taste
- Fresh cilantro or sliced green onions for garnish (optional)
These ingredients come together to create a flavorful snack. The edamame adds protein, while the garlic gives a savory kick. Red pepper flakes bring heat, and lemon juice adds brightness. Each element plays a role in making this dish tasty and fun. You can adjust the spice level by changing the amount of red pepper flakes. If you want more flavor, try adding more garlic or lemon juice.

Step-by-Step Instructions
Preparing the Edamame
To cook frozen edamame, start by boiling water in a pot. Add the edamame to the pot and cook for about 5-6 minutes, or until tender. After cooking, drain the edamame well and set it aside. This step gives the beans a great texture for our spicy dish.
Sautéing the Garlic
Next, heat 2 tablespoons of extra virgin olive oil in a large skillet over medium heat. Wait for about 1-2 minutes until the oil shimmers. Then, add 4 cloves of finely minced garlic to the skillet. Sauté the garlic for 1-2 minutes, stirring often. You want it fragrant and lightly golden but not browned. If it browns, it can taste bitter.
Combining Flavors
Now, it’s time to add some heat! Sprinkle in 1 teaspoon of red pepper flakes and stir for about 30 seconds. This will release their spicy flavor into the oil. Carefully add the cooked edamame to the skillet next. Toss the edamame with the garlic and oil mixture using a spatula. Make sure every bean gets coated well. Then, pour in 1 tablespoon of soy sauce and 1 teaspoon of toasted sesame oil, stirring to combine. This will infuse the beans with tasty flavors.
Final Touches
For the last touches, squeeze in 1 tablespoon of fresh lemon juice. Toss everything one more time to mix well. Taste the dish and add sea salt as needed. Adjust the seasoning to your liking.
Serving the Dish
Remove the skillet from heat and transfer the spicy edamame to a serving bowl. You can serve it warm as a side dish or appetizer. For a nice presentation, garnish with fresh cilantro or sliced green onions. If you like, add lime wedges for a zesty kick before serving. Enjoy your flavorful and easy snack!
Tips & Tricks
Choosing the Right Edamame
When picking edamame, you can choose fresh or frozen. Fresh edamame may have a vibrant green color and a firm texture. Frozen edamame is easy to find and works well. Check the package for signs of freezer burn, which shows poor quality. If you see any brown spots or ice crystals, skip that bag.
Adjusting Spice Levels
You can change the heat in your dish easily. Start with one teaspoon of red pepper flakes. If you want more spice, add more. You can also try other spices, like cayenne pepper or chili powder. Just remember to taste as you go!
Enhancing Flavor
There are many ways to make your dish more exciting. Use different sauces, like teriyaki or ponzu, to change the taste. For crunch, add toasted nuts or seeds, such as sesame seeds or slivered almonds. These will give your edamame a nice texture.
Pro Tips
- Adjust the Spice Level: Feel free to modify the amount of red pepper flakes based on your personal heat preference. Start with less and add more if you like it spicier!
- Use Fresh Ingredients: Using fresh garlic instead of pre-minced can elevate the flavor of the dish significantly. Fresh herbs also add a delightful touch.
- Perfectly Cooked Edamame: If using frozen edamame, be sure not to overcook them. They should be tender but still have a slight bite for the best texture.
- Garnish for Flavor: Adding fresh cilantro or sliced green onions not only enhances the presentation but also adds a burst of fresh flavor to each bite.

Variations
Alternative Ingredients
You can swap out soy sauce for different options. Use liquid aminos for a light taste. If you want a gluten-free choice, tamari works well. You can also try coconut aminos for a sweeter flavor.
For seasoning, garlic is great, but you can explore other options. Try ginger for a fresh twist. Or use a splash of rice vinegar for tang. These changes make the dish unique.
Different Preparation Methods
When cooking edamame, you can choose between steaming and boiling. Steaming keeps more nutrients. It also gives a firmer texture. Boiling is faster but may lose some flavor.
Air frying can add a crunchy texture. This method gives the edamame a nice crisp. Simply toss them in the air fryer with a bit of oil and cook until golden.
Serving Suggestions
Spicy garlic edamame pairs well with many dishes. Serve it as a side with rice or noodles. It also complements sushi or grilled meats nicely.
You can transform it into a salad or bowl. Add fresh greens, diced veggies, and a dressing. This makes a colorful and healthy meal. Mix and match to suit your taste!
Storage Info
Short-Term Storage
After making Spicy Garlic Edamame, store leftovers in an airtight container. Keep it in the fridge. It stays good for about 3 days. When you want to eat it again, just check for any odd smells or textures. If it looks fine, you’re good to go!
Long-Term Storage
To save edamame for later, freezing is the best choice. First, let the cooked edamame cool to room temperature. Then, place it in a freezer-safe bag. Squeeze out as much air as you can. This helps prevent freezer burn. You can freeze the edamame for up to 3 months. When you’re ready to use it, just thaw it in the fridge overnight.
Reheating Instructions
When it’s time to enjoy your leftovers, reheat them in a skillet over medium heat. Add a splash of water to help steam them. Stir often until they are warmed through. You can also use the microwave. Place them in a bowl, cover with a damp paper towel, and heat in 30-second intervals, stirring in between. This keeps them moist and tasty!
FAQs
What are the health benefits of edamame?
Edamame is packed with nutrients. It contains protein, fiber, and healthy fats.
- Nutritional content overview: A serving of edamame has about 17 grams of protein. It also has fiber, iron, and calcium.
- Benefits of protein and fiber: The protein helps build muscles. The fiber aids digestion and keeps you full longer.
Can I make this recipe ahead of time?
Yes, you can prepare this dish in advance.
- Preparing in advance and storing: Cook the edamame and toss it with the garlic mix. Store it in the fridge for up to three days. Reheat it before serving for the best taste.
What can I substitute for soy sauce?
If you need to avoid soy sauce, there are great alternatives.
- Gluten-free alternatives: Use tamari for a gluten-free option. Coconut aminos is another tasty choice.
- Other flavorful substitutes: You can try liquid aminos or even a homemade mix of broth with a splash of vinegar for depth.
This blog post covered how to make a tasty edamame dish. You learned about the key ingredients, step-by-step instructions, and tips to enhance flavor. We also explored variations, storage tips, and answered common questions.
Making this dish can fill your meal with healthy benefits. I hope you feel inspired to try it at home! Enjoy your cooking adventure and make it your ow

Spicy Garlic Edamame Delight
Ingredients
- 2 cups shelled edamame (fresh or frozen)
- 4 cloves garlic, finely minced
- 2 tablespoons extra virgin olive oil
- 1 teaspoon red pepper flakes
- 1 tablespoon soy sauce (or tamari for gluten-free option)
- 1 teaspoon toasted sesame oil
- 1 tablespoon freshly squeezed lemon juice
- to taste sea salt
- optional fresh cilantro or sliced green onions for garnish
Instructions
- Prepare the Edamame: If using frozen edamame, bring a pot of water to a boil and add the edamame. Cook according to the package instructions, usually around 5-6 minutes, until tender. Drain well and set aside.
- Heat the Oil: In a large skillet, warm the extra virgin olive oil over medium heat until shimmering, which takes about 1-2 minutes.
- Sauté the Garlic: Add the finely minced garlic to the skillet and sauté for approximately 1-2 minutes, stirring frequently, until the garlic is fragrant and lightly golden, being careful not to let it brown, as this can affect the flavor.
- Add the Spice: Sprinkle in the red pepper flakes and stir continuously for about 30 seconds to release their heat and flavor into the oil.
- Combine with Edamame: Carefully add the cooked edamame to the skillet. Using a spatula, toss the edamame with the garlic and oil mixture until they are well coated.
- Flavor Infusion: Pour in the soy sauce and toasted sesame oil, stirring well to ensure that all the edamame are evenly enveloped in the delicious sauce.
- Finish with Citrus: Squeeze the fresh lemon juice over the dish and give everything a good toss once more. Taste and season with sea salt as needed.
- Serve and Garnish: Remove from heat and transfer the edamame to a serving bowl. For an added burst of freshness, sprinkle with chopped cilantro or sliced green onions if desired.


![To make delicious roasted red pepper hummus, gather these key ingredients: - 1 cup canned chickpeas, drained and thoroughly rinsed - 1 large roasted red pepper (store-bought jarred or homemade) - 2 tablespoons tahini - 2 tablespoons extra virgin olive oil, plus more for drizzling - 2 tablespoons freshly squeezed lemon juice - 1 clove of garlic, finely minced - 1/2 teaspoon ground cumin - Salt, to taste These ingredients create a smooth and creamy dip. Each one plays a vital role. Chickpeas give it body. Roasted red pepper adds sweetness and depth. Tahini brings a nutty flavor, while olive oil adds richness. Lemon juice gives it brightness and balance. Garlic adds a punch, and cumin adds warmth. To make your hummus even better, you can add some garnishes: - Fresh parsley, finely chopped (for garnish, optional) - Paprika, for garnish (optional) These garnishes not only look nice but also enhance the taste. Fresh parsley adds a pop of color and freshness. Paprika gives a hint of smokiness and warmth. You can use these garnishes to personalize your hummus. For the full recipe, check the detailed instructions that guide you through preparation and blending for a perfect dip. Roasting Techniques (Oven & Grill) You can roast red peppers in two main ways. The oven is great for a consistent roast. Start by preheating your oven to 450°F (230°C). Place whole red peppers on a lined baking sheet. Roast them for 20-25 minutes. Turn them every few minutes until the skin is blistered and charred. If you prefer grilling, place the peppers directly on the grill. Turn them often until they are blackened all around. How to Steam and Peel After roasting, steaming helps peel the skin. Place the hot peppers in a heatproof bowl. Cover it tightly with plastic wrap for about 10 minutes. This traps steam, loosening the skin. Once cool enough to handle, peel off the blackened skin. Remove the seeds, and set the peppers aside. Food Processor Tips Using a food processor makes blending easy. Start with the chickpeas and roasted red pepper in the bowl. Add tahini, olive oil, lemon juice, minced garlic, and ground cumin. Blend on low speed first. Gradually increase to high until smooth. Achieving Creamy Consistency To get a creamy texture, you may need to add water. If the hummus is thick, add one tablespoon at a time while blending. Keep processing until it reaches your desired consistency. Importance of Seasoning Seasoning makes a big difference in taste. After blending, taste your hummus. Add salt slowly, mixing well after each addition. This helps to enhance the overall flavor. Customizing Thickness If you want a thinner hummus, keep adding water. Blend in small amounts until you reach the right thickness. Remember, you can always add more, but you can't take it out! - Experimenting with Spices: You can add spices to boost flavor. Try smoked paprika for a smoky taste. Or add a pinch of cayenne pepper for some heat. Each spice adds a unique twist to your hummus. - Using Fresh Ingredients: Fresh ingredients make a big difference. Fresh garlic brings a sharp bite. Choose ripe lemons for the best juice. They add zest and brightness to the dish. - Store-Bought Ingredient Options: If you're short on time, use store-bought roasted red peppers. They save you the hassle of roasting at home. Check the jar for quality; it should have no added sugars. - Quick Prep Hacks: Use canned chickpeas to save time. They are ready to go. Rinse them well to remove excess sodium. This step helps keep your hummus light and tasty. - Best Pairings for Hummus: Roasted red pepper hummus pairs well with fresh veggies. Carrot sticks, cucumber slices, and bell peppers create a colorful plate. You can also serve it with pita chips or crackers. - Creative Serving Ideas: For a fun twist, serve hummus in cute bowls. Drizzle olive oil on top for a glossy finish. Add a sprinkle of paprika and fresh parsley for color. It looks great and tastes even better. For the full recipe, check out the [Full Recipe]. {{image_4}} To make your hummus spicy, add fresh jalapeños or crushed red pepper flakes. Start with a small amount. Blend everything well and taste. Adjust the heat to your liking. For a balanced flavor, add a bit of honey or maple syrup. This sweetness can tone down the heat and enhance the taste. Fresh herbs give hummus a bright twist. Try adding basil, cilantro, or dill. Just chop them finely before blending. These herbs pair well with roasted red pepper. They add freshness and depth. You can also mix in some sun-dried tomatoes for a Mediterranean vibe. It brings a rich flavor that complements the hummus nicely. Want to make your hummus even healthier? Add superfoods like spinach or kale. They blend in well and boost nutrients. If you have dietary needs, this hummus is easy to adjust. It's naturally vegan and gluten-free. You can enjoy it without worry. Check the full recipe for more tips on adding these healthy ingredients. To keep your roasted red pepper hummus fresh, use an airtight container. Glass containers work best to avoid any odors. If you do not have glass, BPA-free plastic containers are also a good choice. This way, your hummus stays tasty and does not absorb other flavors in the fridge. Homemade hummus lasts up to one week in the fridge. Make sure to check for any signs of spoilage before eating. If it looks or smells off, it is best to toss it. You can freeze hummus for longer storage. First, place the hummus in a freezer-safe container. Leave some space at the top for expansion as it freezes. You can also use ice cube trays for smaller portions. To thaw, place the frozen hummus in the fridge overnight. This will help keep its texture smooth. If it seems a bit thick after thawing, simply add a splash of water and stir well. Enjoy your hummus in wraps, sandwiches, or with fresh veggies. - Start by gathering your ingredients. - Roast the red pepper and cool it. - Blend chickpeas, roasted pepper, tahini, olive oil, lemon juice, garlic, and cumin. - Add water for the right texture. - Season with salt and blend again. - Serve it with a drizzle of olive oil. Making roasted red pepper hummus is simple. You can easily prepare it at home. Follow the quick steps above, and you have a fresh dip ready in about 35 minutes. For the full recipe, check out the detailed instructions provided earlier. - Fresh veggie sticks (carrots, cucumbers, bell peppers) - Warm pita bread or pita chips - Crackers or breadsticks - Grilled meats or seafood - Salads as a dressing Roasted red pepper hummus is versatile. It pairs well with many foods. Fresh veggies make a crunchy, healthy option. You can also enjoy it with pita bread for a classic taste. - Local grocery stores often carry it. - Check health food stores for unique brands. - Look in the deli section for fresh options. - Popular brands include Tribe, Sabra, and Hope. If you prefer buying hummus, many stores have pre-made options. Check your local store's shelves or the deli section for fresh varieties. Each brand may offer a unique taste, so explore a few! - High in protein from chickpeas. - Contains healthy fats from olive oil and tahini. - Rich in vitamins from red peppers and garlic. - Low in saturated fat and cholesterol-free. Roasted red pepper hummus is a healthy snack. It offers many nutritional benefits. The chickpeas give protein, while olive oil adds healthy fats. This dip is not just tasty; it's good for you too! Roasted red pepper hummus is easy to make and packed with flavor. We discussed key ingredients like chickpeas, roasted red peppers, and tahini. You learned step-by-step how to prepare and blend, plus tips to enhance taste and texture. Explore variations by adding spices or herbs to fit your taste. Don't forget how to store your hummus for freshness. I hope this guide inspires you to create your own hummus and enjoy it!](https://dishtreats.com/wp-content/uploads/2025/07/4eff3fe8-7a50-4e3c-86ee-c946a92fe799-768x768.webp)

![- Firm tofu (14 oz, pressed and cubed) - Panko breadcrumbs (1 cup) - Cornstarch (1/4 cup) - Soy sauce (1 tablespoon) - Nutritional yeast (optional, 1 tablespoon) - Garlic powder (1 teaspoon) - Onion powder (1 teaspoon) - Dried oregano (1 teaspoon) - Salt and freshly ground black pepper - Air fryer - Mixing bowls - Cooking spray When making crispy air fryer tofu nuggets, the right ingredients matter. Start with firm tofu. Firm tofu holds its shape well and gives a satisfying bite. Press it to remove extra moisture. This step is crucial. It helps the tofu absorb sauces and seasonings better. Next, panko breadcrumbs add crunch. They are lighter than regular breadcrumbs. This texture makes your nuggets crispy and fun to eat. The cornstarch helps create a crispy coating. For seasonings, soy sauce gives a rich flavor. Nutritional yeast adds a cheesy taste, but it is optional. Garlic powder and onion powder enhance the savory notes. Dried oregano adds a nice herbal touch. Always season with salt and pepper to taste. Gather your cooking supplies. An air fryer is key for even cooking and crispiness. Mixing bowls help combine ingredients well. Don't forget cooking spray! It ensures a golden crust on your tofu nuggets. For the full recipe, check the detailed instructions above. Happy cooking! - Preheat air fryer to 400°F (200°C). This helps the nuggets get crispy. - Toss cubed tofu in soy sauce. Make sure every piece is well-coated. - Combine dry ingredients in a bowl. Use panko, cornstarch, and spices. - Coat each tofu cube in the breadcrumb mixture. Press gently to stick well. - Arrange nuggets in a single layer in the air fryer. Space is key for even cooking. - Mist with cooking spray and cook for 12-15 minutes. Shake the basket halfway for best results. Enjoy your crispy air fryer tofu nuggets! Check out the Full Recipe for more tips. To get crispy tofu nuggets, preheat your air fryer to 400°F (200°C). This helps the nuggets cook evenly and become perfectly crunchy. While cooking, use cooking spray. A light mist on the nuggets before frying ensures they get that golden finish. You can change the taste of your tofu nuggets easily. Swap the seasonings for different flavors. Try adding chili powder for heat or smoked paprika for a rich flavor. You can also use other types of breadcrumbs. Regular breadcrumbs or crushed cornflakes can work well. Pair your crispy nuggets with tasty dipping sauces. Sweet chili sauce or spicy mayo works great. For a fun presentation, garnish your dish with fresh cilantro or thinly sliced green onions. This adds color and makes your meal look appealing. Try these tips, and your tofu nuggets will impress everyone! {{image_4}} You can easily make this recipe vegan. If you want to skip the nutritional yeast, that’s fine. The tofu will still taste great. You can also change the seasonings to fit your taste. Try using paprika, cumin, or even curry powder for a unique twist. If you need a gluten-free snack, swap the regular breadcrumbs for gluten-free ones. You should also check the soy sauce. Some brands add gluten, so look for a gluten-free option. This way, everyone can enjoy your crispy tofu nuggets. Feel free to mix in some veggies or spices. Chopped bell peppers or green onions can add a nice crunch. You could also use cheese alternatives. Adding these can create an extra layer of flavor and keep things exciting. To store your crispy air fryer tofu nuggets, let them cool down first. Place them in an airtight container. This keeps them fresh and tasty. They can last in the fridge for 3 to 4 days. Make sure to check for any signs of spoilage before eating. You can freeze cooked tofu nuggets if you want to save some for later. Arrange them in a single layer on a baking sheet. Freeze them for about 1 hour until solid. Then, transfer them to a freezer bag or container. They can stay in the freezer for up to 3 months. When you want to eat them, thaw them in the fridge overnight. To keep your nuggets crispy, use an air fryer or an oven to reheat them. Preheat the air fryer to 350°F (175°C) and cook for about 5 to 7 minutes. If using an oven, place them on a baking sheet and heat at 350°F (175°C) for 10 to 15 minutes. Avoid using a microwave, as it can make them soggy. Enjoy your crispy air fryer tofu nuggets again! To make sure your air fryer tofu nuggets are crispy, follow these tips: - Press your tofu: Remove excess moisture by pressing your tofu. This helps it soak up flavors and become crispier. - Use panko breadcrumbs: Panko gives a better crunch than regular breadcrumbs. - Preheat the air fryer: Always preheat your air fryer to 400°F (200°C) before cooking. This step is key for crispiness. - Don't overcrowd the basket: Place nuggets in a single layer, leaving space between them. This ensures hot air can circulate. - Mist with cooking spray: A light spray helps create a golden, crispy surface. - Shake halfway through: Give the basket a shake halfway through cooking for even crispiness. Yes, you can use different types of tofu for this recipe: - Firm tofu: This works best for nuggets. It holds its shape and crisps well. - Extra firm tofu: This is also a great choice. It will be very crispy and satisfying. - Silken tofu: I do not recommend this type for nuggets. It will crumble and not hold its shape during cooking. To add some heat to your tofu nuggets, try these suggestions: - Add cayenne pepper: Mix cayenne pepper into your breadcrumb mixture for a kick. - Use spicy sauce: Toss the tofu in a spicy sauce before coating with breadcrumbs. - Include chili powder: Mix chili powder into your dry ingredients for a warm flavor. - Serve with hot sauce: Pair your nuggets with a spicy dipping sauce like sriracha or hot chili sauce. For the full recipe and more details on making crispy air fryer tofu nuggets, check out the [Full Recipe]. These tofu nuggets are easy and fun to make. You prep the tofu, coat it, and air fry it for a tasty snack. You can adjust the seasonings and even use different breadcrumbs for variety. Store leftovers well for later enjoyment. In the end, these nuggets are a great meal or snack choice. Explore different flavors and share them with friends. Enjoy your cooking adventures!](https://dishtreats.com/wp-content/uploads/2025/06/79817f14-b7a2-45e9-a748-387ee13ee939-768x768.webp)
