Spicy Chipotle Chicken Quesadillas Flavorful Treat

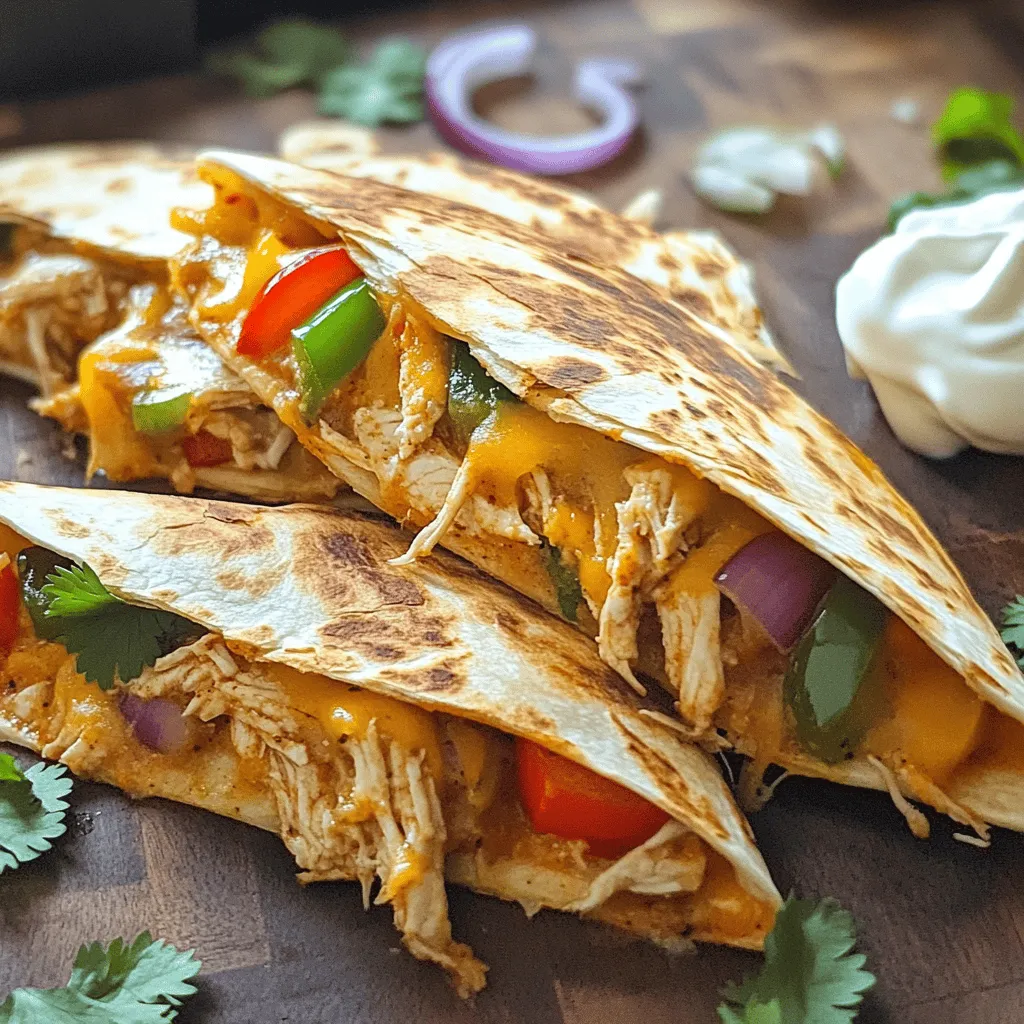
Craving a bold, flavorful treat? Look no further! My Spicy Chipotle Chicken Quesadillas bring a delicious kick to your plate. With tender chicken, zesty chipotle, and gooey cheese, each bite is a burst of flavor. Plus, they’re easy to make and perfect for any meal. Let’s dive into the ingredients and steps to create this spicy delight that will impress your friends and family!
Ingredients
List of Ingredients
- 2 cups shredded cooked chicken
- 1 tablespoon minced chipotle pepper in adobo sauce
- 1 cup shredded Monterey Jack cheese
- 1 cup shredded cheddar cheese
- 1/2 cup bell peppers, thinly sliced
- 1/4 cup finely chopped red onion
- 4 large flour tortillas
- 2 tablespoons olive oil (divided)
- 1 teaspoon garlic powder
- 1 teaspoon ground cumin
- Salt and black pepper to taste
- Optional garnishes
Making spicy chipotle chicken quesadillas is easy and fun. I love using shredded cooked chicken because it saves time. You can use leftover chicken or even a store-bought rotisserie chicken. The chipotle pepper in adobo sauce adds a smoky heat. Adjust the amount based on your spice level.
For the cheese, Monterey Jack melts beautifully, while cheddar brings flavor. I like to mix both for a creamy texture. The bell peppers add color and crunch. You can use any color you like.
Don’t forget the red onion! It gives a sweet bite that pairs well with the spices. Flour tortillas are my go-to because they hold everything together. The olive oil helps the quesadillas get crispy.
Seasoning is important. Garlic powder and ground cumin add depth to the filling. Always taste and adjust salt and black pepper to your liking.Enjoy the process of making these delicious quesadillas.
Step-by-Step Instructions
Preparation Steps
- Combine the chicken with chipotle pepper and seasonings.
In a large bowl, mix the shredded chicken with minced chipotle pepper, garlic powder, ground cumin, salt, and pepper. Make sure each piece of chicken gets coated well. This mix gives your quesadillas a spicy kick.
- Sauté bell peppers and onions.
Heat 1 tablespoon of olive oil in a large skillet on medium heat. Add the thinly sliced bell peppers and chopped red onion. Stir them for about 3-4 minutes until they soften and turn a bit golden. This step adds a nice sweetness to balance the spice.
- Assemble the quesadillas.
In the same skillet, lay one tortilla flat. Sprinkle half of it with Monterey Jack and cheddar cheese. Add half of the spicy chicken mixture on top. Next, add the sautéed bell peppers and onions. Top with a little more cheese. This extra cheese helps keep everything together when you fold the tortilla.
Cooking Process
- Cook the quesadillas on medium heat.
Fold the tortilla in half and press gently to seal it. Cook each side for about 3-4 minutes. Keep an eye on them to ensure they don’t burn. The goal is to get them golden brown and crispy.
- Monitor for golden brown texture.
You want the outside to be crunchy while the inside melts perfectly. If one side looks ready, flip it carefully using a spatula.
- Rest and slice before serving.
After cooking, let the quesadillas sit for about a minute on a cutting board. This resting time helps the cheese firm up a bit. Then, slice them into wedges for easy serving. Enjoy your spicy chipotle chicken quesadillas warm, maybe with some sour cream on the side!
Tips & Tricks
Cooking Tips
- Ensuring even cooking of the quesadillas: To cook your quesadillas evenly, use medium heat. This allows the tortillas to brown without burning. Flip them gently with a spatula for uniform color.
- Preventing filling from spilling out: Place just enough filling in the center. Leave space at the edges when folding. Press the edges down lightly to seal. This helps keep all the tasty bits inside.
- Choosing the right tortilla: Use large flour tortillas for best results. They provide flexibility and hold the filling well. Avoid thin tortillas, as they may tear during cooking.
Flavor Enhancements
- Adding spices for extra heat: For more spice, add cayenne pepper or crushed red pepper flakes. Mix these into the chicken before cooking. This boosts the heat and flavor of your quesadillas.
- Incorporating additional ingredients like avocado or corn: Adding fresh avocado slices brings creaminess. Corn adds a sweet crunch. Mix these with your filling for a tasty twist. You can also experiment with black beans for added protein.

Variations
Ingredient Swaps
You can switch up the protein in this recipe. Try using beef or shrimp for a different taste. These proteins bring their unique flavors and textures. If you want a plant-based option, use black beans or grilled vegetables. Both choices provide great taste without meat.
Serving Suggestions
Pair your spicy chipotle chicken quesadillas with sides that enhance their flavor. Guacamole adds a creamy texture that balances the spice. Fresh salsa, with its crispness and tang, makes a perfect match too.
For drinks, try serving these quesadillas with sparkling water or a light beer. Both can help cool your taste buds from the heat. You can also enjoy them with a fruity mocktail for a fun twist. These pairings will elevate your dining experience and keep everyone happy.
Storage Info
Refrigeration
To keep your spicy chipotle chicken quesadillas fresh, store leftovers in the fridge. Place them in a tight container to avoid drying out. I suggest using glass or plastic containers with a secure lid. This helps keep them fresh for up to three days. If you want to keep them longer, consider freezing instead.
Freezing Instructions
You can freeze both uncooked and cooked quesadillas. For uncooked ones, wrap each quesadilla in plastic wrap. Place them in a freezer bag and remove as much air as possible. Cooked quesadillas can also freeze well. Let them cool first, then wrap and bag them like the uncooked ones.
When you are ready to eat, thaw quesadillas in the fridge overnight. To reheat, place them in a hot skillet. Cook for about 3-4 minutes per side until hot and crispy. This method keeps them tasty and fresh.
FAQs
Common Questions
How spicy are chipotle peppers?
Chipotle peppers have a smoky flavor and medium heat. They rate around 2,500 to 8,000 on the Scoville scale. This means they can be spicy, but not overwhelming. If you like heat, use more. If you prefer mild, use less.
Can I use different types of cheese?
Yes, you can use many types of cheese. Monterey Jack and cheddar melt well. You might try pepper jack for extra spice or mozzarella for a gooey texture. Feel free to mix and match your favorites.
What’s the best way to reheat quesadillas?
To reheat quesadillas, use a skillet. Heat it over medium heat. Place the quesadilla in the skillet and cook for 2-3 minutes on each side. This method keeps the tortilla crispy and the cheese melted.
Cooking and Preparation Inquiries
How long do quesadillas take to cook?
Quesadillas usually take about 6-8 minutes to cook. You need 3-4 minutes on each side. Look for a golden brown color and melted cheese to know they are ready.
Can I make quesadillas in advance?
Yes, you can make quesadillas in advance. Cook them, let them cool, and then store them in the fridge. Reheat them later in a skillet for best results.
Ingredient and Substitution Questions
What can I substitute for chicken?
You can use many options instead of chicken. Try shredded beef or pulled pork for a different flavor. For a vegetarian option, use black beans or sautéed mushrooms.
Are there gluten-free tortillas available?
Yes, many stores sell gluten-free tortillas. Look for options made from corn or other gluten-free grains. Always check the label to ensure they meet your dietary needs.
We explored how to make delicious quesadillas with simple ingredients. You learned the steps for preparation and cooking, along with helpful tips. Variations let you get creative with flavors and ingredients. We also covered how to store leftovers and answered common questions.
In the end, quesadillas are fun and easy to make. Whether you try classic or new flavors, enjoy each tasty bite!


![- 8 oz rotini or fusilli pasta - 1 cup cherry tomatoes, halved - 1 cucumber, diced - 1 cup Kalamata olives, pitted and halved - 1/2 red onion, finely chopped - 1 bell pepper, diced - 1 cup feta cheese, crumbled - 1/4 cup fresh parsley, chopped - 1/4 cup extra virgin olive oil - 3 tablespoons red wine vinegar - 1 teaspoon dried oregano - Salt and pepper, to taste - Substitute red wine vinegar with apple cider vinegar - Add other vegetables like bell peppers or spinach This salad bursts with color and flavor. The main ingredients bring freshness. Each bite is full of crunch and zest. The pasta holds the dressing well, creating a tasty mix. The dressing is simple but packs a punch. Extra virgin olive oil adds richness. Red wine vinegar gives a tangy taste. Dried oregano adds a hint of earthiness. Salt and pepper enhance all the flavors. Want to mix it up? Try adding apple cider vinegar instead of red wine vinegar. You can also throw in extra veggies like spinach. This salad is flexible and lets your creativity shine. For the full recipe, check out the Zesty Greek Pasta Salad with Feta & Olives. To start, bring salted water to a rolling boil. Add 8 ounces of rotini or fusilli pasta. Cook for 8-10 minutes until al dente. Once cooked, drain the pasta in a colander. Rinse it under cold water to stop the cooking. Set the drained pasta aside for later. While your pasta cooks, wash and chop your vegetables. Use 1 cup of cherry tomatoes, 1 cucumber, 1/2 red onion, and 1 bell pepper. Dice these into bite-sized pieces. Also, chop 1/4 cup of fresh parsley. Once chopped, place all the vegetables into a large mixing bowl. This creates a colorful and fresh base for your salad. Now it’s time to mix things! Add the cooled pasta and 1 cup of Kalamata olives to the bowl of vegetables. This combination adds a nice salty flavor. In a separate bowl, prepare the dressing. Mix together 1/4 cup of olive oil, 3 tablespoons of red wine vinegar, and 1 teaspoon of dried oregano. Add salt and pepper to taste. Whisk until well combined. Drizzle the dressing over the pasta and vegetable mixture. Gently fold in 1 cup of crumbled feta cheese. Make sure all the ingredients are evenly coated with the dressing. This step is key for great flavor in every bite. Cover the salad with plastic wrap or a lid. Place it in the refrigerator for 30 minutes. This chilling time helps the flavors meld together. You can serve your pasta salad cold or at room temperature. For the full recipe, check out the details above. Serve your Greek pasta salad in a vibrant bowl for visual appeal. A colorful dish draws people in. You can also use individual plates for a fresh look. Garnish each serving with extra feta and parsley. This adds a pop of color and flavor. Let your salad chill longer in the fridge. This helps the flavors blend and deepen. If you love herbs, try adding basil or dill. Fresh herbs boost the taste and aroma. Prep your ingredients in advance. Chop vegetables and cook the pasta ahead of time. This makes assembly quick and easy. When storing leftovers, use an airtight container. It keeps the salad fresh and tasty for days. For the best flavor, consume within three to five days. {{image_4}} There are many fun ways to switch up your Easy Greek Pasta Salad. Try a Mediterranean twist for a new taste. Here are some ideas: - Add sun-dried tomatoes for a sweet, tangy flavor. - Toss in artichoke hearts for extra texture. - For protein, add grilled chicken or chickpeas. Both options make it filling. If you need to change the recipe for your diet, here are some tips: - Use gluten-free pasta to make it gluten-free. - For a vegan option, skip the feta cheese or try a vegan substitute. Enjoy seasonal ingredients by mixing in fresh veggies: - In summer, add zucchini for a crunchy touch. - Use roasted vegetables for deeper flavors. Roasting brings out their natural sweetness. These variations keep your Easy Greek Pasta Salad fresh and exciting! Check out the [Full Recipe] for the base you can customize. To keep your Easy Greek Pasta Salad fresh, place it in an airtight container. You can store it in the refrigerator for about 3-5 days. This salad tastes best when you enjoy it fresh. I do not recommend freezing this salad. Freezing can change its texture, making it less enjoyable. If you prepare a large batch, store the dressing separately. This keeps the flavors bright and fresh. This pasta salad is best served cold. However, you can also enjoy it at room temperature. Before serving, gently toss the salad. This helps mix the flavors evenly throughout. For the full recipe, check back to the beginning. Yes, it can be prepared a day in advance for flavor enhancement. This allows all the tastes to blend and become more rich. Just keep it in the fridge until you are ready to serve. You can use vegan feta or other cheese alternatives. This makes the dish suitable for various diets. You might want to try a creamy cheese for a nice texture. Yes, it’s perfect for picnics and potlucks if kept properly chilled. The fresh ingredients hold up well. Just pack it in a cooler or insulated bag to keep it fresh. Consider adding grilled chicken, shrimp, or canned chickpeas. These options make the salad more filling. They also add great taste and texture to the mix. This salad combines fresh pasta with vibrant vegetables, feta, and a simple dressing. Using easy steps, you can create a delightful dish that's perfect for any gathering. Remember, you can adjust flavors and ingredients to fit your taste. Meal prep helps save time, and eating fresh is best. Enjoy your colorful pasta salad, whether at a picnic or a family dinner!](https://dishtreats.com/wp-content/uploads/2025/06/42921458-26d8-4100-967d-b17bfbbdb796-768x768.webp)

![- 1 pound Brussels sprouts - 3 tablespoons olive oil - 2 tablespoons maple syrup - 2 tablespoons balsamic vinegar - 1 teaspoon garlic powder - 1 teaspoon smoked paprika - Salt and pepper to taste - 1/4 cup chopped walnuts (optional) - 2 tablespoons grated Parmesan cheese (optional) To create crispy Brussels sprouts, start with fresh Brussels sprouts. Look for firm, small ones for the best taste. Trim the ends and cut each sprout in half. This helps them cook evenly and get crispy. Next, use olive oil to coat the sprouts. It adds flavor and helps them crisp up in the oven. Maple syrup and balsamic vinegar give the sprouts a sweet and tangy glaze. These flavors work great together! For seasonings, garlic powder and smoked paprika add depth. Adjust salt and pepper to match your taste. If you want to add crunch, use walnuts. Grated Parmesan cheese also makes a delicious topping. You can find the full recipe in the article. Enjoy the process, and get ready for a tasty side dish! - Preheat oven to 425°F (220°C). - Trim and halve the Brussels sprouts. Start by preheating your oven. This step is vital for a perfect roast. Next, take your Brussels sprouts and trim off the tough ends. Then, cut each sprout in half. This helps them cook evenly and get crispy. - Mixing oil and seasonings. - Tossing the Brussels sprouts to coat evenly. In a large bowl, pour in three tablespoons of olive oil. Add garlic powder, smoked paprika, salt, and pepper. Mix well. Now, toss in the halved Brussels sprouts. Use your hands to coat them evenly. Each sprout should be shiny and full of flavor. - Spread out on a baking sheet. - Roasting time and tips for even crispiness. Spread the Brussels sprouts in a single layer on a baking sheet. Make sure there’s space between them; this helps with crispiness. Roast them for 20-25 minutes. Halfway through, stir them around. This helps them brown evenly for that perfect crunch. - Whisking together maple syrup and balsamic vinegar. While the sprouts roast, it’s time to make the glaze. In a small bowl, mix two tablespoons of maple syrup with two tablespoons of balsamic vinegar. Whisk until combined. This glaze adds a sweet and tangy kick to the sprouts. - Drizzling glaze and optional toppings. - Return to oven for additional roasting. Once the Brussels sprouts are done roasting, take them out of the oven. Drizzle the maple balsamic glaze over them. Toss gently to coat each sprout. For extra flavor, sprinkle chopped walnuts and grated Parmesan cheese on top. Return the baking sheet to the oven for another 5 minutes to caramelize the glaze. Serve these crispy Brussels sprouts warm for the best taste. Full Recipe can be found in the earlier section for a complete guide. To get the best crispiness, space matters. Place your Brussels sprouts in a single layer on the baking sheet. This helps them roast evenly. If they touch, they will steam instead of crisp. Stirring is key, too. Halfway through cooking, give them a good stir. This ensures all sides get that golden brown color. You can boost flavor with simple spices. Try adding cayenne for heat or lemon zest for brightness. Fresh herbs like thyme or rosemary also work great. For toppings, consider adding crunchy nuts or cheese. Chopped walnuts or grated Parmesan cheese add fun textures and flavors. Avoid overcrowding your pan. If you pack the sprouts too tight, they won’t crisp up. They need room to breathe. Also, always preheat your oven. A hot oven starts the cooking process right. If the oven isn’t hot enough, you’ll lose that nice crunch. For the full recipe, check out the complete guide on making crispy Brussels sprouts with bacon! {{image_4}} You can make crispy Brussels sprouts without bacon. For a tasty vegetarian version, skip the bacon and add a mix of nuts. Try using walnuts or pecans for crunch. You can also sprinkle on some nutritional yeast to give it a cheesy flavor. Adding roasted chickpeas can boost protein and flavor, making it hearty. To change the taste, try new herbs or spices. Rosemary or thyme can add a lovely earthiness. You could also use chili flakes for some heat. For a fresh twist, add lemon or orange zest. The citrus brightens up the dish and makes it pop. You can squeeze fresh lemon juice over the sprouts after roasting for extra zing. Crispy Brussels sprouts pair well with meats like chicken, pork, or fish. Serve them as a side to grilled chicken for a balanced meal. If you want plant-based protein, try adding lentils or quinoa. This makes the dish more filling and nutritious. You can also toss in some cooked bacon if you like the flavor and want to keep the original dish vibe. For the full recipe, check out the details on how to make this delicious side dish! To keep your crispy Brussels sprouts fresh, you need to cool them well. Allow them to sit at room temperature for about 30 minutes. This prevents moisture buildup. After they cool, use airtight containers. Glass or plastic containers work great. Make sure they are sealed tightly to keep out air. Store them in the fridge for up to three days. When it’s time to enjoy your leftovers, reheating is key. Use an oven or an air fryer. Preheat the oven to 350°F (175°C). Spread the sprouts on a baking sheet. Heat them for about 10 to 15 minutes. This helps regain their crispiness. If using an air fryer, set it to 375°F (190°C) for about 5 to 7 minutes. To keep the sprouts crunchy, avoid using the microwave. The microwave makes them soggy, which is not ideal. Enjoy your tasty side dish again with these simple steps. For the full recipe, check out the detailed instructions above! To make crispy Brussels sprouts, follow these steps: 1. Preheat your oven to 425°F (220°C). 2. Trim and halve 1 pound of Brussels sprouts. 3. Mix 3 tablespoons of olive oil, 1 teaspoon of garlic powder, and 1 teaspoon of smoked paprika in a bowl. 4. Toss the halved sprouts in the oil mixture until they are well coated. 5. Spread the sprouts on a baking sheet in a single layer. 6. Roast them for 20-25 minutes, stirring halfway through. 7. Drizzle with a maple balsamic glaze and toss. 8. Return to the oven for 5 more minutes for extra flavor. This method gives you a delicious side dish with a crisp texture. You can use frozen Brussels sprouts, but they might not get as crispy. Frozen sprouts often have more moisture. This can lead to steaming instead of roasting. If you use them, thaw first and pat dry to help with crispiness. Fresh is always best for a crunchy bite. Crispy Brussels sprouts pair well with many dishes. Try serving them with: - Grilled chicken - Roasted pork - Quinoa salad - Baked salmon These options balance flavors and make for a hearty meal. Crispy Brussels sprouts last in the fridge for about 3-4 days. Store them in an airtight container. This helps keep them fresh and safe to eat. However, they may lose some crispiness over time. Yes, you can prep Brussels sprouts ahead of time. Trim and halve them and store in the fridge for up to 2 days. For cooking, roast them fresh for the best texture. If you need to reheat, use the oven to keep them crispy. For the complete recipe for crispy Brussels sprouts with bacon, check out the [Full Recipe]. In this blog post, we explored how to make crispy Brussels sprouts. You learned about the key ingredients, from Brussels sprouts to maple syrup. We covered easy step-by-step instructions, tips for crispiness, and ways to customize flavors. Remember, good cooking involves attention to detail and a dash of creativity. With the right techniques, you can enjoy this tasty dish at home. Now, go ahead and try making it for yourself!](https://dishtreats.com/wp-content/uploads/2025/06/4d1da713-6118-4ecf-9fc1-c93df0ff8318-768x768.webp)

![- 2 cups diced apples - 1 cup celery, thinly sliced - 1 cup red grapes, halved - 1/2 cup walnuts, chopped - 1/2 cup raisins or dried cranberries - 1 cup plain Greek yogurt - 1 tablespoon honey - 1/2 teaspoon fresh lemon juice - Salt and pepper to taste - Lettuce leaves for serving Fresh produce makes this salad shine. I love using crisp apples, like Granny Smith, for their tartness. They add a nice crunch. The celery brings a refreshing snap, while juicy red grapes add sweetness. Nuts and dried fruits give texture and flavor. Chopped walnuts are my go-to. Toast them for even more flavor. Raisins or dried cranberries add a touch of sweetness, balancing the dish well. For the dressing, I use plain Greek yogurt. It’s creamy and healthy. Honey adds sweetness, and a bit of lemon juice brightens the flavors. Season with salt and pepper to enhance everything. Finally, serve on fresh lettuce leaves. They make a great base and add color. This combination of ingredients creates a delightful Waldorf salad. You can find the full recipe at [Full Recipe]. - Start by adding 2 cups of diced apples to a large bowl. - Drizzle the apples with 1/2 teaspoon of fresh lemon juice. This keeps them fresh and bright. - Next, slice 1 cup of celery into thin pieces. Add this to the bowl. - Halve 1 cup of red grapes and toss them in too. - In the same bowl, mix the fruit with 1/2 cup of chopped walnuts. - Add 1/2 cup of raisins or dried cranberries for sweetness. Gently toss the mixture. - In a separate bowl, combine 1 cup of plain Greek yogurt with 1 tablespoon of honey. Stir until smooth. - Carefully fold the yogurt dressing into the fruit mixture. Make sure everything is coated. - Season with salt and pepper to taste, folding gently to mix. - Cover the bowl and chill it in the fridge for at least 30 minutes. This helps the flavors blend. - When ready, serve on fresh lettuce leaves for a beautiful presentation. Enjoy your Waldorf salad! - For the complete recipe, check out the Full Recipe. You can swap out fruits and nuts to suit your taste. Try pears or oranges for a fresh twist. For nuts, almonds or pecans work well, too. If you want a creamier texture, use Greek yogurt instead of mayonnaise. The yogurt adds protein and keeps the salad light. Toasting walnuts really boosts their flavor. Just place them in a dry pan over medium heat. Stir them until they smell nutty and are lightly browned. You can also adjust sweetness or tartness. If the salad is too sweet, add a dash of lemon juice. For more sweetness, drizzle in extra honey. Serve your Waldorf salad on crisp lettuce leaves for a vibrant look. Arrange the salad in a large bowl or individual cups. Garnish with mint leaves for a fresh pop of color. You can also sprinkle extra toasted walnuts on top for added crunch. These simple touches make your dish stand out. For the full recipe, refer to the Waldorf Wonderland Salad 🥗. {{image_4}} The classic Waldorf salad uses simple, fresh ingredients. It combines apples, celery, grapes, and walnuts in a creamy dressing. Modern twists can add new flavors. You might see variations like adding chicken or swapping yogurt for mayonnaise. These changes keep the dish fresh and fun. You can experiment with spices, too. A hint of cinnamon or nutmeg can add warmth. If you want a vegan Waldorf salad, swap Greek yogurt for a plant-based option. Silken tofu blended with lemon juice makes a great dressing. For a gluten-free version, check your nuts and dried fruits. Most are safe, but some brands add gluten. You can also cut calories by using low-fat yogurt. This keeps the creaminess while reducing fat. Seasonal fruits can enhance the Waldorf salad. In fall, add sliced pears for sweetness. In winter, pomegranate seeds add color and crunch. Fresh berries in summer create a bright, juicy contrast. Each season brings a new twist to this classic salad. Try different fruits to match the season and your taste. The full recipe allows you to mix and match as you please. To store leftover Waldorf salad, place it in an airtight container. This keeps the salad fresh. Use a lid or plastic wrap to seal it well. The salad can last up to 3 days in the fridge. After that, the texture and flavor may change. If you see any browning apples, it’s best to toss them out. You can prepare some ingredients in advance. Chop your apples, celery, and grapes a day before. Keep them in separate containers in the fridge. This saves time when you want to make the salad. If you want to freeze Waldorf salad, I suggest not freezing it whole. The fruits will lose their crunch. Instead, freeze just the nuts or dried fruits. This keeps them fresh longer. When you are ready, mix them in fresh, chilled salad. You can enjoy that fresh taste even after storage! For the full recipe, check out the Waldorf Wonderland Salad. Waldorf Salad dates back to the late 1800s. A chef at the Waldorf Astoria Hotel in New York created it. The original recipe had only apples, celery, and mayonnaise. Over time, people added more ingredients, like walnuts and grapes. This salad became popular at formal dinners and events. It has a classic, timeless appeal that many enjoy today. Yes, you can prepare Waldorf Salad ahead of time. Make it a few hours before serving for best results. Just follow the steps of mixing everything and keep it in the fridge. This helps the flavors blend well. If you plan to serve it the next day, be careful with the apples. They can brown, so use lemon juice to keep them fresh. Waldorf Salad is quite healthy! It features fresh fruits and nuts, which offer great nutrients. Apples provide fiber and vitamins, while walnuts add healthy fats. The Greek yogurt dressing gives protein and a creamy texture. This salad is a great choice for a light meal or side dish. Eating it can help you feel full and satisfied. You can find the full recipe for this delightful salad [here](#). Waldorf salad combines fresh produce, nuts, and a creamy dressing. You learned how to prepare it step-by-step. I shared tips to enhance flavor and presentation. Feel free to adjust ingredients based on your taste. You can also explore various dietary options and seasonal fruits. This salad is not only tasty but also healthy. With proper storage methods, you’ll enjoy it for days. Now, it's time to create your own delicious version!](https://dishtreats.com/wp-content/uploads/2025/06/24fb7af7-5454-4649-a19f-39fd463a867f-768x768.webp)