Spicy Chili Crisp Udon Flavorful and Fun Dish

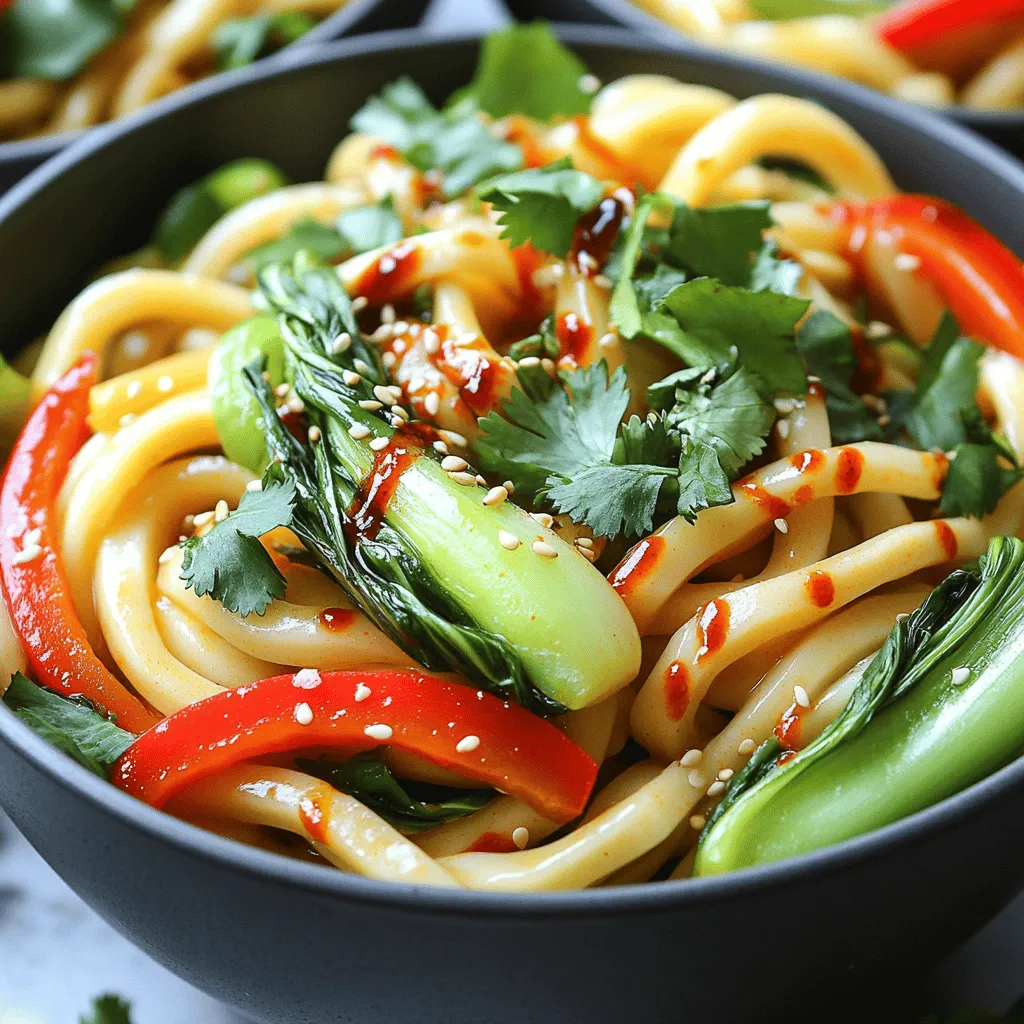
Are you ready to spice up your dinner? My Spicy Chili Crisp Udon is a fun, flavorful dish you can easily make at home. With chewy udon noodles, a zesty chili crisp sauce, and tasty veggies, it’s sure to impress. Whether you’re exploring new flavors or just want something quick and delicious, this recipe is for you. Let’s dive into the tasty details and get cooking!
Ingredients
List of Ingredients
- 300g udon noodles
- 2 tablespoons chili crisp oil (store-bought or homemade)
- 1 tablespoon soy sauce
- 1 teaspoon sesame oil
- 1 teaspoon rice vinegar
- 2 cloves garlic, minced
- ½ inch ginger, grated
- 1 red bell pepper, thinly sliced
- 1 cup bok choy, roughly chopped
- 2 spring onions, sliced (separate the green and white parts)
- 1 tablespoon toasted sesame seeds
- Fresh cilantro for garnish
- Salt and pepper to taste
Description of Key Ingredients
Udon noodles are thick, chewy, and full of flavor. They soak up sauce well. Chili crisp oil adds heat and crunch. It brings a unique taste to this dish. Soy sauce gives a savory depth. Sesame oil adds a nutty note. Rice vinegar brightens the flavors and balances the heat. Fresh garlic and ginger give a warm, aromatic base. Red bell pepper and bok choy add color and crunch. Spring onions lend freshness, while toasted sesame seeds add a nice texture. Finally, fresh cilantro is a must for a burst of flavor.
Substitutions for Common Ingredients
If you can’t find udon noodles, use rice noodles or spaghetti. For the chili crisp oil, you can use regular chili oil or make your own. Soy sauce can be swapped with tamari for a gluten-free option. If you want less heat, skip the chili oil. You can use olive oil instead of sesame oil. For a different taste, apple cider vinegar works in place of rice vinegar. If bok choy is not available, try spinach or kale. Lastly, if you don’t have fresh cilantro, use parsley for garnish.
Step-by-Step Instructions
Cooking the Udon Noodles
Start by boiling salted water in a large pot. Once the water bubbles, add the udon noodles. Cook them for 8 to 10 minutes based on the package directions. When they’re done, drain and rinse them under cold water. This stops the cooking and keeps them firm. Set the noodles aside in a colander.
Preparing the Chili Crisp Sauce
In a medium bowl, mix the chili crisp oil, soy sauce, sesame oil, and rice vinegar. Whisk until everything is well combined. This sauce will add amazing flavor to the dish. Set it aside for later use.
Sautéing the Aromatics and Vegetables
Heat a splash of oil in a large skillet or wok over medium heat. When the oil is hot, add minced garlic and grated ginger. Sauté them for about 30 seconds. You’ll smell a great aroma soon!
Next, toss in the sliced red bell pepper and chopped bok choy. Stir-fry these for 3 to 4 minutes. You want them to soften just a bit but still stay crisp.
Combining Noodles, Sauce, and Vegetables
Now it’s time to bring everything together. Add the cooked udon noodles to the skillet with the veggies. Pour your prepared sauce over the top. Use tongs to gently toss everything together. Make sure every noodle and veggie gets coated in that tasty sauce. If it feels dry, add a little water to help mix.
Final Seasoning and Plating
Take a moment to taste your dish. Add salt and pepper as needed. Once it’s to your liking, remove the skillet from heat. Garnish with sliced spring onions, toasted sesame seeds, and fresh cilantro.
To serve, use deep bowls for the noodles. Drizzle some extra chili crisp oil on top for added heat and flavor. Enjoy your Spicy Chili Crisp Udon!
Tips & Tricks
How to Perfectly Cook Udon Noodles
To cook udon noodles, start with a big pot. Fill it with water and add a pinch of salt. Bring the water to a rolling boil. Once boiling, add the udon noodles. Cook them for about 8-10 minutes. Stir occasionally to keep them from sticking. When done, drain the noodles and rinse them under cold water. This stops the cooking and keeps them firm.
Enhancing Flavor with Additional Ingredients
You can boost the flavor of your udon dish with some extras. Try adding sliced mushrooms for umami. Carrots add a nice crunch and sweetness. You could even toss in some baby corn for fun. For a protein boost, add tofu or shrimp. Just stir-fry them with the veggies. This makes the dish more filling and tasty.
Presentation Tips for Serving
When serving your Spicy Chili Crisp Udon, choose deep, colorful bowls. This makes the dish pop. Drizzle some extra chili crisp oil on top for flair. It adds heat and a glossy look. Garnish with sliced spring onions and fresh cilantro. This gives a fresh touch. Your friends and family will love the look and taste!

Variations
Vegetarian or Vegan Alternatives
You can easily make this dish vegetarian or vegan. Simply swap the chili crisp oil with a plant-based version. Use soy sauce or tamari for an extra umami kick. You can add more vegetables like carrots, mushrooms, or snap peas to enhance the flavor. Try using vegetable broth instead of water when cooking the noodles for added taste.
Protein Add-ins
If you want to boost protein, consider adding tofu, chicken, or shrimp. For tofu, use firm or extra-firm. Cut it into cubes and sauté until golden. For chicken, slice it thinly and cook it in the pan before adding the vegetables. Shrimp cooks quickly, so add it just before the noodles. These proteins blend well with the spicy chili crisp sauce.
Spiciness Adjustments
You can adjust the spice level to suit your taste. For a milder dish, use less chili crisp oil. You can also add a bit of sugar to balance the heat. If you love spice, feel free to add extra chili flakes or a splash of hot sauce. This way, you control the heat and make it just right for you!
Storage Info
How to Store Leftovers
To store leftover Spicy Chili Crisp Udon, let it cool down first. Place the noodles in an airtight container. Make sure to separate the noodles from the sauce to keep them fresh. Store them in the fridge for up to three days.
Reheating Tips for Optimal Texture
When reheating, add a splash of water to the noodles. This helps to keep them moist. Heat them in a skillet over medium heat. Stir the noodles for even warming. You can also use a microwave. Cover the bowl with a damp paper towel to prevent drying out. Heat for one to two minutes, checking often.
Freezing Guidelines for Udon Noodles
Freezing udon noodles is easy. First, cook them but don’t let them overcook. Drain and cool the noodles completely. Place them in a freezer-safe bag. Squeeze out excess air and seal tightly. They can last in the freezer for up to three months. To use, thaw them overnight in the fridge before reheating.
FAQs
What is Chili Crisp and how is it made?
Chili crisp is a spicy oil mix. It has crunchy bits, like garlic and onion. To make it, heat oil and add these ingredients. Let them cook until golden brown. Then, add chili flakes and other spices. This mix brings heat and texture to dishes. You can find it in stores or make it fresh at home.
Can I use other types of noodles?
Yes, you can use other noodles! Rice noodles or soba are great choices. They add different flavors and textures. Just make sure to adjust the cooking time as needed. Each noodle type has its own unique taste, which can change your dish.
How can I make this dish gluten-free?
To make this dish gluten-free, switch to gluten-free udon noodles. These are made from rice or other gluten-free grains. Check the labels to ensure they fit your needs. You can also use tamari instead of soy sauce for a gluten-free option.
What are common side dishes to serve with Udon?
Many side dishes pair well with udon. Some popular options include:
- Edamame
- Seaweed salad
- Tempura vegetables
- Pickled vegetables
These sides add variety and make your meal more enjoyable.
How do I adjust this recipe for meal prep?
For meal prep, cook the noodles and store them separately. Keep the sauce and veggies in another container. When you are ready to eat, heat them together. This keeps the noodles from getting soggy. You can also double the recipe to have more servings ready!
This blog post explored delicious udon noodles and how to make them. We looked at key ingredients, how to cook them, and tips for great flavor. You also learned about variations, storage, and answers to common questions. Enjoy experimenting with your own noodle dishes. Share your flavors with friends and family, and get creative. Your kitchen is a great place for fun and tasty meals. Happy cooking!


![For One Pot Fiesta Rice, you need: - 1 cup long-grain rice - 2 cups vegetable broth - 1 can (15 oz) black beans, drained and rinsed - 1 cup corn kernels (choice of fresh, frozen, or canned) - 1 red bell pepper, diced - 1 green bell pepper, diced - 1 small onion, finely chopped - 2 cloves garlic, minced These ingredients create a base full of colors and flavors. The rice absorbs all the tasty broth, making it fluffy and delicious. The black beans add protein, while the corn and peppers provide sweetness and crunch. You will also need: - 1 teaspoon ground cumin - 1 teaspoon chili powder - Salt and pepper to taste These spices give the dish its kick. Cumin adds warmth, while chili powder brings a bit of heat. Adjust the salt and pepper to balance the flavors just right. To finish off your meal, use: - Fresh cilantro, chopped (for garnish) - Lime wedges (for serving) Cilantro adds freshness, and lime juice brightens the dish. Together, they enhance the fiesta feel. The combination of these ingredients makes this dish not just tasty but also visually appealing. You can find the full recipe to guide you through the cooking process. - Heat olive oil and sauté onion and garlic. - Add diced bell peppers. Start by heating one tablespoon of olive oil in a large pot over medium heat. Once hot, add the finely chopped onion and minced garlic. Sauté for about three to four minutes. You want the onion to become soft and clear. The garlic will fill your kitchen with a lovely aroma. Next, toss in your diced red and green bell peppers. Cook them for two to three more minutes. Stir occasionally until they soften and brighten in color. - Incorporate spices and rice. - Simmer with vegetable broth. Now it's time to spice things up! Sprinkle in one teaspoon each of ground cumin and chili powder. Stir well to mix the spices into the onion and pepper mixture. Let them cook for one minute. This step helps release their rich flavors. Next, add one cup of long-grain rice to the pot. Stir it thoroughly so each grain gets coated with the mixture. Now, pour in two cups of vegetable broth. Turn the heat up to bring it to a boil. Once boiling, reduce the heat to low. Cover the pot and let it simmer for about 15 to 20 minutes. Do not lift the lid during this time; you want to keep the steam in. - Add black beans and corn. - Season and fluff. - Presentation tips. When the rice is tender and all the liquid is gone, gently fold in one can of drained black beans and one cup of corn. Allow the mixture to heat through for about five minutes on low heat. Afterward, taste your dish and season with salt and pepper as needed. Use a fork to fluff the rice gently, mixing all the ingredients together. For a beautiful presentation, serve the fiesta rice in bright bowls. Top with fresh cilantro and add lime wedges on the side. This adds a zesty touch and makes your meal look vibrant. Enjoy the colorful feast you've created! You can find the Full Recipe for more details. To prevent rice from sticking, rinse the rice before cooking. This step removes excess starch. After rinsing, dry the rice with a towel. This helps the grains stay separate. Next, use the right water ratio. For every cup of rice, use two cups of liquid. The right ratio keeps the rice fluffy. Simmering time is key for perfect rice. After bringing the pot to a boil, reduce the heat. Cover the pot tightly and let it simmer. Avoid lifting the lid during cooking. This keeps the steam inside, which is crucial. Allowing it to simmer for 15-20 minutes ensures even cooking. For an extra kick, try adding spices like paprika or oregano. These spices blend well with the base flavors. You can also add a pinch of cayenne for heat. Fresh ingredients like diced tomatoes or jalapeños work great too. Top your fiesta rice with fresh avocado or sour cream. It adds creaminess and balances the spice. Using pre-cooked ingredients saves time. You can find canned black beans and corn at the store. These options cut down your prep time significantly. You can also use pre-chopped veggies from the store. This helps you skip the chopping step. Quick prep ideas include using frozen vegetables. They cook fast and still taste fresh. Keep them on hand for busy nights. You can even prepare the rice ahead of time. Just reheat it when you're ready to serve. For the full recipe, check [Full Recipe]. {{image_4}} You can easily customize One Pot Fiesta Rice with protein. Try adding chicken or shrimp. For chicken, use bite-sized pieces and cook them first. Add them back in with the beans and corn. Shrimp cooks quickly, so toss them in during the last few minutes. They should turn pink when done. If you want a vegetarian dish, consider adding tofu or tempeh. Both soak up flavors well. Cut them into small cubes and sauté them with the veggies. You can also use extra beans to boost protein. Want a spicy kick? Add jalapeños to the mix. Dice them finely and sauté with the onions and garlic. This will give your dish a nice heat. Adjust the amount to fit your taste. For a Southwest edition, swap out black beans for pinto or kidney beans. You can also add diced tomatoes or corn salsa for a fresh taste. These small changes can make a big difference in flavor. If you're looking for alternatives to long-grain rice, try quinoa or cauliflower rice. Quinoa is packed with protein and cooks in about the same time. Rinse it well before cooking to remove any bitterness. Cauliflower rice is a great low-carb option. It cooks faster, so reduce your liquid and cooking time. You don't want it mushy. For a nuttier flavor, brown rice is another option. Just know it will take longer to cook, so adjust your time and liquid accordingly. These substitutes keep your meals fresh and exciting! Store your One Pot Fiesta Rice in an airtight container. It stays fresh for 3 to 5 days. Check for any signs of spoilage before using leftovers. To keep the rice at its best, let it cool down before sealing it. This helps prevent moisture build-up, which can cause mushy rice. You can freeze portions of One Pot Fiesta Rice for later. Use freezer-safe bags or containers. Make sure to remove as much air as possible to avoid freezer burn. It will last up to 3 months in the freezer. When you're ready to eat, thaw it overnight in the fridge. For quick meals, you can microwave frozen rice straight from the freezer. To reheat, place the rice in a pot with a splash of water. Cover and warm it over low heat. Stir occasionally to heat evenly. If it seems dry, add a bit more water. You can also microwave it. Just add a little water and cover it. After reheating, taste and adjust the flavors. You may want to add a squeeze of lime or a sprinkle of fresh cilantro for a burst of flavor. Can I use brown rice instead of white? Yes, you can use brown rice. It takes longer to cook. Add about 10-15 minutes to the cooking time. You may also need to add more broth to keep it moist. How do I adjust the recipe for more servings? To make more servings, simply double the ingredients. Use a larger pot to fit everything. Cooking time may not change much, but check the rice to be sure. What are the best side dishes to serve with One Pot Fiesta Rice? Some great sides include grilled veggies, avocado slices, or a fresh salad. You could also serve it with tortilla chips for a crunchy contrast. How to tell when the rice is cooked? The rice is ready when it has absorbed all the liquid. It should look fluffy and tender. You can taste a grain to check if it’s done. Can I substitute vegetable broth with chicken broth? Yes, chicken broth works well. It adds a different flavor that many people enjoy. Just make sure to choose low-sodium broth if you watch your salt intake. What is the calorie count per serving? Each serving has about 250 calories. This can vary based on additional toppings or sides added. Are there any allergens in this recipe? This recipe is generally free from common allergens. However, check the labels on canned goods for potential allergens. If you are sensitive to beans or corn, be cautious. This blog covered a simple recipe for One Pot Fiesta Rice. We explored ingredients like long-grain rice, black beans, and fresh veggies. I shared tips on cooking techniques and storage methods. You can enjoy many variations to suit your taste. Whether you prefer chicken, shrimp, or a spicy twist, the options are endless. This dish is easy to make and great for leftovers. Enjoy your cooking adventure!](https://dishtreats.com/wp-content/uploads/2025/07/eb10aa28-84d4-4922-bf2e-e4835b83e1a4-768x768.webp)
![Here’s what you need for a creamy, dreamy mac and cheese: - 1 lb elbow macaroni - 4 cups water - 2 tablespoons unsalted butter, divided - 1 teaspoon garlic powder - 1 teaspoon onion powder - ½ teaspoon smoked paprika - Salt and pepper, to taste - 2 cups sharp cheddar cheese, shredded - 1 cup mozzarella cheese, shredded - ½ cup cream cheese, softened - ½ cup whole milk Gather these ingredients to make your Instant Pot creamy mac and cheese. The elbow macaroni cooks perfectly in the Instant Pot, soaking up all the flavors. The two types of cheese give a rich taste. Cream cheese adds smoothness, while whole milk makes it extra creamy. Each spice, like garlic and paprika, adds a nice touch. Want to make your mac and cheese even better? Try these add-ins: - Cooked bacon for a salty crunch - Steamed broccoli for a healthy twist - Diced tomatoes for freshness - Jalapeños for heat Feel free to mix and match! You can make it just how you like. For the full recipe, check out the detailed cooking steps. Gather all your ingredients. You will need: - 1 lb elbow macaroni - 4 cups water - 2 tablespoons unsalted butter, divided - 1 teaspoon garlic powder - 1 teaspoon onion powder - ½ teaspoon smoked paprika - Salt and pepper, to taste - 2 cups sharp cheddar cheese, shredded - 1 cup mozzarella cheese, shredded - ½ cup cream cheese, softened - ½ cup whole milk Measure everything out before you start. This makes cooking easier and faster. Pour 4 cups of water into your Instant Pot. Add the elbow macaroni, 1 tablespoon of unsalted butter, garlic powder, onion powder, smoked paprika, and a pinch of salt. Stir this mix well to coat the pasta. Now, close the lid and set the valve to sealing. Choose the manual cooking option and set the timer to cook on high pressure for 4 minutes. Once the time is up, do a quick release by moving the valve to venting. Open the lid once the steam has escaped. Add the remaining tablespoon of unsalted butter, shredded cheddar cheese, shredded mozzarella cheese, softened cream cheese, and whole milk. Stir everything together with a spatula until it’s creamy. If it’s too thick, add a little more milk for a smoother texture. Season with salt and pepper to your liking. Stir again to mix in the flavors. For the complete recipe, check out the Full Recipe. Enjoy your creamy mac and cheese! To make your mac and cheese super creamy, use a mix of cheeses. I love combining sharp cheddar and mozzarella. The cheddar gives a bold flavor, while mozzarella adds stretchiness. Cream cheese also helps create a rich texture. If it's too thick, add a splash of whole milk. This will help achieve the creamy consistency you want. Here are some great cheese combos: - Sharp cheddar - Mozzarella - Cream cheese - Gruyere - Fontina Mixing these cheeses gives depth and flavor. Try different amounts to find your favorite mix. You can also add a bit of parmesan for a salty kick. Common mistakes can ruin your dish. First, don't overcook the pasta. Set your timer for 4 minutes. Overcooked pasta becomes mushy. Second, be careful when releasing steam. Always use a kitchen towel for safety. Lastly, remember to season well. Taste your mac and cheese before serving. Add more salt and pepper if needed. For more details, check out the Full Recipe. {{image_4}} You can make your mac and cheese heartier by adding protein. Cooked chicken or crispy bacon works great. Simply chop the cooked chicken or crumble the bacon into pieces. Stir it in after mixing the cheese. This adds flavor and makes it a full meal. For a vegan twist, swap the dairy for plant-based ingredients. Use cashew cream or coconut milk in place of whole milk. Replace the cheese with vegan cheese or nutritional yeast for a cheesy taste. This keeps the dish creamy while making it dairy-free. Add extra flavor by mixing in spices and herbs. A dash of cayenne pepper gives it a kick. Fresh herbs like basil or thyme add brightness. Try Italian seasoning for a different twist. You can also add mustard powder for depth. Experiment to find your favorite mix. For the full recipe, check out [Full Recipe]. To store your creamy mac and cheese, let it cool first. Place it in an airtight container. You can keep it in the fridge for up to three days. Make sure it is sealed tightly to keep it fresh. If you want to enjoy it later, consider freezing it. When you want to reheat mac and cheese, use the microwave or stovetop. If using the microwave, place your serving in a bowl. Add a splash of milk to keep it creamy. Heat it in short bursts, stirring in between. For the stovetop, warm it in a pot over low heat. Stir well and add milk if needed. This helps it regain its creamy texture. To freeze mac and cheese, use an airtight container or freezer bag. Make sure it is cool before you put it in. It can last in the freezer for up to three months. When you are ready to eat it, thaw it overnight in the fridge. Then, reheat using one of the methods above. This way, you can enjoy that yummy flavor again! For the full recipe, check the details above. Yes, you can use gluten-free pasta in this recipe. Just choose your favorite brand. Cook times may vary slightly, so check the package instructions. Gluten-free pasta can be just as creamy and tasty as regular pasta. To spice up your mac and cheese, add cayenne pepper or red pepper flakes. Start with a small amount, like 1/4 teaspoon, and taste as you go. You can also mix in some diced jalapeños for a fresh kick. Adjust it based on your spice level preference. Any Instant Pot model works well for this creamy mac and cheese. I recommend using a model with at least a 6-quart capacity. This size gives enough room for the pasta and water. The Instant Pot Duo or Ultra are popular choices, offering great features for beginners and pros alike. For the full recipe, check the link. This blog has shared everything you need for perfect mac and cheese in your Instant Pot. We covered the needed ingredients, cooking steps, and tips to avoid mistakes. You learned how to make it creamy and flavorful, even with variations. Remember to store leftovers properly for later. Keep experimenting with flavors and ingredients to find what you enjoy. Each recipe can be a new adventure. Enjoy your cooking journey!](https://dishtreats.com/wp-content/uploads/2025/07/aef5e05b-bf60-4c96-8d62-11668510c0c6-768x768.webp)


