Spicy Buffalo Chicken Wraps Easy Flavorful Treat

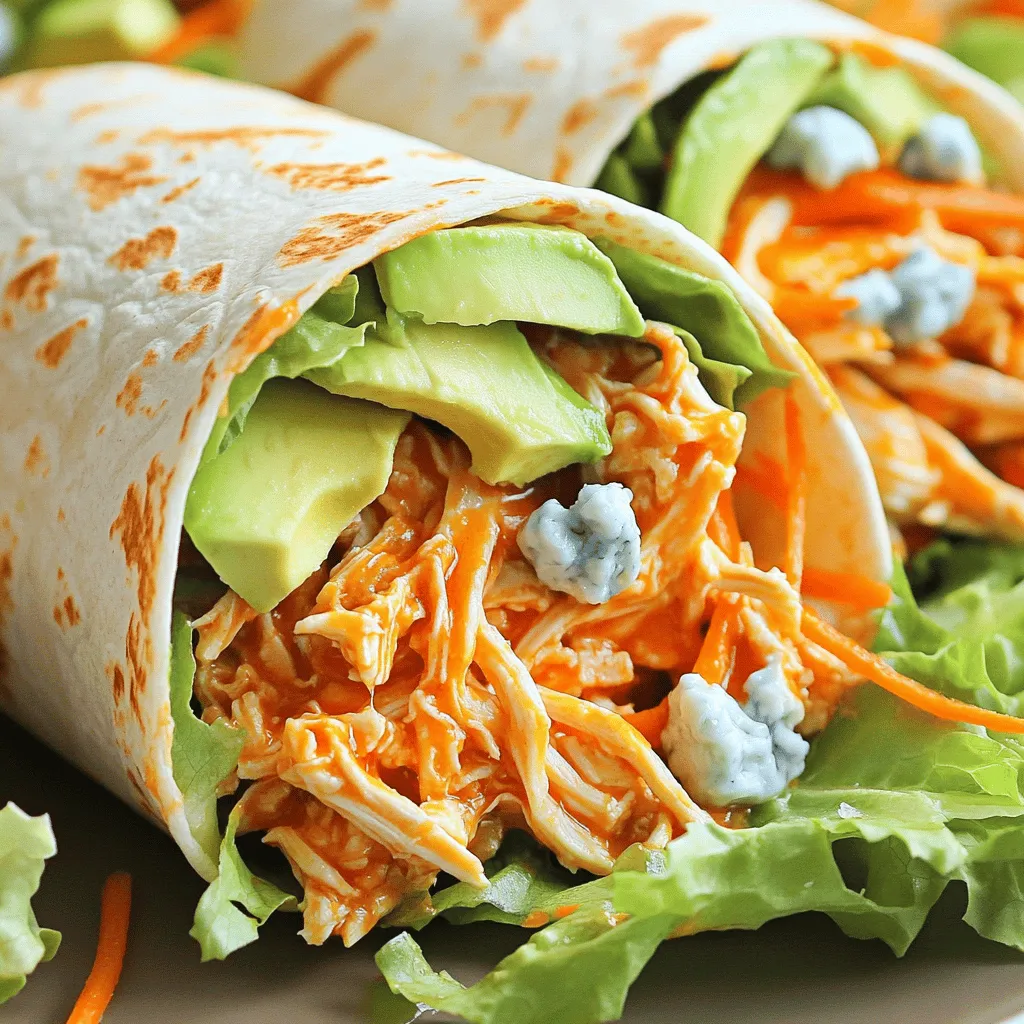
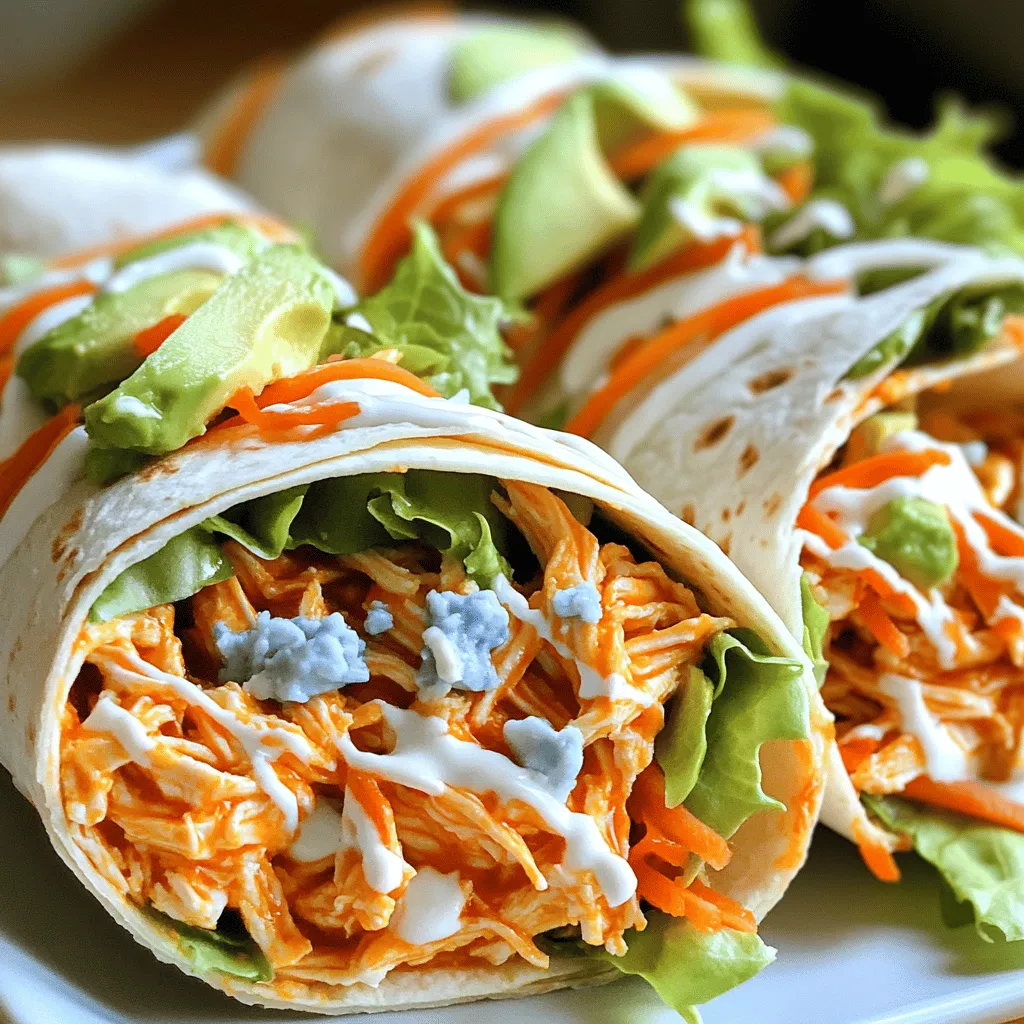
Craving a bold, tasty meal that’s easy to make? Look no further! My Spicy Buffalo Chicken Wraps pack a flavorful punch, perfect for lunch or dinner. With simple ingredients and quick preparation steps, you’ll have a satisfying treat in no time. Plus, I’ll share tips for adjusting the spice level and storage tips to keep your wraps fresh. Get ready to ignite your taste buds with this easy recipe!
Ingredients
List of Required Ingredients
- 2 cups cooked chicken, shredded (rotisserie chicken works well for convenience)
- ½ cup buffalo sauce (adjustable based on your preferred spice level)
- 1 cup lettuce, finely shredded
- ½ cup ripe avocado, sliced into thin pieces
- ½ cup shredded carrots for added crunch
- ½ cup blue cheese crumbles (optional, for a rich flavor)
- 4 large flour tortillas (burrito-sized for better filling)
- 2 tablespoons ranch dressing (or any dressing of your choice for a creamy touch)
- 1 tablespoon olive oil (for sautéing)
- Salt and pepper to enhance flavors to taste
- Fresh cilantro or parsley for garnish (optional for added freshness)
Nutritional Information
Each serving of Spicy Buffalo Chicken Wraps has about 450 calories. This includes protein from the chicken and healthy fats from avocado. You get around 25 grams of protein, 18 grams of fat, and 45 grams of carbs. If you use blue cheese, it adds more flavor but also more calories.
Allergen information includes dairy from the blue cheese and ranch dressing. Always check labels if you have allergies. Adjusting sauces or toppings can help make these wraps safe for everyone.
Step-by-Step Instructions
Preparation Steps
To start, gather your ingredients. I often use rotisserie chicken for ease. In a bowl, mix 2 cups of shredded chicken with ½ cup of buffalo sauce. Stir it well. Make sure every piece of chicken gets coated in that spicy goodness.
Next, heat 1 tablespoon of olive oil in a skillet over medium heat. Once hot, add your buffalo chicken mixture. Sauté for about 5 minutes. This step warms the chicken and blends the flavors. You want it to be just heated through.
Assembling the Wraps
Now, let’s assemble the wraps! Lay out 4 large flour tortillas on a clean surface. For a creamy base, spread 1 tablespoon of ranch dressing in the center of each tortilla.
Next, evenly place the sautéed buffalo chicken mixture on top of the ranch. Then, it’s time for the fun part! Add 1 cup of finely shredded lettuce, several slices of avocado, and ½ cup of shredded carrots for that crunch. If you like blue cheese, sprinkle ½ cup on top.
To wrap, fold in the sides of the tortilla first. Then, roll it up tightly from the bottom. This keeps all the tasty filling inside. Finally, use a sharp knife to slice each wrap in half diagonally. If you want, add a touch of fresh cilantro or parsley for garnish. Enjoy your spicy buffalo chicken wraps!
Tips & Tricks
Making the Perfect Buffalo Chicken Wraps
To make your wraps just right, adjusting spice levels is key. If you prefer milder flavors, use less buffalo sauce. A touch of honey can also balance the heat. For a spicier kick, add more buffalo sauce or some hot sauce. It’s all about what you enjoy!
Preventing soggy wraps is simple. Always dry your lettuce and veggies before adding them. Use a paper towel to absorb excess moisture. If you worry about sogginess, try adding a layer of ranch dressing on the tortilla first. This barrier helps keep the filling fresh and crispy.
Recommended Cooking Utensils
For this recipe, the right kitchen tools make a big difference. You will need:
- A sharp knife for cutting wraps.
- A mixing bowl for combining ingredients.
- A skillet for sautéing the chicken.
To cook and serve efficiently, consider using a non-stick skillet. This type of pan helps prevent sticking and makes cleanup easy. A large platter will also help when serving. Arrange the wraps nicely for an appealing look, and enjoy!

Variations
Alternative Ingredients
You can switch up the protein in your wraps for variety. Here are some tasty options:
- Turkey: This lean meat gives a milder flavor.
- Tofu: A great choice for a plant-based meal. Use extra-firm tofu and marinate it in buffalo sauce.
You can also try different sauces to change the flavor:
- BBQ Sauce: This adds a sweet and smoky taste.
- Teriyaki Sauce: This sauce brings a sweet and savory twist.
These swaps keep your wraps exciting and can fit different diets.
Dietary Modifications
If you need to make your wraps healthier, consider these options:
- Gluten-Free Wraps: Use corn tortillas or gluten-free wraps to fit your diet.
- Low-Calorie Dressings: Choose yogurt-based dressings instead of ranch. They cut calories while adding flavor.
These modifications make it easy to enjoy Spicy Buffalo Chicken Wraps while meeting your dietary needs.
Storage Info
Storing Leftovers
To keep your wraps fresh, store them in the fridge. Place the wraps in an airtight container. This helps to keep them from drying out. Enjoy your wraps within three days for the best taste and texture. If you see any signs of spoilage, like an off smell or color, throw them away.
Freezing Tips
You can freeze these wraps for later. First, wrap each one tightly in plastic wrap. Then, place them in a freezer bag or airtight container. This method prevents freezer burn and keeps the flavor intact. To reheat, remove the plastic wrap and place the wrap in the microwave. Heat on high for about two minutes. Check if it’s hot all the way through. If not, warm it for another minute. You can also use an oven for a crispier wrap. Preheat to 350°F and bake for about 10-15 minutes. Enjoy your Spicy Buffalo Chicken Wraps anytime!
FAQs
Common Questions about Spicy Buffalo Chicken Wraps
How to make buffalo chicken less spicy?
To make buffalo chicken less spicy, reduce the amount of buffalo sauce. You can also mix in a bit of ranch dressing or sour cream. This adds creaminess and cuts the heat. Try using a milder buffalo sauce, too.
What side dishes pair well with buffalo chicken wraps?
Buffalo chicken wraps taste great with many sides. Here are a few ideas:
- Celery sticks with ranch or blue cheese dip
- Sweet potato fries for a tasty crunch
- A fresh garden salad for balance
- Corn on the cob for a sweet touch
Can I make these wraps ahead of time?
Yes, you can prepare the chicken mixture in advance. Just store it in the fridge until you are ready to assemble the wraps. Wraps are best when made fresh, but you can store assembled wraps in the fridge for a few hours. If you do this, keep the filling cool to avoid sogginess.
Ingredient Substitutions
What can I use instead of ranch dressing?
If you want to swap ranch dressing, try these options:
- Blue cheese dressing for a bold flavor
- Greek yogurt for a healthier choice
- Hummus for a unique twist
Can I use lettuce alternatives?
Yes!
In this blog post, we covered how to make delicious buffalo chicken wraps. I shared ingredient lists, including chicken options and sauces. I also walked you through preparation steps and tips for wrapping them perfectly. We explored variations and storage methods to ensure freshness. Remember, you can adjust spices and ingredients to fit your taste. Most importantly, have fun while creating these tasty wraps. Enjoy every bite and experiment! Your kitchen is ready for flavorful wraps that satisfy all.


![- 2 cups diced apples - 1 cup celery, thinly sliced - 1 cup red grapes, halved - 1/2 cup walnuts, chopped - 1/2 cup raisins or dried cranberries - 1 cup plain Greek yogurt - 1 tablespoon honey - 1/2 teaspoon fresh lemon juice - Salt and pepper to taste - Lettuce leaves for serving Fresh produce makes this salad shine. I love using crisp apples, like Granny Smith, for their tartness. They add a nice crunch. The celery brings a refreshing snap, while juicy red grapes add sweetness. Nuts and dried fruits give texture and flavor. Chopped walnuts are my go-to. Toast them for even more flavor. Raisins or dried cranberries add a touch of sweetness, balancing the dish well. For the dressing, I use plain Greek yogurt. It’s creamy and healthy. Honey adds sweetness, and a bit of lemon juice brightens the flavors. Season with salt and pepper to enhance everything. Finally, serve on fresh lettuce leaves. They make a great base and add color. This combination of ingredients creates a delightful Waldorf salad. You can find the full recipe at [Full Recipe]. - Start by adding 2 cups of diced apples to a large bowl. - Drizzle the apples with 1/2 teaspoon of fresh lemon juice. This keeps them fresh and bright. - Next, slice 1 cup of celery into thin pieces. Add this to the bowl. - Halve 1 cup of red grapes and toss them in too. - In the same bowl, mix the fruit with 1/2 cup of chopped walnuts. - Add 1/2 cup of raisins or dried cranberries for sweetness. Gently toss the mixture. - In a separate bowl, combine 1 cup of plain Greek yogurt with 1 tablespoon of honey. Stir until smooth. - Carefully fold the yogurt dressing into the fruit mixture. Make sure everything is coated. - Season with salt and pepper to taste, folding gently to mix. - Cover the bowl and chill it in the fridge for at least 30 minutes. This helps the flavors blend. - When ready, serve on fresh lettuce leaves for a beautiful presentation. Enjoy your Waldorf salad! - For the complete recipe, check out the Full Recipe. You can swap out fruits and nuts to suit your taste. Try pears or oranges for a fresh twist. For nuts, almonds or pecans work well, too. If you want a creamier texture, use Greek yogurt instead of mayonnaise. The yogurt adds protein and keeps the salad light. Toasting walnuts really boosts their flavor. Just place them in a dry pan over medium heat. Stir them until they smell nutty and are lightly browned. You can also adjust sweetness or tartness. If the salad is too sweet, add a dash of lemon juice. For more sweetness, drizzle in extra honey. Serve your Waldorf salad on crisp lettuce leaves for a vibrant look. Arrange the salad in a large bowl or individual cups. Garnish with mint leaves for a fresh pop of color. You can also sprinkle extra toasted walnuts on top for added crunch. These simple touches make your dish stand out. For the full recipe, refer to the Waldorf Wonderland Salad 🥗. {{image_4}} The classic Waldorf salad uses simple, fresh ingredients. It combines apples, celery, grapes, and walnuts in a creamy dressing. Modern twists can add new flavors. You might see variations like adding chicken or swapping yogurt for mayonnaise. These changes keep the dish fresh and fun. You can experiment with spices, too. A hint of cinnamon or nutmeg can add warmth. If you want a vegan Waldorf salad, swap Greek yogurt for a plant-based option. Silken tofu blended with lemon juice makes a great dressing. For a gluten-free version, check your nuts and dried fruits. Most are safe, but some brands add gluten. You can also cut calories by using low-fat yogurt. This keeps the creaminess while reducing fat. Seasonal fruits can enhance the Waldorf salad. In fall, add sliced pears for sweetness. In winter, pomegranate seeds add color and crunch. Fresh berries in summer create a bright, juicy contrast. Each season brings a new twist to this classic salad. Try different fruits to match the season and your taste. The full recipe allows you to mix and match as you please. To store leftover Waldorf salad, place it in an airtight container. This keeps the salad fresh. Use a lid or plastic wrap to seal it well. The salad can last up to 3 days in the fridge. After that, the texture and flavor may change. If you see any browning apples, it’s best to toss them out. You can prepare some ingredients in advance. Chop your apples, celery, and grapes a day before. Keep them in separate containers in the fridge. This saves time when you want to make the salad. If you want to freeze Waldorf salad, I suggest not freezing it whole. The fruits will lose their crunch. Instead, freeze just the nuts or dried fruits. This keeps them fresh longer. When you are ready, mix them in fresh, chilled salad. You can enjoy that fresh taste even after storage! For the full recipe, check out the Waldorf Wonderland Salad. Waldorf Salad dates back to the late 1800s. A chef at the Waldorf Astoria Hotel in New York created it. The original recipe had only apples, celery, and mayonnaise. Over time, people added more ingredients, like walnuts and grapes. This salad became popular at formal dinners and events. It has a classic, timeless appeal that many enjoy today. Yes, you can prepare Waldorf Salad ahead of time. Make it a few hours before serving for best results. Just follow the steps of mixing everything and keep it in the fridge. This helps the flavors blend well. If you plan to serve it the next day, be careful with the apples. They can brown, so use lemon juice to keep them fresh. Waldorf Salad is quite healthy! It features fresh fruits and nuts, which offer great nutrients. Apples provide fiber and vitamins, while walnuts add healthy fats. The Greek yogurt dressing gives protein and a creamy texture. This salad is a great choice for a light meal or side dish. Eating it can help you feel full and satisfied. You can find the full recipe for this delightful salad [here](#). Waldorf salad combines fresh produce, nuts, and a creamy dressing. You learned how to prepare it step-by-step. I shared tips to enhance flavor and presentation. Feel free to adjust ingredients based on your taste. You can also explore various dietary options and seasonal fruits. This salad is not only tasty but also healthy. With proper storage methods, you’ll enjoy it for days. Now, it's time to create your own delicious version!](https://dishtreats.com/wp-content/uploads/2025/06/24fb7af7-5454-4649-a19f-39fd463a867f-768x768.webp)


![- 1 can (15 oz) chickpeas, thoroughly drained and rinsed - 1 cup cherry tomatoes, halved - 1 cucumber, diced into bite-sized pieces - 1 bell pepper (any color), diced - 1/4 red onion, finely chopped - 1/4 cup fresh basil leaves, roughly chopped - Juice of 1 large lemon (about 2 tablespoons) - 3 tablespoons high-quality extra-virgin olive oil - Salt and black pepper to taste - 1/4 teaspoon garlic powder - 1/4 teaspoon red pepper flakes (optional, for a bit of heat) In this Lemon Basil Chickpea Salad, the key ingredients make all the difference. Chickpeas are the star of the show. They add protein and a nice bite. The fresh produce items like cherry tomatoes, cucumbers, and bell peppers bring color and crunch. The red onion adds a mild zing. Fresh basil gives that lovely aroma and flavor. The dressing components are just as important. The lemon juice adds brightness, while the olive oil provides richness. Garlic powder adds depth, and the optional red pepper flakes can give it a kick. This mix creates a delightful balance of flavors. - Additional vegetables - Herbs and spices You can easily customize this salad. Feel free to add more vegetables. Some great options are carrots, radishes, or even avocado. These extras can add different textures and flavors. You can also play with herbs and spices. Try adding cilantro for a fresh twist or cumin for an earthy note. The beauty of this salad lies in its versatility. You can make it your own while keeping it fresh and vibrant. For the full recipe, check out the details above. First, gather your ingredients. Grab a large mixing bowl. Add the chickpeas that you drained and rinsed. Next, toss in the halved cherry tomatoes. After that, add the diced cucumber, diced bell pepper, and finely chopped red onion. Now, it's time for the fresh basil. Gently mix the chopped basil leaves into the bowl. This adds a bright, fresh flavor. For the dressing, take a small bowl. Combine the lemon juice, extra-virgin olive oil, garlic powder, salt, and black pepper. If you like heat, add red pepper flakes. Whisk these together until smooth. This zesty dressing will tie everything together nicely. Drizzle the dressing over your salad in the mixing bowl. Now, use clean hands or a large spoon to toss everything together. Make sure all the ingredients get coated with the dressing. After tossing, taste your salad. Adjust the seasoning if needed. You might want more salt, pepper, or lemon juice for extra flavor. Let the salad sit for at least 10 minutes. This resting time helps the flavors blend. You can serve it chilled or at room temperature, whichever you prefer. For presentation, serve your salad in a large, shallow bowl. You can also use individual plates if you like. Garnish with a sprinkle of chopped basil and a few whole cherry tomatoes. This makes a beautiful display. Consider pairing this salad with crusty bread or pita chips. These sides add nice texture and balance to the meal. For the full recipe, check the earlier section. Enjoy! To keep your Lemon Basil Chickpea Salad fresh, store it in an airtight container. This helps prevent air from spoiling the flavors. Place it in the fridge right after serving. It will stay good for about three days. If you notice extra liquid forming, drain it before serving again. This keeps the salad from getting soggy. To maintain the crispness of the veggies, avoid mixing in the dressing until you're ready to eat. Prepping this salad ahead of time is easy and smart. You can chop the veggies and rinse the chickpeas a day before. Just store them separately in the fridge. This saves time when you're ready to serve. Allowing the salad to rest for at least 10 minutes before serving enhances the flavors. Letting the chickpeas soak up the lemon dressing makes each bite burst with taste. For the best results, try to make it a few hours in advance. The flavors will only get better! For the Full Recipe, visit the main article. {{image_4}} You can make your Lemon Basil Chickpea Salad even better with protein. For vegetarians, great options include: - Tofu: Firm tofu adds a nice texture. - Quinoa: This grain packs protein and adds a nutty taste. - Edamame: These young soybeans give a pop of color and flavor. If you want to add meat or seafood, here are some ideas: - Grilled Chicken: Slice it thin for easy mixing. - Shrimp: Cooked shrimp adds a sweet and savory twist. - Tuna: Canned tuna is a quick and tasty option. You can change the flavor of your salad with different dressings. Try these options: - Balsamic Vinaigrette: Sweet and tangy, it pairs well with veggies. - Honey Mustard: Adds a sweet zing that brightens the salad. - Avocado Dressing: Creamy and rich, it makes the salad feel special. Consider adding seasonal ingredients too. Use: - Corn: Fresh corn is sweet and crunchy in summer. - Avocado: Creamy avocados add richness in spring. - Roasted Squash: Perfect for fall, it adds warmth and flavor. For more recipes, check out the Full Recipe! The Lemon Basil Chickpea Salad packs a punch of nutrients. Each serving has about 200 calories. Most of these calories come from healthy fats and proteins. The salad offers: - Protein: Chickpeas are a great source. You get about 10 grams per serving. - Carbohydrates: The salad contains around 25 grams, mostly from chickpeas and veggies. - Fats: With olive oil, you’ll find about 9 grams of healthy fats. This dish also shines with vitamins and minerals: - Vitamin A: From bell peppers and tomatoes, good for your vision. - Vitamin C: The lemon juice and tomatoes boost your immune system. - Iron: Chickpeas provide iron, helping with blood health. This salad is very friendly for many diets. - Vegan-friendly attributes: The recipe uses no animal products. All ingredients are plant-based. This makes it perfect for vegans. - Gluten-free status: All the ingredients are gluten-free. You can enjoy this salad without worry if you have gluten sensitivity. Enjoy this fresh and colorful salad knowing it supports a healthy lifestyle! For the complete recipe, check out the [Full Recipe]. Lemon Basil Chickpea Salad lasts about 3 to 5 days in the fridge. To store it, place it in an airtight container. This keeps the salad fresh and safe to eat. Make sure to check for any changes in smell or color before eating leftovers. Yes, you can use dried chickpeas! First, soak 1 cup of dried chickpeas in water for 8 hours or overnight. After soaking, drain and rinse them. Then, cook them in a pot with water for about 1 to 1.5 hours, or until tender. Drain and let them cool before adding to your salad. This salad pairs well with many dishes. Consider serving it with grilled chicken or fish for protein. You can also add pita bread or crusty bread for a complete meal. For a lighter option, enjoy it with a fresh fruit salad. To add some heat, mix in red pepper flakes. Start with 1/4 teaspoon, then taste and adjust. You can also add diced jalapeños or hot sauce for extra kick. This will give your salad a nice spicy twist! For the full recipe, check the [Full Recipe]. This blog post covered how to make a Lemon Basil Chickpea Salad. We discussed key ingredients like chickpeas and fresh veggies, plus optional add-ins. You learned step-by-step instructions for mixing and tossing the salad. I shared storage tips and variations to suit your taste. In closing, this salad is simple, healthy, and flexible. Enjoy experimenting with flavors and combinations to make it your own!](https://dishtreats.com/wp-content/uploads/2025/07/d3747d36-0043-45e0-9a82-fe789303a34f-768x768.webp)
 🥔. In this post, we covered how to make crispy roasted sweet potatoes. You learned about the essential ingredients, kitchen tools, and step-by-step instructions to achieve the perfect texture. We also shared tips for flavor, presentation, and variations to suit your taste. Finally, we discussed storage and reheating methods to keep leftovers fresh. I hope you feel ready to try this recipe. Enjoy making these tasty treats for yourself and others!](https://dishtreats.com/wp-content/uploads/2025/06/e613a315-0dcf-4c0d-9ed5-905015ae798c-768x768.webp)