S’mores No-Bake Bars Easy and Delicious Treats

Are you craving a sweet treat but want to skip the oven? You’re in luck! These S’mores No-Bake Bars are easy to make and bursting with flavor. With just a few simple ingredients, you can whip up a delicious snack that captures all the joys of summer campfires. Join me as we create a chocolatey, chewy delight that everyone will love. Let’s get started on these tasty bars!
Why I Love This Recipe
- Easy to Make: This no-bake recipe requires minimal time and effort, making it perfect for busy days or spontaneous cravings.
- Kid-Friendly: With its sweet flavors and fun textures, this recipe is a hit with kids and adults alike, perfect for family gatherings!
- Customizable: You can easily tweak the ingredients to suit your taste, whether adding nuts, using different sweeteners, or even varying the chocolate types.
- Deliciously Indulgent: The combination of chocolate, marshmallows, and graham crackers delivers a nostalgic taste of s’mores without the campfire hassle.
Ingredients
List of Key Ingredients
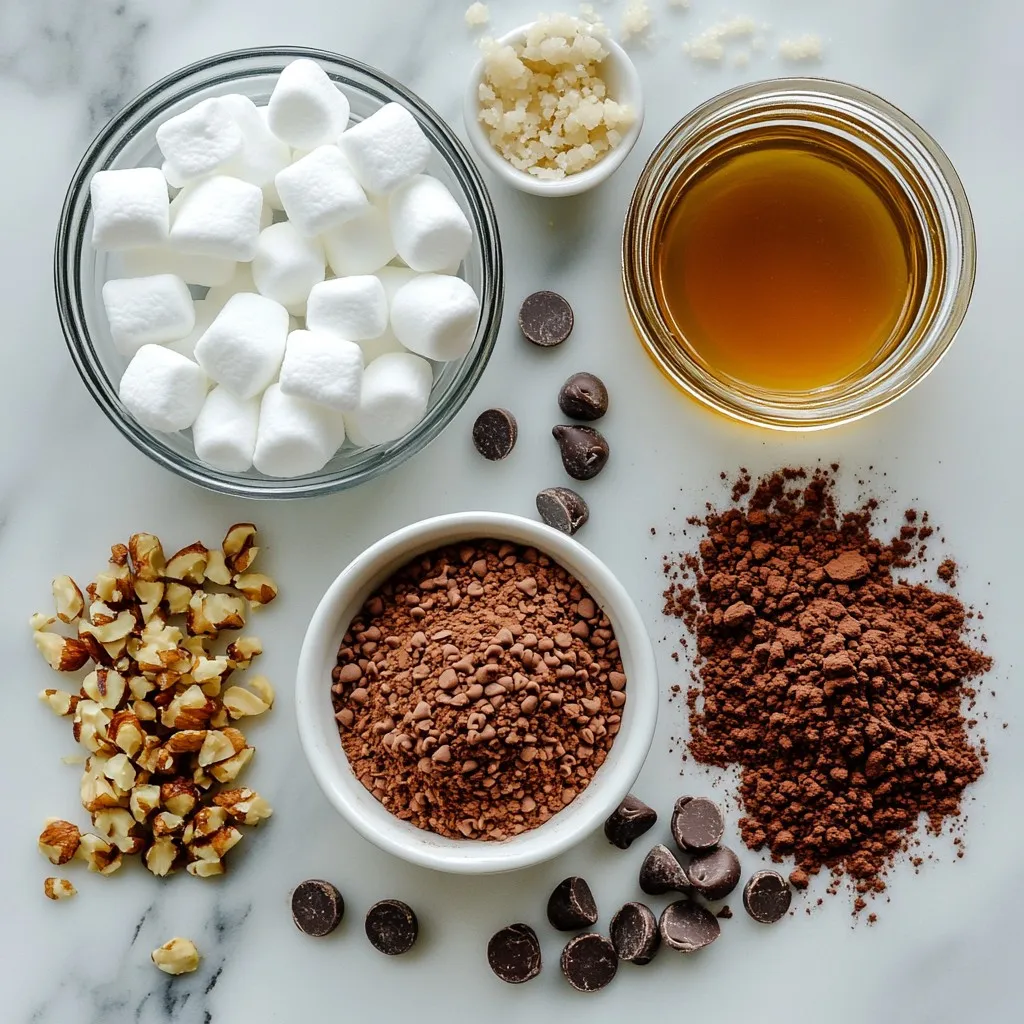
- 2 cups graham cracker crumbs
- 1 cup mini marshmallows
- 1 cup semi-sweet chocolate chips
- 1/2 cup coconut oil
- 1/4 cup honey or maple syrup
- 1/2 cup unsweetened cocoa powder
- 1/2 teaspoon vanilla extract
- Pinch of salt
- 1 cup chopped nuts (optional)
To make S’mores No-Bake Bars, gather these ingredients first. You need graham cracker crumbs for the base. They give this treat its classic flavor. Next, mini marshmallows add that gooey touch. Semi-sweet chocolate chips bring sweetness.
Coconut oil keeps the bars smooth and rich. Honey or maple syrup adds natural sweetness. Cocoa powder deepens the chocolate flavor. Vanilla extract enhances all the tastes. A pinch of salt balances the sweetness. Chopped nuts are optional but add a nice crunch.
These ingredients blend to create a delicious, easy treat. Each has a role that makes these bars shine. Enjoy cooking and have fun mixing these tasty parts together!

Step-by-Step Instructions
Preparation of the Base
- In a large bowl, mix together:
- 2 cups graham cracker crumbs
- 1/2 cup unsweetened cocoa powder
- Pinch of salt
- Use a whisk to blend until smooth. This makes a nice base.
Melting the Chocolate
- In a small saucepan, over low heat, combine:
- 1 cup semi-sweet chocolate chips
- 1/2 cup melted coconut oil
- Stir constantly until smooth. Check that it melts evenly.
Combining the Mixtures
- Pour the melted chocolate mix into the graham mixture.
- Add:
- 1/4 cup honey or maple syrup
- 1/2 teaspoon vanilla extract
- Use a spatula to stir well. Mix until thick and smooth.
Adding Marshmallows and Nuts
- Gently fold in:
- 1 cup mini marshmallows
- 1 cup chopped nuts (if you like)
- Make sure to mix evenly without breaking marshmallows.
Pressing Mixture into the Pan
- Line an 8×8 inch baking pan with parchment paper.
- Spread the mixture into the pan.
- Use a spatula to press down firmly. Make it compact and level.
Chilling and Setting
- Cover the pan with plastic wrap or foil.
- Place it in the fridge for 2-3 hours. Wait until set and firm.
Slicing and Serving
- Lift the bars out using the parchment paper.
- Place on a cutting board and slice into squares.
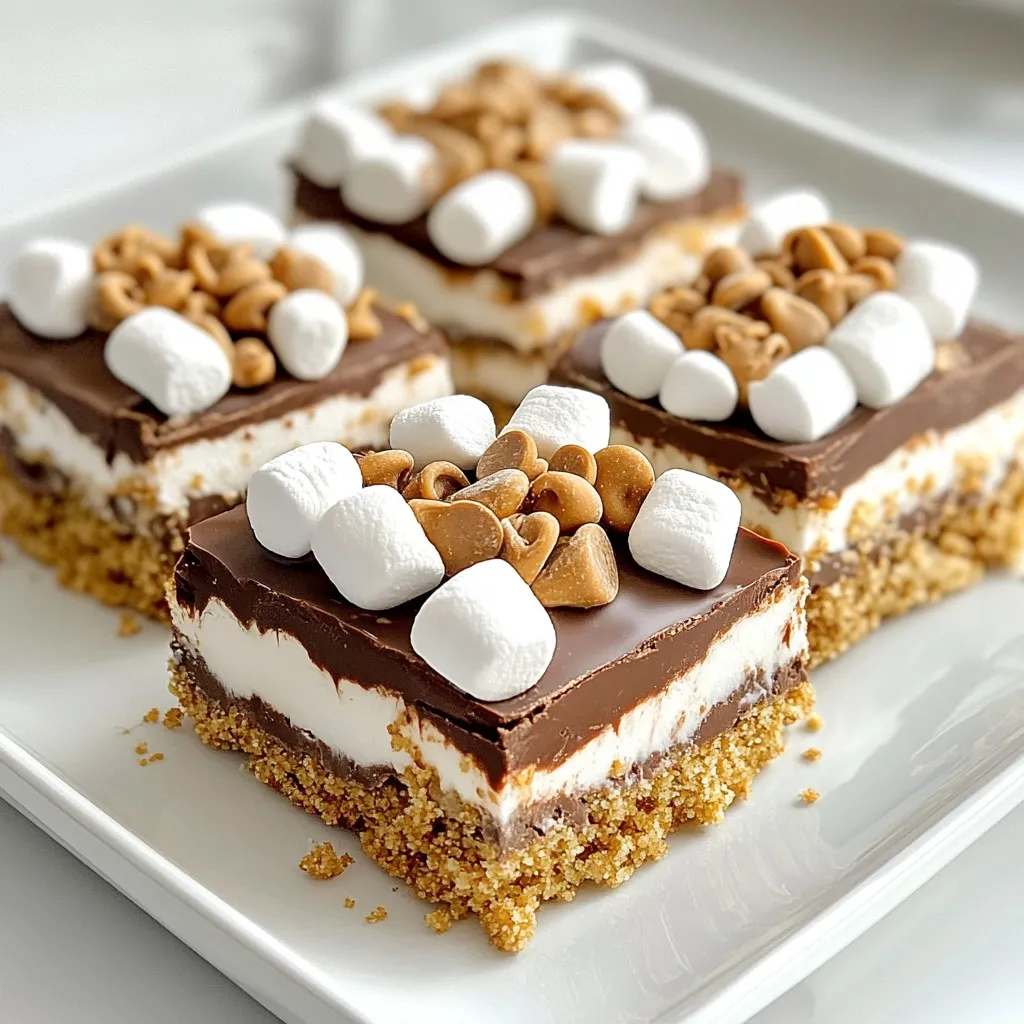
- For a fun touch, arrange them on a rustic platter. Add more mini marshmallows and chocolate chips on top. Drizzle with melted chocolate for extra flair!
Tips & Tricks
Storage Recommendations
To keep your S’mores No-Bake Bars fresh, store them in an airtight container. This helps keep them moist and tasty. Place a piece of parchment paper between layers to avoid sticking. You can store these bars in the fridge for about a week.
Expert Tips for Perfect Bars
To avoid a sticky texture, make sure to mix the chocolate well with the dry ingredients. The melted chocolate must be smooth before adding it to the graham cracker mix. For an even texture, fold in the mini marshmallows gently. This keeps them whole and fluffy, which adds a nice bite.
Presentation Enhancements
For a beautiful display, serve the bars on a wooden platter. You can sprinkle extra mini marshmallows and chocolate chips on top. Drizzling melted chocolate over the bars adds charm and a touch of sweetness. Consider pairing these bars with a scoop of vanilla ice cream for a fun treat!
Pro Tips
- Use Fresh Ingredients: Ensure your mini marshmallows and chocolate chips are fresh for the best flavor and texture in your bars.
- Experiment with Flavors: Feel free to add in different flavors like peanut butter or almond extract for a unique twist on the classic s’mores taste.
- Chill Thoroughly: Allow the bars to chill for the full time recommended to ensure they are set properly and have the right texture when cut.
- Storage Tips: Keep any leftover bars in an airtight container in the fridge to maintain their freshness and prevent them from becoming too soft.

Variations
Flavor Enhancements
You can make these S’mores No-Bake Bars even better. Try adding peanut butter. It gives a nice nutty taste. Use about half a cup of creamy peanut butter. Just mix it in with the melted chocolate.
You can also switch up the chocolate. Instead of semi-sweet chocolate chips, use dark chocolate. White chocolate works too! Each type adds a new flavor twist. Mix and match to find your favorite!
Nut-Free Alternatives
If someone has nut allergies, you can still enjoy these bars. Simply leave out the chopped nuts. You can replace them with sunflower seeds or pumpkin seeds. These options add crunch without nuts. Always read labels to ensure safety.
Vegan and Gluten-Free Options
To make these bars vegan, swap honey for maple syrup. Use dairy-free chocolate chips. Also, check your graham cracker crumbs. Some brands are not vegan.
For gluten-free options, choose gluten-free graham crackers. Many brands offer this choice. Make sure all ingredients are labeled gluten-free. This way, everyone can enjoy these tasty bars!
Nutritional Information
Caloric Content
Each S’mores No-Bake Bar has about 130 calories. This is a great treat to enjoy. With 16 bars in a batch, you can share them or keep some for yourself.
Macronutrient Composition
- Fats: Each bar has about 7 grams of fat. Most of this comes from coconut oil and chocolate.
- Carbohydrates: You get around 17 grams of carbs per bar. This includes sugars from honey and marshmallows.
- Proteins: There is about 1 gram of protein in each bar. While not high, the nuts can add a bit more.
Health Benefits
These bars use healthy ingredients that offer benefits:
- Coconut Oil: This oil can help improve heart health and boost energy.
- Honey or Maple Syrup: Both are better than white sugar. They can provide antioxidants.
- Nuts: If added, they add healthy fats and protein. They can help you feel full longer.
- Cocoa Powder: It is rich in antioxidants and can improve heart health too.
Enjoying these bars gives you a sweet treat with some good nutrients!
FAQs
Can I substitute honey with agave or sugar?
Yes, you can use agave or sugar. Both options work well. Agave is sweeter than honey. Sugar granules will dissolve in the mixture. If you use sugar, try to mix it well so it blends in.
How long do these bars last in the refrigerator?
These bars can last about one week in the fridge. Store them in an airtight container. They stay fresh and tasty this way. If you notice them getting dry, try adding a slice of bread in the container. It helps keep the bars moist.
Can I freeze these no-bake bars?
Yes, you can freeze these bars. Wrap them well in plastic wrap. Then, place them in a freezer-safe bag. They can last up to three months in the freezer. To enjoy, just thaw them in the fridge overnight.
What can I use instead of coconut oil?
If you lack coconut oil, use butter or olive oil. Both will work to bind the ingredients. Butter gives a rich flavor, while olive oil adds a lighter taste. Each option has its own unique touch.
How can I make these bars more chocolatey?
To amp up the chocolate flavor, add more chocolate chips. You can also sprinkle cocoa powder on top. For an extra treat, drizzle melted chocolate over the bars before chilling. This makes the bars even more delicious.
This blog covered how to make no-bake bars using simple ingredients. We shared detailed steps, from mixing dry items to chilling the final product. You learned tips for perfect texture and storage, plus variations for taste and dietary needs.
In the end, making your own bars is easy and fun. Enjoy experimenting and sharing your delicious creation

S’mores No-Bake Bars
Ingredients
- 2 cups graham cracker crumbs
- 1 cup mini marshmallows
- 1 cup semi-sweet chocolate chips
- 0.5 cup unsweetened cocoa powder
- 0.5 cup coconut oil, melted
- 0.25 cup honey or maple syrup
- 0.5 teaspoon vanilla extract
- 1 pinch salt
- 1 cup chopped nuts (optional, for added crunch)
Instructions
- In a large mixing bowl, combine the graham cracker crumbs, unsweetened cocoa powder, and a pinch of salt. Use a whisk or spatula to mix thoroughly until you achieve a uniform blend.
- In a small saucepan, over low heat, combine the semi-sweet chocolate chips and melted coconut oil. Stir continuously until the chocolate is fully melted and the mixture is smooth. Once melted, remove from heat and let it cool for a few minutes.
- Pour the melted chocolate mixture into the bowl with the graham cracker mixture. Add the honey (or maple syrup) and vanilla extract. Using a spatula, stir until all ingredients are well incorporated, forming a thick, homogenous mixture.
- Gently fold in the mini marshmallows and chopped nuts (if using). Ensure they are evenly distributed throughout the mixture without breaking the marshmallows.
- Line an 8x8 inch square baking pan with parchment paper, allowing some overhang for easy removal later. Transfer the mixture to the pan, spreading it evenly. Use a spatula or the back of a spoon to press down firmly, ensuring it is compact and level.
- Cover the pan with plastic wrap or foil and place it in the refrigerator. Allow it to chill for at least 2-3 hours, or until the bars are set and firm to the touch.
- After the bars have set, carefully lift them out of the pan using the parchment paper overhang. Place on a cutting board and slice into squares or rectangles. Serve immediately, and store any leftovers in an airtight container in the refrigerator for up to a week.


![When making peach streusel muffins, the right ingredients make all the difference. Here’s what you need: - 1 ½ cups all-purpose flour - 1 tsp baking powder - ½ tsp baking soda - ¼ tsp salt - ½ cup granulated sugar - ¼ cup packed brown sugar - ⅓ cup unsalted butter, melted - 1 large egg - 1 tsp vanilla extract - ½ cup buttermilk - 1 ½ cups fresh peaches, peeled and diced - ⅓ cup rolled oats - 1 tsp ground cinnamon These ingredients create a lovely balance of flavors. The fresh peaches add sweetness and moisture. The streusel topping gives a nice crunch. This recipe is simple and uses common items. I love how easy it is to find these ingredients at any store. For the full recipe, check out [Full Recipe]. It's a delightful way to enjoy seasonal peaches in a warm muffin. First, preheat your oven to 375°F (190°C). This step warms the oven, helping the muffins bake evenly. Next, prepare your muffin tin. You can line it with muffin liners or grease it lightly with some non-stick spray or butter. This will keep the muffins from sticking. In a medium bowl, whisk together the dry ingredients. Combine 1 ½ cups of all-purpose flour, 1 teaspoon of baking powder, ½ teaspoon of baking soda, and ¼ teaspoon of salt. Mix well until everything is blended. Set this bowl aside for now. In a large mixing bowl, combine the sugars and melted butter. Use ½ cup of granulated sugar and ¼ cup of brown sugar. Mix them well until they blend together. Then, add 1 large egg and 1 teaspoon of vanilla extract. Beat the mixture until it looks fluffy. Next, pour in ½ cup of buttermilk and stir gently. Now, it’s time to add the dry ingredients. Gradually fold the flour mixture into the wet ingredients. Be gentle and avoid overmixing. It’s okay if the batter has a few lumps. Finally, fold in 1 ½ cups of diced peaches. Make sure they are evenly spread throughout the batter. In a small bowl, mix together ⅓ cup of rolled oats, 1 teaspoon of ground cinnamon, and a pinch of sugar for the streusel topping. This mix will add a crunchy texture to your muffins. Using a scooper or a spoon, fill each muffin liner with the batter. Aim to fill them about two-thirds full. This gives your muffins room to rise. Once filled, sprinkle a generous amount of the streusel topping over each muffin. This adds that crispy layer on top. Place the muffin tin in your preheated oven. Bake for 18 to 20 minutes. Check for doneness by inserting a toothpick into the center of a muffin. If it comes out clean, your muffins are ready. After baking, let the muffins cool in the pan for about 5 minutes. Then, transfer them to a wire rack to cool completely. For a complete recipe and detailed instructions, check out the Full Recipe. To make great muffins, avoid overmixing the batter. When you mix too much, muffins can turn tough and dry. Gently fold the dry ingredients into the wet. Leave some lumps; they are okay! The batter should feel thick but not dry. Aim for a smooth mix with small bits of flour still visible. This keeps the muffins soft and fluffy. To keep your muffins fresh, store them in an airtight container at room temperature. They will stay good for up to three days. If you want to keep them longer, freeze them. Wrap each muffin in plastic wrap, then put them in a freezer bag. When ready to eat, thaw them in the fridge overnight or microwave them for about 20 seconds. This keeps them soft and tasty. These peach streusel muffins pair well with coffee or tea. They also taste great with a glass of milk. For a nice touch, dust the muffins with powdered sugar before serving. You can also add a slice of fresh peach on the side. This extra step makes your muffins look fancy and adds more peach flavor. Enjoy the delightful mix of tastes! {{image_4}} You can switch the peaches for other fruits. Blueberries and raspberries work great! They add a nice burst of flavor. You can even mix fruits, like peaches and blueberries, for a fun twist. Remember to adjust the amount of fruit based on what you use. Keep it around 1 ½ cups to fill the muffins well. Need a gluten-free option? Use a gluten-free flour blend instead of all-purpose flour. For a dairy-free version, replace buttermilk with almond milk or coconut milk. You can also use a flax egg instead of a regular egg. Just mix 1 tablespoon of flaxseed meal with 2.5 tablespoons of water. Let it sit for a few minutes to thicken. This will keep your muffins tasty and friendly for different diets. Want to kick up the flavor? Try adding nuts like walnuts or pecans to the batter. They give a nice crunch. You can also sprinkle some cinnamon or nutmeg in the batter for warmth. For a little zing, add a splash of lemon juice or zest. These small changes can make your muffins more exciting and tasty. For the full recipe, look for the Peach Streusel Muffins instructions above! You can store Peach Streusel Muffins at room temperature. Place them in an airtight container. This helps keep them fresh and soft. They will stay tasty for up to three days. If you want to keep them longer, consider freezing. Freezing is a great way to save these muffins for later. Wrap each muffin in plastic wrap. Then, place them in a freezer bag or container. This keeps them from getting freezer burn. You can freeze them for up to three months. To enjoy them later, thaw your muffins. Take them out of the freezer and let them sit at room temperature. This usually takes about an hour. You can also warm them in the oven at low heat for a fresh-baked taste. For the best experience, try the Full Recipe to make these delightful muffins again! Yes, you can use canned peaches. Look for peaches packed in juice or water. Drain them well and pat them dry to remove excess moisture. This step helps avoid soggy muffins. Cut the peaches into small pieces, similar to fresh ones. Canned peaches can be sweeter, so reduce the sugar in the recipe by a tablespoon. This keeps your muffins balanced. If your batter is thick, add a splash of milk or buttermilk. Mix well until you reach a smooth texture. Thick batter can lead to dry muffins. You want a batter that can easily drop from a spoon but is not runny. Another tip is to gently fold in a bit more diced peaches. This adds moisture and flavor. Check for doneness by inserting a toothpick into the center of a muffin. If it comes out clean or with a few crumbs, your muffins are ready. Look for a golden-brown top and a slight spring when you touch the surface. If the muffins still look wet or jiggly, bake them a few more minutes. Yes, you can prepare the batter ahead. Store it in the fridge for up to 2 hours. Mix the wet and dry ingredients separately. Combine them just before baking. This helps keep the muffins light and fluffy. If you plan to store longer, consider freezing the batter in muffin tins. This way, you can bake fresh muffins anytime. For the full recipe, check above. These peach muffins are easy to make and full of flavor. We covered the ingredients, step-by-step instructions, and tips to improve texture and taste. From using fresh peaches to adding oats, each detail counts. You can experiment with flavors and storage methods. Enjoy these muffins fresh or store them for later. Happy baking!](https://dishtreats.com/wp-content/uploads/2025/07/b62cebd8-d26b-48c0-b1ab-fab18f37a599-768x768.webp)


