Slow Cooker Honey Sesame Beef Lettuce Wraps Simple Dish

Are you ready to enjoy a tasty and easy meal? Slow Cooker Honey Sesame Beef Lettuce Wraps are a winner. This dish has tender beef, sweet honey, and fresh veggies. You can make it in your slow cooker with just a few simple steps. Plus, it’s perfect for family dinners or gatherings. Let’s dive in and get cooking! Your new favorite dish is just a few clicks away.
Ingredients
Main Ingredients
- 1 lb flank steak, thinly sliced
- 1/4 cup low-sodium soy sauce
- 1/4 cup honey
- 2 tablespoons sesame oil
- 1 tablespoon rice vinegar
Aromatics
- 2 cloves garlic, minced
- 1-inch piece of ginger, grated
- 1/4 cup green onions, chopped (plus extra for garnish)
Accompaniments
- 1 head of butter or romaine lettuce, leaves carefully separated
- 1 tablespoon sesame seeds
- Sriracha sauce (optional, for serving)
In this recipe, flank steak is the star. This cut is lean and tender, making it perfect for slow cooking. The low-sodium soy sauce adds depth without too much salt. Honey brings sweetness, balancing the savory flavors nicely.
Sesame oil gives the dish its signature nutty taste. Rice vinegar adds a hint of acidity, brightening everything up. Aromatics like garlic and ginger enhance the beef’s flavor profile. Green onions add freshness and a nice crunch.
For serving, crisp lettuce leaves act as wraps. You can choose either butter or romaine lettuce. Both options are great for holding the beef. Finally, sesame seeds sprinkle on top add a delightful crunch. If you like some heat, Sriracha sauce is a tasty option. It’s all about finding what flavors you love!
Step-by-Step Instructions
Preparing the Sauce
Start by gathering your ingredients. In your slow cooker, combine:
- 1/4 cup low-sodium soy sauce
- 1/4 cup honey
- 2 tablespoons sesame oil
- 1 tablespoon rice vinegar
Stir these together until they blend well. Next, add:
- 2 cloves garlic, minced
- 1-inch piece of ginger, grated
Mix these in too. This sauce will give your beef a sweet and savory flavor.
Cooking the Beef
Now, take your flank steak and cut it into thin slices. Add the beef to the sauce in your slow cooker. Make sure each piece is well coated in the sauce. This helps the beef soak up all the flavors.
Cover your slow cooker and set it to low heat. Cook the beef for 6 to 8 hours. This long cook time makes the beef tender and easy to shred.
Shredding and Serving
When the cooking time is up, use two forks to shred the beef right in the slow cooker. Let it sit in the sauce for 15 more minutes. This step helps the beef absorb even more flavor.
Before serving, stir in:
- 1/4 cup green onions, chopped
- 1 tablespoon sesame seeds
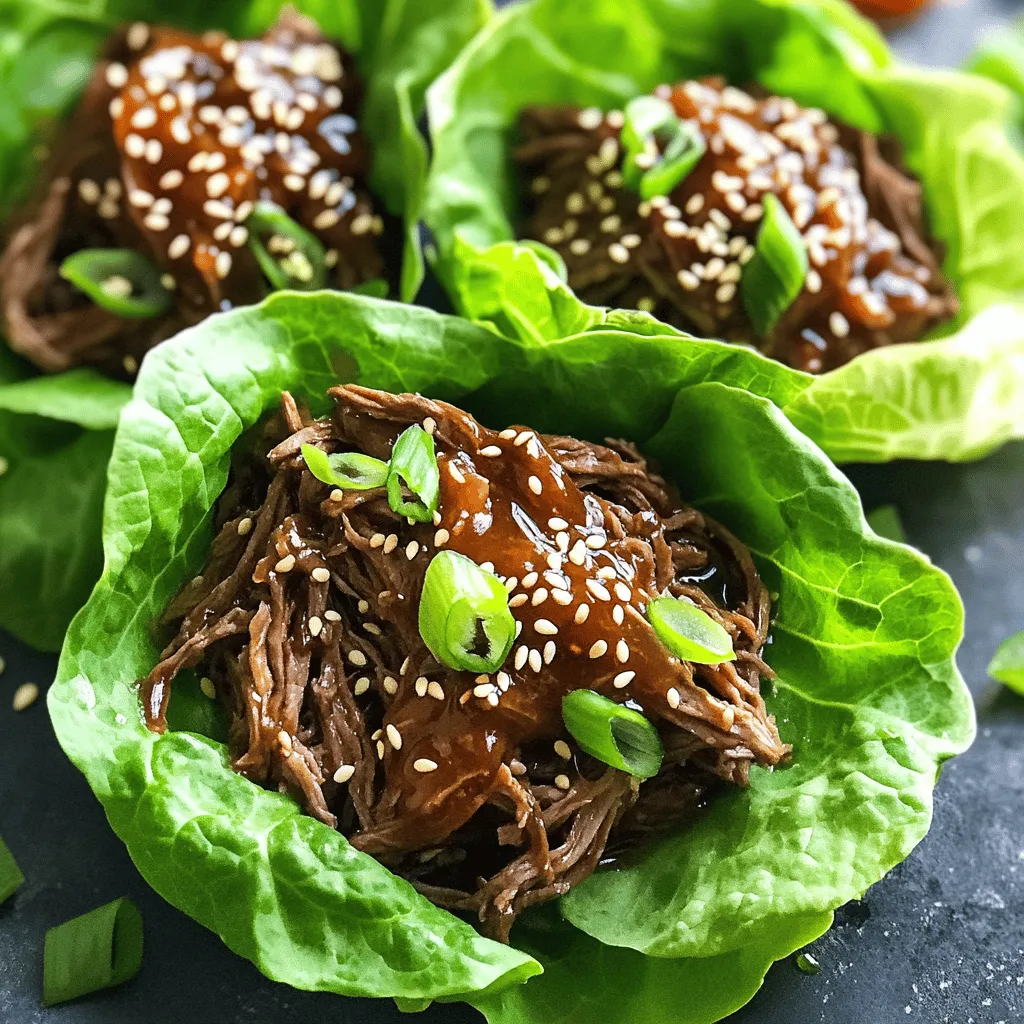
This adds a nice crunch and extra taste. To make your lettuce wraps, take a fresh lettuce leaf. Place a spoonful of the honey sesame beef in the center. If you like spice, add a drizzle of Sriracha sauce. Top with more green onions for a lovely look.
Tips & Tricks
Cooking Tips
- To achieve tender beef, use flank steak. It cooks well in the slow cooker.
- Cut the beef into thin slices. This helps it absorb the sauce.
- Marinate the beef in the sauce for at least 30 minutes. This adds more flavor.
- Cook on low heat for 6 to 8 hours. Low heat makes the beef soft and juicy.
Presentation Tips
- Serve the beef in a large bowl. Arrange lettuce leaves around it.
- Each guest can make their own wraps. This adds fun to the meal.
- Use a bright platter for serving. It makes the dish look more appealing.
- Add extra green onions on top for color and taste.
Flavor Enhancements
- For more flavor, try adding crushed red pepper. It gives a nice kick.
- You can mix in hoisin sauce for added depth. It pairs well with honey.
- If you like it sweeter, add more honey. Adjust to your taste.
- Want it spicier? Add more Sriracha sauce when serving. This adds heat.

Variations
Protein Swaps
You can easily swap the beef for other proteins. Chicken works great in this recipe. Use boneless, skinless chicken breasts for a lighter option. Just slice them thinly like the beef. Pork is another tasty choice. Use pork loin, and it will soak up the flavors well.
If you prefer a plant-based dish, try tofu or tempeh. Both options are great for soaking up the honey and soy flavors. Cut them into small cubes and follow the same cooking steps. This way, everyone can enjoy a delicious wrap.
Sauce Modifications
You can change the sauce to fit your taste. If you want less sugar, use maple syrup or agave nectar instead of honey. Both options keep the sweetness while making it unique.
For spice lovers, adjust the heat level. Add more Sriracha or red pepper flakes for extra kick. You can also mix in some chili paste for a new flavor twist. Just remember to taste as you go!
Lettuce Choices
The type of lettuce you use can change the dish’s vibe. Butter lettuce is soft and easy to fold. Romaine is a bit crunchier and adds a nice texture. You can even use iceberg lettuce for a crisp bite.
Consider serving these wraps with side dishes too. Rice or quinoa pairs well, adding more filling to the meal. You can also add fresh veggies like carrots and cucumbers for extra crunch. Enjoy creating your perfect plate!
Storage Information
Refrigeration
After you enjoy your Slow Cooker Honey Sesame Beef, store any leftovers right away. Use an airtight container to keep the beef fresh. This method helps maintain the dish’s flavor and moisture. You can safely store it in the fridge for up to three days. If you want to keep it longer, freezing is a good option.
Freezing
To freeze the beef mixture, let it cool completely first. Then, place it in a freezer-safe bag or container. Make sure to remove as much air as possible to avoid freezer burn. You can freeze it for up to three months. When you’re ready to eat, thaw it in the fridge overnight. Reheat it in a pan over medium heat until warm. You can also use the microwave for quick reheating.
Serving Leftovers
Leftovers can be fun and versatile! Try using the beef in tacos or over rice for a new meal. You can also top a salad with the honey sesame beef for a tasty lunch. If you meal prep, pack the beef and lettuce leaves separately. This way, you can enjoy fresh lettuce wraps throughout the week.
FAQs
What is the best cut of beef for this recipe?
The best cut for this dish is flank steak. It has good flavor and tenderness. This cut cooks well in the slow cooker. The long cooking time makes it easy to shred. You can also try sirloin or chuck if you prefer. Both offer great taste, but flank steak is my top choice.
How can I make this recipe spicier?
To add spice, use more Sriracha sauce. You can also stir in red pepper flakes. Both options increase the heat without changing the dish’s flavor. If you want more heat from the start, add fresh chili peppers to the sauce. This gives a nice kick to the honey and soy blend.
Can I cook this on high heat in the slow cooker?
Yes, you can cook on high heat. However, I recommend cooking on low for best results. Cooking on high takes about 3 to 4 hours. You still want the beef tender. Check it often to ensure it doesn’t overcook. Cooking low and slow gives the best taste.
What sides go well with Honey Sesame Beef Lettuce Wraps?
Great sides include rice or quinoa. They balance the dish well. You can also serve steamed veggies for a healthy addition. Another option is a light salad with sesame dressing, which complements the wraps. These sides make your meal more filling and satisfying.
How do I ensure my beef is tender?
To ensure tender beef, slice it thinly before cooking. Flank steak is tender when cooked low and slow. The slow cooker works wonders here. After cooking, shred the beef well. Let it sit in the sauce to soak up flavor and moisture. This step is key for a juicy bite.
This blog post walks you through making delicious Honey Sesame Beef Lettuce Wraps. We covered the key ingredients, tips for perfecting the beef, and how to store leftovers. Remember to be creative with variations and accompaniments. You can easily adapt the recipe to your taste or try different proteins. Enjoy these wraps as a fun meal or snack anytime. Make it your own and savor every bite!


![- 2 cups diced apples - 1 cup celery, thinly sliced - 1 cup red grapes, halved - 1/2 cup walnuts, chopped - 1/2 cup raisins or dried cranberries - 1 cup plain Greek yogurt - 1 tablespoon honey - 1/2 teaspoon fresh lemon juice - Salt and pepper to taste - Lettuce leaves for serving Fresh produce makes this salad shine. I love using crisp apples, like Granny Smith, for their tartness. They add a nice crunch. The celery brings a refreshing snap, while juicy red grapes add sweetness. Nuts and dried fruits give texture and flavor. Chopped walnuts are my go-to. Toast them for even more flavor. Raisins or dried cranberries add a touch of sweetness, balancing the dish well. For the dressing, I use plain Greek yogurt. It’s creamy and healthy. Honey adds sweetness, and a bit of lemon juice brightens the flavors. Season with salt and pepper to enhance everything. Finally, serve on fresh lettuce leaves. They make a great base and add color. This combination of ingredients creates a delightful Waldorf salad. You can find the full recipe at [Full Recipe]. - Start by adding 2 cups of diced apples to a large bowl. - Drizzle the apples with 1/2 teaspoon of fresh lemon juice. This keeps them fresh and bright. - Next, slice 1 cup of celery into thin pieces. Add this to the bowl. - Halve 1 cup of red grapes and toss them in too. - In the same bowl, mix the fruit with 1/2 cup of chopped walnuts. - Add 1/2 cup of raisins or dried cranberries for sweetness. Gently toss the mixture. - In a separate bowl, combine 1 cup of plain Greek yogurt with 1 tablespoon of honey. Stir until smooth. - Carefully fold the yogurt dressing into the fruit mixture. Make sure everything is coated. - Season with salt and pepper to taste, folding gently to mix. - Cover the bowl and chill it in the fridge for at least 30 minutes. This helps the flavors blend. - When ready, serve on fresh lettuce leaves for a beautiful presentation. Enjoy your Waldorf salad! - For the complete recipe, check out the Full Recipe. You can swap out fruits and nuts to suit your taste. Try pears or oranges for a fresh twist. For nuts, almonds or pecans work well, too. If you want a creamier texture, use Greek yogurt instead of mayonnaise. The yogurt adds protein and keeps the salad light. Toasting walnuts really boosts their flavor. Just place them in a dry pan over medium heat. Stir them until they smell nutty and are lightly browned. You can also adjust sweetness or tartness. If the salad is too sweet, add a dash of lemon juice. For more sweetness, drizzle in extra honey. Serve your Waldorf salad on crisp lettuce leaves for a vibrant look. Arrange the salad in a large bowl or individual cups. Garnish with mint leaves for a fresh pop of color. You can also sprinkle extra toasted walnuts on top for added crunch. These simple touches make your dish stand out. For the full recipe, refer to the Waldorf Wonderland Salad 🥗. {{image_4}} The classic Waldorf salad uses simple, fresh ingredients. It combines apples, celery, grapes, and walnuts in a creamy dressing. Modern twists can add new flavors. You might see variations like adding chicken or swapping yogurt for mayonnaise. These changes keep the dish fresh and fun. You can experiment with spices, too. A hint of cinnamon or nutmeg can add warmth. If you want a vegan Waldorf salad, swap Greek yogurt for a plant-based option. Silken tofu blended with lemon juice makes a great dressing. For a gluten-free version, check your nuts and dried fruits. Most are safe, but some brands add gluten. You can also cut calories by using low-fat yogurt. This keeps the creaminess while reducing fat. Seasonal fruits can enhance the Waldorf salad. In fall, add sliced pears for sweetness. In winter, pomegranate seeds add color and crunch. Fresh berries in summer create a bright, juicy contrast. Each season brings a new twist to this classic salad. Try different fruits to match the season and your taste. The full recipe allows you to mix and match as you please. To store leftover Waldorf salad, place it in an airtight container. This keeps the salad fresh. Use a lid or plastic wrap to seal it well. The salad can last up to 3 days in the fridge. After that, the texture and flavor may change. If you see any browning apples, it’s best to toss them out. You can prepare some ingredients in advance. Chop your apples, celery, and grapes a day before. Keep them in separate containers in the fridge. This saves time when you want to make the salad. If you want to freeze Waldorf salad, I suggest not freezing it whole. The fruits will lose their crunch. Instead, freeze just the nuts or dried fruits. This keeps them fresh longer. When you are ready, mix them in fresh, chilled salad. You can enjoy that fresh taste even after storage! For the full recipe, check out the Waldorf Wonderland Salad. Waldorf Salad dates back to the late 1800s. A chef at the Waldorf Astoria Hotel in New York created it. The original recipe had only apples, celery, and mayonnaise. Over time, people added more ingredients, like walnuts and grapes. This salad became popular at formal dinners and events. It has a classic, timeless appeal that many enjoy today. Yes, you can prepare Waldorf Salad ahead of time. Make it a few hours before serving for best results. Just follow the steps of mixing everything and keep it in the fridge. This helps the flavors blend well. If you plan to serve it the next day, be careful with the apples. They can brown, so use lemon juice to keep them fresh. Waldorf Salad is quite healthy! It features fresh fruits and nuts, which offer great nutrients. Apples provide fiber and vitamins, while walnuts add healthy fats. The Greek yogurt dressing gives protein and a creamy texture. This salad is a great choice for a light meal or side dish. Eating it can help you feel full and satisfied. You can find the full recipe for this delightful salad [here](#). Waldorf salad combines fresh produce, nuts, and a creamy dressing. You learned how to prepare it step-by-step. I shared tips to enhance flavor and presentation. Feel free to adjust ingredients based on your taste. You can also explore various dietary options and seasonal fruits. This salad is not only tasty but also healthy. With proper storage methods, you’ll enjoy it for days. Now, it's time to create your own delicious version!](https://dishtreats.com/wp-content/uploads/2025/06/24fb7af7-5454-4649-a19f-39fd463a867f-768x768.webp)
![To make this tasty dip, you need a few key items: - 1 medium head of cauliflower, broken into bite-sized florets - 1 cup plain Greek yogurt (preferably full-fat for creaminess) - 1/2 cup shredded sharp cheddar cheese - 1/4 cup cream cheese, softened at room temperature - 1/4 cup buffalo sauce (adjust based on your heat preference) - 2 cloves garlic, finely minced - 1/2 teaspoon onion powder - 1/2 teaspoon smoked paprika for extra depth - Salt and freshly ground black pepper to taste These ingredients blend together to create a creamy, spicy dip that you will love. While the dip is great on its own, you can add some fun toppings. Here are some ideas: - Chopped green onions (scallions) for a fresh pop of color - Celery sticks for a crunchy contrast - Crispy tortilla chips for dipping These add-ons enhance both the look and taste of your dish. This dip is not just delicious; it's also packed with nutrients. Here’s a quick look at what you get: - Cauliflower: Low in calories, high in fiber - Greek yogurt: Good source of protein and probiotics - Cheese: Adds calcium and flavor Each serving is a great choice for a snack or appetizer. You can enjoy this dish without guilt! First, preheat your oven to 375°F (190°C). This step helps the dip cook well. Take a medium head of cauliflower and break it into bite-sized florets. Next, fill a large pot halfway with water and bring it to a boil. Once boiling, place a steamer basket inside the pot and add the cauliflower florets. Steam them for 8 to 10 minutes. You want them tender enough to pierce easily with a fork. After steaming, remove the florets from heat and let them cool for a few minutes. In a food processor, add the steamed cauliflower, 1 cup of plain Greek yogurt, 1/4 cup of softened cream cheese, and 1/4 cup of buffalo sauce. You can adjust the buffalo sauce to control the heat. Also, include 2 cloves of minced garlic, 1/2 teaspoon of onion powder, 1/2 teaspoon of smoked paprika, salt, and black pepper to taste. Blend until smooth and creamy. Scrape down the sides as needed. Then, gently fold in 1/2 cup of shredded sharp cheddar cheese. This adds great flavor and texture to the dip. Now, transfer the cauliflower mixture to your greased baking dish. Spread it out evenly using a spatula. Place it in the oven and bake for 20 to 25 minutes. You want the dip to be hot and the top to turn a light golden-brown color. When done, carefully take the dish out of the oven and let it cool for about 5 minutes. This rest time allows the flavors to blend. Don’t forget to garnish with chopped green onions before serving! Enjoy your warm dip with crunchy celery sticks and crispy tortilla chips. For the Full Recipe, you can refer back to the ingredients and instructions. To get the best flavor and texture from your dip, use fresh cauliflower. Steam it until it's tender but not mushy. This keeps the dip thick and creamy. Use full-fat Greek yogurt and cream cheese for added richness. They blend well and give a nice mouthfeel. Don't skip the garlic; it adds a punch of flavor. For spice lovers, adjust the buffalo sauce to your taste. You can easily modify this dip for different diets. For a vegan option, swap Greek yogurt and cream cheese for cashew cream or coconut yogurt. Use nutritional yeast for that cheesy flavor without dairy. If you want a low-carb option, serve it with sliced veggies instead of chips. This way, everyone can enjoy it without feeling left out. This dip works for many occasions. For game days, serve it warm with crispy tortilla chips. At parties, set it out with celery sticks and carrot sticks for a colorful platter. If you're hosting a casual dinner, pair it with toasted bread or pita chips. This dip can fit into any setting, making it a versatile choice. You can find the full recipe to make it just right! {{image_4}} To make a vegan version, swap Greek yogurt for cashew cream or vegan yogurt. Use vegan cream cheese instead of regular cream cheese. You can also choose nutritional yeast for a cheesy taste without dairy. Adjust the buffalo sauce based on your heat level. This version keeps the flavor while being plant-based. If you love heat, add extra buffalo sauce or some diced jalapeños. For a cheesier dip, mix in more shredded vegan cheese or cheddar. You can even top it with cheese before baking for a bubbly, golden finish. This variation will delight cheese lovers and spice fans alike. While celery sticks and tortilla chips are classic, try using sliced bell peppers or cucumber sticks. Pita chips or even crispy veggies add a nice crunch. For a fun twist, serve with mini pretzels for a salty kick. These options keep it fresh and exciting! For the full recipe, visit the [Full Recipe] page. To store leftover dip, let it cool first. Place it in an airtight container. This keeps the dip fresh for up to three days. You can also cover it tightly with plastic wrap. Make sure no air gets in, as this can spoil the dip. When you're ready to enjoy it again, scoop out what you need. Reheat in the oven for best results. Preheat your oven to 350°F (175°C). Place the dip in an oven-safe dish and cover it with foil. Heat for about 15-20 minutes, or until it's warm. You can also use the microwave. Heat in short bursts, about 30 seconds, stirring in between until hot. You can freeze Cauliflower Buffalo Dip for up to three months. Use a freezer-safe container. Leave some space at the top, as the dip may expand. To thaw, move it to the fridge overnight. Reheat it as mentioned above. The texture may change slightly, but the taste remains delicious. Enjoy this tasty dip anytime! Yes, you can use various cheeses. Creamy cheeses like goat cheese or ricotta work well. You could also try mozzarella for a milder taste. Each cheese changes the dip's flavor and texture. Mixing cheeses can create a unique taste. Just keep the total amount the same as the recipe calls for. You have many fun options for serving this dip. Here are a few ideas: - Crispy tortilla chips - Fresh celery sticks - Carrot sticks - Pita bread or chips - Crackers These choices add crunch and flavor. You can even make a veggie platter for a colorful spread. The dip's spice level depends on the buffalo sauce you use. Some sauces are very hot, while others are mild. If you like less heat, use less buffalo sauce. You can taste and adjust as you mix. This way, you control the spice to suit your taste. In this blog post, I covered how to make tasty Cauliflower Buffalo Dip. You learned about the key ingredients, how to prepare, and bake the dip. I shared tips for the best flavor and texture, plus easy variations to try. Storage tips ensure your leftovers stay fresh. Cauliflower Buffalo Dip is great for any party. Enjoy experimenting with flavors and tweaks. I hope you make this dish and share it with others. It’s sure to be a hit!](https://dishtreats.com/wp-content/uploads/2025/07/091f7212-5f30-4b51-84f4-e8795fa9d64a-768x768.webp)