Slow Cooker Cinnamon Roll French Toast Delight

Are you ready to wake up to a warm, sweet breakfast that makes mornings special? With my Slow Cooker Cinnamon Roll French Toast Delight, you can create a breakfast that everyone will love. Imagine soft, fluffy cinnamon rolls soaked in a creamy egg mix, cooked low and slow for a tasty treat. Join me as I guide you through easy steps and tips for this delightful dish that’ll make your breakfast the star of the day!
Ingredients
List of Ingredients
- 1 can (16 oz) refrigerated cinnamon rolls, cut into quarters
- 6 large eggs
- 1 cup whole milk
- 1 teaspoon pure vanilla extract
- 1 teaspoon ground cinnamon
- 1/2 teaspoon ground nutmeg
- 1/2 cup pure maple syrup
- 1/2 cup chopped pecans (optional for added texture)
- 1/2 cup powdered sugar (for drizzling)
Optional Ingredients for Added Flavor
You can add 1/2 cup of raisins or chocolate chips. Both bring sweetness and chewiness. For a twist, try adding orange zest for a bright flavor. It pairs well with the cinnamon.
Recommended Substitutes for Healthier Options
For a lighter dish, use egg whites instead of whole eggs. Almond milk works as a great low-calorie milk substitute. If you want to reduce sugar, you can use a sugar substitute like stevia or monk fruit. These swaps keep the taste while making it healthier.
Step-by-Step Instructions
Preparing the Slow Cooker
Start by greasing the inside of your slow cooker. You can use cooking spray or butter. This step keeps the dish from sticking. A well-greased pot makes serving much easier. Don’t skip this part!
Creating the Egg Mixture
In a large bowl, whisk together six large eggs. Add in one cup of whole milk. Then, mix in one teaspoon of pure vanilla extract. Next, add one teaspoon of ground cinnamon and half a teaspoon of nutmeg. Make sure to blend it all until smooth. This mixture gives the dish its rich flavor.
Layering the Ingredients in the Slow Cooker
Open the can of cinnamon rolls. Cut each roll into quarters. Layer these pieces evenly at the bottom of the greased slow cooker. Pour the egg mixture over the cinnamon roll pieces. Ensure that every piece is well-coated. Gently press down on the rolls. This helps them soak up the egg mixture.
Cooking Guidelines and Timing
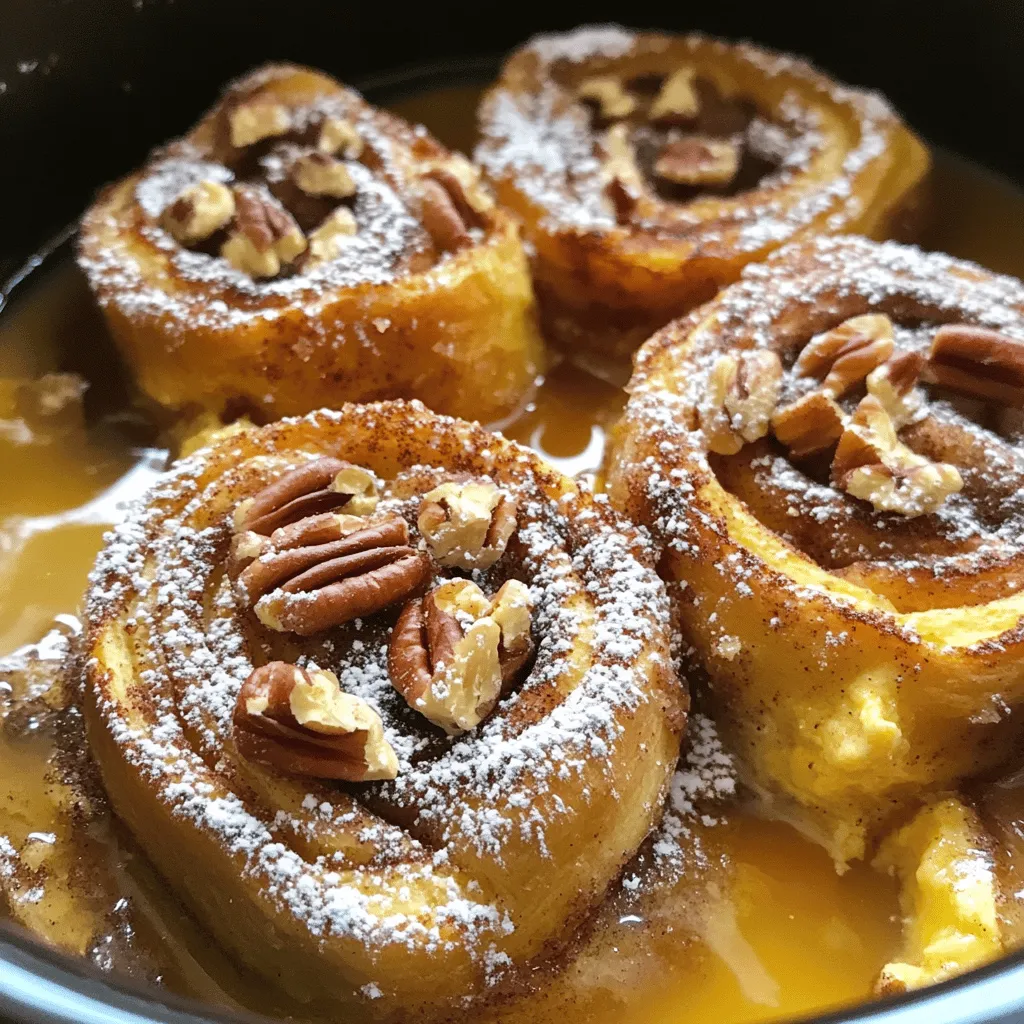
Drizzle half a cup of pure maple syrup over the top. If you want, sprinkle half a cup of chopped pecans for some crunch. Cover the slow cooker with its lid. Cook on low for about four hours. Check for doneness with a toothpick. It should come out clean when the center is set. After cooking, turn off the slow cooker. Let it cool for a few minutes before serving. Drizzle powdered sugar over the top for a sweet finish. Enjoy your warm, gooey treat!
Tips & Tricks
How to Prevent Sticking in the Slow Cooker
To keep your Slow Cooker Cinnamon Roll French Toast from sticking, grease the pot well. Use cooking spray or butter on the inside. Make sure to coat all sides. This step is key. It helps the cinnamon rolls lift out easily once cooked.
Ensuring Even Soaking of Cinnamon Rolls
To soak the cinnamon rolls evenly, layer them flat in the slow cooker. Cut each roll into quarters and spread them out. Pour the egg mixture over them slowly. Press down gently to help the rolls absorb the egg. This ensures every piece gets that rich flavor.
Serving Suggestions for a Complete Meal
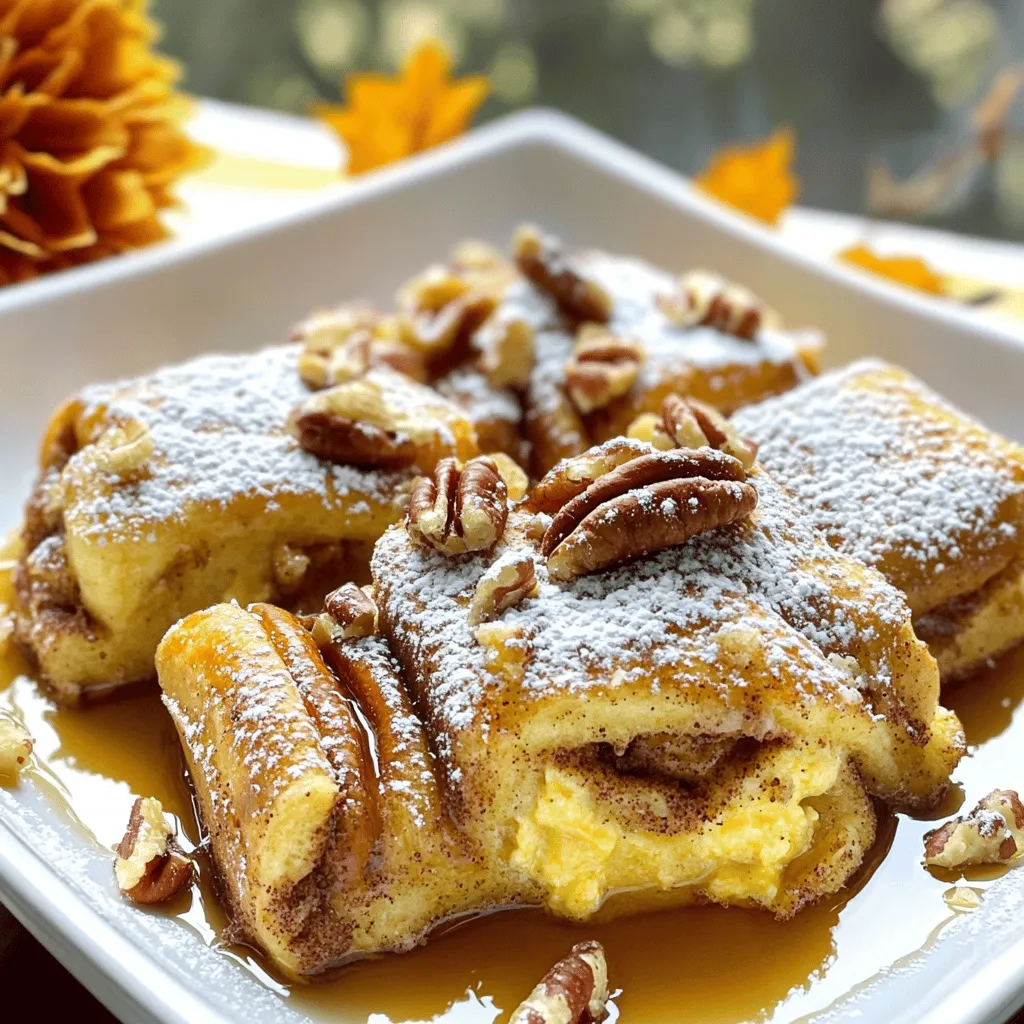
Serve your French toast with fresh fruit on the side. Berries or sliced bananas add color and taste. You can also add crispy bacon or sausage for a savory touch. Drizzle extra maple syrup over the top for sweetness. A dollop of whipped cream makes it feel special. Enjoy it warm to get the full flavor!

Variations
Seasonal Variations (e.g., Pumpkin Spice)
One fun way to change this dish is by adding seasonal flavors. For fall, try a pumpkin spice version. Just add 1 cup of pumpkin puree to the egg mixture. Also, include 2 teaspoons of pumpkin pie spice instead of cinnamon. This twist brings warmth and comfort to your breakfast table.
Alternative Toppings and Mix-Ins
You can also play with toppings and mix-ins to make this dish your own. Try adding fresh berries, like blueberries or strawberries, on top after cooking. They add a nice tartness. You could also swap the pecans for walnuts or almonds for a different crunch. For extra sweetness, drizzle chocolate syrup on top.
Adjusting for Dietary Restrictions (Gluten-Free, Dairy-Free)
If you have dietary needs, don’t worry! You can make this dish gluten-free by using gluten-free cinnamon rolls. Many brands offer tasty options that work well. For a dairy-free version, swap whole milk with almond or oat milk. Use a dairy-free cream cheese frosting in place of powdered sugar for a rich finish. These adjustments keep the dish delicious for everyone!
Storage Info
Recommended Storage Practices
To keep your Slow Cooker Cinnamon Roll French Toast fresh, store it in an airtight container. Make sure it cools down completely before you put it away. This dish can last in the fridge for up to three days. If you want to keep it longer, freezing is a great option.
Reheating Instructions
When you are ready to enjoy leftovers, reheating is simple. Place the desired portion on a microwave-safe plate. Heat it in the microwave for about 30 seconds to 1 minute. Check if it’s warm enough. You can also reheat it in the oven at 350°F for about 10-15 minutes, covered with foil.
Freezing for Later Use
If you want to freeze your Slow Cooker Cinnamon Roll French Toast, cut it into portions first. Wrap each piece tightly in plastic wrap, then place them in a freezer bag. It can stay in the freezer for up to two months. To enjoy, simply thaw in the fridge overnight before reheating.
FAQs
Can I use frozen cinnamon rolls for this recipe?
Yes, you can use frozen cinnamon rolls. Just thaw them first. Cut the rolls into quarters, as you would with fresh ones. This will help them soak up the egg mixture better. Keep in mind that cooking time may vary slightly.
How do I know when the Slow Cooker Cinnamon Roll French Toast is done?
To check if it’s done, insert a toothpick into the center. If it comes out clean, it is ready. You should see that the center is no longer jiggly. The edges may brown slightly, which is normal.
What can I serve with Slow Cooker Cinnamon Roll French Toast?
You can serve this dish with fresh fruit, like berries or bananas. Whipped cream adds a nice touch too. A drizzle of extra maple syrup can make it even sweeter. If you want more crunch, add crispy bacon or sausage on the side.
You can make a delicious Slow Cooker Cinnamon Roll French Toast with just a few simple steps. Start with the right ingredients and layers them well. Use tips to avoid sticking and get even soaking. Explore fun variations to suit your tastes. Lastly, store any leftovers properly for later enjoyment.
This dish is easy, fun, and sure to please everyone at your table. Enjoy cooking and sharing this delightful treat!


![To make spicy chickpea tacos, you need some key items. Here is what you will need: - 1 can (15 oz) chickpeas, thoroughly drained and rinsed - 2 tablespoons extra virgin olive oil - 1 teaspoon ground chili powder - 1 teaspoon ground cumin - 1/2 teaspoon smoked paprika - 1/4 teaspoon cayenne pepper - Sea salt and freshly cracked black pepper to taste - 8 small corn or flour tortillas - 1 ripe avocado, sliced into thin pieces - 1 cup finely shredded purple cabbage - Fresh cilantro leaves for garnish - Lime wedges for serving These ingredients create a tasty and spicy base for your tacos. The spices bring warmth and depth, while the chickpeas offer a great source of protein and fiber. You can add some unique touches to your tacos. Here are some ideas: - Diced tomatoes for freshness - Sliced jalapeños for extra heat - A dollop of sour cream or yogurt for creaminess - Shredded cheese for richness - Corn or black beans for more texture Feel free to mix and match these extras. They can elevate your tacos to a whole new level. Chickpeas are not just tasty; they are also very healthy. Here are some benefits: - High in protein, which helps build muscle - Rich in fiber, aiding in digestion - Contain vitamins and minerals like iron and magnesium - Low in fat, making them a great choice for heart health Including chickpeas in your diet can support your overall health. They are a smart ingredient in any meal. For the full recipe, check the [Full Recipe]. Start by opening a can of chickpeas. Drain and rinse them well. In a bowl, use a fork or potato masher to gently mash the chickpeas. Leave some chunks for texture. You want them slightly broken but not a paste. This will help them stay firm while cooking. Heat 2 tablespoons of extra virgin olive oil in a skillet over medium heat. Once the oil shimmers, add the mashed chickpeas. Sprinkle in the spices: 1 teaspoon of chili powder, 1 teaspoon of cumin, 1/2 teaspoon of smoked paprika, and 1/4 teaspoon of cayenne pepper. Add sea salt and black pepper to taste. Stir well to coat all the chickpeas. Cook for about 5 to 7 minutes. This will make the spices fragrant and the chickpeas slightly crispy. While the chickpeas cook, warm the tortillas in another skillet for about 30 seconds on each side. You can also heat them in the oven. Once the chickpeas are ready, spoon a generous amount onto each tortilla. Top with sliced avocado, shredded purple cabbage, and fresh cilantro. Serve with lime wedges on the side. This adds a zesty touch just before eating. For the full recipe, check out the complete guide! To make your spicy chickpea tacos pop, use a mix of spices. I love pairing chili powder with cumin for a warm base. Adding smoked paprika brings a nice depth. If you want more heat, cayenne pepper is the way to go. You can also try adding garlic powder or onion powder for extra flavor. Experiment until you find your favorite blend. Warming your tortillas is key to a great taco. You can heat them in a skillet, about 30 seconds on each side. This keeps them soft and pliable. Alternatively, stack them, wrap in foil, and warm in the oven. If you prefer a crispy texture, try frying them lightly in oil. Just be careful not to overcook them! Serving matters! Place your tacos on a large platter. Add lime wedges and fresh cilantro for color. You can even include cherry tomatoes or sliced radishes for a vibrant touch. This not only looks great but also invites your guests to dig in. For a fun twist, serve with a side of salsa or guacamole to enhance the flavor. Enjoy the Full Recipe for more tips! {{image_4}} You can turn your spicy chickpea tacos into a taco bowl. Start with a base of rice or quinoa. Then, add your chickpea mixture on top. Pile on shredded cabbage, avocado, and cilantro. This bowl offers a fun twist on the classic taco. You could also add salsa or hot sauce for extra flavor. Feel free to mix in different proteins or veggies. You can add cooked chicken, beef, or shrimp if you want. For a veggie boost, try bell peppers, corn, or zucchini. These options add variety and nutrition to your meal. You can also swap chickpeas for black beans or lentils for a new taste. Making this dish gluten-free is easy. Just use corn tortillas instead of flour ones. They are tasty and safe for those with gluten issues. This recipe is already vegan, so you can enjoy it as is. To enhance flavors, add avocado or a vegan sour cream. These small changes can make a big difference in taste and texture. For the full recipe, check out the earlier sections. To store leftover chickpeas, place them in a clean, airtight container. Make sure the lid seals tightly. You can keep them in the fridge for up to three days. If you want to store them for longer, freeze the chickpeas. They will last for about three months in the freezer. Just remember to label your container with the date. This helps you keep track of freshness. Reheating your tacos is easy! You can microwave them for about 30 seconds. Make sure to cover them with a damp paper towel. This keeps the tortillas soft. If you prefer a crispier taco, reheat them in a skillet. Heat the skillet on medium and warm each taco for about one minute on each side. This way, you keep that delicious crunch! For storing your ingredients, glass containers are best. They are safe, durable, and help keep food fresh. You can also use plastic containers, but make sure they are BPA-free. Small jars work well for spices and herbs. Label each container so you can find what you need quickly. Keep everything in a cool, dry place for the best results. For a full recipe, check the Spicy Chickpea Tacos section. You can make chickpea tacos spicier by adding more cayenne pepper. Start with 1/2 teaspoon and adjust to your heat level. You can also use hot sauce for an extra kick. Another idea is to add chopped jalapeños or serrano peppers. These fresh peppers bring heat and flavor. If you love smoky flavors, try adding chipotle powder. This will give your tacos a nice depth. Yes, you can prepare chickpea tacos in advance. I suggest cooking the chickpeas and storing them in an airtight container. Keep the tortillas and toppings separate until ready to serve. This way, everything stays fresh. You can store the chickpea mixture in the fridge for up to three days. Just reheat it before serving. Fresh toppings like avocado and cilantro should be added last. Spicy chickpea tacos pair well with many sides. You could serve them with rice or quinoa for a filling meal. A fresh salad adds brightness and crunch. Try a simple cabbage slaw or a corn salad. You might also enjoy salsa or guacamole on the side. For drinks, consider a refreshing limeade or a cold beer. This will balance the spice and add flavor. For the full recipe, check out the detailed instructions above. In this post, we covered how to make spicy chickpea tacos. We explored essential ingredients and their health benefits. You learned step-by-step instructions for preparing and cooking chickpeas, assembling tacos, and customizing them. We shared tips for seasoning, tortilla methods, and serving ideas. Variations included taco bowls and gluten-free options. Finally, we discussed how to store leftovers effectively. These tacos are fun, tasty, and good for you. Ready to enjoy your homemade spicy chickpea tacos?](https://dishtreats.com/wp-content/uploads/2025/06/78aca89b-dca0-4457-a4a9-555278ab1264-768x768.webp)


 for all the details! How can I ensure my shrimp don't overcook? To avoid overcooking shrimp, watch the color. When they turn pink, they are close to done. Cook for about 2-3 minutes on each side. Remove them from heat as soon as they are opaque. This helps keep them tender and juicy. Can I use frozen shrimp for this recipe? Yes, you can use frozen shrimp. Just thaw them first. Place them in cold water for about 15-20 minutes. Pat them dry before cooking. This ensures they cook evenly and absorb the sauce well. What can I substitute for soy sauce? If you need a substitute for soy sauce, try coconut aminos. It has a similar flavor and is often gluten-free. You can also use tamari for a gluten-free option. Both choices will still give you that umami taste. How to make the dish gluten-free? To make this dish gluten-free, use tamari instead of soy sauce. Ensure that all other ingredients, like butter and honey, are also gluten-free. This way, you can enjoy the same great flavor without gluten. What side dishes pair well with honey garlic butter shrimp? Honey garlic butter shrimp tastes great with rice or quinoa. You can also serve it with steamed veggies or a fresh salad. These sides balance the rich flavors of the dish, making a perfect meal. Can this recipe be scaled up for larger servings? Yes, you can easily scale up this recipe. Just double or triple the ingredients based on how many servings you need. Make sure your skillet is large enough, or use two pans to cook everything evenly. This keeps the shrimp from overcrowding and helps them cook well. This blog post offered a complete guide on making honey garlic butter shrimp. We explored each ingredient's role and shared cooking tips to ensure success. I highlighted variations and storage advice for leftovers. In conclusion, with fresh shrimp and the right techniques, you can create a flavorful dish. Explore your options and enjoy your culinary journey. Trust me, this recipe is worth trying!](https://dishtreats.com/wp-content/uploads/2025/07/4796c05b-30f7-4441-b7cb-ba0299151dfe-768x768.webp)