Sheet Pan Garlic Parmesan Gnocchi & Veggies Delight

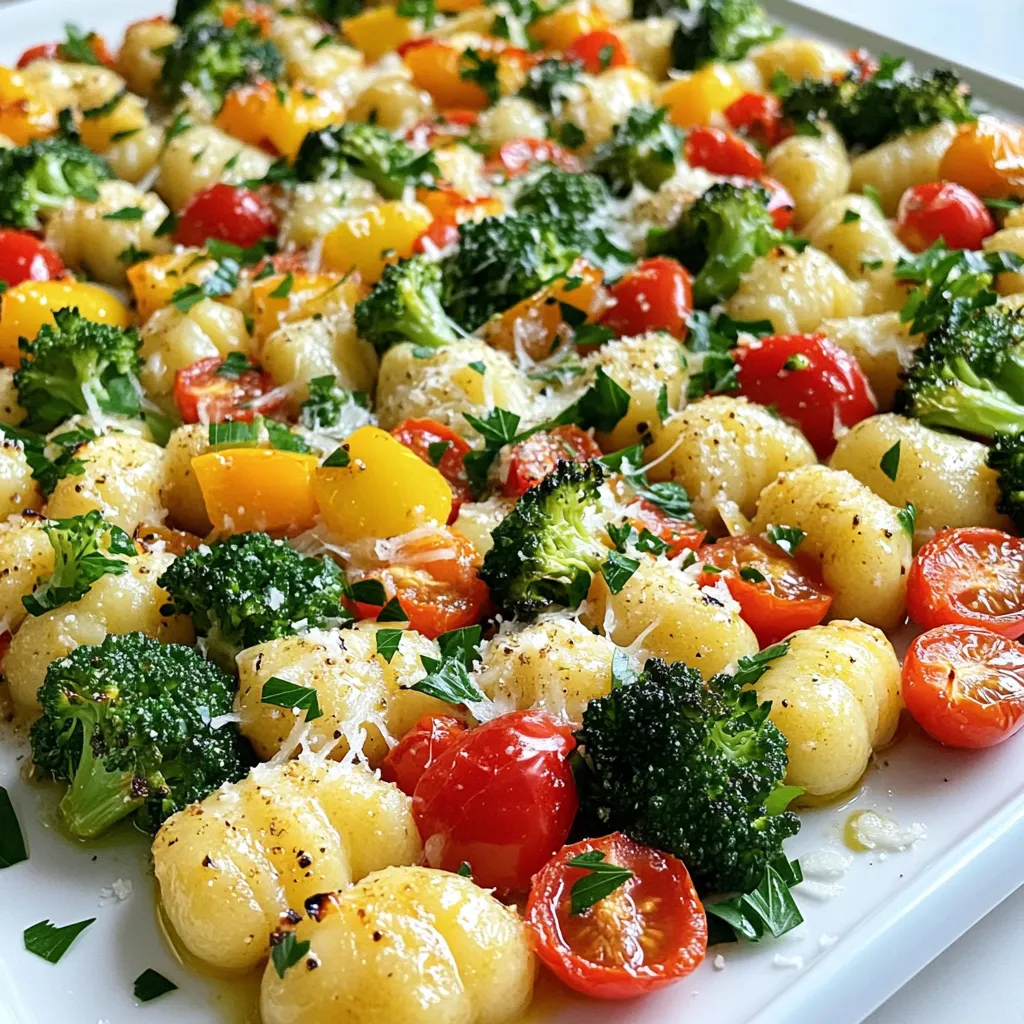
Looking for a quick and tasty dinner idea? Try my Sheet Pan Garlic Parmesan Gnocchi & Veggies Delight! This one-pan meal is not just simple; it’s full of bold flavors that everyone loves. You’ll get tender gnocchi, roasted veggies, and a hint of garlic, all baked to perfection. Join me as I walk you through easy steps, tips, and even fun variations. Let’s make dinner delightful tonight!
Ingredients
Main Ingredients
For this dish, you need:
- 1 pound potato gnocchi
- 2 cups broccoli florets, fresh or frozen
- 1 cup cherry tomatoes, halved
- 1 red bell pepper, diced into bite-sized pieces
- 4 cloves garlic, minced finely
- 1/4 cup olive oil, plus more for drizzling
- 1/2 cup grated Parmesan cheese, plus extra for serving
These simple yet tasty ingredients make a great base for our dish. The potato gnocchi provides a soft and chewy texture. The broccoli, tomatoes, and red bell pepper add color and nutrition. Garlic brings a bold flavor that pairs well with everything.
Seasonings
To enhance the flavor, you will need:
- 1 teaspoon Italian seasoning blend
- Salt and black pepper, to taste
These seasonings are key to making every bite burst with flavor. The Italian seasoning blend adds herbs that complement the veggies and gnocchi. The salt and pepper balance the taste and elevate the dish.
Optional Garnishes
For a finishing touch, consider:
- Fresh parsley, chopped, for garnish
Adding fresh parsley not only brightens up the dish but also gives a fresh taste. If you like, sprinkle extra grated Parmesan on top for more cheesy goodness. A drizzle of olive oil can also enhance the flavor and presentation.
Step-by-Step Instructions
Preparing the Oven and Sheet Pan
First, preheat your oven to 400°F (200°C). This temperature helps the gnocchi and veggies roast well. Next, line a large sheet pan with parchment paper. This step makes cleaning easy and stops food from sticking.
Mixing Gnocchi and Vegetables
Grab a large mixing bowl. In it, combine 1 pound of potato gnocchi, 2 cups of broccoli florets, 1 cup of halved cherry tomatoes, and 1 diced red bell pepper. These veggies add color and flavor. Now, add 4 minced garlic cloves, 1/4 cup of olive oil, and 1 teaspoon of Italian seasoning. Don’t forget salt and black pepper to taste! Toss everything gently until all the ingredients are well mixed and coated with oil.
Baking Process
Spread the gnocchi and veggie mix evenly on your prepared sheet pan. Sprinkle 1/2 cup of grated Parmesan cheese over the top. This cheese adds a rich flavor as it bakes. Place the sheet pan in the oven and bake for 20-25 minutes. Stir the mixture halfway through to help it cook evenly. The gnocchi should turn golden, and the veggies will become tender and slightly caramelized. Once done, carefully take the sheet pan out and let it cool for a few minutes. Before serving, sprinkle some fresh parsley on top for a touch of color and freshness.
Tips & Tricks
Achieving Perfect Roasting
To get the best roast, space the gnocchi and veggies out on the pan. This helps them crisp up nicely. Don’t crowd the pan. Stir halfway through to cook evenly. Keep an eye on them. You want a golden color and tender veggies.
How to Store Leftovers
You can store leftovers in an airtight container. Place them in the fridge for up to three days. To reheat, use the oven for best results. This keeps the gnocchi crispy. You can also use a microwave, but it may make them soft.
Substitutions for Ingredients
You can swap gnocchi for pasta or even sweet potatoes. If you don’t have broccoli, use green beans or zucchini. For cheese, try feta or a dairy-free option. Adjust the seasonings to fit your taste. These changes can give new flavors to the dish.

Variations
Protein Additions
You can make this dish heartier by adding protein. Cooked chicken or shrimp works great. Just toss it with the gnocchi and veggies before roasting. If you want to keep it plant-based, try chickpeas or tofu. They add protein and soak up flavors well.
Different Vegetable Combinations
Feel free to mix and match veggies. Asparagus, zucchini, or carrots can add different textures. Use what you have on hand or what is in season. This recipe is very flexible, so be creative with your choices.
Flavor Enhancements
To boost flavors, add a squeeze of lemon juice before serving. You can also sprinkle in some red pepper flakes for heat. Fresh herbs like basil or thyme can add more aroma. Experiment with your favorite flavors to make this dish yours!
Storage Info
Refrigeration Guidelines
Store any leftovers in an airtight container. Place the container in the fridge. The dish stays fresh for up to three days. If you want to keep the flavors intact, eat it sooner. Make sure it’s completely cool before sealing it.
Freezing Instructions
To freeze, portion the leftovers into freezer-safe bags. Press out any air before sealing. This way, they stay fresh for up to three months. When you’re ready to eat, thaw the bags in the fridge overnight before reheating.
Reheating Tips
Reheat the dish in the oven or microwave. For the oven, preheat to 350°F (175°C). Place the gnocchi and veggies in a baking dish. Cover with foil to prevent drying out. Heat for about 15-20 minutes until warm. In the microwave, use a microwave-safe plate. Heat in short bursts, stirring in between, until hot. Enjoy your meal just like fresh!
FAQs
Can I use other types of gnocchi?
Yes, you can use other types of gnocchi. You may choose sweet potato gnocchi or even mushroom gnocchi. Both will add a new taste and color to the dish. Just make sure to adjust the cooking time based on the gnocchi you select. Fresh gnocchi cooks faster than frozen.
How do I know when the dish is done?
To tell if the dish is done, look for golden-brown gnocchi and tender veggies. The edges should caramelize slightly. You can use a fork to test the vegetables. If they are soft, your dish is ready. Baking usually takes 20 to 25 minutes. Don’t forget to stir halfway for even cooking.
Can I make this recipe vegan?
Yes, you can make this recipe vegan! Simply replace the Parmesan cheese with a vegan cheese option. Nutritional yeast is a great alternative that adds a cheesy flavor. You can also use more veggies or add tofu for protein. Adjust the olive oil as needed to keep it rich and tasty.
This blog post covered how to roast gnocchi and veggies. We looked at key ingredients, simple steps, and helpful tips. You learned how to achieve perfect roasting and store leftovers. Variations gave you ideas for proteins and flavors.
In closing, roasting gnocchi is easy and tasty. With this guide, you can create a dish that suits your taste. Go ahead, try it out, and enjoy your delicious meal!


![To make stuffed bell peppers with quinoa, gather these tasty ingredients: - 4 large bell peppers (mixed colors) - 1 cup quinoa (rinsed) - 2 cups vegetable broth - 1 can black beans (drained and rinsed) - 1 cup corn kernels - 1 medium onion (finely chopped) - 2 cloves garlic (minced) - 1 teaspoon ground cumin - 1 teaspoon chili powder - ½ teaspoon smoked paprika - Salt and pepper to taste - 1 cup diced tomatoes - 1 cup shredded cheese - Fresh cilantro (optional for garnish) These ingredients work together to create a colorful and healthy meal. Quinoa is the star here, adding protein and fiber. The bell peppers not only look great but also bring sweetness and crunch. If you want to learn how to combine them into a delicious dish, check out the Full Recipe. - To cook quinoa with vegetable broth, start by rinsing 1 cup of quinoa under cold water. This step removes bitterness. Pour the rinsed quinoa into a medium saucepan. Add 2 cups of vegetable broth for added flavor. Bring the mixture to a boil over medium-high heat. Once boiling, reduce the heat to low. Cover the pan and let it simmer for about 15 minutes. You will know it's done when all the liquid is absorbed. - After cooking, fluff the quinoa with a fork. This makes it light and airy. Set the quinoa aside to cool while you prepare the other ingredients. - Heat a non-stick skillet over medium heat. Add 1 medium onion, finely chopped, and 2 cloves of minced garlic. Cook these until the onion turns soft and translucent. This takes about 3 to 5 minutes. - Next, add 1 can of drained black beans and 1 cup of corn kernels to the skillet. Stir in 1 cup of diced tomatoes, along with 1 teaspoon of ground cumin, 1 teaspoon of chili powder, ½ teaspoon of smoked paprika, and salt and pepper to taste. Mix well and let it cook for an additional 5 minutes until everything is warm. - To prepare the bell peppers, slice off the tops and remove the seeds and membranes. Choose 4 large bell peppers for a colorful dish. Place the hollowed peppers upright in a baking dish. Make sure they stand stable. - Now, fill each bell pepper with the quinoa and vegetable mix. Press it down gently to pack it in well. For a cheesy touch, top each pepper with 1 cup of shredded cheese. Let it cascade down the sides for a fun look. - Cover the baking dish with aluminum foil. This helps keep the moisture in. Place it in the preheated oven at 375°F (190°C). Bake for 25 minutes. - After 25 minutes, carefully remove the foil. Return the dish to the oven for another 10 to 15 minutes. You want the peppers to be tender, and the cheese to melt and bubble. It should have a lovely golden color when done. Now you have a delicious, colorful dish ready to serve! For full details, refer to the [Full Recipe]. How to choose the right bell peppers Pick large, firm bell peppers for stuffing. Look for vibrant colors like red, yellow, or green. The best peppers have smooth skin. Avoid any with soft spots or blemishes. This ensures a tasty bite every time. Ensuring even cooking Cut off the tops of the peppers evenly. This helps them stand upright. Remove seeds and membranes for better stuffing. Place them in a baking dish that fits snugly. This keeps them from tipping over during cooking. Adding herbs or spices for variety Fresh herbs like cilantro or parsley boost flavor. Try adding a pinch of oregano or thyme for depth. For a spicy touch, sprinkle in some red pepper flakes. These small tweaks make a big difference in taste. Recommended cheese types for best flavor Cheddar and mozzarella melt well and taste great. For a kick, use pepper jack cheese. If you like tang, feta cheese can add a nice twist. Experiment to find your favorite cheese blend. Essential kitchen tools and equipment You’ll need a sharp knife and a cutting board for prep. A medium saucepan is great for cooking quinoa. Use a non-stick skillet for sautéing vegetables. A sturdy spoon helps you mix everything well. Baking dish recommendations for even heat distribution Choose a glass or ceramic baking dish. These materials distribute heat evenly. Make sure it’s big enough to hold all your stuffed peppers. This way, they cook through without burning. For the full recipe, follow this link: [Full Recipe]. {{image_4}} You can change the protein in stuffed peppers easily. If you want a meat option, try ground turkey. It adds great flavor. For a plant-based choice, use tofu. You can mash it and mix it into the filling. Black beans are great, but these options offer variety. You can also make vegetarian or vegan options. Use black beans or lentils for protein. These keep it meat-free. Just ensure you skip the cheese for a vegan meal. There are many ways to customize the protein to fit your needs. Quinoa is a fantastic base for stuffed peppers, but you can switch grains. Rice is a classic choice that works well. Farro or couscous can also bring a different texture. They make the meal hearty and filling. If you need gluten-free options, use rice or quinoa. Both are naturally gluten-free. This way, everyone can enjoy your stuffed peppers without worry. Think about different flavors to spice things up. For a Mexican twist, add jalapeños or taco seasoning. This gives the dish a kick and adds excitement. You can also use salsa for added flavor. For a Mediterranean vibe, add olives or crumbled feta cheese. These ingredients enhance the taste and bring a fresh feel. Both options are simple yet effective ways to change your stuffed peppers. To keep your stuffed bell peppers fresh, store them in the fridge. Place them in an airtight container. They will stay good for up to 4 days. If you want to save them for later, freezing is a great option. Wrap each stuffed pepper in plastic wrap, then put them in a freezer-safe bag. This way, they can last for up to 3 months. For reheating in the oven, preheat it to 350°F (175°C). Place the peppers in a baking dish with a little broth or water. Cover with foil to keep moisture in. Bake for about 20 minutes or until heated through. If you need a quick option, use the microwave. Place one stuffed pepper on a microwave-safe plate. Heat on high for about 2-3 minutes. If it's not hot enough, heat in 30-second bursts until warm. Stuffed peppers last in the fridge for about 4 days. After that, they may spoil. Look out for any signs of spoilage. If you see mold or a bad smell, it's time to toss them. Always trust your senses! You typically bake stuffed bell peppers for 35 to 40 minutes. Start by covering them with foil for the first 25 minutes. This keeps them moist. After that, remove the foil to let the cheese melt and brown for another 10 to 15 minutes. Check the peppers to ensure they are tender but not mushy. Yes, you can prepare stuffed peppers in advance. Stuff the peppers and place them in a baking dish. Cover with foil and store them in the fridge for up to 24 hours. When ready to bake, just pop them in the oven. You may need to extend the baking time by a few minutes. If you want to swap quinoa, try rice, farro, or couscous. These grains provide a nice texture. Rice cooks quickly and absorbs flavors well. Farro adds a chewy bite, while couscous is fluffy and light. You can also use lentils for a protein boost. Stuffed peppers are quite healthy! They are full of fiber from the quinoa, beans, and veggies. Bell peppers are rich in vitamins A and C. This dish tends to be low in calories and high in nutrients. It offers a balanced meal with protein, carbs, and healthy fats. Absolutely! You can use green, red, yellow, or orange bell peppers. Each type has a unique taste. Green peppers are more bitter, while red ones are sweet and fruity. Mixing colors not only looks pretty but also gives different flavors. Feel free to choose your favorite or what’s on hand! For the complete method to make flavorful stuffed bell peppers, check out the [Full Recipe]. Here, I’ll share key details about the dish that will help you create a yummy meal your family will love. Stuffed bell peppers are colorful and fun. They make a great meal for any day. You can use any bell pepper color. Red, yellow, and green peppers add a nice look to your plate. Each color has a different taste too. Quinoa is the star here. It’s a healthy grain packed with protein. Rinsing it before cooking helps remove any bitter taste. You cook quinoa in vegetable broth for extra flavor. This makes it soft and fluffy, perfect for mixing with veggies. The filling is made from black beans, corn, diced tomatoes, and spices. Black beans add protein and fiber. Corn brings sweetness and crunch. Diced tomatoes add moisture and flavor, making the filling juicy. The spices—cumin, chili powder, and smoked paprika—give your dish a tasty kick. They create layers of flavor that make each bite exciting. Don’t forget to add salt and pepper to taste! When you stuff the peppers, pack the filling well. This keeps everything together during cooking. Topping with shredded cheese adds a melty touch. As the peppers bake, the cheese melts and gets golden. Baking them with foil keeps the peppers moist. Then, removing the foil lets the cheese get bubbly and brown. The result is a beautiful dish that is sure to impress! Stuffed peppers combine colorful ingredients into a tasty meal. We discussed how to prepare quinoa, sauté vegetables, and stuff the peppers. I shared tips for choosing the right peppers and flavoring your dish. Variations allow you to substitute proteins and grains based on your taste. Storing leftovers properly extends the life of your meal. Making stuffed peppers can be fun and creative. Enjoy trying new flavors and share this recipe with others!](https://dishtreats.com/wp-content/uploads/2025/06/552026c8-f020-4e58-b656-10611c333f52-768x768.webp)


![- 8 oz spaghetti or fettuccine pasta - 2 boneless, skinless chicken breasts - 1 cup basil pesto (homemade or store-bought) - 1/2 cup heavy cream - 1/4 cup cherry tomatoes, halved - 1/4 cup freshly grated Parmesan cheese - Fresh basil leaves for garnish - Salt and freshly ground black pepper, to taste - 2 tablespoons extra virgin olive oil Gather these ingredients before you start cooking. The pasta and chicken form the base of your dish. The creamy pesto sauce adds rich flavor. The cherry tomatoes bring a burst of freshness. The Parmesan cheese tops it off with a salty kick. Fresh basil leaves make it look gorgeous. Using fresh ingredients makes a big difference. If you have the time, try making your own pesto. It’s simple and tastes amazing. You can adjust the flavors to your liking. You can also swap the pasta type if you want. Just keep in mind that different shapes may change how the sauce clings to the pasta. For the chicken, you want it juicy and tender. The seasoning is key here. Use good quality olive oil, salt, and pepper. This will help keep the flavor bright and fresh. Once you have everything, you’ll be ready to make a delicious meal. If you want the full recipe, check out the complete guide for step-by-step instructions. Start by boiling a large pot of water. Add a good amount of salt to the water. This will help flavor the pasta. Once the water is boiling, add your spaghetti or fettuccine. Cook it until it is al dente, which means it should be firm to the bite. This usually takes around 8-10 minutes. When done, drain the pasta. Make sure to save about 1/2 cup of the pasta water for later. While the pasta cooks, get ready to season the chicken. Sprinkle salt and pepper on both sides of the chicken breasts. Heat 2 tablespoons of olive oil in a large skillet over medium heat. When the oil is hot, add the chicken. Cook each side for about 6-7 minutes. You want the chicken to turn a nice golden brown. Check that the juices run clear when you cut into it. Once cooked, take the chicken out of the skillet and let it rest for a few minutes. Then, slice it into thin strips. In the same skillet, lower the heat to medium-low. Add your basil pesto to the pan and stir it. You want to warm it through but not burn it. After about a minute, slowly pour in 1/2 cup of heavy cream. Stir it all together until it is well mixed and heated, which should take about 2-3 minutes. Now, add the cooked pasta to the skillet with your creamy pesto sauce. Toss the pasta gently to make sure it gets coated evenly. If the sauce looks too thick, add a little of the reserved pasta water. This will help you reach your desired creamy consistency. To finish, fold in the halved cherry tomatoes and the sliced chicken. Stir everything together for another 2 minutes. This will warm the chicken and tomatoes through. Finally, sprinkle freshly grated Parmesan cheese on top. Toss it lightly to mix. For a bright touch, garnish with fresh basil leaves before serving. For a full recipe, check out the details above! You can use homemade or store-bought pesto for this dish. Homemade pesto gives you full control over flavors, but store-bought saves time. If you want a stronger basil taste, simply add more fresh basil leaves to your mix. For a milder flavor, blend in more nuts or cheese. This helps balance the taste to your liking. To keep your chicken juicy, avoid overcooking it. Cook chicken breasts in a hot skillet for 6-7 minutes on each side. The internal temperature should reach 165°F. Rest the chicken for a few minutes before slicing. This helps the juices stay inside. You can make your sauce thicker or lighter based on your taste. For a richer sauce, use more heavy cream. If you want a lighter option, try half-and-half or low-fat milk. Adding a splash of pasta water helps adjust the sauce's thickness too. This way, you can achieve the perfect creamy texture for your chicken pesto pasta. For the Full Recipe, check out the detailed instructions to create this delightful dish! {{image_4}} Adding vegetables to your Chicken Pesto Pasta makes it even better. It boosts flavor and nutrition. Seasonal veggies like spinach or bell peppers work great. Spinach adds a nice green color. Bell peppers give a sweet crunch. You can toss them in during the last few minutes of cooking. This way, they stay bright and fresh. If you need gluten-free pasta, you have choices! You can use rice pasta or chickpea pasta. These options taste great and cook well. Just follow the package instructions. Cooking times may differ, so keep an eye on them. You want your pasta to be tender but not mushy. Not in the mood for chicken? Try shrimp or tofu instead! Shrimp cooks fast and adds a nice twist. Just sauté them until they turn pink. Tofu is a fantastic plant-based option. Make sure to press it first to remove extra water. Adjust cooking times based on what you choose. This keeps your dish delicious and exciting. For the full recipe, check out the [Full Recipe]. Store any leftovers in the fridge. Use a tight-sealing container to keep your chicken pesto pasta fresh. Glass containers work well, as do plastic ones. Make sure to let it cool down before putting it away. It stays good in the fridge for up to three days. To freeze your chicken pesto pasta, pack it in an airtight container or freezer bag. Remove as much air as possible. This helps prevent freezer burn. You can freeze it for up to three months. Just label the bag with the date so you remember when you froze it. When reheating, use the microwave or stovetop. If using the microwave, heat in short bursts. Stir between each burst to ensure even warming. On the stovetop, add a splash of water or cream to keep it moist. This helps keep the creaminess intact. Enjoy your meal again as if it were fresh! To make chicken pesto pasta from scratch, follow these basic steps: 1. Cook the pasta. Boil water in a large pot, add salt, and cook your choice of spaghetti or fettuccine until al dente. 2. Prepare the chicken. Season boneless chicken breasts with salt and pepper. Sear them in olive oil until golden brown. 3. Make the sauce. In the same skillet, mix basil pesto with heavy cream until warm and creamy. 4. Combine. Toss the cooked pasta with the sauce and sliced chicken. Adjust the sauce with reserved pasta water if needed. 5. Serve. Garnish with cherry tomatoes, Parmesan cheese, and fresh basil. You can find the full recipe above for a detailed guide. Yes, you can make chicken pesto pasta ahead of time. Here are some tips: - Cooked pasta and sauce. Prepare the chicken and sauce, then store them separately from the pasta. This keeps them fresh. - Refrigerate. Store in airtight containers in the fridge for up to three days. - Freeze. For longer storage, freeze the chicken and sauce. Use within two months for best flavor. - Reheat. When ready, reheat the chicken and sauce. Cook the pasta fresh to keep it al dente. Chicken pesto pasta pairs well with various side dishes. Consider these suggestions: - Garlic bread. A warm, crispy slice complements the creamy pasta. - Salad. A light green salad with a tangy vinaigrette balances the richness of the dish. - Roasted vegetables. Seasonal veggies add color and nutrients to the meal. Chicken pesto pasta can be a healthy option. Here’s why: - Protein. Chicken provides lean protein, which is vital for muscle health. - Basil and olive oil. These ingredients are rich in antioxidants and healthy fats. - Pasta. Whole-grain pasta offers fiber, which aids digestion. - Portion control. Adjust the serving size to fit your dietary needs. Absolutely! You can use various pasta types. Here are some alternatives: - Whole wheat pasta. Adds extra fiber and nutrients. - Gluten-free pasta. Great for those with gluten sensitivities. - Zoodles. Spiralized zucchini for a low-carb option. - Penne or rigatoni. These shapes hold the sauce well, providing a satisfying bite. In this post, I covered how to make a delicious chicken pesto pasta. We discussed the main ingredients and their roles, along with simple steps for cooking. I also shared tips for perfecting your dish and exciting variations to try. In closing, this recipe is easy and flexible, letting you customize flavors. Whether you choose to add veggies or change proteins, your meal will impress. Enjoy this tasty dish and make it your own!](https://dishtreats.com/wp-content/uploads/2025/06/ae0d281d-adb6-406a-8a42-58bd8911a0b3-768x768.webp)