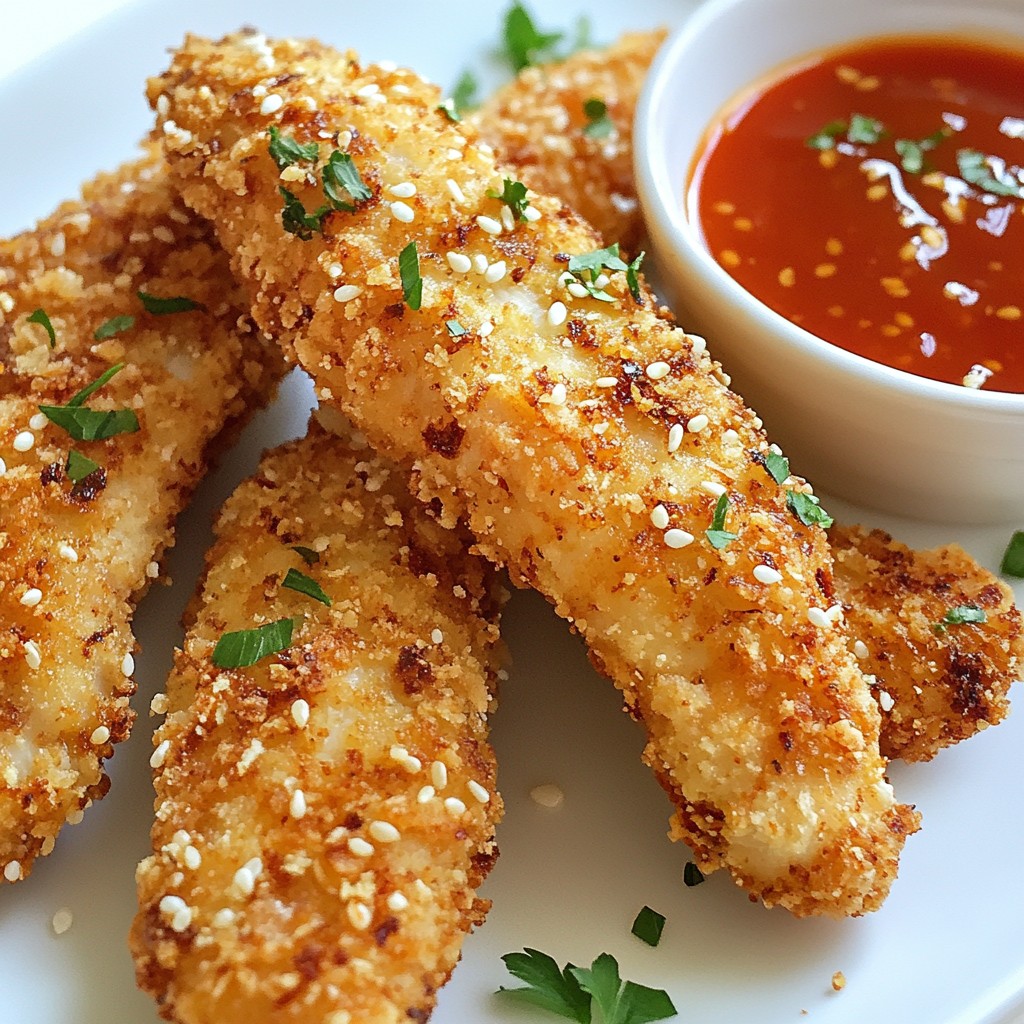
Looking for a tasty twist on a dinnertime favorite? Sesame Crusted Chicken Tenders are packed with flavor and super easy to make! With a crunchy coating of sesame seeds and spices, these tenders will impress your family or guests. So, grab your apron and let’s dive into a recipe that you’ll want to make again and again. You’ll find everything you need to know right here!
Why I Love This Recipe
- Easy to Prepare: This recipe is straightforward and quick, making it perfect for busy weeknights.
- Flavorful Crunch: The combination of breadcrumbs and sesame seeds creates a deliciously crunchy coating that enhances the chicken.
- Customizable: You can easily adjust the spices and dipping sauces to suit your taste preferences or dietary needs.
- Kid-Friendly: These chicken tenders are a hit with kids, making mealtime enjoyable for the whole family.
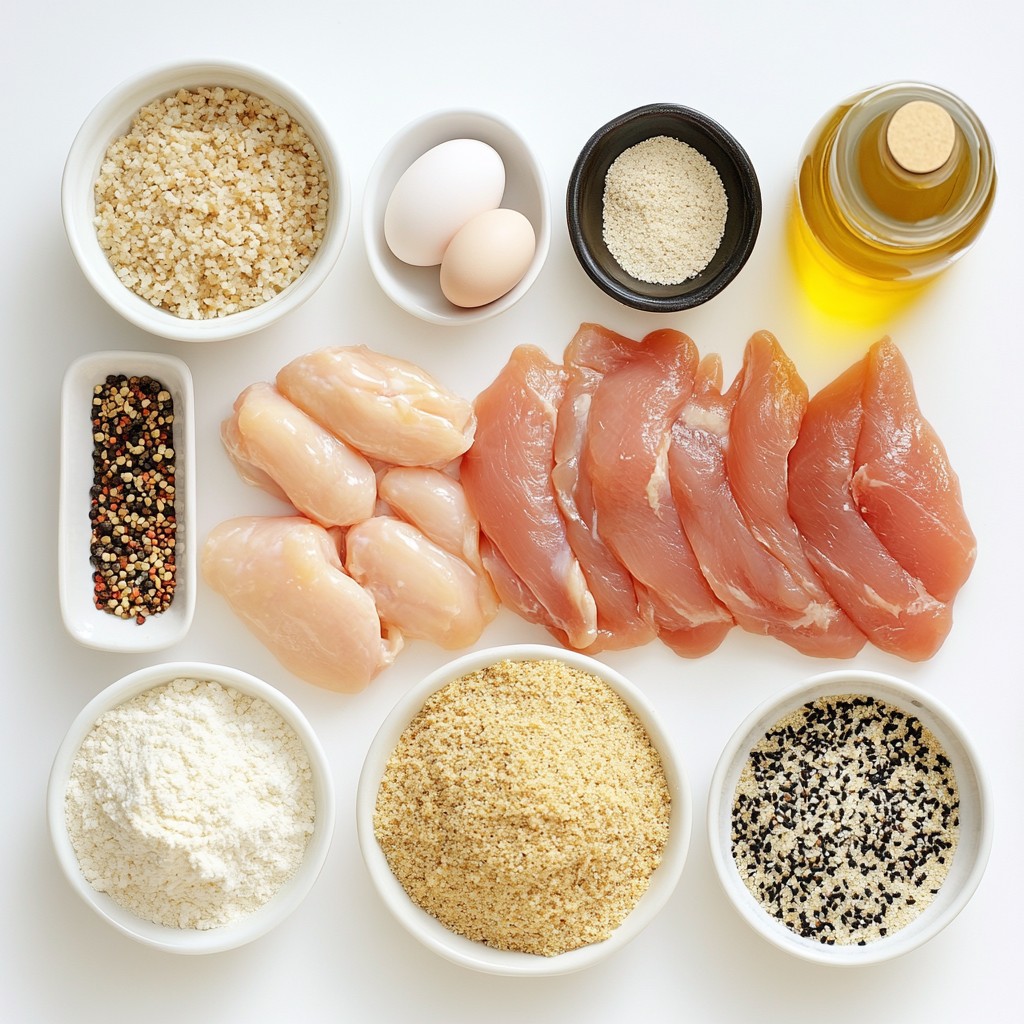
Ingredients
Main Ingredients
- 1 lb chicken breast tenders
- 1 cup breadcrumbs (panko or regular)
- 1/2 cup sesame seeds (white and black)
Seasonings
- 1 teaspoon garlic powder
- 1 teaspoon onion powder
- 1/2 teaspoon salt
- 1/2 teaspoon black pepper
- 1/4 teaspoon cayenne pepper (optional)
Coating and Frying
- 1/2 cup all-purpose flour
- 2 large eggs, beaten
- Vegetable oil for frying
To make sesame crusted chicken tenders, gather all your ingredients first. You need chicken breast tenders, breadcrumbs, and sesame seeds. I love using a mix of white and black sesame seeds for a pretty look.
Next, you'll want some seasonings. Garlic powder and onion powder add great flavor. A little salt and black pepper make everything taste better. If you want some heat, add cayenne pepper.
For coating, you will need all-purpose flour and beaten eggs. These help the breadcrumbs stick to the chicken. Finally, vegetable oil is needed for frying. This oil gives the chicken a nice crispy crust.
By preparing these ingredients, you're on your way to a tasty meal. Enjoy the process, and get ready to impress your family or friends!
Step-by-Step Instructions
Setting Up Dredging Stations
Prepare three shallow bowls for the coating process.
- In the first bowl, add 1/2 cup all-purpose flour.
- In the second bowl, beat 2 large eggs until smooth.
- In the third bowl, mix 1 cup breadcrumbs, 1/2 cup sesame seeds, and the seasonings. This includes 1 teaspoon garlic powder, 1 teaspoon onion powder, 1/2 teaspoon salt, 1/2 teaspoon black pepper, and 1/4 teaspoon cayenne pepper if you like heat.
Coating the Chicken
Now it’s time to coat the chicken tenders.
- Take each chicken tender and first dip it in the flour. Make sure it is fully coated.
- Shake off any extra flour. You want it to stick, not clump.
- Next, dip the floured tender into the beaten eggs. Let any excess drip back into the bowl.
- Finally, press the chicken into the breadcrumb mixture. Ensure it is covered on all sides. Set the coated tender on a plate and repeat for all chicken tenders.
Cooking the Chicken
Heat the oil before frying the chicken.
- In a skillet, pour enough vegetable oil to cover the bottom by about 1/4 inch. Heat it over medium heat.
- To know if the oil is ready, drop in a small pinch of the breadcrumb mix. If it sizzles, it’s hot enough.
- Carefully add a few chicken tenders. Do not overcrowd the pan. This helps them cook evenly.
- Fry each side for about 4-5 minutes. The chicken should turn golden brown and reach an internal temperature of 165°F (74°C). Use a meat thermometer to check.
- Once cooked, place the chicken on a plate lined with paper towels. This helps soak up extra oil.
Tips & Tricks
Achieving the Perfect Coat
To get a nice coat on your chicken, follow these steps. First, use three shallow bowls in your setup. One bowl holds flour, another holds beaten eggs, and the last holds the breadcrumb mix. When coating, make sure to shake off any excess flour. This step keeps the coating from clumping. After the egg bath, ensure the chicken is well dipped. Then, press it firmly into the breadcrumb mix to cover all sides.
Cooking Tips
Maintaining the right oil temperature is key. Heat the oil in your skillet over medium heat. To test if it’s ready, drop in a tiny bit of the breadcrumb mix. If it sizzles, you are good to go. Avoid overcrowding the pan while frying. This keeps the temperature steady and ensures even cooking. Cook each piece for about 4-5 minutes on each side until golden brown.
Serving Suggestions
For a complete meal, pair these chicken tenders with sides. Try serving them with steamed rice or a fresh salad. Dipping sauces enhance the flavor. Consider sweet chili sauce or honey mustard for a tasty treat. You can also add a sprinkle of fresh parsley or sesame seeds on top for a nice touch.
Pro Tips
- Use Fresh Ingredients: For the best flavor, use fresh chicken and high-quality breadcrumbs. Fresh ingredients make a noticeable difference in taste and texture.
- Control the Oil Temperature: Make sure the oil is hot enough before adding the chicken. If the oil is too cool, the chicken will absorb excess oil and become greasy. A good temperature is around 350°F (175°C).
- Don't Overcrowd the Pan: Fry the chicken tenders in batches to avoid overcrowding. This ensures even cooking and helps maintain the oil temperature.
- Let Them Rest: After frying, let the chicken tenders rest for a few minutes before serving. This allows the juices to redistribute, keeping the meat tender and juicy.
Variations
Baking Option
You can bake sesame crusted chicken tenders for a healthier twist. Preheat your oven to 400°F (200°C). Line a baking sheet with parchment paper. Place the coated chicken tenders on the sheet, ensuring they do not touch. Spray the tops lightly with cooking spray to help them crisp. Bake for 20 to 25 minutes, flipping halfway through. Check for doneness with a meat thermometer; it should read 165°F (74°C).
Flavor Enhancements
To change the taste, add spices to your breadcrumbs. Try a teaspoon of paprika or Italian herbs for fun flavors. You can also switch the breadcrumbs. Use crushed cornflakes or almond flour for a different crunch. These swaps can make your tenders unique and exciting.
Dietary Adjustments
If you need gluten-free options, use gluten-free breadcrumbs and flour. For a keto version, replace breadcrumbs with crushed pork rinds or almond flour. Both variations keep the flavor while fitting into your diet. Enjoy your meal without worry!
Storage Info
Storing Leftovers
To keep your sesame crusted chicken tenders fresh, follow these steps:
- Let the chicken cool down to room temperature.
- Place them in an airtight container.
- Store in the fridge for up to three days.
This method helps keep the chicken moist and tasty.
Reheating Guidelines
When it’s time to enjoy your leftovers, reheating is key. Here’s how:
- Preheat your oven to 375°F (190°C).
- Place the chicken on a baking sheet.
- Bake for about 10-15 minutes.
This keeps the chicken crispy. You can also use an air fryer for a quicker option.
Freezing Instructions
If you want to save some for later, freezing works well:
- Wrap each chicken tender in plastic wrap or aluminum foil.
- Place them in a freezer-safe bag or container.
- They can last up to three months in the freezer.
When you’re ready to eat, thaw in the fridge overnight. Then reheat as mentioned above to restore that crunchiness.
FAQs
How long do sesame crusted chicken tenders last?
Sesame crusted chicken tenders can last up to 3 days in the refrigerator. Store them in an airtight container. If you freeze them, they can last for about 3 months. Just make sure to wrap them well to prevent freezer burn.
Can I use chicken breasts instead of tenders?
Yes, you can use chicken breasts. Just cut them into strips for even cooking. The cooking time will change. You should cook them for about 6-7 minutes per side to ensure they are done all the way through.
What dips pair well with sesame crusted chicken tenders?
Here are some great dipping sauce ideas:
- Sweet chili sauce
- Honey mustard
- Soy sauce
- Barbecue sauce
- Ranch dressing
These dips add extra flavor and make the meal even more enjoyable.
This blog post walks you through making sesame crusted chicken tenders. We covered the key ingredients, from chicken and breadcrumbs to seasonings. You learned step-by-step how to coat and fry the chicken to get it just right. We discussed tips for achieving the perfect coat and shared variations for baking, flavoring, and dietary needs.
Now you can enjoy tasty chicken tenders any way you like. With these simple steps, you'll impress everyone at the table. Happy cooking!