Savory Southwest Stuffed Peppers Recipe for Dinner

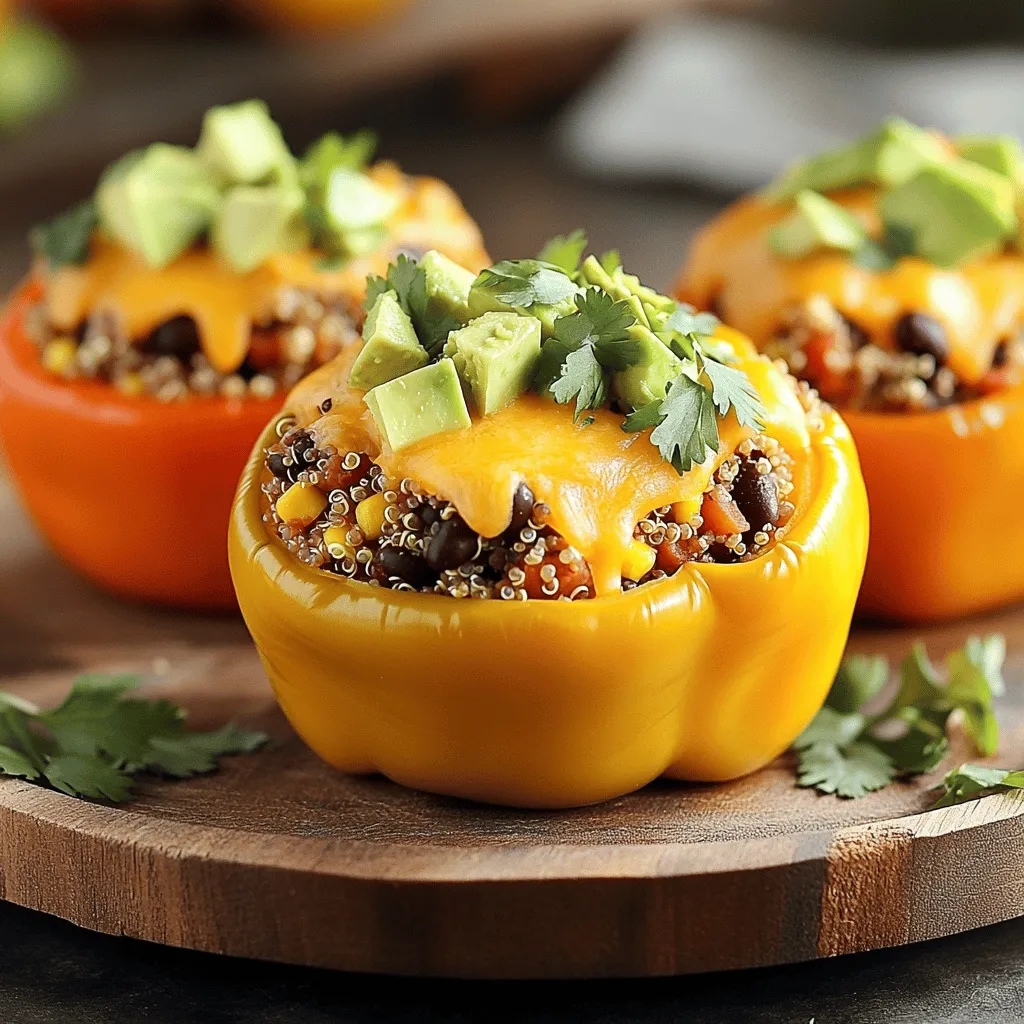
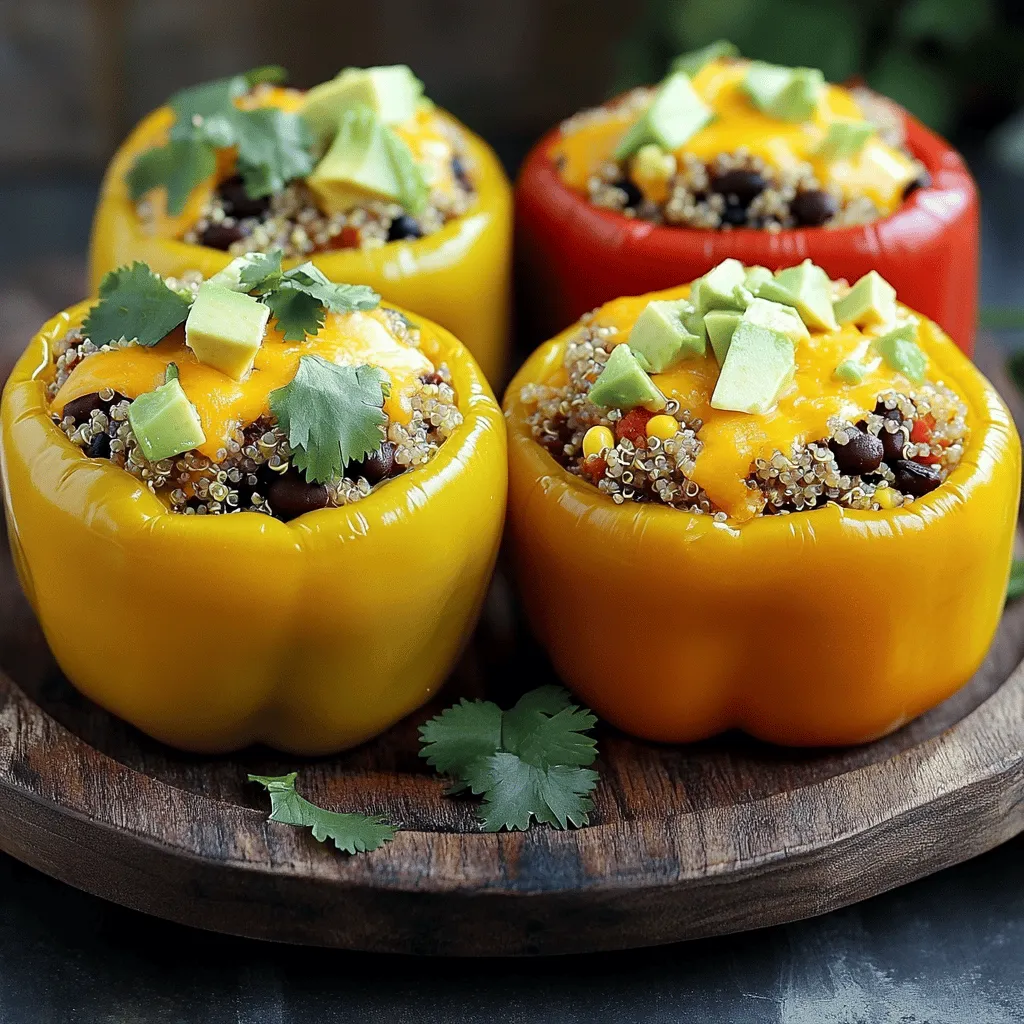
Are you ready to spice up your dinner routine? This Savory Southwest Stuffed Peppers recipe is full of flavor and nutrients. Packed with quinoa, black beans, and fresh veggies, these vibrant peppers make a satisfying meal for everyone. Plus, they’re simple to prepare! Join me as we dive into this delicious recipe that will impress your family and friends. Let’s get cooking!
Ingredients
List of Ingredients for Southwest Stuffed Peppers
- 4 large bell peppers (any color)
- 1 cup quinoa, rinsed
- 2 cups vegetable broth
- 1 can (15 oz) black beans, drained and rinsed
- 1 cup corn kernels (fresh or frozen)
- 1 small red onion, diced
- 2 cloves garlic, minced
- 1 teaspoon ground cumin
- 1 teaspoon smoked paprika
- 1 teaspoon chili powder
- Salt and pepper to taste
- 1 cup shredded cheddar cheese (optional)
- 1 avocado, diced (for garnish)
- Fresh cilantro, chopped (for garnish)
Suggested Tools
- Baking dish
- Medium saucepan
- Large skillet
- Aluminum foil
- Measuring cups and spoons
Gathering the right ingredients is key. I love using bright bell peppers. They bring color and flavor. Quinoa is my go-to grain. It cooks quickly and adds protein. Black beans are hearty and filling. Corn gives a sweet crunch.
You’ll need a few spices to boost the flavor. Ground cumin, smoked paprika, and chili powder create warmth. Don’t forget salt and pepper. They are essential for taste. If you love cheese, add cheddar on top for a gooey finish.
For serving, I like to add diced avocado and fresh cilantro. These toppings add freshness and a nice pop of color.
Make sure you have the right tools. A baking dish holds the peppers. A medium saucepan cooks the quinoa. You’ll use a large skillet for sautéing. Measuring cups and spoons help keep you precise.
Cooking should be fun and easy. With these ingredients and tools, you will create a tasty meal.
Step-by-Step Instructions
Preheating and Preparing Peppers
- Preheat the oven to 375°F (190°C).
- Cut the tops off and scoop out seeds from bell peppers.
Cooking Quinoa
- Bring vegetable broth to a boil and add rinsed quinoa.
- Cover and simmer for 15 minutes until fluffy.
Sautéing Vegetables and Mixing Filling
- Sauté diced red onion and minced garlic in a skillet.
- Add black beans, corn, quinoa, spices, and stir to combine.
Assembling and Baking Stuffed Peppers
- Fill each pepper with the quinoa mixture, top with cheese if desired.
- Cover and bake for 25 minutes, uncover and bake for an additional 10-15 minutes.
This recipe brings together great flavors and textures.Enjoy making your stuffed peppers!
Tips & Tricks
Cooking Tips for Perfect Stuffed Peppers
- Use a mix of color bell peppers for visual appeal. It makes the dish more inviting.
- Do not overcook quinoa for a better texture. Fluffy quinoa holds the filling well.
Presentation Tips
- Arrange on a vibrant platter with garnishes. Bright colors make your meal pop.
- Use sour cream or hot sauce for added flavor. A little extra zest elevates the dish.
Timing Tips
- Prepare filling while preheating the oven to save time. Multitasking speeds up your cooking.
- Let peppers cool slightly before serving for easier handling. This makes them safer and more enjoyable to eat.
Remember, these tips help you create the best Southwest Stuffed Peppers.

Variations
Protein Variations
You can easily change the protein in your stuffed peppers. Substitute quinoa with brown rice or couscous for a different base. This gives you a nice texture and flavor. If you want meat, add some ground turkey or chicken. This makes the dish hearty and filling.
Vegetarian Options
If you prefer a vegetarian dish, replace black beans with lentils. Lentils add a unique taste and are packed with protein. You can also use different vegetables like zucchini or mushrooms. This keeps your meal fresh and exciting.
Flavor Enhancements
For those who love a kick, spice it up by adding jalapeños to the filling. This adds heat and depth. You can also explore different cheese varieties. Try pepper jack for a spicy twist or feta for a tangy punch. Each cheese brings its own flavor dimension.
Storage Info
How to Store Leftover Stuffed Peppers
Store your leftover stuffed peppers in an airtight container. They keep well in the fridge for up to 4 days. Be sure to separate any sauce or toppings. This helps keep the texture fresh and tasty.
Freezing Instructions
If you want to keep them longer, freeze the unbaked stuffed peppers. Place them in a single layer with parchment between each pepper. For the best quality, use them within 2-3 months.
Reheating Instructions
You can reheat stuffed peppers in the microwave or oven. Heat them until they are warm all the way through. For an even better taste, add extra cheese or toppings before reheating. This keeps them fresh and flavorful.
FAQs
How long to cook Southwest Stuffed Peppers?
Total bake time is approximately 35-40 minutes at 375°F (190°C). This ensures the peppers cook through and the flavors blend well. Always check for doneness by piercing a pepper with a fork; it should be tender yet firm.
Can I make Southwest Stuffed Peppers ahead of time?
Yes, you can prepare and refrigerate before baking for convenience. Just stuff the peppers, cover them, and store them in the fridge. When you’re ready to bake, simply add a few extra minutes to the cooking time.
What other ingredients can I use in stuffed peppers?
Consider veggies, grains, or different proteins based on taste preferences. You can use rice, lentils, or even diced tomatoes. Mix in your favorite spices for a unique twist. The options are endless!
Can I make this recipe spicy?
Yes, add cayenne pepper or hot sauce to the filling for a kick. Start with a small amount, taste, and adjust to your heat level. You can also add jalapeños for extra spice and flavor.
In this post, I shared how to make delicious Southwest Stuffed Peppers. We covered the key ingredients, tools, and step-by-step instructions. You also learned helpful tips for cooking and presenting your dish.
Feel free to customize the recipe to fit your taste. Whether you prefer quinoa or want to spice it up, the options are endless. Enjoy making this fun and colorful meal that is sure to impress!


![- 4 thick slices of bread (brioche or challah) - 2 large eggs - 1/2 cup milk - 1 teaspoon vanilla extract - 1 teaspoon ground cinnamon - 1 tablespoon granulated sugar For this recipe, I love using thick slices of brioche or challah bread. They soak up the egg mixture well and give a soft, rich texture. The eggs, milk, and vanilla extract create a smooth base for dipping. Ground cinnamon adds warmth and flavor, while granulated sugar enhances the sweetness. - 1 tablespoon granulated sugar - 1/2 teaspoon ground cinnamon - 1 tablespoon unsalted butter (for frying) The cinnamon sugar mixture is the star here. It adds a sweet crunch that makes each bite special. Using unsalted butter for frying helps achieve that golden brown crust. You want the sticks to be crispy on the outside but soft inside. - Maple syrup or honey - Optional fresh fruits and berries Serve these French toast sticks with maple syrup or honey for dipping. It adds a nice touch of sweetness. Fresh fruits or berries can brighten the plate and add some refreshing flavor. You can use strawberries, blueberries, or even banana slices. It all comes together for a fun and tasty breakfast! For the full recipe, visit [Full Recipe]. To start, grab a shallow bowl. In this bowl, whisk together 2 large eggs, 1/2 cup of milk, 1 teaspoon of vanilla extract, and 1 teaspoon of ground cinnamon. Add 1 tablespoon of granulated sugar for sweetness. It’s important to mix until everything blends well and becomes slightly frothy. This mixture will coat your bread sticks and give them great flavor. Now, take your thick slices of bread, like brioche or challah. Cut each slice into uniform sticks, about 1 inch wide. This helps them cook evenly. After cutting, dip each stick into the egg mixture. Make sure to fully submerge it so it gets well-coated. Let any extra liquid drip off before cooking. This step is key to avoid soggy sticks. Next, it's time to cook! Preheat a non-stick skillet over medium heat. Add 1 tablespoon of unsalted butter to the pan. Wait for it to melt and swirl it around to coat the bottom. Carefully place the coated bread sticks in the skillet, making sure not to overcrowd them. Cook each side for about 2-3 minutes. You want them to turn golden brown and get a slightly crispy texture. This method gives you the best result for your Cinnamon Sugar French Toast Sticks. For a full recipe with all details, check out the [Full Recipe]. To make great cinnamon sugar French toast sticks, you need to control the heat. I suggest using medium heat for the best results. Medium heat cooks the bread evenly without burning it. If you cook on high heat, you may get burnt outsides and soggy insides. Next, prevent soggy French toast sticks. After dipping the sticks in the egg mixture, let them sit for a moment. This helps the bread absorb the mixture without getting too wet. For an appealing look, stack the French toast sticks neatly on a plate. You can sprinkle a little extra cinnamon sugar on top for a pop of color. Add fresh fruit like strawberries or blueberries on the side. This not only adds color but also freshness. Using the right tools makes cooking easier. A non-stick skillet or griddle is best for frying. This helps prevent sticking and makes cleanup simple. A spatula is handy for flipping the sticks. A shallow bowl is key for mixing the egg mixture. You’ll find this method gives you the best results for your cinnamon sugar French toast sticks. Remember to check the [Full Recipe] for detailed steps and proportions to ensure success. {{image_4}} You can change the flavor of your cinnamon sugar French toast sticks in fun ways. Adding a few drops of almond or orange extract gives a twist to the classic taste. These extracts bring a unique sweetness that pairs well with cinnamon. You can also try using different types of bread. Flavored bread like chocolate or pumpkin spice adds an exciting touch. Just think about how much fun it would be to bite into a chocolate French toast stick! If you need gluten-free or dairy-free options, you can easily adapt this recipe. Use gluten-free bread made from rice or almond flour. For dairy-free, almond or oat milk works well. If you want vegan French toast sticks, substitute eggs with flaxseed meal or a plant-based egg replacement. This way, everyone can enjoy this treat, no matter their diet. Get creative with dipping sauces and toppings! You can try different sauces like chocolate, peanut butter, or fruit compote. These add a fun twist to the flavor. You can also serve your French toast sticks with whipped cream or yogurt. Top them with fresh fruits like strawberries or blueberries for extra color and taste. Each bite can be a new flavor adventure! To store leftover cinnamon sugar French toast sticks, place them in an airtight container. This keeps them fresh and prevents drying out. You can store them in the fridge for up to three days. If you want to keep them longer, consider freezing. When reheating, I recommend using the oven for the best texture. Preheat your oven to 350°F (175°C). Place the sticks on a baking sheet and heat for about 10 minutes. This method helps restore their crispiness. If you use the microwave, heat them for 20-30 seconds. However, they may turn a bit soggy. To freeze cooked French toast sticks, let them cool completely first. Then, place them in a single layer on a baking sheet. Freeze until solid, then transfer them to a freezer-safe bag. They last up to two months in the freezer. To thaw, move them to the fridge overnight. Reheat in the oven for the best results. To make your French toast sticks crispy, use thick slices of bread. Brioche or challah works best. They soak up the egg mixture without getting too soggy. Here are some tips for crispiness: - Preheat your pan: Heat your skillet on medium. A hot pan helps form a nice crust. - Use enough butter: Butter adds flavor and helps create a golden crust. Don't skimp on it! - Cook without crowding: Give each stick space in the pan. This allows heat to circulate for even cooking. - Flip carefully: Use a spatula to turn them gently. This keeps them from breaking apart. Yes, you can prepare the egg mixture in advance. This saves time when you're ready to cook. Here’s how to store it: - Refrigerate: Store the mixture in a sealed container. Use it within 24 hours for the best results. - Give it a whisk: Before using, stir it again to ensure the ingredients mix well. The type of bread you choose can change the flavor and texture of your French toast sticks. Here are some great options: - Brioche: This bread is soft and rich, making it perfect for soaking up the egg mixture. - Challah: It has a slightly sweet flavor and holds up well when cooked. - Texas toast: Thick slices of this bread create a hearty bite. - Sourdough: If you like a tangy taste, sourdough adds a unique twist. For the full recipe, check out the detailed instructions! In this post, we explored how to make delicious French toast sticks. You learned about key ingredients, quick preparation steps, and helpful cooking tips. We also discussed fun variations and smart storage methods for leftovers. With these tips, you can create a tasty meal that impresses. Remember, the right bread and careful cooking make all the difference. Enjoy your French toast sticks, and feel free to get creative with flavors and toppings!](https://dishtreats.com/wp-content/uploads/2025/07/664e1dd1-150a-4660-86e6-505ad35a42cc-768x768.webp)
![- 2 grilled chicken breasts, shredded - 1 cup BBQ sauce (choice of homemade or your favorite store-bought) - 4 cups mixed greens (combination of spinach, arugula, and romaine) - 1 cup cherry tomatoes, halved - 1 cup corn (freshly cooked, canned, or frozen) - 1 ripe avocado, diced - ½ cup red onion, finely sliced - ½ cup shredded cheddar cheese - ¼ cup fresh cilantro, chopped (optional for garnish) - Salt and freshly ground black pepper, to taste - Tortilla chips, for serving on the side Gather these ingredients before you start cooking. Grilled chicken gives a great flavor. You can use any BBQ sauce you like. If you want homemade sauce, that works too! The salad greens add crunch and freshness. Cherry tomatoes and corn give sweetness. Avocado adds creaminess. Red onion gives a nice bite. Shredded cheese makes everything richer. The cilantro is optional, but it adds a nice touch. Finally, don’t forget the tortilla chips for a fun crunch on the side. This combination makes for a bright, colorful, and tasty BBQ chicken salad bowl. For the complete recipe, follow the steps provided in the article. First, shred your grilled chicken breasts. Place the chicken in a medium bowl. Next, pour in your BBQ sauce. You can use homemade sauce or your favorite store-bought kind. Mix it well. Make sure every piece of chicken gets coated with the sauce. This step is key to getting great flavor. After mixing, set the chicken aside. Let it sit for a few minutes. This allows the flavors to meld together. Grab a large salad bowl for this part. Start by adding your mixed greens, which can include spinach, arugula, and romaine. Next, toss in the halved cherry tomatoes, corn, and sliced red onion. Use salad tongs or your hands to mix the greens and veggies. You want everything to be evenly distributed. Now, gently add the diced avocado. Take care to fold it in without mashing it. This keeps the avocado pieces intact and adds a creamy texture. Now it’s time for the fun part! Divide your colorful salad mixture into individual serving bowls. This makes for a beautiful display. On top of each bowl, add a generous scoop of the BBQ chicken. Finish each bowl with a sprinkle of shredded cheddar cheese. This adds richness and flavor. If you like, you can also garnish with fresh cilantro. This step gives a nice touch. Serve your bowls with tortilla chips on the side. They add a satisfying crunch to the meal. For the full recipe, check out the earlier section. Grilling chicken gives it a smoky flavor. This method adds a nice char. Baking chicken is easier and keeps it juicy. Choose what fits your time and setup. For great BBQ flavor, marinate the chicken overnight. This helps the sauce soak in well. Boost your BBQ sauce with spices. Try adding garlic powder, onion powder, or smoked paprika. Fresh herbs like oregano or thyme can also work wonders. If you want cheese alternatives, try feta or goat cheese. Both add a tangy kick to your salad. Layer your salad ingredients for a beautiful look. Start with greens, then add the chicken. Place colorful toppings like tomatoes and corn on top. Use bright bowls to make the meal pop. Vibrant tortilla chips add a fun touch and great crunch. For the full recipe, check back to the beginning! {{image_4}} You can make BBQ chicken salad bowls even more fun by swapping ingredients. Instead of grilled chicken, try using pulled pork or even tofu for a vegetarian option. These proteins still soak up that yummy BBQ flavor. For salad greens, don't feel stuck with just one type. You can mix in kale, romaine, or even baby spinach. Each green adds a new taste and texture. You might also consider adding different vegetables like bell peppers or cucumbers. They can add a nice crunch and freshness to your bowls. While BBQ sauce is a star, you can explore other dressings too. Ranch dressing gives a creamy twist. A tangy vinaigrette can make the salad lighter. Try mixing BBQ sauce with ranch for a unique blend. Don't hesitate to play with BBQ sauce flavors. You could use a spicy version for a kick or a honey BBQ for sweetness. Each type creates a new experience every time you make this dish. When serving your BBQ chicken salad bowls, think about sides that go well. Cornbread or sweet potato fries are great options. They can balance the salad's freshness with some warmth. Get creative with your bowls. Use large lettuce leaves as edible bowls or even hollowed-out bell peppers. This makes your meal fun and different. Plus, it adds color and excitement to your table. For more ideas, check out the Full Recipe to get inspired on how to mix things up! To keep your BBQ chicken salad fresh, store it in the fridge. Use airtight containers. This helps keep the flavors and textures intact. You can also separate the chicken from the salad if you prefer. For reheating BBQ chicken, place it in a microwave-safe dish. Heat it for short intervals, about 30 seconds at a time. Stir it in between to ensure even heating. You want it warm, not hot, to keep the chicken juicy. You can safely eat your prepared salad for up to three days. After that, the greens may wilt and lose their crunch. If you want to keep it longer, consider freezing some components. You can freeze the BBQ chicken for up to three months. Just make sure to package it well in freezer bags. The salad greens and toppings should stay in the fridge, as freezing changes their texture. For a full recipe on how to make this delicious dish, check the [Full Recipe]. It takes about 15 minutes to prep and 15 minutes to cook. So, in total, you’ll need around 30 minutes. This quick time makes it perfect for busy days. Yes, you can prepare this salad ahead of time! Just keep the salad and chicken separate until you’re ready to eat. This way, the greens stay fresh and crisp. You can store the chicken in the fridge for up to three days. When you are ready, mix them together for a tasty meal. If you want to swap out BBQ sauce, you can try teriyaki sauce for a sweet twist. Ranch dressing also works well if you prefer something creamy. Each option gives a different flavor, making your salad fun and unique. To make this recipe gluten-free, choose a gluten-free BBQ sauce. Many brands offer tasty options. Also, ensure your tortilla chips are gluten-free. This way, you can enjoy this dish without worry! This blog post detailed how to create tasty BBQ chicken salad bowls. You learned about key ingredients, from grilled chicken to colorful salad greens. We discussed step-by-step instructions for preparing and assembling the salad, along with cool tips for flavor and presentation. You also discovered variations for ingredients, sauces, and serving suggestions. Now, you can enjoy these bowls at home. Try new flavors and enjoy your meals. With simple swaps, your salad will always be fresh and fun.](https://dishtreats.com/wp-content/uploads/2025/06/ab007e5c-1328-4456-8678-35604ca2185e-768x768.webp)
![- 2 cups watermelon, diced into bite-sized cubes - 1 cup fresh pineapple, diced - 1 cup ripe mango, peeled and diced - 1 cup strawberries, hulled and sliced - 1 cup plump blueberries - 1 tablespoon pure honey - 2 tablespoons freshly squeezed lime juice - 1 teaspoon finely grated lime zest - Fresh mint leaves, for a lovely garnish When picking fruits, look for bright colors and firm textures. Choose watermelon that feels heavy for its size. Make sure the skin is smooth and free from blemishes. For pineapple, smell the base; a sweet scent means it's ripe. Ripe mangoes should yield slightly when you press them. Strawberries should be bright red, without white tips. Pick blueberries that are firm and plump, with a deep color. This fruit salad is not just tasty; it’s also packed with nutrients. Watermelon is hydrating and low in calories. Pineapple provides vitamin C and enzymes that aid digestion. Mango is rich in antioxidants and vitamins A and C. Strawberries boost heart health due to their high fiber and vitamin C content. Blueberries are known for their powerful antioxidants. The honey adds a natural sweetness, while lime juice helps with vitamin C and adds a zesty kick. Each bite not only delights your taste buds but also nourishes your body. First, gather all your fruits. You will need watermelon, pineapple, mango, strawberries, and blueberries. Wash each fruit well to remove any dirt. Dice the watermelon into cubes. Cut the pineapple and mango into small pieces. Hull and slice the strawberries. Finally, add the blueberries. Place all the fruit into a large mixing bowl. Be gentle while mixing to keep the fruit intact. In a separate small bowl, combine one tablespoon of honey with two tablespoons of freshly squeezed lime juice. Add one teaspoon of finely grated lime zest for extra flavor. Whisk the mixture together until it is smooth and well-blended. This honey lime dressing will add a sweet and tangy flavor to your salad. Now, drizzle the honey lime dressing over the fruit. Make sure to cover every piece of fruit for the best taste. Use a gentle motion to toss the salad. This helps the dressing coat all the fruit without mashing it. Let the salad sit for about 10 minutes. This resting time allows the flavors to blend well. When ready to serve, garnish with fresh mint leaves. This adds a lovely touch to your fruit salad. Enjoy your Honey Lime Fruit Salad Delight! For a full recipe, visit the [Full Recipe]. Cutting fruit can be fun and easy. Start with a sharp knife for safety. For watermelon, slice it in half. Then, cut each half into thick wedges. Remove the rind and dice the flesh into cubes. Pineapple is best peeled and cored first. Cut the fruit into thick slices, then dice. For strawberries, remove the green tops and slice them. Keep your cuts even for a pretty look. You can add more fun to the salad. Try adding a splash of orange juice. This will give it a citrus twist. You can also mix in a pinch of cinnamon for warmth. Chopped nuts like almonds or walnuts add crunch. If you like creamy, add a dollop of yogurt. These extra flavors make the salad pop! Make your fruit salad shine with great presentation. Use a clear glass bowl to show off the colors. You can layer the fruits for a rainbow effect. Garnish with mint leaves on top for a fresh touch. A few extra blueberries scattered around add visual flair. Serve with colorful spoons for added fun. Remember, we eat with our eyes first! {{image_4}} You can switch up fruits in your Honey Lime Fruit Salad. Try using peaches or nectarines for a juicy twist. Grapes add a nice pop, and kiwi brings a tart flavor. You might also add oranges for an extra citrus kick. Mix and match based on your taste! Change your fruit salad with the seasons. In summer, use berries and stone fruits for freshness. Fall is great for apples and pears, while winter calls for citrus fruits like clementines and grapefruits. Spring gives you the chance to add strawberries and rhubarb for a bright taste. Add nuts or seeds for a crunchy texture. Almonds and walnuts are perfect options. If you prefer seeds, sprinkle in some pumpkin or sunflower seeds. These additions not only improve texture, but they also boost the nutrition of your salad. Enjoy the added flavor and health benefits! Store leftover honey lime fruit salad in an airtight container. This keeps the fruit fresh and tasty. If you can, eat it within a day or two. The longer it sits, the softer the fruit may get. I recommend using glass or plastic containers with tight-fitting lids. These help lock in moisture and prevent spills. If you have smaller portions, use smaller containers for easy access. The salad stays fresh for about two days in the fridge. Keep it away from foods with strong odors. To refresh the taste, add a little more honey or lime juice before serving. If you notice any browning, remove those pieces before enjoying. For the full recipe, make sure to check the main article! Yes, you can make Honey Lime Fruit Salad a few hours ahead. However, I recommend serving it fresh. If you prepare it too early, the fruit may get soft and lose its crunch. If you decide to make it ahead, store it in the fridge. This keeps it cool and fresh. Just remember to add the dressing right before serving to keep the fruit juicy. The best fruits for Honey Lime Fruit Salad are those that are ripe and sweet. I love using: - Watermelon - Pineapple - Mango - Strawberries - Blueberries These fruits blend well together, creating a vibrant and tasty mix. You can also try using kiwi or grapes for extra flavor. The key is to choose fruits that you enjoy and that are in season. Yes, you can use another sweetener if you prefer. Options include agave syrup or maple syrup. These sweeteners work great in the dressing. Just keep in mind that the flavor may change slightly. I suggest starting with the same amount as the honey. You can always adjust it to your taste. For a sugar-free option, consider using a sugar substitute that you like. In this blog post, we explored how to make a tasty Honey Lime Fruit Salad. We discussed the key ingredients, tips for selecting fresh fruits, and the nutritional benefits they offer. You learned step-by-step instructions for preparation, dressing, and serving. We also shared tips for cutting fruits and enhancing flavor. Plus, variations for using different fruits and tips for storage were provided. Creating this salad is simple and rewarding. Enjoy it yourself or share it with friends. It’s a fun and healthy treat everyone will love.](https://dishtreats.com/wp-content/uploads/2025/07/a7fe8aa9-0619-4c4c-8a63-94d099c8a4d2-768x768.webp)


