
Get ready to savor a dish that’s perfect for any occasion—Savory Honey Garlic Sesame Chicken Bites! These tasty bites bring a sweet and tangy flavor that you won’t forget. Whether you’re throwing a party or craving a quick meal, I’ve got you covered. I’ll share easy steps to create this dish along with helpful tips, variations, and storage advice. Let’s dive into the world of bold flavors and satisfying bites!
Why I Love This Recipe
- Quick and Easy: This recipe is straightforward and doesn’t require advanced cooking skills, making it perfect for any home cook.
- Flavor Explosion: The combination of honey, garlic, and sesame creates a deliciously sweet and savory flavor that is simply irresistible.
- Versatile Dish: These chicken bites can be served as an appetizer, snack, or main course, making them great for any occasion.
- Healthy Option: Using low-sodium soy sauce and fresh ingredients makes this dish a healthier choice without sacrificing taste.
Ingredients
Main Ingredients for Honey Garlic Sesame Chicken Bites
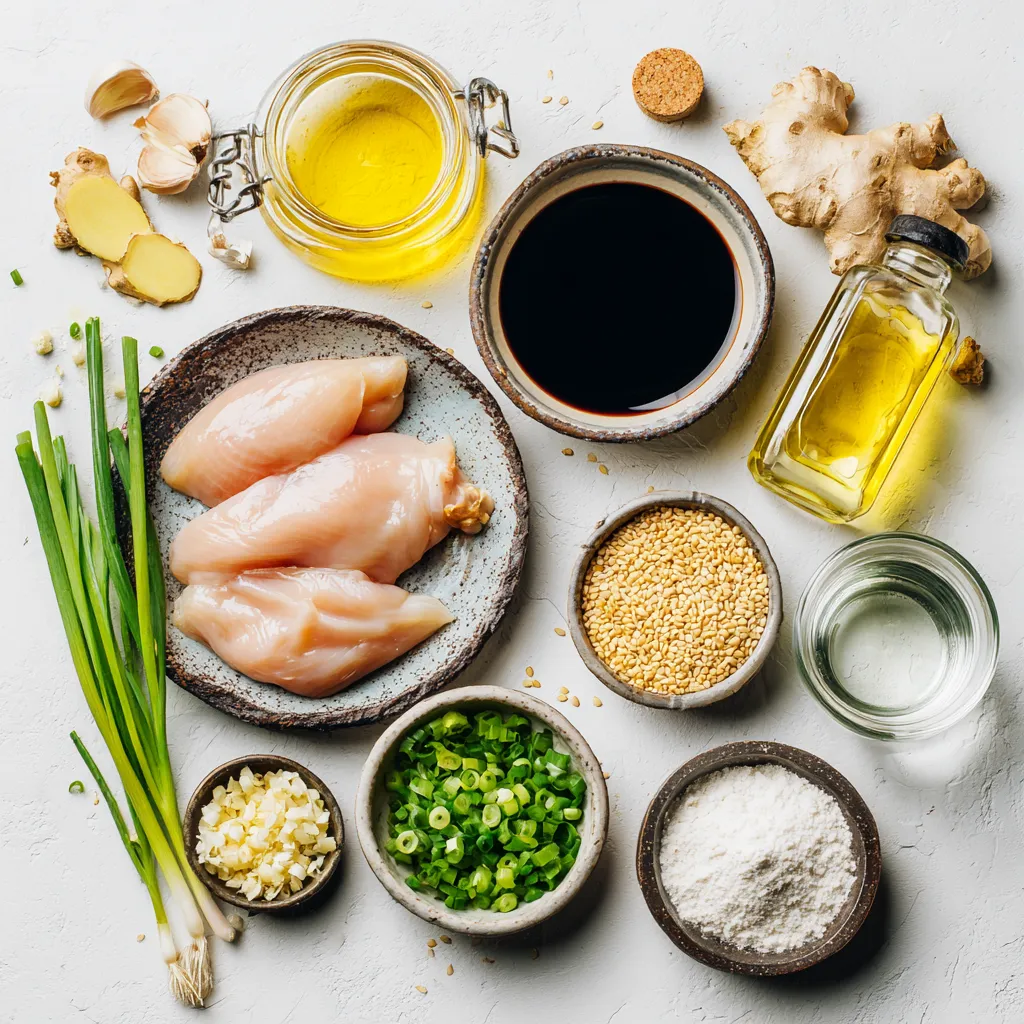
For this tasty dish, you need a few key items:
– 1 lb (450g) chicken breast, cut into bite-sized pieces
– 1/4 cup (60ml) honey
– 2 tablespoons (30ml) low-sodium soy sauce
– 3 cloves garlic, minced
– 1 teaspoon fresh ginger, grated
– 1 tablespoon (15ml) sesame oil
– 1 tablespoon (8g) cornstarch
– 2 tablespoons (30ml) water
– 2 tablespoons (20g) sesame seeds
– 3 green onions, finely chopped (for garnish)
– Salt and pepper to taste
– Oil for frying
These ingredients come together to make a sweet and savory flavor that everyone will love.
Cooking Oil Options
When frying the chicken, you have many oil choices. I recommend using:
– Canola oil
– Vegetable oil
– Peanut oil
These oils have high smoke points. They work well for frying without burning. Choose any of these to achieve golden, crispy chicken bites.
Garnishes and Accompaniments
Garnishes add a nice touch to your dish. Here are some ideas:
– Finely chopped green onions for freshness
– Extra sesame seeds for crunch
– Steamed rice for a complete meal
– A refreshing salad to balance flavors
These add-ons make your honey garlic sesame chicken bites not just tasty, but also beautiful on the plate.
Step-by-Step Instructions
Preparing the Marinade
To start, grab a medium mixing bowl. In it, add 1/4 cup of honey, 2 tablespoons of low-sodium soy sauce, 3 minced garlic cloves, and 1 teaspoon of grated fresh ginger. Pour in 1 tablespoon of sesame oil. Whisk these ingredients together until they mix well. This marinade will give your chicken an amazing flavor.
Marinating the Chicken
Take your 1 lb of chicken breast and cut it into bite-sized pieces. Place these pieces into the bowl with the marinade. Make sure every piece is covered by the marinade. Cover the bowl tightly with plastic wrap and place it in the fridge. Let the chicken marinate for at least 30 minutes. This step is key to getting deep flavor.
Cooking the Chicken Bites
Now, it’s time to cook! Heat a large skillet over medium-high heat and add enough oil for frying. When the oil shimmers, take the marinated chicken out of the fridge. Add the chicken pieces in batches, making sure not to crowd the pan. Cook each batch for about 5-6 minutes until they turn golden brown and are fully cooked. Once done, remove them and set on a plate lined with paper towels to drain any extra oil.
Thickening the Sauce
In a separate small bowl, mix 1 tablespoon of cornstarch with 2 tablespoons of water to create a slurry. Lower the heat on your skillet to medium and pour in the leftover marinade. Stir in the cornstarch slurry and cook for 2-3 minutes. Stir constantly until the sauce thickens to your liking.
Final Assembly and Garnishing
Return the cooked chicken bites to the skillet. Make sure to coat them well in the thick sauce. Cook for another minute while stirring gently. Remove the skillet from the heat. Sprinkle 2 tablespoons of sesame seeds over the chicken. Add finely chopped green onions for a pop of color and fresh taste. Serve these bites hot and enjoy the sweet and savory flavors!
Tips & Tricks
Perfecting Your Chicken Bites
To make the best honey garlic sesame chicken bites, the marinade is key. Use fresh garlic and ginger for bright flavors. Marinate the chicken for at least 30 minutes. This lets the flavors soak in and makes the chicken tender. When cooking, don’t overcrowd the pan. Each piece needs space to brown nicely. This step helps give you that golden crust.
Common Mistakes to Avoid
One common mistake is not letting the chicken marinate long enough. Skipping this step can make the chicken bland. Another mistake is using too much oil in the pan. It can lead to greasy bites instead of crispy ones. Also, avoid stirring the chicken too much while it cooks. Let it sit to brown well on each side.
Serving Suggestions for Honey Garlic Sesame Chicken Bites
These chicken bites shine on their own but pair well with many sides. Serve them on a wooden board for a rustic look. You can also use small skewers for easy serving. A side of steamed rice complements the sweet and savory flavors. A fresh salad adds a nice crunch. Sprinkle extra sesame seeds and chopped green onions on top for color and texture.
Pro Tips
- Marinate for Maximum Flavor: Allow the chicken to marinate for at least 30 minutes, but if time permits, marinating for a few hours or overnight will enhance the flavor even more.
- Use High Smoke Point Oil: For frying, choose an oil with a high smoke point like canola or peanut oil to achieve a crispy texture without burning.
- Adjust Sauce Thickness: If you prefer a thicker sauce, simply add more cornstarch slurry, but be sure to cook it long enough to eliminate the raw starch taste.
- Garnish for Color: Fresh herbs or colorful vegetables can elevate your dish. Consider adding red pepper flakes for a hint of spice or a squeeze of lime for brightness.
Variations
Spicy Honey Garlic Variation
If you like heat, add red pepper flakes. Start with 1/2 teaspoon and adjust to taste. This spice adds a bold kick to the sweet honey and garlic mix. You can also use Sriracha. Just mix it in the marinade. It brings warmth and flavor that pairs well with the chicken.
Gluten-Free Adaptation
To make this dish gluten-free, simply swap regular soy sauce for tamari. Tamari is a great option that offers the same taste without gluten. Check the cornstarch too; most brands are gluten-free. This way, everyone can enjoy the bites without worry.
Alternative Proteins for the Recipe
Chicken isn’t the only option here. Try shrimp or tofu for a fun twist. Shrimp cooks quickly and soaks up the flavors well. For tofu, press it first to remove excess water, then cut it into cubes. Both options bring new tastes to this dish. Just follow the same steps for marinating and cooking.
Storage Info
How to Store Leftovers
After enjoying your honey garlic sesame chicken bites, store any leftovers in an airtight container. Make sure to let them cool to room temperature first. Place the bites in the fridge, where they will last for about three to four days.
Reheating Tips
When reheating, use the oven or stovetop for the best results. Preheat your oven to 350°F (175°C). Spread the chicken bites on a baking sheet, and heat for about 10 minutes. This method keeps them crispy. If you prefer the stovetop, warm a skillet over medium heat and add a splash of water. Cover the pan to steam the bites for about five minutes.
Freezing Honey Garlic Chicken Bites
If you want to save some chicken bites for later, freezing is an option. First, let them cool completely. Then, place them in a single layer on a baking sheet. Freeze them for about two hours. After that, transfer the frozen bites to a freezer bag or container. They can last up to three months in the freezer. When ready to eat, thaw them in the fridge overnight before reheating.
FAQs
Can I use chicken thighs instead of chicken breasts?
Yes, you can use chicken thighs. They are juicier and have more flavor. Cut the thighs into bite-sized pieces like you would with chicken breasts. Cook them the same way, and they will turn out great.
What can I serve with honey garlic sesame chicken bites?
These chicken bites pair well with many sides. Try serving them with steamed rice or a fresh salad. You can also add some crispy veggies or noodles for a complete meal. For a fun touch, serve them on skewers for easy eating.
How do I make the sauce thicker or thinner?
To thicken the sauce, mix cornstarch with water. Add this slurry to the sauce while heating. Stir continuously until it thickens. If you want a thinner sauce, add a little more water. Heat it gently while stirring until you reach your desired consistency.
Can I prepare the marinade in advance?
Yes, you can! Make the marinade a day ahead and store it in the fridge. Just add the chicken right before cooking. This saves time and allows the flavors to blend even more.
What’s the best way to choose ingredients for this recipe?
Choose fresh ingredients for the best flavor. Look for bright green onions and firm chicken pieces. Use raw, unfiltered honey for a richer taste. For soy sauce, low-sodium options are great if you want to control the salt. Always check expiration dates on your ingredients too!
Honey garlic sesame chicken bites are fun and easy to make. We covered ingredients, step-by-step cooking, and tips to perfect your dish. You learned to avoid mistakes and explore tasty variations. Storing and reheating leftovers keeps meals fresh.
Try different proteins or spice levels to match your taste. Remember, cooking is about joy and creativity. Enjoy sharing these bites with family and friends. Now, grab your ingredients and start making your delicious honey garlic chicken bite


