Savory Chicken & Rice Casserole Slow Cooker Recipe

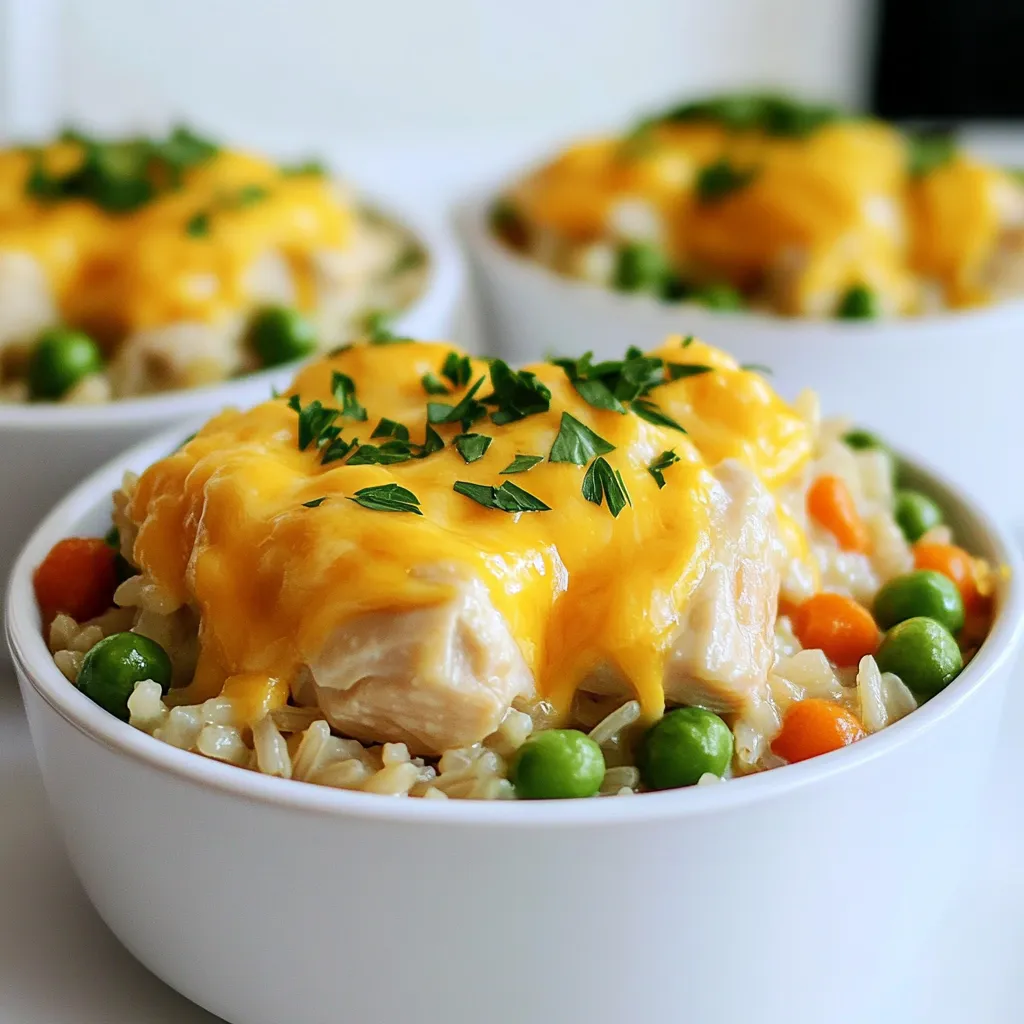
Looking for a simple, hearty meal? This Savory Chicken & Rice Casserole Slow Cooker Recipe is just what you need! With tender chicken, wholesome brown rice, and vibrant veggies, this dish brings comfort with every bite. Plus, you can throw everything into a slow cooker and let it do the work for you! Let’s dive into the easy steps and learn how to create this family favorite.
Ingredients
List of Ingredients
- 2 cups uncooked brown rice
- 4 boneless, skinless chicken breasts (approximately 1.5 lbs)
- 1 medium onion, finely chopped
- 2 cloves garlic, minced
- 1 cup frozen peas and carrot mix
- 4 cups chicken broth
- 1 tablespoon olive oil
- 1 teaspoon garlic powder
- 1 teaspoon paprika
- 1 teaspoon dried thyme
- Salt and black pepper, to taste
- 1 cup shredded cheddar cheese
- Fresh parsley, chopped (for garnish)
This recipe has simple yet flavorful ingredients. The brown rice adds a nutty taste. The chicken brings protein and heartiness to the dish. Onions and garlic give a strong base flavor. Peas and carrots add sweetness and color. Chicken broth makes everything juicy and rich.
Using olive oil helps the chicken achieve that nice golden brown crust. The spices like garlic powder and paprika give the dish warmth. Dried thyme adds aroma and depth. Salt and black pepper enhance every bite. Lastly, cheddar cheese melts into a creamy topping.
Gather these ingredients before you start cooking. Each one plays a role in making this casserole a winner.
Step-by-Step Instructions
Preparing the Chicken
- Searing the chicken breasts: Start by heating olive oil in a skillet over medium heat. Season the chicken breasts with garlic powder, paprika, dried thyme, salt, and pepper. Sear each breast for 4-5 minutes on both sides, until they turn golden brown. This step adds great flavor to the chicken.
- Seasoning tips for optimal flavor: Use a mix of spices like garlic powder and paprika. This adds depth to your dish. Don’t forget to season with salt and pepper to enhance the overall taste.
Combining Ingredients in the Slow Cooker
- Layering the uncooked ingredients: In your slow cooker, add uncooked brown rice first. Next, layer in the chopped onion, minced garlic, and frozen peas and carrots. This order helps the rice cook well.
- Importance of stirring for even cooking: After adding the chicken broth, stir everything together. This ensures all ingredients mix well and cook evenly. A good stir also helps the rice absorb flavors from the other ingredients.
Cooking the Casserole
- Setting the slow cooker temperature: Cover your slow cooker with its lid. Set it to cook on low heat for 6-8 hours, or choose high heat for 3-4 hours. Both methods work well, but low heat gives richer flavor.
- Cooking time preferences (low vs high): Cooking on low allows the flavors to meld. High heat cooks faster but may not be as rich. Choose what fits your schedule best.
Finishing Touches and Serving
- Adding cheese before finishing: About 15 minutes before cooking ends, sprinkle shredded cheddar cheese on top. Cover again to let the cheese melt into a gooey layer. This adds creaminess to the dish.
- Fluffing the casserole and garnishing: Once it’s done cooking, use a fork to fluff the casserole gently. Garnish with fresh parsley for a colorful and tasty finish. This little touch makes your meal look great!
Tips & Tricks
Perfecting Your Chicken & Rice Casserole
To make a great chicken and rice casserole, avoid a few common mistakes:
- Not Searing the Chicken: Searing adds flavor. Don’t skip this step.
- Overcooking the Rice: Brown rice takes longer than white rice. Adjust cooking time accordingly.
- Skipping the Stirring: Mix the ingredients well. This ensures even cooking.
You can choose between fresh or frozen vegetables. Fresh veggies add crunch, while frozen ones save time. Both work well, so pick what you have.
Enhancing Flavor
Adding herbs and spices can boost the taste of your casserole.
- Thyme, Garlic Powder, and Paprika: These are great choices for flavor.
- Experiment with Others: Consider adding oregano or rosemary for a twist.
You can also try different broth options. Chicken broth is classic, but vegetable broth works too. This can change the dish’s taste in a fun way.
Equipment Suggestions
For this recipe, a good slow cooker is key. Look for one with a programmable timer. Here are some suggestions:
- 6-Quart Slow Cooker: Great size for family meals.
- Smart Slow Cooker: Connects to your phone for easy control.
You will need some basic kitchen tools too:
- Large Skillet: For searing the chicken.
- Chopping Board and Knife: For veggies and chicken prep.
- Measuring Cups and Spoons: To get ingredient amounts just right.
With the right tips and tools, you will make a tasty chicken and rice casserole!

Variations
Ingredient Swaps
You can easily change the rice in this recipe. While I use brown rice, white rice works great too. Just be aware that cooking times may differ. If you want a nutty flavor, try wild rice. It adds a unique twist.
You can also swap out the chicken. If you prefer turkey, it works well in this dish. For a lighter option, use chicken thighs instead of breasts. You could even try pork or beef for a different taste.
Cooking Method Alternatives
Not a fan of the slow cooker? No problem! You can make this dish on the stove. Start by cooking the rice separately. Sauté the chicken and veggies in a large pot, then stir in the cooked rice and broth. Let it simmer until everything is tender.
If you want the oven-baked version, preheat your oven to 350°F. Combine all the ingredients in a baking dish. Cover it with foil and bake for about 45 minutes. Remove the foil, add the cheese, and bake for another 10 minutes until golden.
Dietary Adjustments
For a gluten-free option, choose gluten-free rice and broth. Make sure all your ingredients are certified gluten-free. This keeps the dish safe for those with gluten allergies.
If you’re looking for vegetarian or vegan options, skip the chicken. Use mushrooms or tofu for protein. Swap chicken broth with vegetable broth. Add in extra veggies for more flavor and texture. This way, you still get a comforting meal without meat.
Storage Info
Refrigerating Leftovers
After your meal, let the chicken and rice casserole cool down a bit. This helps keep the texture nice. Use airtight containers to store leftovers. This keeps moisture in and prevents odors. I like to use glass containers, as they don’t stain and are easy to clean. Make sure to cover the dish tightly. You can keep it in the fridge for up to three days.
Freezing Instructions
If you want to save some for later, freezing works great. First, let the casserole cool completely. Then, scoop it into freezer-safe bags or containers. Try to remove as much air as possible. This helps prevent freezer burn. When you’re ready to eat, thaw it in the fridge overnight. You can reheat it in the microwave or in the oven until hot.
Shelf Life
In the fridge, leftovers last about three days. In the freezer, they can last up to three months. Just remember to label your containers with the date. This way, you know when to eat them by. Keeping track helps avoid eating old food. Enjoy your savory chicken and rice casserole whenever you like!
FAQs
Can I use brown rice instead of white rice?
Yes, you can use brown rice in this recipe. Brown rice takes longer to cook than white rice. It usually needs about 30-45 minutes more. This change will give your casserole a nutty taste and chewy texture. Keep in mind that using brown rice may also change the liquid amount. You might need a bit more broth for best results.
What can I serve with chicken and rice casserole?
You can serve many things with this casserole. A fresh side salad adds crunch and color. Roasted vegetables are another great choice. You might also enjoy garlic bread for a tasty side. If you want something warm, pair it with steamed broccoli. Each of these sides complements the flavors well.
How do I know when the casserole is done?
To check if the casserole is done, look at the rice and chicken. The rice should be soft and fluffy. The chicken should be fully cooked and not pink. If you have a meat thermometer, the chicken should reach 165°F (75°C). If everything looks good, it’s ready to serve!
You now have all the ingredients and steps to make a great chicken and rice casserole. Remember to layer the ingredients correctly and adjust cooking times based on your preferences. Don’t forget to add cheese for extra flavor! With the tips and variations provided, you can make this dish your own. Enjoy sharing this meal with your loved ones, knowing you created something delicious and fulfilling. Happy cooking!


![To make crispy sweet and sour chicken, you need some key ingredients. Here’s what to gather: - 1 lb (450g) chicken breast, cut into bite-sized pieces - 1 cup cornstarch - 2 large eggs, beaten - Oil for frying - Salt and black pepper to taste These ingredients form the base of your dish. The chicken gives protein, while cornstarch creates that crispy texture. Eggs help the cornstarch stick to the chicken. Adding vibrant colors and fresh flavors is easy with the right vegetables and fruits. Here’s what you’ll need: - 1 cup bell peppers, chopped (mix of colors for visual appeal) - 1 cup pineapple chunks (fresh or canned) - 1 cup onion, chopped - 3 cloves garlic, minced The bell peppers and onions add crunch and sweetness. Pineapple brings a juicy burst of flavor. Garlic adds depth to the dish. The sweet and sour sauce makes this dish memorable. Gather these components: - 1/2 cup ketchup - 1/4 cup apple cider vinegar - 1/4 cup brown sugar - 2 tablespoons soy sauce - 1 tablespoon cornstarch mixed with 2 tablespoons water (for slurry) This sauce balances sweetness and tang. Ketchup gives a rich base, while apple cider vinegar adds a zesty kick. Brown sugar enhances the sweetness, and soy sauce adds umami. The cornstarch slurry thickens the sauce perfectly. For the full recipe, check out the complete list of steps to follow. Happy cooking! Start by seasoning the chicken pieces with salt and pepper. This simple step adds great flavor. Next, dredge each piece in cornstarch. Make sure to shake off any extra cornstarch. This helps create a nice, crispy crust. After that, dip the chicken pieces into the beaten eggs. This coating will help the cornstarch stick well. In a large skillet, heat oil over medium-high heat. You want the oil to shimmer before adding the chicken. Fry the chicken in batches. Avoid crowding the pan to keep the chicken crispy. Cook each piece for about 4-5 minutes per side. When golden brown, use a slotted spoon to remove the chicken. Place it on paper towels to drain any excess oil. Lower the heat to medium. In the same pan, add chopped onions and bell peppers. Sauté them for about 3-4 minutes or until soft. This brings out their sweetness. Then, add minced garlic and cook for another minute. The aroma will fill your kitchen and make your mouth water. In a bowl, whisk together the sauce ingredients: ketchup, apple cider vinegar, brown sugar, and soy sauce. Combine these until smooth. Pour this sweet and tangy sauce over the sautéed vegetables. Stir gently to mix everything together. The colors and smells will be inviting. Raise the heat slightly and bring the sauce to a gentle simmer. This helps blend the flavors. Once it simmers, add pineapple chunks for sweetness. Then, mix the cornstarch slurry and pour it in. Stir continuously until the sauce thickens, which takes about 2-3 minutes. You want it to coat the chicken well. Add the crispy chicken back into the pan. Carefully fold it into the thickening sauce. Toss everything gently to coat each piece of chicken. Once warmed through, the dish is ready to serve. For a great presentation, plate it over fluffy rice or steamed quinoa. You can also garnish it with sesame seeds and green onions for extra flair. To get that perfect crispy texture, start with your oil. Heat it well, around 350°F (175°C) is ideal. If the oil isn't hot enough, your chicken will soak up oil and get soggy. Fry the chicken in batches to avoid crowding. This keeps the oil temperature steady. Once fried, place the chicken on paper towels. This helps drain off any extra oil. For a twist on the classic sauce, try adding a splash of orange juice. It brightens the flavor. You can also swap brown sugar with honey for a different sweetness. Using fresh ginger in your sauce will give an extra kick. Remember to taste as you mix. Adjust salt and pepper to suit your taste buds. Presentation makes your dish look more appealing. Serve your crispy sweet and sour chicken over fluffy white rice or quinoa. Sprinkle sesame seeds on top for crunch. Finely chopped green onions add a pop of color. You can even add a few slices of fresh pineapple on the side for a tropical touch. This will make your meal look vibrant and inviting. {{image_4}} You can switch up the protein in this dish. Shrimp works great and cooks fast. Just sauté it until it turns pink. Tofu is another good option. Use firm tofu for the best texture. Cut it into cubes and fry until golden. Pork also fits well. Use pork tenderloin or chops, cut into bite-sized pieces. Each protein adds its own flavor, keeping things exciting. You can mix in different veggies for added nutrition. Broccoli is a great choice. It adds a nice crunch and color. Carrots give a sweet flavor and vibrant look. Snap peas are another fun option. They stay crisp and add a pop of freshness. Feel free to combine any of these for a colorful plate. It makes your meal more appealing and nutritious. You can easily tweak the sauce to match your taste. If you like heat, add some red pepper flakes or sriracha. This will spice up the dish nicely. For sweetener options, you can swap brown sugar for honey or maple syrup. This change adds a different flavor twist. Adjust the acidity by adding more vinegar or a squeeze of lime juice. Each change can create a new experience with this classic dish. For the full recipe, check out the detailed instructions earlier. After enjoying your crispy sweet and sour chicken, store any leftovers in an airtight container. This keeps the dish fresh for up to three days. Before storing, let the chicken cool down to room temperature. This prevents condensation, which can make the chicken soggy. If you have sauce left over, store it separately to keep the chicken crispy. To freeze your crispy sweet and sour chicken, place it in a freezer-safe container or bag. Make sure to remove as much air as possible. This helps avoid freezer burn. It can stay good for about one month. When you're ready to eat, thaw it overnight in the fridge. For the best taste and texture, reheat your chicken in an oven. Preheat the oven to 350°F (175°C). Spread the chicken on a baking sheet and cover with foil. Heat for about 15-20 minutes or until warm. This method helps keep the chicken crispy. You can also reheat it in a skillet over medium heat. Just add a splash of water to the pan to create steam, which helps warm it without drying out. Enjoy your leftovers just as much as the first time! To make crispy sweet and sour chicken, start with these steps: 1. Prep Chicken: Cut chicken breast into bite-sized pieces. Season with salt and pepper. Dredge in cornstarch, then coat in beaten eggs. 2. Fry Chicken: Heat oil in a skillet over medium-high heat. Fry chicken pieces until golden brown, about 4-5 minutes per side. Drain on paper towels. 3. Sauté Vegetables: Lower heat and add chopped onion and bell peppers to the same pan. Cook for 3-4 minutes. Add minced garlic and cook for another minute. 4. Prepare Sauce: Mix ketchup, apple cider vinegar, brown sugar, and soy sauce in a bowl. Pour this mixture over the vegetables in the pan. 5. Thicken Sauce: Bring the sauce to a gentle simmer. Add pineapple chunks and cornstarch slurry. Stir until the sauce thickens, about 2-3 minutes. 6. Combine Chicken and Sauce: Add the fried chicken back into the pan. Toss gently to coat the chicken in the sauce. 7. Serve: Let the dish rest for a minute. Serve it over rice or quinoa for a complete meal. Yes, you can prepare some parts in advance. Cook the chicken and the sauce ahead of time. Store them separately in airtight containers in the fridge. You can keep the chicken for up to three days. The sauce will last about a week. When ready to serve, reheat the chicken and sauce together in a pan. This keeps the chicken crispy and the sauce fresh. Yes, you can make a vegetarian version! Use tofu instead of chicken. Press the tofu to remove excess moisture, then cut it into cubes. Coat and fry the tofu pieces just like you would with chicken. You can also use seitan or tempeh for a similar texture. The sauce remains the same, giving you that sweet and sour flavor. I love serving crispy sweet and sour chicken with steamed rice or quinoa. You can also pair it with: - Fried rice - Noodles - Steamed broccoli - A fresh cucumber salad These sides complement the dish well and add color to your plate. Enjoy your meal! For the complete recipe, check the [Full Recipe]. Crispy sweet and sour chicken is a delightful dish. We explored key ingredients, cooking methods, and tips for perfecting it. You learned how to achieve that crispy texture and enhance flavors. Remember, try different proteins and veggies for variety. Proper storage keeps leftovers fresh. This dish is not only tasty but also versatile. Enjoy making and sharing it with friends and family. Let your kitchen creativity shine with this classic recipe!](https://dishtreats.com/wp-content/uploads/2025/05/ffc138cc-1bdb-4282-b515-13f85bd5dbd6-768x768.webp)

![- 4 chicken thighs (bone-in, skin-on) - 2 tablespoons jerk seasoning - 1 tablespoon olive oil - Salt and pepper to taste - 1 ripe pineapple, peeled and diced into small cubes - 1 red bell pepper, diced into small pieces - 1 small red onion, finely chopped - 1 jalapeño, deseeded and minced (adjust for spice preference) - Juice of 1 fresh lime - Fresh cilantro, chopped (for garnish) For this jerk chicken with pineapple salsa recipe, use chicken thighs for their rich flavor. The jerk seasoning adds a spicy and smoky kick. The pineapple and vegetables bring freshness and sweetness to the dish. - Adjust spice levels: If you want less heat, skip the jalapeño or use less jerk seasoning. - Additional garnishes: Lime wedges and extra cilantro make great toppings. You can also add avocado for creaminess. Feel free to customize these ingredients according to your taste. The key is to balance heat, sweetness, and freshness. For the full recipe, check out the [Full Recipe]. Start by mixing the chicken thighs with jerk seasoning, olive oil, salt, and pepper. Use your hands to coat each piece well. This step is key for flavor. Cover the bowl with plastic wrap and place it in the fridge. Marinate for at least 1 hour, but overnight gives the best taste. In a clean bowl, combine diced pineapple, red bell pepper, red onion, and jalapeño. Squeeze the juice of one lime over it and add a pinch of salt. Stir gently to mix. Let this salsa rest for at least 15 minutes. This resting time allows the flavors to blend nicely. Heat your grill or grill pan to medium-high. Take the chicken out of the marinade and let any extra drip off. Grill the chicken for about 6-8 minutes on each side. Use a meat thermometer to check that it reaches 165°F (75°C). This ensures it is fully cooked and safe to eat. Arrange the grilled jerk chicken on a platter. Spoon the bright pineapple salsa over the top. For a finishing touch, sprinkle fresh cilantro on the dish. You can also serve it on a rustic wooden board with lime wedges and extra pineapple chunks. This adds a fun, tropical vibe to your meal. For the full recipe, check out the [Full Recipe]. The key to great jerk chicken is marinating well. Many people rush this step, but a good marinating time is essential. Aim for at least one hour, or overnight if you can. This allows the chicken to soak up the flavors deeply. Common mistakes to avoid: - Skipping the marinade: This makes the chicken bland. - Using too much heat: Jerk seasoning has a kick. Balance it with other flavors. - Not resting the chicken: Skipping this step makes the meat dry. Flavor enhancements: - Add some lime zest to your marinade for extra tang. - Try a bit of honey for a hint of sweetness. - Use smoked paprika for a deeper, richer flavor. The salsa adds brightness to the dish. Choosing ripe pineapples is key to great flavor. Tips for selecting ripe pineapples: - Look for pineapples with a sweet smell at the base. - The skin should be golden and slightly firm. - Press gently; it should give just a little. Variations for additional flavor: - Add diced mango for extra sweetness. - Mix in some chopped mint for a fresh twist. - Try a dash of cumin for a warm, earthy note. These tips will help you create a jerk chicken dish that shines. Don't forget to check out the Full Recipe for more details! {{image_4}} You can swap chicken for other meats. Try pork or turkey. Both soak up jerk flavor well. If you prefer seafood, shrimp or fish works too. Just keep an eye on cooking times. Seafood cooks quickly, so grill it for just a few minutes. Feel free to play with the vegetables. You can use different peppers like green or yellow. Red onions are great, but sweet onions add a nice touch too. Want to mix it up? Add diced mango or avocado to the salsa. Fresh herbs like mint or basil can add fun flavors too. For gluten-free options, check your jerk seasoning. Make sure it has no gluten. You can enjoy jerk chicken without any worries. If you're looking for low-carb choices, skip the sugar in the salsa. You can also serve the chicken with a salad instead of rice. This keeps it fresh and light. To store leftovers, place the jerk chicken in an airtight container. Let it cool to room temperature before sealing. This helps keep it fresh longer. Jerk chicken can stay in the fridge for up to three days. When you are ready to eat, reheat it in the oven or on the grill. Heat it to 165°F (75°C) for safe eating. Avoid reheating in the microwave if you want crispy skin. Yes, you can freeze jerk chicken. Wrap it tightly in plastic wrap and then place it in a freezer-safe bag. It can last up to three months in the freezer. For thawing, move the chicken to the fridge overnight. If you need it fast, you can also use the microwave on the defrost setting. After thawing, make sure to heat it well before serving. This keeps it tasty and safe to eat. For the full recipe, visit the [Full Recipe]. I suggest marinating the chicken for at least one hour. For the best flavor, try to marinate overnight. This allows the jerk seasoning to soak in deeply, making the chicken tasty and juicy. Jerk chicken pairs well with a variety of sides. Some great options are: - Rice and peas - Grilled vegetables - Coleslaw - Fried plantains - Cornbread These sides balance the rich flavors of the chicken. Yes, you can make the salsa ahead of time. I recommend preparing it a few hours before serving. This gives the salsa time to rest. The flavors will mix better, making it even more delicious. Jerk seasoning has a unique and bold flavor. It combines heat from peppers, sweetness from spices, and a hint of smokiness. Common ingredients include allspice, thyme, and garlic. This mix creates a savory and vibrant taste. The spice level of jerk chicken can vary. It depends on the amount of jalapeño you use. If you want less heat, remove the seeds. For more spice, add extra jalapeño or a hotter pepper. Adjusting the seasoning lets you enjoy the dish at your preferred heat level. You learned about making jerk chicken with easy steps and key ingredients. Focus on marinating the chicken and crafting the pineapple salsa for the best flavor. Enjoy grilling techniques to get that perfect char. Remember to avoid common mistakes while cooking. You can also try different proteins and flavor swaps for variety. Store leftovers properly to enjoy later. Your jerk chicken can impress anyone at the table. Now, it’s time to put this knowledge to use and enjoy your delicious creation!](https://dishtreats.com/wp-content/uploads/2025/06/27cc5104-89a5-4e73-8f97-3d018bc709fa-768x768.webp)

