Savory Chicken Alfredo Stuffed Shells Simple Recipe

Looking for a quick and tasty dinner? Try my Savory Chicken Alfredo Stuffed Shells! This simple recipe combines creamy Alfredo sauce, tender chicken, and gooey cheese all in one bite. You can whip this up in no time, making it perfect for busy weeknights or even special gatherings. Let’s dive into the easy ingredients and steps that will have everyone asking for seconds!
Why I Love This Recipe
- Comfort Food Classic: This recipe combines creamy Alfredo sauce with tender chicken, making it a warm and satisfying dish perfect for any occasion.
- Easy to Prepare: With simple ingredients and straightforward steps, this dish can be made quickly, even on busy weeknights.
- Customizable: Feel free to add your favorite vegetables or swap out the chicken for another protein, making this recipe versatile for everyone.
- Impressive Presentation: The stuffed shells look beautiful when served, making them an ideal choice for dinner parties or special gatherings.
Ingredients
Main Ingredients for Chicken Alfredo Stuffed Shells
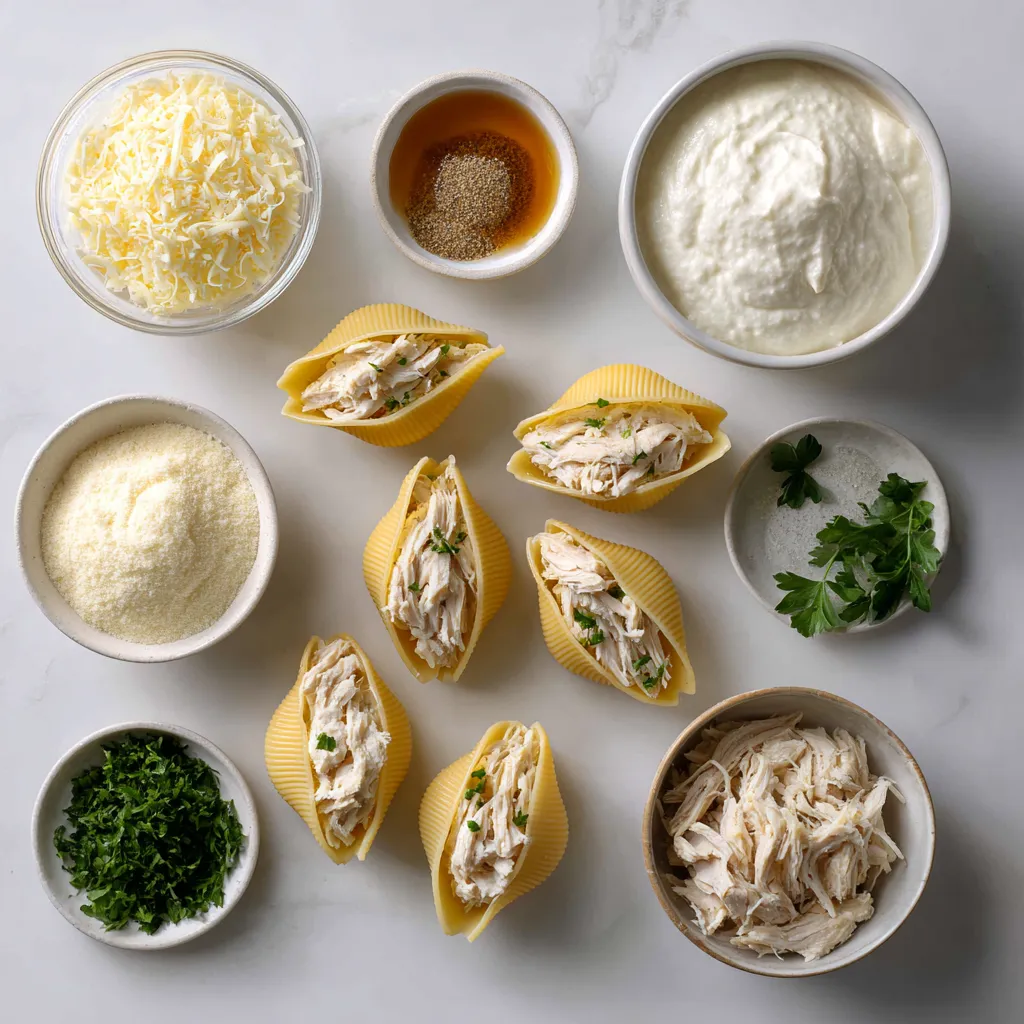
- 12 large jumbo pasta shells
- 2 cups cooked chicken, shredded
- 1 cup ricotta cheese
- 1 cup mozzarella cheese, shredded
- 1/2 cup Parmesan cheese, grated
- 2 cups Alfredo sauce (store-bought or homemade)
- 1 teaspoon garlic powder
- 1 teaspoon Italian seasoning
- Salt and pepper to taste
I love starting with the main ingredients for Chicken Alfredo Stuffed Shells. Jumbo pasta shells hold the creamy filling so well. You need cooked chicken, and it can be any kind you like. Shredded rotisserie chicken works great. The cheese mix brings creaminess and flavor. I use ricotta, mozzarella, and Parmesan for the best taste.
Next, the Alfredo sauce gives a rich and smooth base. You can use store-bought sauce or make your own if you prefer. The garlic powder and Italian seasoning add depth to the filling. Don’t forget to add salt and pepper to taste.
Optional Garnishes
- Fresh parsley
Fresh parsley is a simple but nice touch. It adds color and a fresh bite to the rich dish. You can chop some and sprinkle it on top just before serving.

Step-by-Step Instructions
Preparing the Pasta Shells
First, boil salted water in a large pot. Add the jumbo pasta shells once the water boils. Cook the shells according to the package directions until they are al dente. This step is key to avoid mushy shells later. After cooking, drain the shells in a colander. Let them cool for a few minutes so you can handle them easily.
Making the Filling
In a mixing bowl, combine the shredded chicken, ricotta cheese, 1/2 cup of mozzarella cheese, and 1/4 cup of Parmesan cheese. Add the garlic powder and Italian seasoning. Don’t forget a pinch of salt and black pepper. Mix all ingredients well. You want a creamy filling that sticks together. This step adds flavor and texture to your stuffed shells.
Assembling and Baking
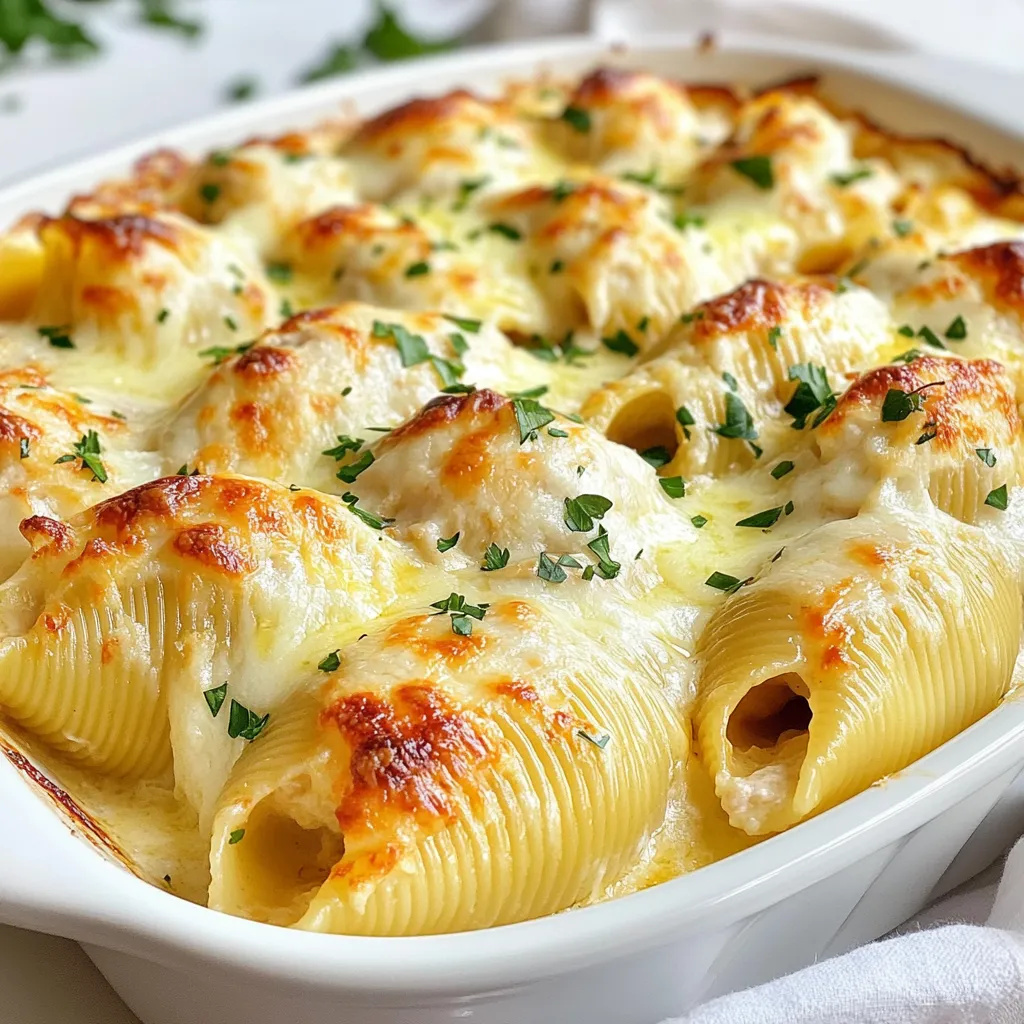
Spread 1 cup of Alfredo sauce evenly on the bottom of a 9×13 inch baking dish. This sauce creates a tasty base for the shells. Next, gently stuff each cooked shell with the chicken and cheese mixture. Place them seam-side up in a single layer in the dish. Once all shells are filled, pour the remaining Alfredo sauce over them. Make sure every shell is well-coated. Then sprinkle the rest of the mozzarella and Parmesan cheese on top.
Cover the dish tightly with aluminum foil to keep the cheese from browning too quickly. Bake in the preheated oven at 350°F (175°C) for 25 minutes. After that, remove the foil and bake for another 10 to 15 minutes. You want the cheese to be melted and bubbly. Once done, take the dish out and let it cool for a few minutes. Before serving, sprinkle fresh parsley on top for a bright finish.
Tips & Tricks
Perfecting Your Chicken Alfredo Stuffed Shells
To get the best flavor and texture from your Chicken Alfredo Stuffed Shells, focus on two main areas: sauce coverage and herb use.
- Ensuring the sauce coats evenly: Start by pouring some Alfredo sauce into the baking dish first. This helps prevent sticking. Then, after stuffing each shell, pour the remaining sauce on top. Use a spoon to ensure every shell is covered. This keeps your shells moist and adds rich flavor.
- Using fresh herbs for flavor enhancement: Fresh parsley adds color and taste. Chop it finely and sprinkle it on top before serving. You can also mix in some fresh basil or oregano into the filling for extra zest. Fresh herbs make a big difference in the overall taste.
Common Mistakes to Avoid
Many people run into a few common issues when making stuffed shells. Avoid these to ensure a perfect dish.
- Overcooking pasta shells: Cook the jumbo shells until they are just al dente. This means they should still have a slight bite. If you cook them too long, they will break when you stuff them.
- Under-seasoning the filling: Your filling should be flavorful. Make sure to add enough salt, pepper, and spices. This will elevate the taste of the chicken and cheese mixture. Taste it as you mix to ensure you love the flavor before stuffing the shells.
Pro Tips
- Prepare Ahead: You can prepare the filling a day in advance and store it in the refrigerator. This saves time on the day you’re serving the dish.
- Cheese Variations: Feel free to experiment with different cheeses such as goat cheese or fontina for a unique flavor profile in your stuffed shells.
- Make it Extra Creamy: For an even creamier texture, add a splash of heavy cream to the Alfredo sauce before pouring it over the stuffed shells.
- Leftover Transformation: If you have leftovers, consider turning them into a baked pasta casserole by adding more sauce and cheese before reheating.

Variations
Ingredient Swaps
You can easily change the protein in this recipe. Try using turkey or shrimp instead of chicken. Both options work well and add new flavors. If you want a vegetarian dish, swap the chicken for spinach or mushrooms. Sauté the spinach or mushrooms first to get the best taste. This way, you can cater to different diets while still enjoying that creamy goodness.
Sauce Alternatives
When it comes to sauce, you have choices. You can use homemade Alfredo sauce for a fresh taste. Making it from scratch can be fun and allows you to control the ingredients. If you’re short on time, store-bought Alfredo sauce works great too. It saves you time without losing flavor.
You can also explore white sauce variations. A béchamel sauce can be a tasty twist. Just remember to keep it creamy and rich. This way, your stuffed shells will remain a crowd-pleaser!
Storage Info
Proper Storage Techniques
To keep your Chicken Alfredo stuffed shells fresh, you must store them right. After cooking, let them cool down completely. Then, transfer any leftovers into an airtight container.
- Refrigerating leftovers: You can store them in the fridge for up to three days. Just make sure the container is sealed well. This keeps the flavors intact and prevents spoilage.
- Freezing stuffed shells for later use: If you want to save them for a longer time, freezing is a great option. Place the stuffed shells in a freezer-safe container. They can last up to three months in the freezer. Label the container with the date so you remember when you made them.
Reheating Tips
When it’s time to enjoy your leftovers, reheating is key. Here are the best methods:
- Best methods for reheating (oven vs. microwave): The oven is my favorite way to reheat stuffed shells. Preheat it to 350°F (175°C). Cover the dish with foil to keep them moist. Bake for about 20 minutes or until heated through.
If you’re in a hurry, the microwave works too. Just place a shell on a microwave-safe plate. Heat it for 1-2 minutes, checking every 30 seconds. This method might not keep the shells as creamy, but it’s quick and easy.
FAQs
What can I serve with Chicken Alfredo Stuffed Shells?
You can pair Chicken Alfredo Stuffed Shells with several tasty sides. Here are some ideas:
- Garlic Bread: It adds a nice crunch and helps soak up sauce.
- Caesar Salad: The crisp greens and creamy dressing balance the rich pasta.
- Steamed Vegetables: Broccoli or green beans provide a healthy, colorful touch.
- Roasted Asparagus: It brings a lovely flavor that goes well with the dish.
- Mixed Green Salad: A light salad with vinaigrette can cleanse your palate.
Can I make Chicken Alfredo Stuffed Shells ahead of time?
Yes, you can prepare Chicken Alfredo Stuffed Shells in advance. Here’s how:
- Assemble the Dish: Stuff the shells and place them in the baking dish.
- Cover and Chill: Wrap the dish in plastic wrap or foil and store it in the fridge.
- Baking Later: When ready, remove the wrap and bake. Add 10-15 extra minutes to the cooking time if baking straight from the fridge.
This makes meal prep easy and saves time during busy nights.
How do I ensure my stuffed shells don’t fall apart?
To keep your stuffed shells sturdy, follow these tips:
- Cook Pasta Al Dente: Make sure not to overcook the shells. They should stay firm.
- Cool Before Stuffing: Allow the shells to cool slightly so they hold their shape.
- Fill Carefully: Don’t overstuff the shells. A gentle hand helps them stay intact.
- Layer Sauce Wisely: Pour just enough sauce at the bottom to help the shells hold up without drowning them.
These steps will help ensure your stuffed shells stay delicious and beautiful.
In this post, we explored how to make Chicken Alfredo Stuffed Shells. We covered main ingredients like jumbo shells, chicken, and different cheeses. I provided step-by-step instructions on preparing, assembling, and baking. We also shared tips to avoid common mistakes and discussed tasty variations and storage methods.
Chicken Alfredo Stuffed Shells are simple, filling, and perfect for any meal. Enjoy experimenting with flavor

Creamy Chicken Alfredo Stuffed Shells
Ingredients
- 12 large jumbo pasta shells
- 2 cups cooked chicken, shredded
- 1 cup ricotta cheese
- 1 cup mozzarella cheese, shredded
- 1/2 cup Parmesan cheese, grated
- 2 cups Alfredo sauce
- 1 teaspoon garlic powder
- 1 teaspoon Italian seasoning
- to taste salt and pepper
- to taste fresh parsley, chopped
Instructions
- Preheat your oven to 350°F (175°C) to prepare for baking.
- In a large pot, bring salted water to a boil. Cook the jumbo pasta shells according to package instructions until they are al dente, then drain them and set aside to cool slightly to handle.
- In a mixing bowl, add the shredded chicken, ricotta cheese, 1/2 cup of mozzarella cheese, 1/4 cup of Parmesan cheese, garlic powder, Italian seasoning, and a generous pinch of salt and black pepper. Stir until all ingredients are well combined and create a creamy filling.
- Spread 1 cup of Alfredo sauce evenly over the base of a 9x13 inch baking dish, creating a flavorful foundation for the shells.
- Gently stuff each cooked pasta shell with the creamy chicken and cheese mixture. Place the stuffed shells seam-side up in a single layer in the prepared baking dish.
- Once all the shells are filled and arranged, pour the remaining Alfredo sauce over them, ensuring each shell is generously coated.
- To finish, sprinkle the remaining mozzarella and Parmesan cheese evenly over the top for that delightful cheesy crust.
- Cover the baking dish tightly with aluminum foil to prevent excess browning, then bake in the preheated oven for 25 minutes.
- After 25 minutes, carefully remove the foil and continue baking for an additional 10-15 minutes, or until the cheese is melted, bubbly, and beautifully golden.
- Once ready, remove the dish from the oven and allow it to cool for a few minutes. Before serving, garnish with freshly chopped parsley for a pop of color and flavor.


![To make Classic Sloppy Joes, you need some simple, fresh ingredients. Here’s what you will need: - 1 lb ground beef (or turkey) - 1 small onion, finely chopped - 1/2 green bell pepper, finely chopped - 2 cloves garlic, minced - 1 cup tomato sauce - 2 tablespoons ketchup - 1 tablespoon brown sugar - 1 tablespoon Worcestershire sauce - 1 teaspoon mustard - Salt and pepper to taste - 4 hamburger buns - 1 cup shredded cheddar cheese (optional) - Fresh parsley for garnish These ingredients come together to create a rich and tasty filling. The ground beef or turkey serves as a hearty base. The onion and bell pepper add a nice crunch and sweetness. Garlic gives it a punch of flavor. You can also adjust the recipe. If you want a lighter dish, use turkey. For a cheesy twist, add cheddar on top. Fresh parsley adds color and a hint of freshness. This Classic Sloppy Joes recipe is quick and easy. You can find the full recipe [Full Recipe]. Enjoy cooking! First, heat a large skillet over medium heat. This step is key to getting a nice sear. Once the skillet is hot, add 1 lb ground beef or turkey. Use a wooden spoon to break the meat apart as it cooks. This helps it brown evenly. Cook until the meat is browned throughout. Be sure to drain any excess fat from the pan. This keeps your Sloppy Joes from being greasy. Next, add 1 small finely chopped onion, 1/2 green bell pepper, and 2 cloves minced garlic to the skillet. Stir the mixture well. Cook for about 5 minutes or until the veggies soften and smell great. They add a nice flavor to your dish. Now it’s time to make the sauce. Stir in 1 cup tomato sauce, 2 tablespoons ketchup, 1 tablespoon brown sugar, 1 tablespoon Worcestershire sauce, and 1 teaspoon mustard. Mix everything well until the sauce blends with the meat and veggies. Bring the mixture to a gentle simmer. This step helps all the flavors meld together. Lower the heat to maintain a gentle simmer. Let the mixture cook for about 10 minutes, stirring occasionally. If it gets too thick, add a splash of water. This keeps it from becoming dry. Stirring helps prevent sticking and keeps the mixture smooth. Taste the mixture and season it with salt and pepper to your liking. This is your chance to adjust the flavors. While the sloppy joe filling simmers, toast 4 hamburger buns. You can use a hot skillet or toaster. Toast them until they are golden brown and slightly crisp. This adds a nice crunch to your meal. To serve, take a toasted bun and spoon the savory filling onto it. For a cheesy twist, add 1 cup shredded cheddar cheese on top. Finish with a sprinkle of chopped parsley for a pop of color and flavor. This makes your Sloppy Joes look and taste amazing. Enjoy this delightful dish with your family! For the full recipe, check the recipe section above. To enhance flavor, try adjusting the ketchup or brown sugar. If you like it sweeter, add more brown sugar. For a tangy kick, a splash of vinegar works wonders. The sauce should be rich but not too thick. If it gets too thick, add a little water or extra tomato sauce. This keeps it juicy and fun to eat. You can cook Sloppy Joes on the stovetop or in a slow cooker. The stovetop is quick and easy. Sauté the meat and veggies, then let it simmer. In a slow cooker, mix everything and let it cook for hours. This method deepens the flavor. You can also swap the meat. Ground turkey or chicken are great lighter options. For a twist, try lentils for a vegetarian dish. Sloppy Joes pair well with crispy fries or a fresh coleslaw. The crunch of the coleslaw balances the softness of the sandwich. For drinks, a cold soda or iced tea is perfect. You can also enjoy them with a light beer if you prefer. These pairings make your meal fun and complete. {{image_4}} You can spice up your Sloppy Joes with fun twists. For a veggie option, try lentils or black beans instead of meat. They give a hearty texture and soak up the sauce well. Another twist is BBQ Sloppy Joes. Just add your favorite BBQ sauce to the meat mixture for a sweet and tangy flavor. Toppings can make your Sloppy Joes even more amazing. You might want to add different types of cheese. Try provolone or pepper jack for a kick. You can also mix in various sauces. A drizzle of ranch or hot sauce adds a nice touch. Different places have their own takes on Sloppy Joes. In Mexico, they use spices and jalapeños for a spicy version. In the Philippines, they might add sweet sauce and serve it with rice. Exploring these options shows how versatile this dish can be. To keep your Sloppy Joes fresh, store them in an airtight container. Place the cooled mixture in the fridge. Make sure to separate any extra buns to avoid sogginess. You can keep the leftovers for up to three days. If you want to keep them longer, freezing is a great option. When you reheat Sloppy Joes, the stovetop is best. Place the mixture in a skillet over low heat. Stir often to keep it juicy. If using the microwave, cover it with a damp paper towel to keep moisture in. For buns, you can toast them lightly on a skillet or wrap them in foil and warm them in the oven. This way, they stay soft and tasty. To freeze the Sloppy Joe mixture, let it cool first. Then, transfer it to a freezer-safe bag. Remove as much air as possible before sealing. This helps prevent freezer burn. You can freeze it for up to three months. When ready to eat, thaw it in the fridge overnight. Reheat on the stove until hot. Enjoy your Sloppy Joes just like the first time! Making Classic Sloppy Joes is quick and easy. You need about 10 minutes for prep. Cooking takes another 15 minutes. In total, you can have dinner ready in just 25 minutes. Yes, you can use ground turkey as a lighter choice. Turkey has fewer calories and less fat than beef. The flavor will be milder, so you might want to adjust your spices. It’s a great way to make a healthier Sloppy Joe. Sloppy Joes pair well with many sides. Here are some tasty options: - French fries - Coleslaw - Potato chips - Corn on the cob - Salad These sides add nice crunch and freshness to your meal. You can definitely make Sloppy Joes ahead of time. Just cook the meat and sauce, then store it in the fridge. It will last for three days. When you’re ready to eat, heat it up and serve on toasted buns. This makes meal prep easy and saves time. For longer storage, you can freeze the mixture. Just thaw and reheat when ready. You’ll still enjoy great flavor! In this blog post, we covered how to make Classic Sloppy Joes. We explored the ingredients, cooking steps, and tips for flavoring. I also shared variations and storage methods. Sloppy Joes are simple to make, versatile, and fun to eat. Don't hesitate to explore your options by trying new ingredients or toppings. Enjoy your meal and share it with friends for a delicious time!](https://dishtreats.com/wp-content/uploads/2025/06/3a095a95-3efb-4397-8f70-4189d4d50cab-768x768.webp)


![- 2 cups cooked chicken, shredded - 4 cups mixed salad greens - 1 cup cherry tomatoes - 1 cup corn - 1 ripe avocado - 1/2 cup red onion - 1 cup shredded cheddar cheese - 1/2 cup ranch dressing - BBQ sauce - Salt and freshly ground black pepper - Crispy tortilla strips, fresh cilantro leaves When making BBQ Ranch Chicken Salad, start with fresh, quality ingredients. The chicken brings protein and heartiness. I love using shredded chicken that is moist and flavorful. Mixed salad greens add crunch and color. You can choose your favorites like romaine, arugula, or baby spinach. Cherry tomatoes bring sweetness. Always cut them in half to make them easy to eat. Corn adds a pop of sweetness too, and you can use canned or fresh. I prefer fresh corn when it’s in season for the best taste. The avocado adds creaminess. A ripe avocado makes the salad smooth and rich. Red onion gives a nice bite. Keep it thinly sliced so it does not overpower. Shredded cheddar cheese adds a delightful sharpness, making each bite even tastier. The ranch dressing is creamy and tangy, tying everything together. Pair it with BBQ sauce for a smoky flavor boost. This combo is truly delicious. For seasoning, use salt and freshly ground black pepper. These simple touches really enhance the flavors. Lastly, crispy tortilla strips add a fun crunch. Fresh cilantro leaves not only look great but also add a fresh taste. You can find the full recipe [Full Recipe]. Enjoy mixing these ingredients for a vibrant, tasty salad! - Combine shredded chicken with BBQ sauce. - Use a large bowl for easy mixing. - Season with salt and black pepper to taste. - Mix until the chicken is fully coated. This step is key. The BBQ sauce gives the chicken a sweet and smoky flavor. It makes the salad pop with taste. - Create the salad base with mixed greens. - Spread the greens evenly in a large bowl. - Layer fresh ingredients: tomatoes, corn, avocado, and onion. - Arrange each ingredient for a colorful look. The vibrant colors make the salad appealing. Each bite brings a different taste, making it fun to eat! - Top with BBQ chicken and cheddar cheese. - Spoon the chicken evenly over the fresh veggies. - Drizzle with ranch dressing, adjusting to your liking. - Toss gently with clean hands or tongs to mix. This salad is now ready to impress! The creamy ranch dressing and savory chicken blend perfectly. Check the [Full Recipe] for more tips! To make your BBQ Ranch Chicken Salad shine, adjust the ranch dressing to your taste. If you love creamy flavors, add more dressing. For a lighter touch, use less. This lets you control how rich the salad feels. Make sure all ingredients mix well. This way, each bite has a bit of everything. An even spread of chicken, veggies, and cheese creates balance. For a lovely presentation, serve the salad in individual bowls or on a large platter. This makes it easy for everyone to take their share. Add some cilantro leaves and crispy tortilla strips on top. These toppings not only look great but also add flavor and crunch. A colorful display of greens and toppings makes the salad more appealing. Feel free to experiment with different seasonings. A dash of chili powder can add a nice kick. You might also try garlic powder or smoked paprika for depth. Also, think about adding extra ingredients for more variety. Black beans, diced peppers, or even fresh corn can bring new tastes. Each addition offers a chance to create your perfect salad blend. For more details on making this delicious salad, check out the Full Recipe. {{image_4}} You can easily change the protein in this salad. If you want a different taste, use pulled pork or tofu instead of chicken. Both options add great flavor. For a seafood twist, grilled shrimp works well. The shrimp adds a nice, light touch to the salad. While ranch dressing is a favorite, you can swap it out. Blue cheese dressing gives a strong flavor. A vinaigrette adds a tangy kick that brightens the salad. You can also make your own dressing blends. Mix yogurt with herbs for a fresh taste. Don't be afraid to add more veggies. Bell peppers, cucumbers, and radishes give a nice crunch. You can also roast vegetables like zucchini or carrots. Roasting adds a warm, rich taste that contrasts nicely with the cool salad. For a full recipe, check out the BBQ Ranch Chicken Salad with a Crunchy Twist. Store your BBQ Ranch Chicken Salad in an airtight container. This keeps it fresh and tasty. For best results, eat it within 2-3 days. The longer it sits, the soggier it may get. If you want to freeze some, consider freezing the chicken separately. This helps keep the chicken tasty when you eat it later. Avoid freezing the salad with dressing. The dressing makes the greens soggy, and nobody likes that! To refresh your leftovers, toss them with fresh greens. This adds crunch and makes it feel new again. If you want to reheat the BBQ chicken, do it separately. This keeps it warm without making the salad wilt. To make BBQ Ranch Chicken Salad, follow these simple steps: 1. Prepare the BBQ Chicken: Mix shredded chicken with BBQ sauce in a big bowl. Add salt and black pepper. Stir until the chicken is well coated. 2. Build the Salad Base: In another large bowl, spread the mixed greens evenly. This is your salad's base. 3. Layer Fresh Ingredients: Add halved cherry tomatoes, corn, diced avocado, and sliced red onion on top of the greens. This creates a colorful layer. 4. Top with BBQ Chicken: Spoon the BBQ chicken evenly over the fresh layers. This ensures every bite has flavor. 5. Add Creamy Cheese: Sprinkle shredded cheddar cheese over the salad. Let it melt slightly into the warm chicken. 6. Drizzle with Dressing: Pour ranch dressing over the salad. Adjust the amount to fit your taste. 7. Toss Gently: Use clean hands or tongs to mix everything. Make sure the ranch dressing coats all the ingredients. 8. Taste Test: Before serving, taste the salad. Add more salt or black pepper if needed. 9. Add Crunch and Garnish: Top with crispy tortilla strips and fresh cilantro for a nice finish. This process makes a delicious and colorful salad. For the complete recipe, check the Full Recipe above. Yes, you can prep this salad ahead of time. Here are some tips: - Cook the Chicken: You can cook and shred the chicken a day in advance. Store it in the fridge with BBQ sauce. - Chop Veggies: Cut the vegetables, like tomatoes and onions, a few hours before serving. Keep them in airtight containers. - Store Dressing Separately: Keep the ranch dressing separate until serving. This keeps the greens fresh and crisp. - Combine Before Serving: Mix everything together just before you eat. This keeps your salad from becoming soggy. This BBQ Ranch Chicken Salad goes great with several side dishes. Here are some ideas: - Crusty Bread: A nice loaf of bread pairs well and adds a hearty touch. - Chips: Tortilla chips or potato chips add crunch and fun. - Fruit Salad: A fresh fruit salad adds sweetness and a refreshing taste. - Grilled Veggies: Grilled vegetables complement the salad's flavors. - Coleslaw: A crunchy coleslaw gives a nice contrast to the salad. These sides enhance your BBQ Ranch Chicken Salad experience. Enjoy! We explored a tasty BBQ Ranch Chicken Salad. You learned about the main and optional ingredients, along with step-by-step instructions for making it. You also picked up tips for perfecting the salad and ideas for variations. Don’t forget to check the storage info for leftovers. This salad is easy to adjust, making it a fun dish for everyone. Enjoy this recipe and make it your own!](https://dishtreats.com/wp-content/uploads/2025/07/4c564630-ecab-497d-8bae-b951c19ef4f1-768x768.webp)
![To make crispy cauliflower tacos, gather these key ingredients: - 1 head of cauliflower, separated into bite-sized florets - 1 cup panko breadcrumbs - 1 teaspoon smoked paprika - 1 teaspoon garlic powder - 1 teaspoon onion powder - 1/2 teaspoon cayenne pepper (adjust to your spice level) - Salt and pepper to taste - 1 cup all-purpose flour - 1 cup plant-based milk (or regular milk) - Corn tortillas (for assembling the tacos) - 1 ripe avocado, sliced - 1 cup shredded red cabbage - Fresh cilantro, for garnishing - Lime wedges, for serving You can swap some ingredients based on your needs. Here are some ideas: - Use gluten-free flour instead of all-purpose flour. - Replace panko with crushed cornflakes for a different crunch. - Try almond milk or oat milk instead of plant-based milk. - Use different spices, like chili powder or cumin, for a unique flavor. To make your tacos even more delicious, consider these toppings: - Fresh salsa for a burst of flavor. - Pickled onions for a tangy kick. - Crumbled feta or queso for creaminess. - Radish slices for added crunch. - A drizzle of hot sauce for some heat. For the full recipe, refer back to the earlier section. Enjoy creating your crispy cauliflower tacos! Start by preheating your oven to 425°F (220°C). This ensures even cooking and crispiness. Next, take your head of cauliflower and separate it into bite-sized florets. Make sure the pieces are not too big. Smaller florets cook faster and get crispier. Now, let’s set up your breading station. Get three bowls in a row. In the first bowl, add one cup of all-purpose flour. In the second bowl, pour one cup of plant-based milk (or regular milk). In the third bowl, mix one cup of panko breadcrumbs with one teaspoon of smoked paprika, one teaspoon of garlic powder, one teaspoon of onion powder, and half a teaspoon of cayenne pepper. Add salt and pepper to taste. Stir the breadcrumbs well to spread the spices evenly. Once your cauliflower is ready and your breading station is set, it’s time to coat the florets. Dip each floret into the flour first. Make sure it’s fully coated, then shake off the excess. Next, dip the floret into the plant-based milk, letting any extra drip off. Finally, roll it in the breadcrumb mixture, pressing gently. Place the breaded florets on a lined baking sheet, leaving space between them. Now, slide the baking sheet into your preheated oven. Bake for 25-30 minutes. Flip the florets halfway through to ensure they brown evenly. When they turn golden and crispy, they’re ready! Enjoy your crispy cauliflower tacos with all the tasty toppings from the Full Recipe. To get that crunch, the key is the panko breadcrumbs. They create a light and crispy coating. Make sure to coat each cauliflower floret well. When you bake them, place them evenly on the sheet. This allows hot air to circulate, making them crispier. Spice up your tacos with smoked paprika and cayenne pepper. They add a nice kick. You can also mix in herbs like cumin or oregano for extra depth. Don't forget to season with salt and pepper. Taste the breadcrumbs before coating the cauliflower to ensure they are flavorful. For the best serving experience, warm your corn tortillas before filling them. This makes them pliable and tasty. Layer your tacos with fresh avocado and shredded cabbage. Top with chopped cilantro and a squeeze of lime for brightness. For an extra treat, serve with a side of salsa or hot sauce. If you want the full recipe, check out the Crispy Cauliflower Tacos section. {{image_4}} You can easily make these tacos vegan. Use plant-based milk instead of regular milk. For the breading, stick to vegan-friendly panko breadcrumbs. This keeps the flavor and crunch you want. To make these tacos gluten-free, swap regular flour with a gluten-free all-purpose blend. Gluten-free panko will also work well for the breading. This way, everyone can enjoy these tasty tacos. You can change the flavor of your tacos. For a spicy kick, add more cayenne pepper or some chili powder. If you prefer sweet, try adding a drizzle of agave syrup or honey. For a savory twist, consider using smoked paprika or a dash of soy sauce in the batter. Each variation brings a new taste adventure to your table. To store leftover tacos, place them in an airtight container. Separate the crispy cauliflower and tortillas if you can. This keeps the tortillas from getting soggy. Store in the fridge for up to three days. When you are ready to eat, you can reheat them for the best taste. To reheat, place the cauliflower on a baking sheet. Preheat your oven to 350°F (175°C). Bake for about 10-15 minutes until crispy again. For the tortillas, heat them in a dry pan for a minute on each side. This helps to keep them warm and flexible. If you want to freeze the tacos, wrap each taco tightly in plastic wrap. Place them in a freezer-safe bag to avoid freezer burn. They can last up to a month in the freezer. When ready to eat, thaw them overnight in the fridge and reheat as mentioned above. Enjoy the great taste even after storage! For the full recipe, refer back to the beginning of the article. To make your cauliflower tacos crispier, follow these tips: - Use Panko Breadcrumbs: They are lighter and create a better crunch than regular breadcrumbs. - Double Coat: For extra crunch, dip the florets in flour, then milk, and roll in breadcrumbs twice. - Bake at High Heat: Ensure your oven is at 425°F (220°C) for that golden finish. - Don’t Crowd the Pan: Space the florets on the baking sheet. This helps them crisp all over. - Flip Regularly: Halfway through baking, flip the florets to cook evenly. By using these steps, you'll achieve a wonderfully crispy texture every time. Yes, you can use different tortillas! Here are some options: - Flour Tortillas: These are soft and great for holding fillings. - Whole Wheat Tortillas: A healthier choice with more fiber. - Lettuce Wraps: For a low-carb option, try using large lettuce leaves. - Taco Shells: Crunchy taco shells add a fun twist. Choose the tortilla that fits your taste and dietary needs. Pair your crispy cauliflower tacos with these delicious side dishes: - Mexican Rice: Fluffy rice with spices complements the tacos well. - Black Beans: A protein-rich side that adds flavor and nutrition. - Guacamole: Creamy and fresh, it’s always a hit. - Corn Salad: A sweet and tangy salad brightens the meal. - Grilled Vegetables: Charred veggies bring a smoky flavor that pairs nicely. These sides will enhance your taco experience and create a full, flavorful feast. For the complete recipe, check out the [Full Recipe]. This blog covered ingredients, steps, tips, variations, and storage for cauliflower tacos. You learned how to prep, bread, and bake for that perfect crunch. I shared useful flavor boosts and serving ideas. You can explore vegan and gluten-free options to suit your needs. Finally, I provided storage tips to keep leftovers fresh. Cauliflower tacos are fun and flexible. Enjoy making them your own!](https://dishtreats.com/wp-content/uploads/2025/07/b9e73b78-f0ec-4a59-80bf-257d8f9aee98-768x768.webp)