
Are you ready to spice up your dinner with something fun and tasty? I’m excited to share my recipe for savory Buffalo Cauliflower Tacos. These easy tacos pack bold flavor and crispy texture, making them a crowd-pleaser. Whether you’re a veggie lover or just looking for a healthier meal, these tacos are sure to satisfy. Let’s dive into the tasty details of making your new favorite meal!
Why I Love This Recipe
- Bold Flavor Explosion: The combination of spicy buffalo sauce with crispy cauliflower creates a deliciously bold flavor that satisfies cravings without the guilt.
- Easy and Quick to Make: This recipe comes together in just 45 minutes, making it perfect for busy weeknights or casual gatherings.
- Healthy Alternative: Using cauliflower instead of meat makes these tacos a healthier choice, packed with nutrients while still being hearty and filling.
- Customizable Toppings: With options like avocado, feta, and fresh cilantro, you can easily customize each taco to suit your taste preferences.
Ingredients
Main Ingredients List
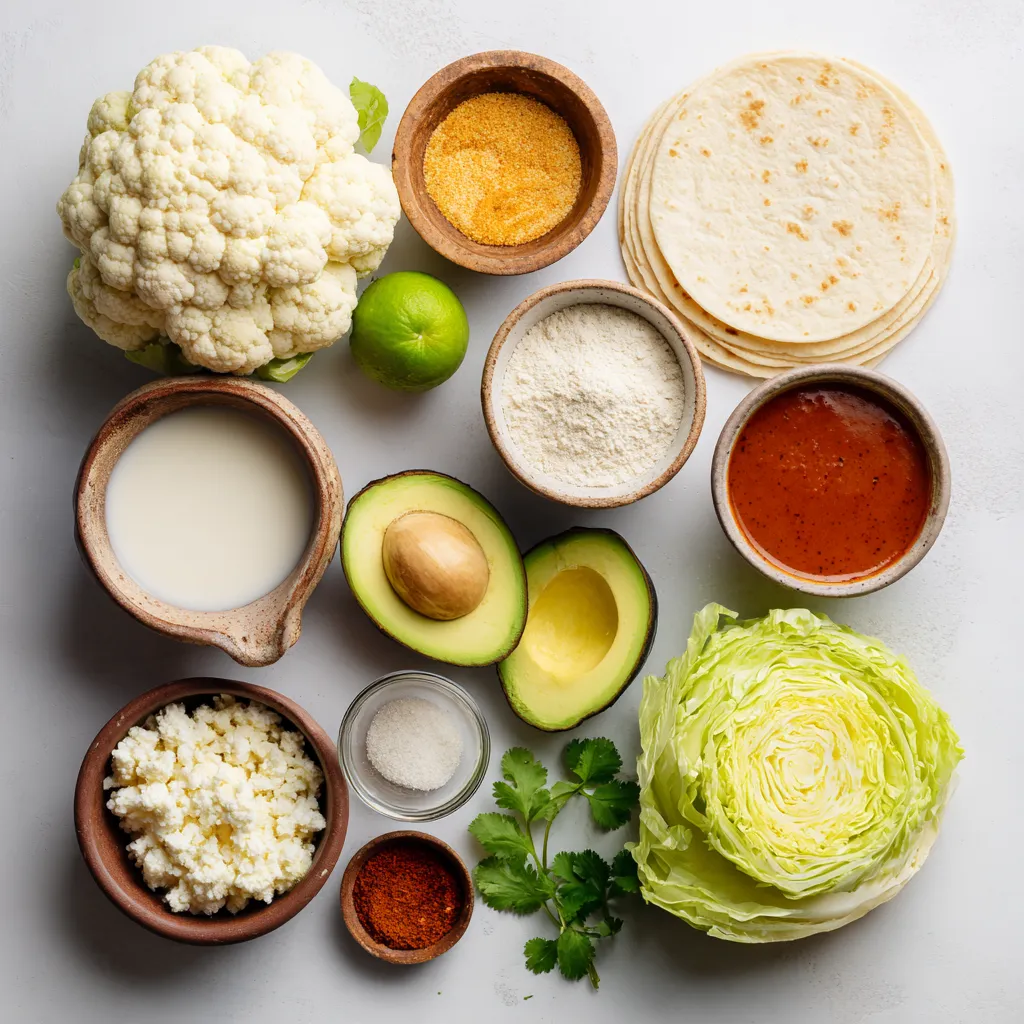
To make Buffalo cauliflower tacos, gather these tasty ingredients:
– 1 medium head of cauliflower, cut into bite-sized florets
– 1 cup all-purpose flour
– 1 cup milk (dairy or plant-based)
– 1 cup panko breadcrumbs
– 1 teaspoon garlic powder
– 1 teaspoon onion powder
– 1 teaspoon smoked paprika
– 1/2 teaspoon cayenne pepper
– 1 cup buffalo sauce
– 8 small corn or flour tortillas
– 1 cup shredded lettuce
– 1 ripe avocado, sliced
– 1/2 cup crumbled feta cheese or vegan cheese
– Fresh cilantro leaves for garnish
– Lime wedges
Common Substitutions
If you can’t find certain ingredients, here are some easy swaps:
– Use chickpea flour instead of all-purpose flour for a gluten-free option.
– Swap milk for almond or soy milk to keep it dairy-free.
– Instead of panko, use regular breadcrumbs for a softer texture.
– Try sriracha or barbecue sauce in place of buffalo sauce for a different flavor.
– For the cheese, use nutritional yeast for a vegan option.
Recommended Garnishes
Garnishes add flavor and color. I suggest:
– Fresh cilantro leaves for a pop of freshness.
– Lime wedges for a zesty squeeze on top.
– Pickled onions for a tangy crunch.
– A dollop of sour cream or a vegan alternative for creaminess.
Each garnish enhances your taco, making it even more delicious!
Step-by-Step Instructions
Preparation of Cauliflower
First, preheat your oven to 425°F (220°C). This high heat helps the cauliflower crisp up nicely. Next, cut your medium head of cauliflower into bite-sized florets. Make sure they are all about the same size. This way, they cook evenly. Rinse the florets under cold water and shake off any excess moisture. This helps the batter stick better.
Coating and Baking the Cauliflower
Now, let’s make the batter. In a mixing bowl, combine 1 cup of all-purpose flour, 1 cup of milk, 1 teaspoon of garlic powder, 1 teaspoon of onion powder, 1 teaspoon of smoked paprika, and 1/2 teaspoon of cayenne pepper. Whisk until smooth. Dip each floret into the batter. Let any extra batter drip off back into the bowl. Then, coat each floret in 1 cup of panko breadcrumbs for that extra crunch. Place the coated florets on a lined baking sheet. Bake them for 25-30 minutes. Flip them halfway to ensure even cooking. They should turn golden brown and crispy.
Assembling the Tacos
When the cauliflower is done, put it in a large bowl. Pour 1 cup of buffalo sauce over the florets and toss gently to coat them all. While the cauliflower bakes, warm 8 small corn or flour tortillas in a dry skillet or the microwave. Once warm, they will be easier to fold. To build your tacos, place a good amount of buffalo cauliflower on each tortilla. Top with 1 cup of shredded lettuce, slices of avocado, and sprinkle with 1/2 cup of crumbled feta cheese or a vegan cheese alternative. Finally, add fresh cilantro leaves and a squeeze of lime juice for brightness. Enjoy your tasty buffalo cauliflower tacos!
Tips & Tricks
How to Get Crispy Cauliflower
To make your cauliflower nice and crispy, follow these steps:
– Use Panko Breadcrumbs: They add extra crunch.
– Coat Evenly: Make sure each floret gets a good layer of batter and breadcrumbs.
– Baking Temperature: Bake at 425°F (220°C) for that perfect crisp.
– Flip Halfway: Turn the florets halfway through to cook evenly.
These tips ensure your cauliflower stays crunchy and delicious!
Serving Suggestions
Serve your tacos in style! Here are some ideas:
– Platter Arrangement: Place tacos on a large platter.
– Lime Wedges: Offer lime wedges for extra flavor.
– Customize Toppings: Let guests choose toppings like more avocado or cilantro.
These options help everyone enjoy their meal just the way they like it.
Best Storage Practices
To keep your leftovers fresh, follow these steps:
– Cool Completely: Let the cauliflower cool before storing.
– Airtight Container: Use a sealed container for best results.
– Refrigerate: Store in the fridge for up to three days.
When you want to reheat, place in the oven to regain crispiness!
Pro Tips
- Choose the Right Cauliflower: Opt for a medium-sized head of cauliflower that is firm and free from blemishes for the best texture and flavor.
- Customize the Spice Level: Feel free to adjust the amount of cayenne pepper in the batter to suit your heat preference. You can also add more buffalo sauce for an extra kick!
- Make It a Meal: Serve your tacos with a side of rice or quinoa to make it a complete meal. You can also add black beans for added protein and texture.
- Store Leftovers Properly: If you have any leftovers, store the buffalo cauliflower and tortillas separately in airtight containers to maintain their crispness. Reheat in the oven before serving.
Variations
Vegetarian and Vegan Options
You can easily make Buffalo Cauliflower Tacos vegetarian or vegan. For a vegetarian option, use regular cheese or sour cream. For a vegan choice, opt for plant-based cheese or yogurt. This way, you can enjoy all the flavors without losing your dietary focus.
Different Sauce Choices
While buffalo sauce is a classic, you can try other sauces too. For a milder flavor, use BBQ sauce or honey mustard. For extra heat, spicy sriracha or harissa works well. Experimenting with sauces adds fun and variety to your tacos.
Incorporating Additional Vegetables
Adding more vegetables can boost flavor and nutrition. Try mixing in roasted bell peppers, corn, or red onions. These veggies add crunch and color. You can also toss in some sautéed mushrooms or spinach for an extra layer of taste. Make your tacos even more colorful and delicious!
Nutritional Information
Caloric Breakdown
Buffalo cauliflower tacos are tasty and can fit well into many diets. One taco has about 150-200 calories, depending on toppings. The flour, cauliflower, and sauce all add to this count. If you use less sauce or skip cheese, you can lower the calories further.
Macronutrients Analysis
Each taco has a balance of macronutrients. Here’s a quick look:
– Carbohydrates: 20-25 grams
– Protein: 4-6 grams
– Fat: 5-7 grams
This taco is a good source of healthy carbs from the tortilla and fiber from the cauliflower. The protein comes from the cauliflower and any added cheese.
Health Benefits of Cauliflower
Cauliflower is a power-packed veggie. It offers many health benefits:
– Low in Calories: Great for weight management.
– High in Fiber: Helps digestion and keeps you full.
– Rich in Vitamins: Contains vitamins C, K, and B6.
– Antioxidants: Helps fight inflammation and boosts health.
Eating buffalo cauliflower tacos is a smart choice. They are not just tasty but also nutritious!
FAQs
Can I make Buffalo Cauliflower Tacos ahead of time?
Yes, you can make Buffalo Cauliflower Tacos ahead of time. You can bake the cauliflower and toss it in buffalo sauce earlier in the day. Store the coated florets in the fridge. When ready to eat, just warm them in the oven. This keeps the crunch and flavor intact. You can also prepare the toppings, like lettuce and avocado, ahead of time. Just store them separately until you’re ready to assemble the tacos.
What can I substitute for buffalo sauce?
If you need a substitute for buffalo sauce, try hot sauce mixed with melted butter. This mix creates a similar flavor. You can also use BBQ sauce for a sweeter taste. If you want a milder version, ranch dressing or a creamy garlic sauce works well too. Each option gives a unique twist to the dish.
Are Buffalo Cauliflower Tacos gluten-free?
Yes, Buffalo Cauliflower Tacos can be gluten-free. Simply substitute the all-purpose flour with a gluten-free flour blend. Also, make sure to choose gluten-free panko breadcrumbs. Most corn tortillas are gluten-free, but check the label to be sure. These simple swaps keep your tacos tasty while meeting dietary needs.
This blog post covered how to make Buffalo Cauliflower Tacos. We looked at the main ingredients and their substitutes, along with tasty garnishes. I shared step-by-step instructions for preparation, coating, and baking. We explored tips for crispy cauliflower and storage best practices. You can try variations with different sauces and extra veggies. Lastly, I shared the nutritional value and answered common questions.
These tacos are fun, healthy, and full of flavor. Enjoy your cooking adventur


