Satisfying 25. Roasted Beet and Goat Cheese Salad Recipe

Are you ready to add a burst of flavor to your meals? My Roasted Beet and Goat Cheese Salad is the perfect mix of earthy beets, creamy goat cheese, and crunchy nuts. This dish is not only beautiful but also packed with nutrients. In this post, I will guide you step-by-step through the process, from roasting beets to making a tasty dressing. Let’s dive in and elevate your salad game!
Ingredients
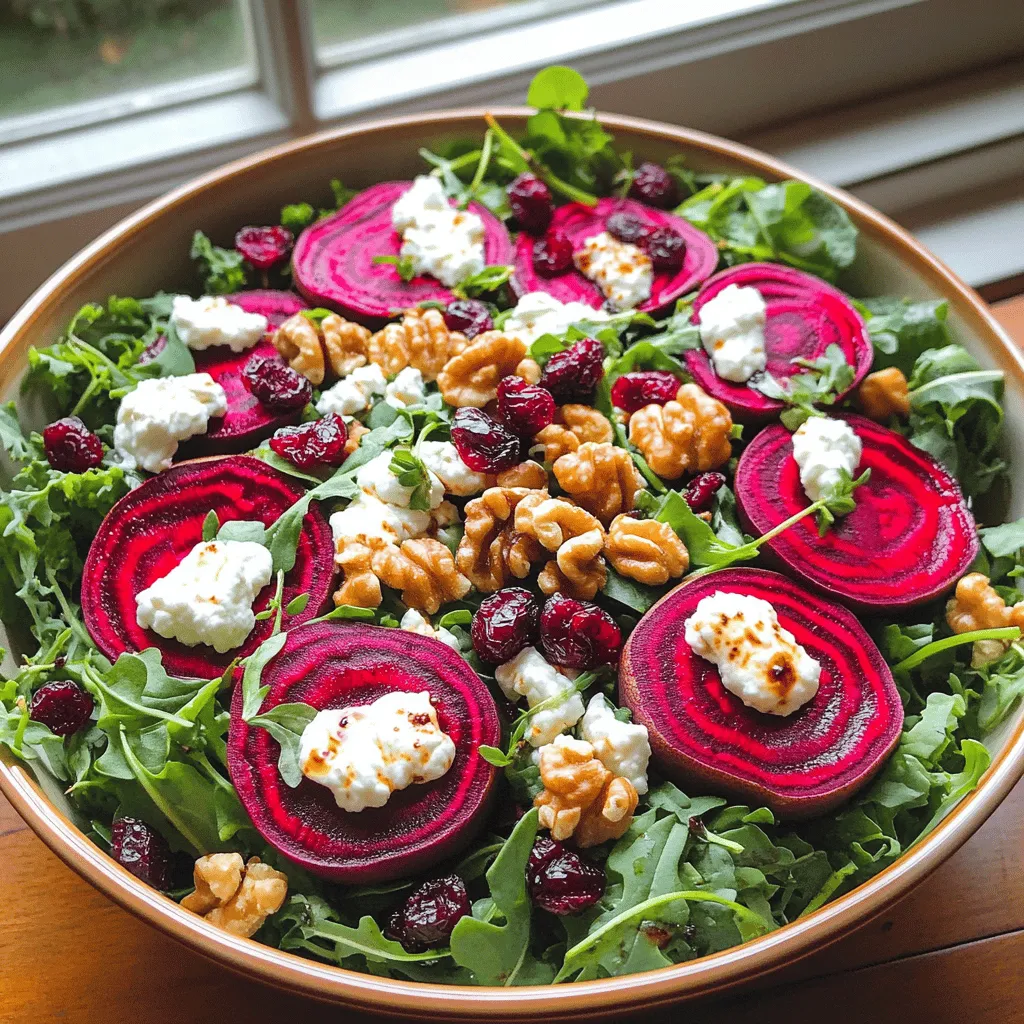
List of Ingredients for Roasted Beet and Goat Cheese Salad
- Beets: You need 4 medium beets. Scrub and trim them well. Roasting brings out their sweet flavor.
- Salad Greens: Use 4 cups of mixed greens. A blend of arugula, spinach, and kale works best. This mix adds flavor and texture.
- Goat Cheese: Get 1 cup of goat cheese. Crumble it into small pieces. Soft or aged goat cheese both work well.
- Nuts and Dried Fruits: Use 1/2 cup of walnuts for crunch. Toast them for extra flavor. Add 1/4 cup of dried cranberries for a touch of sweetness.
These ingredients make a vibrant and tasty salad.Enjoy making this delightful dish!
Step-by-Step Instructions
How to Roast Beets
Preheating the Oven: Start by preheating your oven to 400°F (200°C). This temperature helps cook the beets evenly.
Wrapping and Baking: Take each beet and wrap it in aluminum foil. Seal it tightly so the moisture stays in. Place the wrapped beets on a baking tray. Roast them for about 45 to 60 minutes. You know they are done when a knife goes through them easily.
Cooling and Peeling: After roasting, take the beets out of the oven. Let them cool for a bit. Once they are cool enough to handle, peel off the skin. It should come off easily. Slice the beets into wedges or rounds, and set them aside.
Making the Dressing
Ingredients for Dressing: You will need balsamic vinegar, extra virgin olive oil, Dijon mustard, salt, and pepper. These ingredients create a tasty, tangy dressing.
Whisking Techniques: In a small bowl, combine all the dressing ingredients. Use a whisk to blend them together until smooth. Make sure there are no lumps.
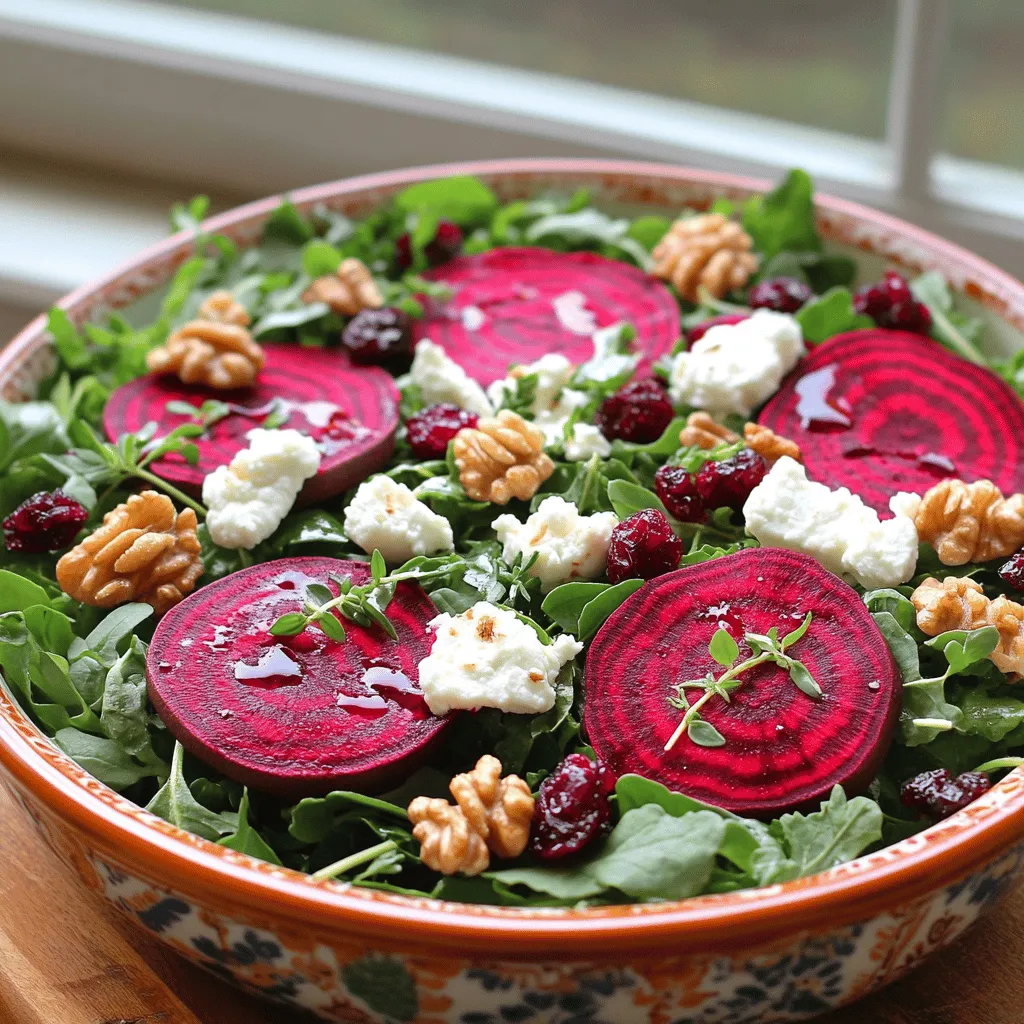
Assembling the Salad
Combining Ingredients: In a large mixing bowl, gently mix the salad greens, roasted beet slices, goat cheese, walnuts, and cranberries. Be careful not to break the beet slices.
Dressing the Salad: Drizzle the dressing over the salad. Toss everything together carefully. You want the salad coated well without mashing the beets.
Now, you can enjoy your Beet-tastic Goat Cheese Garden Salad!
Tips & Tricks
Perfecting Your Roasted Beets
Checking Doneness:
To check if your beets are done, insert a knife or fork into the largest beet. If it goes in easily, they are ready. You want them tender, but not mushy.
Alternate Cooking Methods:
You can choose to boil or roast beets. Boiling takes about 30-40 minutes but may wash away some flavor. Roasting, on the other hand, gives a rich taste. I recommend roasting for the best flavor.
Salad Assembly Tips
Layering for Visual Appeal:
When you assemble your salad, think about color and texture. Start with the greens as the base. Then, add beet slices, goat cheese, walnuts, and cranberries on top. This makes the salad look vibrant and inviting.
Best Serving Temperature:
This salad tastes great at room temperature or slightly chilled. I suggest letting it sit for about 10 minutes after dressing. This allows the flavors to blend nicely before serving. For a fresh touch, serve it right after mixing.

Variations
Ingredient Swaps
Greens Alternatives:
You can switch up the greens. Try using only arugula for a peppery kick. Spinach adds a mild taste. Kale gives a hearty texture. Each green brings its own flavor. Mix and match based on your taste.
Cheese Alternatives:
If you want to go beyond goat cheese, feta works well too. Its crumbly texture adds a salty punch. For a creamier option, try ricotta. A vegan cheese can also fit in nicely for a dairy-free choice.
Added Proteins
Protein Choices:
Adding proteins makes this salad more filling. Grilled chicken adds a savory touch. Chickpeas offer a plant-based option full of fiber. You could also use shrimp or tofu for variety.
Nutritional Benefits:
Adding proteins boosts the salad’s nutrients. Chicken provides lean protein, great for muscle health. Chickpeas add fiber, which helps digestion. Proteins also keep you full longer, making this salad a complete meal.
Storage Info
How to Store Leftovers
To keep your roasted beet and goat cheese salad fresh, place it in the fridge. Store it in a sealed container to avoid drying out. This method keeps the flavors intact. Try to eat it within two days for the best taste.
Use a glass or plastic container with a lid. Avoid metal containers as they can react with the beets. If you have any dressing left, store it separately. This keeps the salad crisp and prevents sogginess.
Reheating Instructions
You usually won’t need to reheat this salad. It tastes best cold. If you want to warm the beets, use a microwave. Place them in a bowl with a little water, cover it, and heat for 30 seconds.
For creative ways to use leftovers, turn the salad into a wrap. Use a tortilla to wrap the salad and enjoy it as a quick lunch. You can also mix it with cooked grains like quinoa for a hearty meal.
FAQs
Common Questions about Roasted Beet and Goat Cheese Salad
How long do roasted beets last in the fridge?
Roasted beets can last up to five days in the fridge. Store them in an airtight container. This keeps them fresh for your salad or other meals.
Can I use pre-cooked beets for this salad?
Yes, you can use pre-cooked beets. They save time and still taste great. Just slice them and add them to your salad.
Is this salad gluten-free?
Absolutely! This salad is naturally gluten-free. All the ingredients are safe for those with gluten sensitivities.
Serving Suggestions
Complementary Dishes: What to serve alongside
This salad pairs well with grilled chicken or fish. You can also serve it with crusty bread for a complete meal. A light soup like tomato or carrot can make a great starter.
Ideal Occasions: Best times to serve this salad
Enjoy this salad at a summer picnic, a brunch, or a holiday dinner. It’s colorful and festive, making it perfect for gatherings.
Nutritional Information
Caloric Breakdown: Overview of nutritional value per serving
Each serving of this salad has around 300 calories. It provides a good mix of healthy fats, fiber, and protein. Goat cheese adds creaminess, while beets offer vitamins and minerals.
Dietary Considerations: Tips for dietary restrictions
This salad is vegetarian and gluten-free. For a vegan version, skip the goat cheese and use a nut-based cheese. If you need a nut-free option, replace walnuts with seeds.
Roasted beet and goat cheese salad is fresh and tasty. We explored key ingredients and simple steps for preparation. I provided tips for perfecting your beets and assembling the salad. You can even try variations to suit your taste.
Remember to store leftovers properly for maximum freshness. This salad is versatile, nutritious, and great for any meal. I hope you enjoy making and sharing this delightful dish!


![- 3 medium zucchinis (spiralized) - 1 cup cherry tomatoes (halved) - 1/2 cup bell peppers (diced) - 1/4 cup red onion (thinly sliced) - 1 cup fresh basil leaves - 1/4 cup pine nuts (lightly toasted) - 1/2 cup grated parmesan cheese (or nutritional yeast for a vegan option) - 1/2 cup extra virgin olive oil - 2 cloves garlic (minced) - Sea salt and freshly ground black pepper (to taste) - Juice of 1 lemon I love choosing fresh ingredients for my Pesto Zoodle Salad. The zucchinis become long, curly noodles when you spiralize them. They are light and perfect for summer. Cherry tomatoes add a sweet bite. Use any color bell peppers for a pop of color. I enjoy the crunch of red onions. Fresh basil gives that classic pesto flavor. Pine nuts add a rich, nutty taste. You can swap grated parmesan cheese for nutritional yeast if you prefer a vegan option. Extra virgin olive oil makes the pesto creamy and smooth. The garlic gives a punch of flavor, while lemon juice brightens the dish. Don’t forget the sea salt and black pepper for seasoning. - Spiralizer - Food processor - Mixing bowl You will need a spiralizer to create the zoodles. A food processor helps blend the pesto quickly. A mixing bowl is essential for combining all the delicious ingredients. The caloric content per serving varies based on the ingredients used. On average, this salad packs around 200 calories per serving. The macronutrient breakdown is roughly 15g of fat, 8g of carbs, and 5g of protein. This makes it a light and healthy dish. You can find the full recipe for the Pesto Zoodle Salad above. Enjoy making this fresh and healthy meal! To make the pesto, you'll need: - 1 cup fresh basil leaves - 1/4 cup pine nuts (lightly toasted) - 1/2 cup grated parmesan cheese (or nutritional yeast) - 2 cloves garlic (minced) - 1/2 cup extra virgin olive oil - Sea salt and freshly ground black pepper - Juice of 1 lemon Start by placing the basil, pine nuts, parmesan, and garlic in a food processor. Blend them until smooth. While blending, slowly add the olive oil until the mixture is creamy. If you find it too thick, add more olive oil. Taste it, then adjust the seasoning with salt, pepper, and lemon juice. For spiralizing zucchini, use a spiralizer to create long, thin noodles called zoodles. Simply place the zucchini in the spiralizer and twist to form strands. If you don't have a spiralizer, you can use a julienne peeler or a sharp knife. Just slice the zucchini into thin strips to mimic zoodles. In a large mixing bowl, combine the zoodles, halved cherry tomatoes, diced bell peppers, and thinly sliced red onion. Pour the vibrant pesto over this mix. Carefully toss all the ingredients with tongs until the zoodles are well coated. Letting the salad rest for about 10 minutes is key. This marinating time allows all the flavors to blend nicely. It makes each bite more tasty and refreshing. Enjoy your vibrant Pesto Zoodle Salad! For the complete recipe, check the [Full Recipe]. To boost the taste of your pesto zoodle salad, add fresh herbs like parsley or mint. These herbs brighten your dish. You can also adjust the garlic and lemon. If you love garlic, add more. For a zesty kick, squeeze in more lemon juice. Soggy zoodles can ruin your salad. To avoid this, salt the zoodles first. Let them sit for a few minutes, then pat them dry. This step helps remove excess moisture. For the pesto, if it's too thick, add more olive oil. This keeps it light and creamy. For a stunning presentation, serve your salad in a large bowl. This lets the colors shine. You can garnish it with extra basil leaves and lemon zest. If you want to add protein, grilled chicken or shrimp works well. These pair nicely with the fresh flavors of the salad. Don't forget to check the [Full Recipe] for more details and tips! {{image_4}} You can switch zoodles for other veggies. Carrots and cucumbers make great alternatives. They add crunch and color, too. If you want a vegan option, skip the cheese. Use nutritional yeast instead. It gives a cheesy flavor without dairy. While pesto shines here, other dressings work well. Try a lemon vinaigrette for a bright taste. You can also use tahini or a simple olive oil and vinegar mix. Add spices like paprika or cumin to change the flavor. These can add warmth and depth. Seasonal veggies can enhance your salad. Think fresh corn, snap peas, or bell peppers. They add a burst of color and nutrition. You can also toss in fruits like diced peaches or berries. They bring sweetness to the mix, making every bite exciting. For more ideas, check the Full Recipe for inspiration! Store your Pesto Zoodle Salad in an airtight container. This keeps it fresh longer. Make sure you let it cool to room temperature before sealing. I recommend using glass containers. They do not hold odors and are easy to clean. The salad lasts in the fridge for about 3 days. After that, it may lose flavor and crispness. Signs of spoilage include a slimy texture or off smell. If you see these signs, it's best to toss it. You can enjoy this salad cold or at room temperature. If you want to warm it up, use a microwave. Heat it gently for about 30 seconds. Avoid reheating if you have added fresh veggies, as they can become mushy. A zucchini noodle salad, or zoodle salad, uses spiralized zucchinis as noodles. Zoodles are light and low in carbs. They are a great alternative to pasta. Zoodles help add more veggies to your meals while keeping the dish fresh and crunchy. Yes, you can make the pesto ahead of time. Store it in an airtight container in the fridge. It lasts about one week. You can also freeze it for up to three months. Just remember to leave some space in the container. The pesto will expand when frozen. Absolutely! This salad works well for meal prep. You can prepare the zoodles and pesto in advance. Keep them separate until you are ready to eat. This way, the zoodles stay fresh and do not get soggy. You can pack the salad in lunch boxes for easy grab-and-go meals. To make this recipe gluten-free, check all your ingredients. Ensure the pesto does not contain any gluten. Use gluten-free pasta or zoodles as a base. The other ingredients, like veggies and cheese, are naturally gluten-free. This way, you can enjoy the salad worry-free. Freezing the Pesto Zoodle Salad is not ideal. The zoodles can become mushy after freezing. However, you can freeze the pesto alone. When ready to enjoy, just thaw the pesto and mix it with fresh zoodles and veggies. This keeps your salad fresh and tasty. For the full recipe, check the main section. Pesto Zoodle Salad is a fresh, tasty dish made from zoodles, tomatoes, peppers, and pesto. You learned how to prepare the pesto and combine all the ingredients for a delightful meal. Remember to store any leftovers properly for the best taste. Try out the flavor tips and variations to make the dish your own. This recipe is not only nutritious but also easy to adapt for different diets. Enjoy exploring your cooking skills with this vibrant salad!](https://dishtreats.com/wp-content/uploads/2025/07/8637ce27-f1ae-4e5b-b0b9-802b4b26ee84-768x768.webp)

![- 1 lb Brussels sprouts, trimmed and halved - 3 tablespoons extra virgin olive oil - 2 tablespoons pure maple syrup - 1 tablespoon Dijon mustard - 1 teaspoon garlic powder - 1/4 cup chopped walnuts (optional for added crunch) - Fresh parsley, roughly chopped, for garnish (optional) - Salt - Freshly ground black pepper When making Maple Mustard Brussels Sprouts, the main ingredients are key to flavor. Brussels sprouts bring a nice crunch. Extra virgin olive oil adds richness, while pure maple syrup gives a sweet touch. Dijon mustard adds a tangy kick that ties it all together. You might want to add garlic powder for more flavor. If you like crunch, chopped walnuts work well. A sprinkle of fresh parsley adds color and freshness to the dish. For seasoning, salt and freshly ground black pepper enhance the taste. Be sure to adjust these to your liking. The balance of flavors makes this dish a standout! Check the [Full Recipe] for detailed steps to prepare these delightful sprouts. - Preheat your oven to 400°F (200°C). - Line a baking sheet with parchment paper. This makes cleanup easy. - In a bowl, combine olive oil, maple syrup, Dijon mustard, and garlic powder. - Season with salt and pepper. Whisk until smooth. - Add halved Brussels sprouts to the dressing. - Toss until evenly coated. Make sure every sprout gets some flavor. - Spread sprouts on the baking sheet in a single layer. - If you like, sprinkle with walnuts for crunch. - Roast for 25-30 minutes. Remember to stir halfway through for even cooking. - Check if the sprouts are fork-tender and caramelized. - Garnish with fresh parsley before serving. This adds color and freshness to your dish. For the complete recipe, check out the [Full Recipe]. To get that golden-brown color, you need to space the Brussels sprouts well on the baking sheet. If they are too close, they will steam instead of roast. Stir them halfway through cooking. This helps them cook evenly and get that nice caramelized look. You can add more flavor by mixing in balsamic vinegar for a tangy twist. This will balance the sweetness of the maple syrup. Also, try using herbs like thyme or rosemary. These herbs add a fresh taste that brightens the dish. Use a large mixing bowl when tossing your ingredients. This gives you enough space to coat the Brussels sprouts well. A high-quality baking sheet is key for even roasting. It helps them brown nicely without sticking. For the full recipe, check out the details above. {{image_4}} To make this dish vegan, swap out the Dijon mustard for a vegan option. There are many great choices available, like a chickpea or tahini-based mustard. These alternatives keep the flavor bold and rich, just like the traditional recipe. You won’t lose any taste while making it plant-based. If you need a nut-free dish, simply leave out the walnuts. The Brussels sprouts will still have a lovely texture and taste. The maple and mustard glaze adds all the flavor you want. You can enjoy this dish without any worries about allergies. For a heartier meal, consider adding protein. Roasted chickpeas or crispy tofu work great here. They pair perfectly with the sweet and tangy flavors of the Brussels sprouts. You can serve them together on the same plate for a filling and nutritious dish. This option makes it easy to create a balanced meal. For the full recipe, check out the details above! Store any leftover Maple Mustard Brussels Sprouts in an airtight container. They will stay fresh for up to 3 days. This keeps them safe and tasty for later meals. Just remember to let them cool down first before sealing them up. You can freeze roasted Brussels sprouts for up to 2 months. To do this, place them in a freezer-safe bag or container. Make sure to squeeze out as much air as possible. This helps prevent freezer burn and keeps their flavor intact. To enjoy your Brussels sprouts again, reheat them in the oven or on the stovetop. The oven gives them a nice crispy texture. If you choose the stovetop, keep the heat medium to avoid burning. Just warm them through until they are hot and ready to eat. For the full recipe, check out the [Full Recipe]. The ideal roasting time is 25-30 minutes. This time allows them to cook perfectly. You want them fork-tender and golden brown. Stir them halfway through to help them caramelize well. Yes, you can prep these sprouts a day ahead. Just mix the Brussels sprouts with the maple-mustard dressing and store them in the fridge. When you're ready to serve, simply roast them before your meal. This saves time and keeps flavors fresh. Pair them with proteins like chicken or fish. They also go great with grains like quinoa or rice. The sweet and tangy flavor of the sprouts complements many dishes well. Absolutely! Maple Mustard Brussels Sprouts store well in the fridge. You can enjoy them throughout the week. Just reheat them in the oven or on the stovetop for the best texture. For the full recipe, be sure to check the earlier sections. This blog post shared a simple and tasty recipe for Maple Mustard Brussels Sprouts. You learned about the main ingredients and optional add-ins. The step-by-step instructions ensure you roast them to perfection. I’ve also shared tips for flavor and storage, plus variations to suit your needs. These Brussels sprouts are easy to make and full of flavor. Try them with your favorite protein for a delicious meal! Enjoy experimenting with this recipe and make it your own.](https://dishtreats.com/wp-content/uploads/2025/06/4f608c6e-5907-49f6-a9cf-d865501fb0be-768x768.webp)