
Are you ready to satisfy your sweet cravings? Salted caramel apple nachos are the perfect treat! In this post, I’ll share how to make this fun and tasty snack. You’ll love the mix of juicy apples, crunchy granola, and velvety caramel. Get ready for a dessert that delights everyone. Let’s dive into the simple ingredients and steps to create your own irresistible salted caramel apple nachos!
Why I Love This Recipe
- Easy to Make: This recipe takes just 10 minutes, making it perfect for a quick and delicious treat.
- Customizable Toppings: You can personalize the nachos with your favorite granola, nuts, and chocolate, allowing everyone to enjoy their perfect combination.
- Perfect Balance of Flavors: The combination of sweet caramel, tart apples, and crunchy toppings creates a delightful flavor explosion in every bite.
- Visually Stunning: These nachos present beautifully, making them an impressive dessert for gatherings and parties.
Ingredients
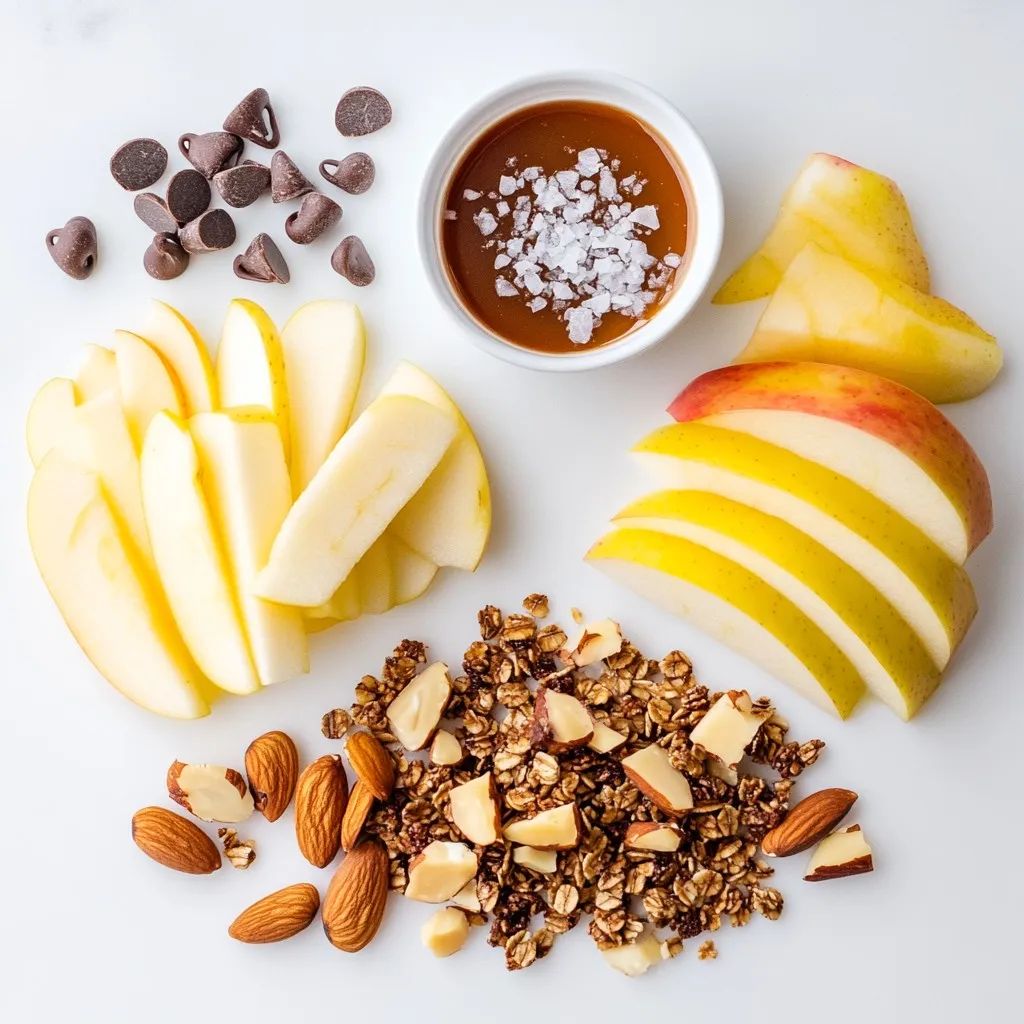
– 3 medium-sized apples (Honeycrisp, Fuji, or Granny Smith)
– 1 cup granola (your favorite flavor)
– 1/2 cup salted caramel sauce (store-bought or homemade)
– 1/4 cup mini chocolate chips
– 1/4 cup chopped nuts (walnuts, pecans, or almonds)
– Sea salt flakes
– 1 tablespoon lemon juice
For this tasty treat, I love using Honeycrisp apples. They are sweet and crisp, which pairs well with the caramel. You can also use Fuji or Granny Smith apples for a nice twist. Each apple brings its own flavor to the dish.
Granola adds a crunchy texture. You can choose any flavor you like, such as honey or nut. This adds a fun touch and makes the dish yours.
Salted caramel sauce is the star here. You can use store-bought for ease or make your own if you have time. A good homemade sauce can really elevate the dish.
Mini chocolate chips add sweetness, while the chopped nuts give a nice crunch. Walnuts, pecans, or almonds work well. Choose the nuts you enjoy the most.
Lemon juice is important. It helps keep the apple slices fresh and bright in color. Finally, sea salt flakes add a savory touch. This balances the sweetness of the caramel and enhances all the flavors.
These ingredients come together to create a fun and delicious dessert that everyone will love!
Step-by-Step Instructions
Preparing the Apples
– Rinse and slice the apples. Use 3 medium-sized apples like Honeycrisp, Fuji, or Granny Smith.
– Toss the slices with 1 tablespoon of lemon juice. This helps prevent browning.
Assembling the Nachos
– Create a base layer with the apple slices. Arrange them on a large platter or baking sheet.
– Drizzle 1/2 cup of salted caramel sauce over the apple layer. This adds a rich flavor.
Adding Toppings
– Sprinkle 1 cup of granola over the apples. Choose your favorite flavor for extra fun.
– Scatter 1/4 cup of mini chocolate chips and 1/4 cup of chopped nuts on top. This adds crunch and richness.
– Finish with the remaining salted caramel drizzle. This makes the nachos even more tempting.
Enjoy making your salted caramel apple nachos!
Tips & Tricks
Selecting the Best Apples
– Choose Honeycrisp, Fuji, or Granny Smith for the best flavor.
– Honeycrisp apples are sweet and crunchy. Fuji apples are juicy and crisp. Granny Smith offers a nice tartness.
– To keep apple slices fresh, toss them with lemon juice right after slicing. This step prevents browning and keeps the apples looking great.
Presentation Suggestions
– Serve your nachos on a large platter to make it fun and inviting.
– Arrange the apple slices in a colorful pattern.
– Add garnishes like fresh mint leaves or extra apple slices for a bright splash of color. This makes the dish more appealing.
Enhancing Flavor with Sea Salt
– A sprinkle of sea salt balances the sweetness of the caramel and the tartness of the apples.
– Use flaky sea salt for a delightful crunch and burst of flavor.
– Try different sea salts, like fleur de sel or smoked sea salt, for unique twists.
Pro Tips
- Choose the Right Apples: Selecting the right variety of apples can make a significant difference in flavor. Honeycrisp offers a sweet crunch, while Granny Smith provides a tart contrast that pairs beautifully with caramel.
- Make Your Own Caramel: For a gourmet touch, consider making homemade salted caramel sauce. It’s easier than you think and allows you to control the sweetness and saltiness to your liking.
- Layer Strategically: When assembling your nachos, layer the toppings strategically to ensure every bite is packed with flavor. Start with apples, then caramel, followed by granola, and repeat for a balanced taste.
- Presentation Matters: Enhance the visual appeal by garnishing with fresh mint leaves or additional apple slices. A beautiful presentation makes the dessert more inviting and enjoyable.
Variations
Dietary Adaptations
To make this treat fit different diets, consider these options:
– Use gluten-free granola for a crunchy base.
– For a vegan version, swap in a plant-based caramel sauce.
Both changes keep the flavor while making the dish more inclusive. Gluten-free granola can be found at most stores, and many vegan caramel recipes use coconut milk or dates. This way, everyone can enjoy salted caramel apple nachos!
Flavor Combinations
You can mix up the flavors with easy tweaks:
– Try adding a dash of cinnamon or nutmeg for warmth.
– Slicing in bananas or strawberries gives a fruity twist.
Cinnamon adds a cozy flavor, while bananas or strawberries bring freshness. These additions can make your nachos even more exciting!
Alternate Toppings
Explore different textures and tastes with various toppings:
– Drizzle with dark chocolate or yogurt for creaminess.
– Toss in dried fruits or coconut flakes for extra crunch.
Using different chocolate types can change the taste profile. Dried fruits add chewiness, while coconut gives a tropical vibe. The possibilities here are endless, so get creative!
Storage Info
Storing Leftover Nachos
To keep your salted caramel apple nachos fresh, store them in an airtight container. They will last about one day in the fridge. The apples can brown, so use lemon juice on them to help. This will slow down browning and keep them looking nice. Avoid stacking the nachos too high to prevent sogginess. Place parchment paper between layers if you need to stack.
Reheating Techniques
Reheating nachos is a bit tricky. You want to keep the apples crisp. Instead of using a microwave, try the oven. Preheat the oven to 350°F (175°C). Place the nachos on a baking tray and warm them for about 5 to 10 minutes. This will help the toppings stay crunchy. If you plan to serve them later, keep the toppings separate until you are ready to eat. This will prevent them from getting soggy and keep every bite delicious.
FAQs
Can I make salted caramel sauce at home?
Yes, you can make salted caramel sauce at home. Here’s a simple recipe:
– Ingredients:
– 1 cup granulated sugar
– 6 tablespoons unsalted butter
– 1/2 cup heavy cream
– 1 teaspoon sea salt
– Instructions:
1. Heat the sugar in a pot over medium heat.
2. Stir until it melts and turns amber.
3. Add butter and mix until melted.
4. Remove from heat and slowly stir in cream.
5. Add sea salt and mix well.
This sauce is rich and creamy. You can use it for your nachos or as a dip!
How long can salted caramel apple nachos be kept?
Salted caramel apple nachos are best fresh. They can last up to 2 hours at room temperature. After that, the apples may brown and the nachos can get soggy.
– Food Safety Tips:
– Store any leftovers in an airtight container in the fridge.
– Use within 1 day for the best taste.
If you see browning, toss any apples that look off. Always prioritize freshness!
Can I substitute the nuts in this recipe?
Yes, you can substitute the nuts in this recipe. If you want a nut-free option, try these:
– Nut-free alternatives:
– Sunflower seeds
– Pumpkin seeds
– Toasted coconut flakes
These options add crunch without using nuts. Feel free to mix and match based on your taste!
This article covered how to make delicious salted caramel apple nachos. You learned which apples to choose and how to slice them. We detailed the steps to create the nachos, add toppings, and enhance flavors. Plus, we offered tips on storage and variations for dietary needs.
In summary, this treat is fun and easy to make. Enjoy serving them at your next gatherin


