
Craving a rich, flavorful dish? Roasted Red Pepper Penne is your answer! This creamy delight blends roasted red peppers, heavy cream, and fresh basil for a satisfying meal. With easy steps and optional add-ins, it suits every taste. Whether it’s a quick dinner or a fancy gathering, you can make this dish shine. Ready to impress? Let’s dive into the world of Roasted Red Pepper Penne!
Why I Love This Recipe
- Delicious Flavor Combination: The roasted red peppers combined with the creamy basil sauce create a rich and flavorful dish that’s both comforting and exciting.
- Quick and Easy: This recipe comes together in just 30 minutes, making it perfect for busy weeknights while still being impressive enough for guests.
- Versatile Ingredients: With simple ingredients like pasta, cream, and fresh basil, this dish can easily be customized with your favorite vegetables or proteins.
- Perfect for Meal Prep: This penne dish stores well in the fridge, making it a great option for meal prepping for lunch or dinner throughout the week.
Ingredients
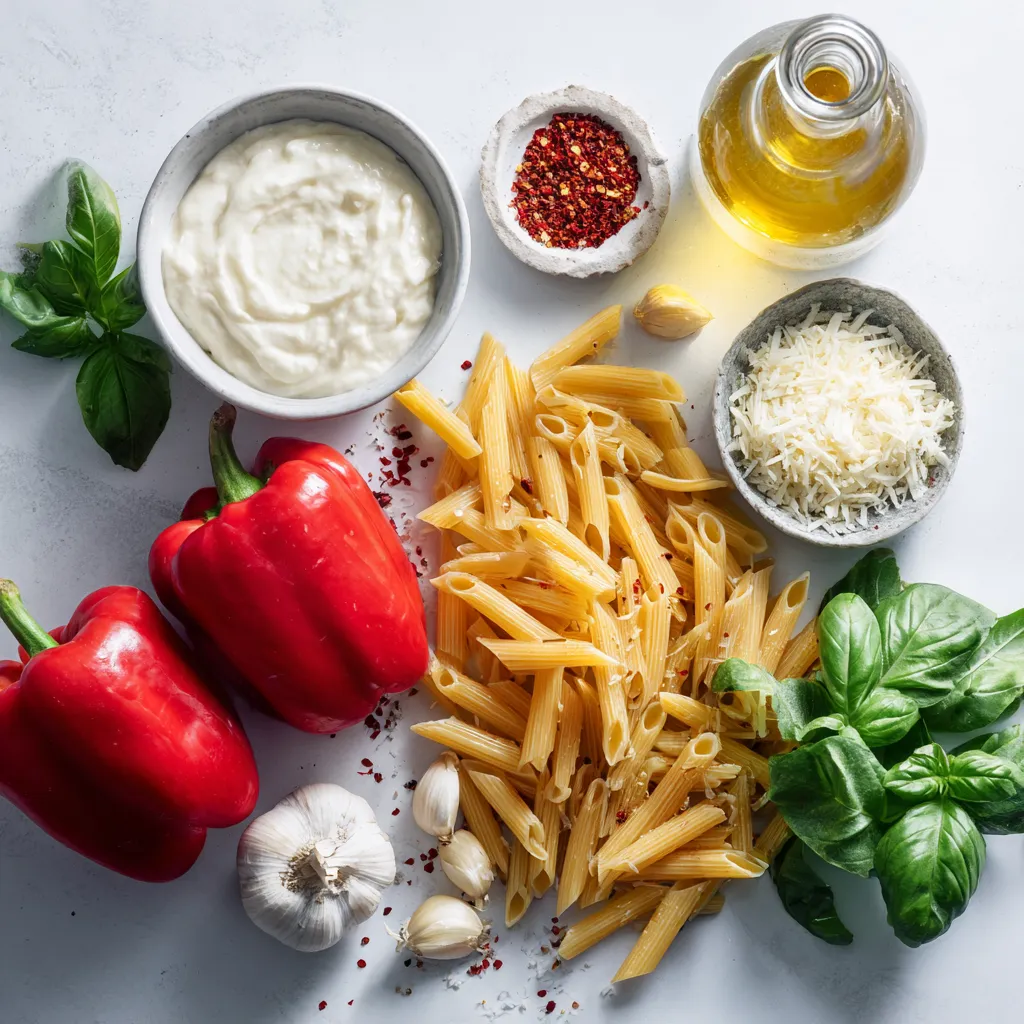
Main Ingredients
– 12 oz penne pasta
– 2 large red bell peppers, roasted and peeled
– 1 cup heavy cream
– 1/2 cup fresh basil leaves, chopped
– 1/4 cup grated Parmesan cheese
Optional Ingredients
– 1 teaspoon red pepper flakes
– Salt and black pepper
– 2 tablespoons olive oil
– Fresh basil leaves for garnish
Serving Suggestions
– Extra Parmesan cheese
– Crusty bread as a side dish
The main ingredients create a rich and creamy flavor for Roasted Red Pepper Penne. You need the penne pasta for a solid base. Roasted red bell peppers add sweetness and depth. Heavy cream gives the dish its smooth texture. Fresh basil brightens the taste, while grated Parmesan adds a salty finish.
Optional ingredients enhance the dish. Red pepper flakes give a spicy kick if you like heat. Salt and black pepper balance the flavors. Olive oil adds richness. Fresh basil leaves make a great garnish, adding both flavor and color.
For serving, I suggest adding extra Parmesan cheese on top. A side of crusty bread pairs well with the creamy pasta. It’s the perfect way to soak up every last drop of sauce. Feel free to get creative with your presentation!
Step-by-Step Instructions
Preparing the Roasted Red Peppers
– Preheating the broiler or grill
Start by turning on the broiler or grill. Let it heat up for a few minutes.
– Roasting and steaming the peppers
Place the red bell peppers under the broiler or on the grill. Turn them often until the skin gets charred. This should take about 15 minutes. Once charred, put the peppers in a bowl and cover it with plastic wrap. This will help steam them for about 10 minutes.
– Peeling and chopping the peppers
After steaming, let the peppers cool down a bit. Once they are cool, peel off the charred skin. Remove the seeds and chop the peppers into small pieces.
Cooking the Pasta
– Boiling water and salting
In a large pot, bring salted water to a boil. The salt adds flavor to the pasta.
– Cooking penne to al dente
Add the penne pasta to the boiling water. Cook it according to the package directions until it is al dente. This means it should be firm but not hard.
– Draining and reserving pasta water
Once the pasta is ready, drain it in a colander. Save a small cup of the pasta water for later.
Blending and Heating the Sauce
– Combining ingredients in a blender
In a blender, add the roasted red peppers, heavy cream, chopped basil, minced garlic, and Parmesan cheese.
– Blending to a smooth consistency
Blend all the ingredients until you get a smooth and creamy sauce.
– Heating the sauce in a skillet
In a large skillet, heat olive oil over medium heat. Once the oil shimmers, pour in the creamy red pepper sauce. Let it simmer for about 5 minutes while stirring.
Combining Pasta and Sauce
– Tossing penne with the sauce
After the sauce is warm, add the cooked penne pasta to the skillet. Gently toss it until every piece is coated in sauce.
– Adding red pepper flakes if desired
If you like some heat, sprinkle in red pepper flakes and mix well.
Adjusting Seasoning and Serving
– Tasting and adjusting flavors
Take a moment to taste your dish. Add more salt and black pepper if needed to enhance the flavors.
– Plating and garnishing suggestions
Serve the pasta on plates or in bowls. Garnish with fresh basil leaves and a sprinkle of extra Parmesan cheese for a nice touch. Enjoy your meal hot for the best taste!
Tips & Tricks
Flavor Enhancement Tips
– Using fresh basil vs. dried basil: Fresh basil gives a bright, aromatic flavor. It makes the dish lively. Dried basil can work too, but it lacks that fresh taste. If you can, always use fresh basil for this recipe.
– Importance of reserving pasta water: When you cook pasta, save a cup of the water. This water is starchy and helps the sauce cling to the pasta. It can also thin out the sauce if it gets too thick.
Cooking Techniques
– Tips for roasting red peppers perfectly: Preheat your broiler or grill. Place the red peppers directly under the heat. Turn them often until the skin is blackened and blistered. This usually takes about 15 minutes. After roasting, let them steam in a covered bowl. This makes peeling easier.
– Using a food processor vs. a blender: A food processor can chop the peppers well, but a blender makes the sauce creamier. Use a blender for a smooth sauce. If you don’t have one, a food processor will still work. Just blend until it is smooth.
Presentation Tips
– Serving in deep bowls: Serving your dish in deep bowls makes it look fancy. It also keeps the sauce contained, making it easier to eat.
– Drizzling olive oil and garnishing: A drizzle of olive oil on top adds shine and flavor. Place a few whole basil leaves on top for color. You can also sprinkle more Parmesan cheese for an extra touch.
Pro Tips
- Roasting Perfection: To achieve the best flavor, ensure your red peppers are fully charred. This enhances the sweetness and smokiness of the sauce.
- Fresh Basil Boost: Add fresh basil leaves just before serving for a vibrant color and fresh flavor that elevates the dish.
- Pasta Water Magic: Reserve some pasta water and add it to the sauce if you need to loosen it up after combining with the pasta.
- Spice It Up: For those who enjoy heat, increase the amount of red pepper flakes or add a dash of cayenne pepper to the sauce.
Variations
Vegan Option
To make Roasted Red Pepper Penne vegan, you can swap heavy cream. Use coconut cream for a rich, creamy texture. Another good choice is cashew cream. Simply soak cashews in water, blend them with a bit of water until smooth, and use it in place of cream. For cheese alternatives, nutritional yeast gives a cheesy flavor. You can also use vegan cheese if you prefer.
Protein Additions
You can add protein to your dish. Grilled chicken, shrimp, or sausage work well. Cook them separately and mix them in with the pasta. If you want vegetarian options, consider chickpeas or lentils. These provide great protein without meat. Tofu is another option; just sauté it before adding to the dish.
Flavor Variations
Adjust spice levels by using different peppers. For more heat, choose spicy peppers like jalapeños. You can also add red pepper flakes for a kick. Adding veggies is a fun way to change the dish. Zucchini or spinach complement the flavors nicely. Just sauté them briefly before mixing them into the pasta for added texture and taste.
Storage Info
Refrigeration Tips
To keep your Roasted Red Pepper Penne fresh, store leftovers in airtight containers. This helps prevent moisture loss and keeps flavors intact. You can safely refrigerate the pasta for about three days. If you wait too long, the sauce may separate and lose its creamy texture.
Reheating Instructions
When you’re ready to enjoy the leftovers, the best method is to use the stove. Heat a skillet over low to medium heat. Add a splash of water or extra cream to the pasta. This will help keep the sauce creamy as you stir. Avoid microwaving, as it can make the pasta dry.
Freezing Guidance
If you want to enjoy this dish later, freezing is a great option. Place the cooled pasta in freezer-safe bags or containers. It stays good for up to three months. When it’s time to eat, thaw the pasta in the fridge overnight. Then, reheat it gently on the stove, adding a little cream to revive the sauce.
FAQs
What can I substitute for heavy cream in Roasted Red Pepper Penne?
You can use several lighter options. Here are a few:
– Half-and-half: It gives creaminess with less fat.
– Coconut milk: This adds a touch of sweetness.
– Greek yogurt: This is a healthy choice and adds tang.
– Cashew cream: Blend soaked cashews for a rich, vegan option.
How can I make Roasted Red Pepper Penne spicier?
To add spice, consider these ideas:
– Add more red pepper flakes for heat.
– Toss in diced jalapeños for a fresh kick.
– Use spicy Italian sausage instead of chicken.
– Try a dash of hot sauce right before serving.
Can I use jarred roasted peppers instead?
Yes, jarred roasted peppers work well. Here are some pros and cons:
– Pros: They save time and are easy to find.
– Cons: They may have added salt or preservatives. Freshly roasted peppers have a deeper flavor.
How long does it take to make Roasted Red Pepper Penne?
The total time is about 30 minutes. Here’s a quick breakdown:
– Prep time is around 15 minutes.
– Cooking time takes about 15 minutes.
Is Roasted Red Pepper Penne suitable for meal prep?
Yes, it’s great for meal prep! Here are some tips:
– Cook the pasta al dente to keep it firm.
– Store the sauce and pasta separately to avoid sogginess.
– Reheat gently to maintain the creamy texture.
This blog covered how to make Roasted Red Pepper Penne. We discussed key ingredients, including penne pasta and roasted red peppers. I shared step-by-step instructions to guide you in preparing the dish. You learned tips for enhancing flavor and variations to try.
In the end, this recipe is simple and tasty. Whether you keep it classic or try variations, enjoy your delicious mea


