Roasted Garlic Pumpkin Soup Just Perfect for Fall

As the leaves turn and the air cools, there’s nothing quite like a warm bowl of Roasted Garlic Pumpkin Soup. This recipe captures the essence of fall with rich flavors and simple ingredients. You’ll enjoy the comforting blend of roasted garlic, fresh pumpkin, and warm spices. Join me as I guide you through this easy step-by-step process, perfect for cozy evenings or holiday gatherings. Let’s create a dish that warms the heart!
Why I Love This Recipe
- Comforting Flavor: This soup combines the earthy sweetness of pumpkin with the rich, roasted flavor of garlic, creating a warm and comforting dish perfect for chilly days.
- Simple Ingredients: Made with just a few wholesome ingredients, this recipe is not only healthy but also accessible to anyone looking to whip up a delicious meal.
- Vegan-Friendly: With the use of vegetable broth and coconut milk, this soup is entirely plant-based, making it suitable for vegans and those with dairy allergies.
- Easy to Make: This recipe is straightforward and requires minimal prep work, making it a perfect choice for both cooking novices and experienced chefs.
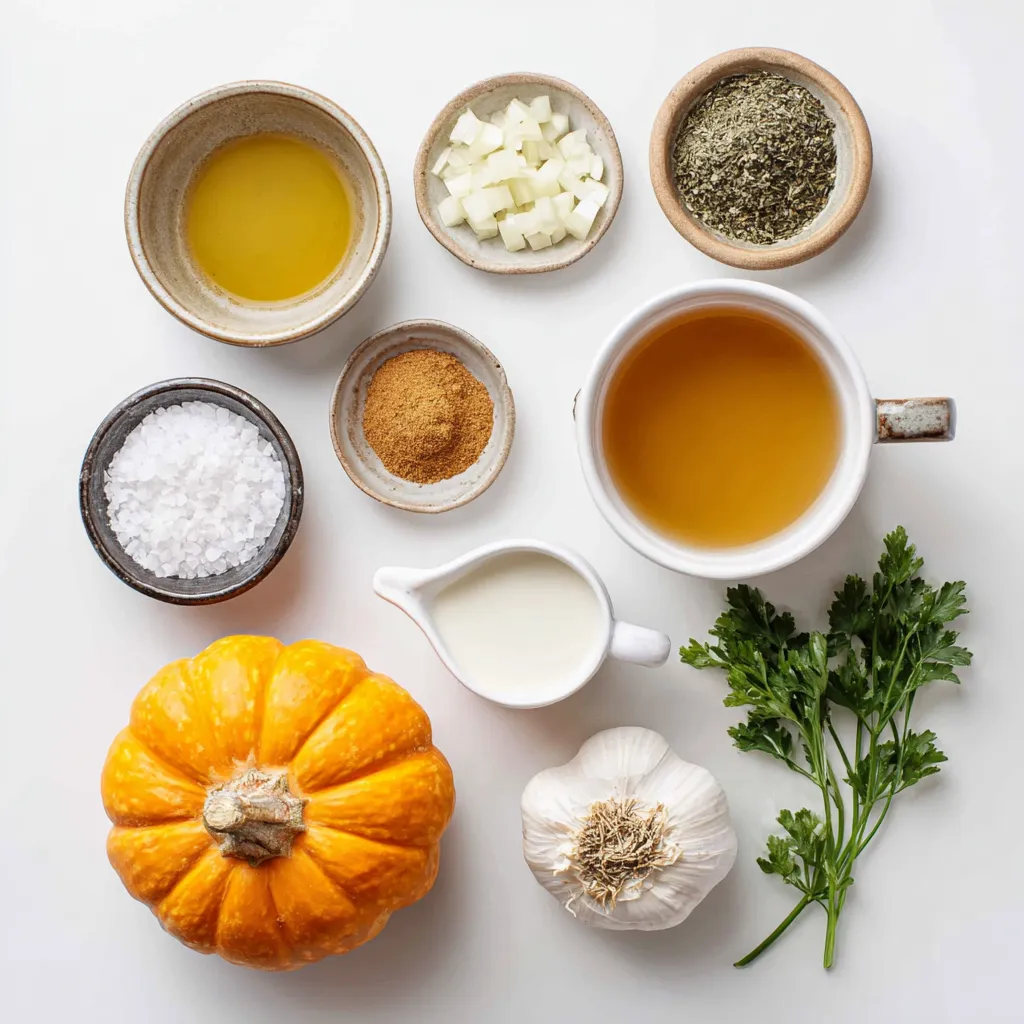
Ingredients
Main Ingredients
- Medium pumpkin
- Whole bulb of garlic
- Medium onion
- Extra virgin olive oil
Spices and Seasonings
- Ground cumin
- Ground nutmeg
- Sea salt
- Freshly cracked black pepper
Optional Garnish
- Fresh parsley or cilantro leaves
- Additional coconut milk
When making roasted garlic pumpkin soup, the right ingredients are key. I like using a medium pumpkin that weighs about 3-4 pounds. It gives a great base for the soup. Choosing a fresh bulb of garlic adds a rich flavor. A medium onion will help build the base for the soup, giving it warmth and sweetness.
For spices, I always include ground cumin and nutmeg. These spices add depth to the flavor. I also use sea salt and freshly cracked black pepper to season the soup just right.
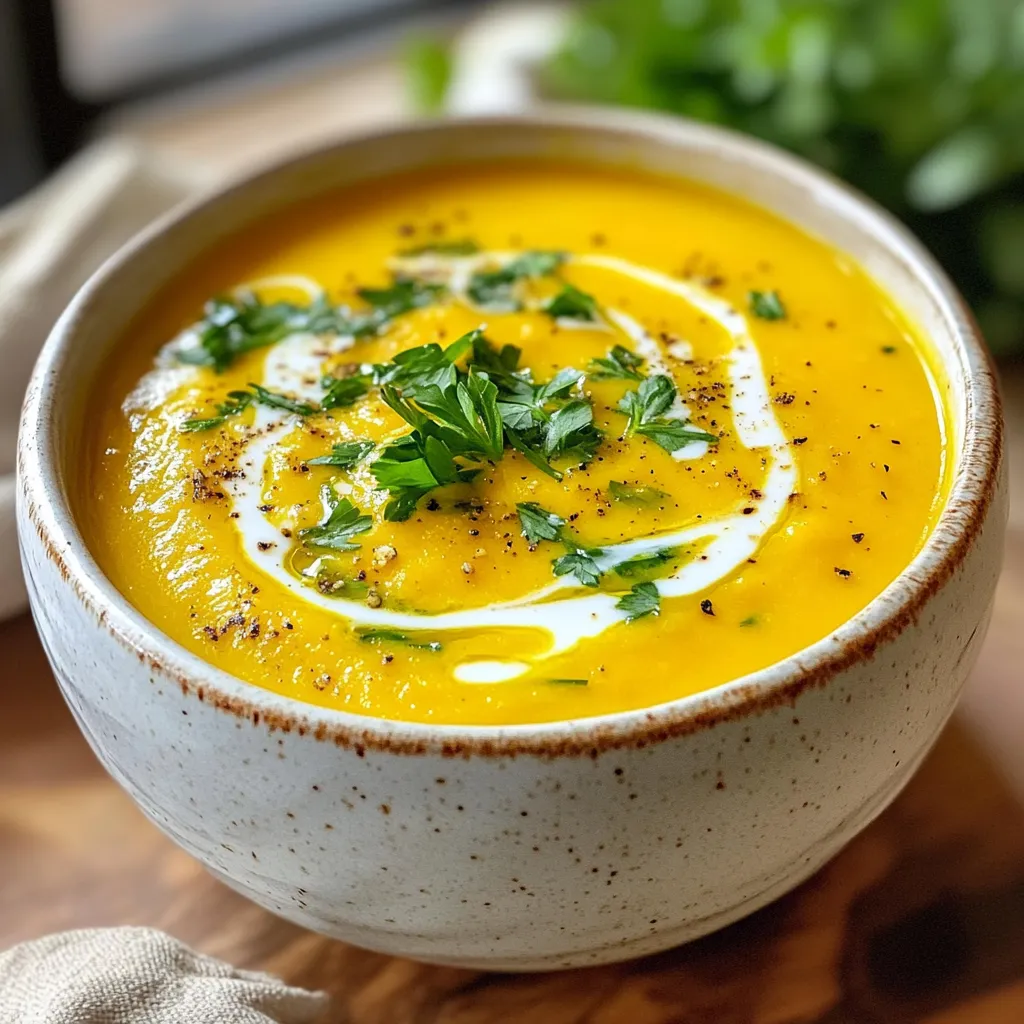
Garnishing the soup can elevate its look and taste. Fresh parsley or cilantro leaves add a nice color. A drizzle of extra coconut milk on top makes it look fancy. This soup is not just tasty; it’s also a feast for the eyes!

Step-by-Step Instructions
Preparation Steps
- Preheat your oven to 400°F (200°C).
- Get a whole bulb of garlic. Cut off the top to show the cloves. Drizzle 1 tablespoon of olive oil on it. Wrap the garlic in aluminum foil to keep it moist.
- Take your diced pumpkin and chopped onion. Place them on a large baking sheet. Add 1 tablespoon of olive oil, sea salt, black pepper, and ground cumin. Mix everything well to coat evenly.
Roasting Process
- Place the wrapped garlic bulb on the baking sheet next to the pumpkin and onion. Roast them together for about 30-35 minutes. Check when the pumpkin is soft and caramelized at the edges.
- Keep an eye on the time to avoid burning.
Blending and Final Additions
- Remove the baking sheet from the oven and let it cool a bit. Squeeze the roasted garlic cloves into a large pot. They should be soft and smell amazing.
- Add the pumpkin and onion from the baking sheet into the pot. Pour in the vegetable broth and sprinkle ground nutmeg. Mix it all together and heat gently until it simmers.
- Use an immersion blender to puree the soup until smooth. You can also use a countertop blender if you don’t have an immersion one. Just be careful with the hot liquid.
- Stir in 1 cup of coconut milk and let it heat for another 5 minutes. Taste the soup and add more sea salt or black pepper as needed.
- Serve the warm soup in bowls. Garnish with fresh parsley or cilantro for a bright touch. Enjoy this warm, hearty dish!
Tips & Tricks
Flavor Enhancements
- Adding herbs or spices: Fresh herbs like thyme or sage can boost the flavor. You can also add a pinch of red pepper flakes for a hint of heat.
- Alternative toppings: Try using roasted pumpkin seeds or a swirl of coconut milk. These add texture and flavor to your soup.
Cooking Techniques
- Using an immersion blender vs. countertop blender: An immersion blender is easy to use right in the pot. It helps you avoid spills. If using a countertop blender, blend in small batches to keep it safe.
- Ensuring a creamy texture: To get a creamy soup, blend until all chunks are gone. Adding coconut milk at the end makes it rich and smooth.
Presentation Ideas
- Elegant serving suggestions: Pour the soup into pretty bowls. Drizzle with coconut milk and sprinkle herbs on top for a nice look.
- Accompaniments to enhance the meal: Serve with warm, crusty bread or a simple salad. This makes your meal feel complete and cozy.
Pro Tips
- Choose the Right Pumpkin: For the best flavor and texture, opt for a sugar pumpkin or a pie pumpkin, which are sweeter and more flavorful than larger carving pumpkins.
- Roast the Garlic Properly: Make sure to wrap the garlic tightly in aluminum foil to prevent it from burning, which can give a bitter taste to the soup.
- Adjusting Consistency: If the soup is too thick after blending, gradually add more vegetable broth or coconut milk until you reach your desired consistency.
- Add Spice Gradually: Start with less cumin and nutmeg, and taste as you go. You can always add more, but it’s hard to balance if you add too much at once.

Variations
Seasonal Additions
You can change up your roasted garlic pumpkin soup by using different squash varieties. Butternut or acorn squash works great too. They add their unique taste and texture. You can also mix in seasonal spices like cinnamon or allspice. These spices bring warmth to the soup, making it even more comforting in fall.
Dietary Modifications
If you want a vegan or dairy-free soup, coconut milk is perfect. It adds creaminess without dairy. You can also use almond milk or oat milk for a lighter option. For those watching their sodium, try using low-sodium vegetable broth. This keeps the soup flavorful while reducing salt.
Alternative Cooking Methods
You can cook this soup in a slow cooker for a hands-off approach. Just put all the ingredients in the pot and let it cook on low for 6-8 hours. This method deepens the flavors and makes it super easy. If you’re short on time, use an Instant Pot. Cook the ingredients on high pressure for about 15 minutes. This gives you a rich soup in no time.
Storage Information
Refrigeration
To store leftover soup, let it cool slightly first. Then, pour it into an airtight container. You can keep it in the fridge for up to five days. Just make sure the lid is on tight to keep it fresh.
Freezing Tips
If you want to freeze the soup, use freezer-safe containers. Leave some space at the top for the soup to expand. It can last in the freezer for about three months. When you’re ready to eat, thaw it overnight in the fridge. This method keeps the flavor intact.
Reheating Recommendations
To reheat the soup, you can use the stove or microwave. If using the stove, warm it over low heat. Stir it often to avoid burning. For the microwave, heat in short bursts, stirring in between. Glass or ceramic containers work best for storage. They heat evenly and won’t change the soup’s taste.
FAQs
Common Questions about Roasted Garlic Pumpkin Soup
How long does it take to make roasted garlic pumpkin soup?
It takes about 55 minutes to make this soup. You spend 15 minutes prepping and 40 minutes cooking.
Can I use canned pumpkin instead of fresh?
Yes, you can use canned pumpkin. It saves time and still tastes great.
What can I substitute for coconut milk?
You can use almond milk or cashew cream. They add a nice flavor but aren’t as rich.
Meal Serving Questions
What to serve with roasted garlic pumpkin soup?
This soup pairs well with crusty bread or a fresh salad. You can also add roasted seeds for crunch.
How can I make this soup spicier?
Add a pinch of cayenne pepper or some red pepper flakes. This will give it a nice kick.
Ingredient Substitutions
Can I use regular milk instead of coconut milk?
Yes, you can use regular milk. However, it will change the flavor and creaminess slightly.
How to replace garlic if allergic?
You can use garlic oil or shallots. They provide a similar taste without using garlic.
This blog post covered how to make roasted garlic pumpkin soup using simple ingredients. We explored the main components like pumpkin, garlic, and onions, along with spices for flavor. You learned key steps for preparation and cooking, plus tips for variations and storage.
As you try this recipe, remember to adjust it to your taste. Cooking is fun and allows for creativity. Enjoy your delicious, warm bowl of sou

Roasted Garlic Pumpkin Soup
Ingredients
- 1 medium pumpkin, peeled and diced into 1-inch cubes
- 1 whole bulb garlic
- 1 medium onion, finely chopped
- 2 tablespoons extra virgin olive oil, divided
- 4 cups vegetable broth
- 1 teaspoon ground cumin
- 1/2 teaspoon ground nutmeg
- to taste sea salt and freshly cracked black pepper
- 1 cup full-fat coconut milk
- for garnish fresh parsley or cilantro leaves
Instructions
- Begin by preheating your oven to 400°F (200°C).
- While the oven is heating, prepare the garlic: slice the top off the bulb to expose the individual cloves. Drizzle the exposed cloves with 1 tablespoon of olive oil. Enclose the bulb in a piece of aluminum foil to keep it from drying out.
- On a large baking sheet, combine the diced pumpkin and chopped onion. Drizzle with the remaining tablespoon of olive oil and season generously with sea salt, black pepper, and ground cumin. Toss the mixture well to ensure even coating.
- Place the wrapped garlic bulb onto the baking sheet with the pumpkin and onion. Roast everything in the preheated oven for about 30-35 minutes, or until the pumpkin is tender and begins to caramelize at the edges.
- After roasting, remove the baking sheet from the oven. Allow it to cool slightly, then squeeze the roasted garlic cloves from their skins into a large pot. The cloves should be soft and fragrant.
- Add the roasted pumpkin and onion from the baking sheet to the pot, along with the vegetable broth and ground nutmeg. Stir to combine, then heat over medium heat until the mixture comes to a gentle simmer.
- Using an immersion blender, carefully puree the soup until it is smooth and creamy. If you don’t have an immersion blender, you can carefully transfer the soup in batches to a countertop blender. Just be cautious with the hot liquid.
- Once pureed, stir in the coconut milk and let the soup heat through for an additional 5 minutes. Taste and adjust seasoning with sea salt and freshly cracked black pepper as needed.
- Serve the warm soup in bowls, garnished with fresh parsley or cilantro for a pop of color and added freshness.


![- 1 cup quinoa - 2 cups water or vegetable broth - 1 large cucumber, diced - 1 red bell pepper, diced - 1 cup cherry tomatoes, halved - 1/4 red onion, finely chopped - 1 cup fresh parsley, roughly chopped - 1/4 cup tahini - 2 tablespoons fresh lemon juice - 1 tablespoon extra virgin olive oil - 1 clove garlic, minced - Salt and freshly cracked pepper - 1/4 cup sunflower seeds - Chopped nuts (walnuts or almonds) The ingredients for your Lemon Tahini Quinoa Salad are fresh and colorful. Each one adds flavor and nutrition. Start with quinoa, which is the base of this dish. It is high in protein and gluten-free. For the salad, you need diced cucumber, red bell pepper, cherry tomatoes, red onion, and parsley. The cucumber gives crunch. The red bell pepper adds sweetness. Cherry tomatoes bring juiciness. The red onion gives a mild bite, while parsley adds a fresh taste. Next, let’s talk about the dressing. Tahini is a creamy paste made from sesame seeds. It gives richness to the salad. Lemon juice adds zing and brightness. Olive oil makes it smooth. Garlic adds depth of flavor. A pinch of salt and cracked pepper finishes it off. If you want more texture, try adding sunflower seeds or chopped nuts. They add crunch and healthy fats. This Lemon Tahini Quinoa Salad is easy to make and packed with good ingredients. You can find the Full Recipe to guide you through the steps. First, you need to cook the quinoa. Combine one cup of rinsed quinoa and two cups of water or vegetable broth in a medium saucepan. Bring the mixture to a rapid boil over medium-high heat. Once it boils, lower the heat and cover the pot. Let it simmer for about 15 minutes. The quinoa will soak up all the liquid and become fluffy. After cooking, remove it from heat and let it cool for a bit. While the quinoa cooks, you can prepare the dressing. In a small bowl, whisk together a quarter cup of tahini, two tablespoons of fresh lemon juice, one tablespoon of olive oil, and one clove of minced garlic. Mix until it becomes smooth and creamy. You can add salt and pepper to taste. Now it's time to make the salad. In a large mixing bowl, add one large diced cucumber, one diced red bell pepper, one cup of halved cherry tomatoes, one-fourth of a finely chopped red onion, and one cup of roughly chopped fresh parsley. Stir these ingredients together until they are well mixed. Next, add the cooled quinoa to the bowl with the veggies. Toss everything together gently so the ingredients blend well. Drizzle the tahini dressing over the salad and mix again. For a nice crunch, you can sprinkle a quarter cup of sunflower seeds or chopped nuts on top before serving. For the full recipe, refer to the earlier sections. Enjoy your fresh and flavorful Lemon Tahini Quinoa Salad! To make the best quinoa, start with rinsing it well. This removes any bitter coating. Use cold water and a fine mesh strainer. After rinsing, cook the quinoa in water or broth. Cooking this way adds a nice flavor. Once cooked, let it cool a bit. This helps it mix better with other ingredients. For a creamy dressing, whisk all ingredients together. Use a bowl that allows for easy mixing. If you find clumps, keep whisking until smooth. Adjust the lemon juice and tahini to match your taste. You may like it tangy or mild. Experiment to find your favorite balance. Presentation is key! Serve the salad in colorful bowls. This makes it more inviting and fun. Add lemon slices and fresh parsley on top for a pop of color. These garnishes not only look great but also add extra flavor. For a unique touch, use clear glasses to showcase the vibrant layers of the salad. Check the Full Recipe for more tips on serving! {{image_4}} You can easily boost the protein in your Lemon Tahini Quinoa Salad. Incorporate chickpeas for a hearty touch. These legumes add fiber and flavor. Diced grilled chicken also works well if you want meat. For those following a vegan diet, try tempeh or tofu. Both options soak up flavors and make the salad filling. Feel free to mix in various vegetables. Substitute or add bell peppers, carrots, or creamy avocado. These veggies add crunch and color. You can also use seasonal vegetables for extra freshness. Think of bright summer tomatoes or hearty winter squash. The key is to choose what you enjoy most. Spice up your salad with fun flavors. Add spices like cumin or paprika for a tasty twist. These spices bring warmth and depth to the dish. Fresh herbs like mint or cilantro can brighten things up, too. They add a burst of freshness that takes your salad to the next level. Store your Lemon Tahini Quinoa Salad in an airtight container in the fridge. This keeps it fresh and tasty. It’s best to eat it within 3-5 days. After this time, the flavors may fade, and veggies can lose their crunch. You can freeze quinoa salad if needed. Dress it before serving after you thaw it. Be aware that freezing may change the texture of some vegetables. It’s a good idea to use firmer veggies like bell peppers, as softer ones may not hold up well. I don’t recommend reheating salads. They taste best when served chilled. However, if you want to reheat, you can warm individual components like quinoa or cooked veggies. Just make sure to let them cool before mixing back into the salad. Enjoy the fresh, vibrant flavors! Yes, it's great for meal prep; just dress before serving. This salad stays fresh for days. You can cook the quinoa and chop the veggies in advance. When you are ready to eat, mix in the dressing. This way, the salad will taste fresh. Yes, quinoa is naturally gluten-free. It makes this salad a perfect choice for gluten-free diets. Always check that your other ingredients, like broth, are gluten-free too. This salad is friendly for many diets. You can add different vegetables, proteins, or dressings to suit your taste. Try adding chickpeas for protein or avocados for creaminess. You can also change the herbs or use a different dressing. The choices are endless! It can be a side dish or a main dish, served chilled or at room temperature. For a picnic, serve it cold. If you want a warm meal, let it sit for a bit. Dress it just before serving for the best flavor. Yes, other grains like farro or bulgur can be used as substitutes. Each grain brings a different taste and texture. You can experiment to find your favorite. Just cook them according to package directions. Check the [Full Recipe] for more details! This blog post covered how to make a tasty Lemon Tahini Quinoa Salad. You learned the main ingredients, cooking steps, and tips for perfecting the dish. Remember, feel free to add your favorite proteins or veggies. You can also make it ahead of time for meal prep. Enjoy this salad fresh and chilled for the best flavor. Experiment with it, and you'll find your perfect mix!](https://dishtreats.com/wp-content/uploads/2025/07/0131a3b2-a937-48f9-ad75-9f78e7be101a-768x768.webp)


