Roasted Garlic Parmesan Brussel Sprouts Delight
. It will guide you through each step with details and tips. Enjoy cooking! In summary, we explored how to make delicious Roasted Garlic Parmesan Brussels Sprouts. I shared a full list of ingredients and options for substitutions. Fresh ingredients elevate taste and nutrition. You learned step-by-step instructions for perfect roasting, along with tips for flavor and presentation. Variations and storage tips help you customize and save leftovers. Remember to check FAQs for any lingering questions. Enjoy this simple yet tasty dish at your next meal!](https://dishtreats.com/wp-content/uploads/2025/08/f224f6d0-5adb-4fa1-b176-de066c43a5f2-3.webp)
Ready to transform Brussels sprouts into a favorite dish? In Roasted Garlic Parmesan Brussel Sprouts Delight, I’ll show you how to combine simple ingredients like garlic and cheese for a crunchy, savory treat. You’ll impress your family and friends with this easy recipe. Grab your apron and follow along as we dive into roasting methods, flavor tips, and variations that make this dish stand out. Your taste buds will thank you!
Ingredients
List of Ingredients
- 1 pound Brussels sprouts, trimmed and halved
- 4 cloves garlic, minced
- 3 tablespoons extra-virgin olive oil
- 1 teaspoon sea salt
- ½ teaspoon freshly ground black pepper
- ½ teaspoon smoked paprika
- ½ cup freshly grated Parmesan cheese
- 2 tablespoons balsamic glaze
- Fresh parsley, finely chopped
Ingredient Substitutions
You can swap extra-virgin olive oil with avocado oil or melted butter. For cheese, feel free to use Pecorino Romano or nutritional yeast for a vegan option. If you don’t have balsamic glaze, a simple mix of balsamic vinegar and honey will work well.
Importance of Fresh Ingredients
Fresh ingredients make a big difference in flavor. Fresh Brussels sprouts taste sweet and nutty. They also keep more nutrients, giving you a healthy meal. Fresh garlic brings a bold taste, while fresh Parmesan melts perfectly over the sprouts. Using fresh herbs, like parsley, adds color and a burst of taste. Always choose high-quality ingredients for the best results.
Step-by-Step Instructions
Preheating the Oven
Preheat your oven to 400°F (200°C). This hot temperature is perfect for roasting Brussels sprouts. It helps them get crispy and brown.
Mixing the Ingredients
In a large bowl, add the halved Brussels sprouts. Toss them with minced garlic, olive oil, sea salt, black pepper, and smoked paprika. Use your hands or a spoon to mix well. Make sure each sprout gets a good coat of the oil and spices for great flavor.
Arranging for Roasting
Spread the seasoned Brussels sprouts on a baking sheet. Place them cut-side down. This helps them become extra crispy as they roast.
Roasting Duration
Put the baking sheet in the oven and roast for 20-25 minutes. Keep an eye on them. You want the sprouts to be golden brown and crispy on the edges.
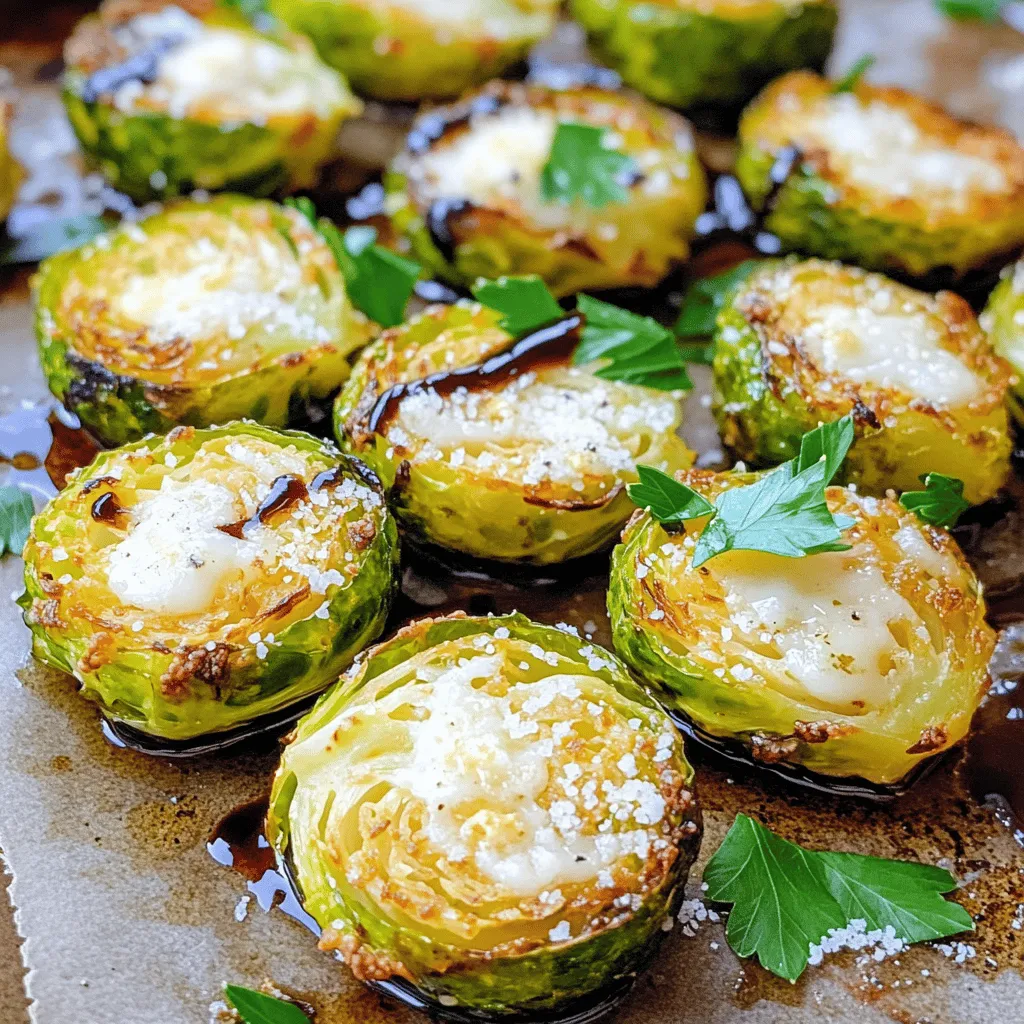
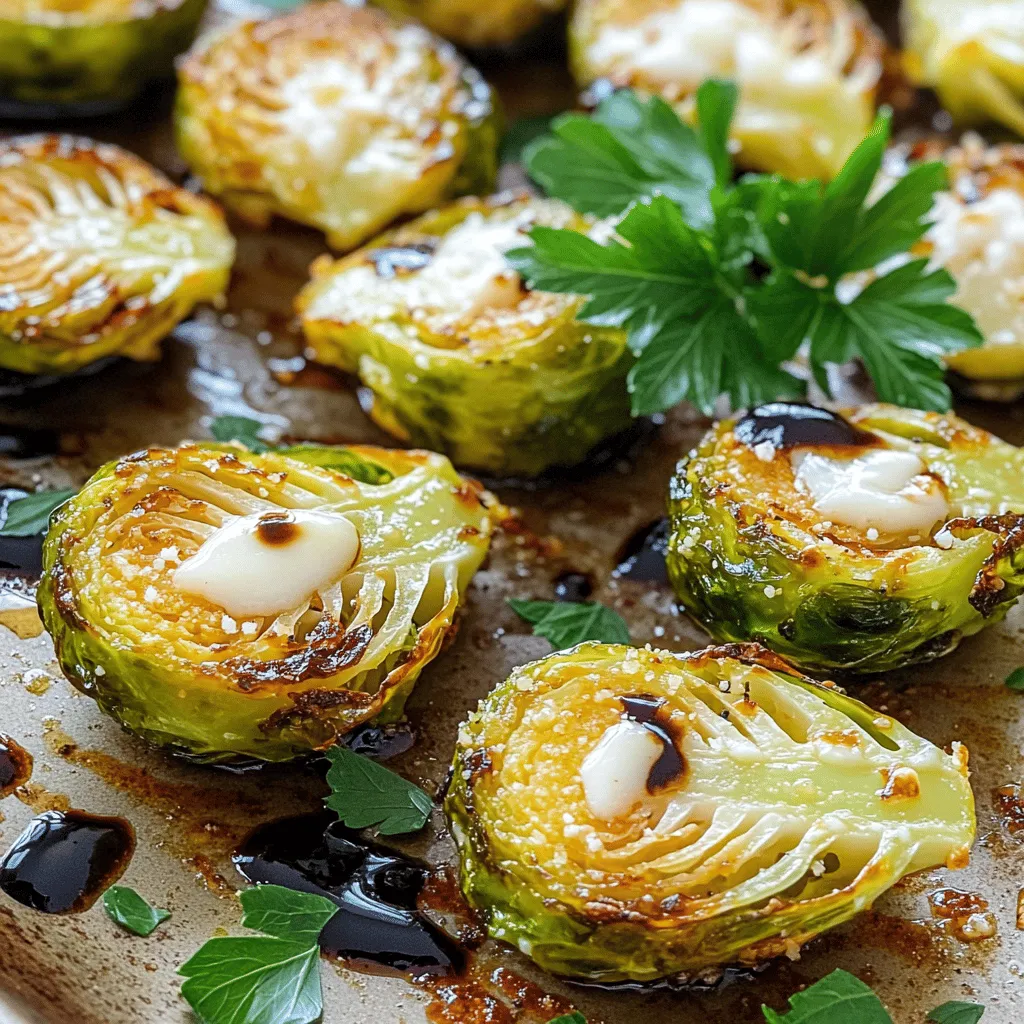
Adding Parmesan
When the Brussels sprouts are done, take them out of the oven. Sprinkle freshly grated Parmesan cheese evenly over the hot sprouts. The heat will help the cheese melt nicely.
Final Touches
Put the baking sheet back in the oven for another 5 minutes. This will create a tasty, cheesy crust. After that, drizzle balsamic glaze over the sprouts for a sweet and tangy flavor. Finally, sprinkle chopped parsley on top for a fresh touch.
Tips & Tricks
Achieving Perfect Crispiness
To get that nice, crispy bite, start with dry Brussels sprouts. After washing, pat them dry. This helps them roast better. Place the sprouts cut-side down on the baking sheet. This lets the heat hit the flat side directly. Roast them in a hot oven at 400°F for 20-25 minutes. This high heat creates a great crunch without burning.
Flavor Enhancements
While garlic and Parmesan are key, feel free to boost the flavor. Try adding a pinch of red pepper flakes for heat. You can also mix in some lemon zest for a fresh twist. Fresh herbs like thyme or rosemary can give a nice aroma. Don’t hesitate to experiment with smoked paprika. It adds a unique depth to the dish.
Presentation Tips
Presentation makes a dish shine. Serve the Brussels sprouts in a large bowl or on a platter. Arrange them in a circle for a nice look. A drizzle of balsamic glaze on top adds a glossy finish. Sprinkle some fresh parsley for color. It makes the dish pop and shows off the flavors.

Variations
Flavor Variations
You can spice things up by adding chili flakes. A pinch of these flakes gives a nice kick. If you prefer sweet, try adding honey or maple syrup. This will balance the savory flavors and add a tasty twist.
Alternative Cooking Methods
If you want to use an air fryer, it’s simple. Cook the Brussels sprouts at 375°F for about 15 minutes. Shake the basket halfway for even cooking. For stovetop sautéing, heat some olive oil in a large pan. Add the sprouts and sauté for about 10-12 minutes. Stir often to avoid burning.
Ingredient Swaps
For a vegan option, substitute the Parmesan with nutritional yeast or vegan cheese. This keeps the dish creamy without dairy. You can also mix in other veggies like carrots or bell peppers. This adds color and flavor, making the dish more exciting.
Storage Info
How to Store Leftovers
To keep your Roasted Garlic Parmesan Brussels sprouts fresh, store them in an airtight container. Glass or plastic containers work well. Make sure they cool down before sealing. This helps avoid moisture build-up. If you plan to eat them within three days, just refrigerate. For longer storage, consider freezing.
Reheating Tips
When reheating, try using the oven. Preheat it to 350°F (175°C). Spread the sprouts on a baking sheet. Heat for about 10-15 minutes. This method keeps them crispy. You can also use a skillet on medium heat. Just stir them until hot. Avoid the microwave if you want to keep that great texture and flavor.
Freezing Instructions
To freeze Brussels sprouts, first, blanch them. Boil them for 2-3 minutes, then shock in cold water. Drain and dry well. Place them in freezer bags, removing as much air as possible. Label the bags with the date. They can last up to 6 months in the freezer. When you’re ready to use them, thaw in the fridge overnight.
FAQs
Can I use frozen Brussels sprouts?
Yes, you can use frozen Brussels sprouts. However, the texture may be softer. Frozen sprouts often contain more water. This can lead to steaming rather than roasting. If you use frozen sprouts, extend cooking time by 5-10 minutes. Ensure they roast until golden brown.
How do I know when Brussels sprouts are done roasting?
Look for a golden brown color and crispy edges. You want them to be tender inside. A fork should pierce them easily, but they should not be mushy. The garlic should also be fragrant and slightly caramelized.
Can I prepare this recipe ahead of time?
Yes, you can prep Brussels sprouts ahead. Trim and halve them up to a day in advance. Store them in an airtight container in the fridge. You can also mix the olive oil and spices beforehand. Just combine everything right before roasting.
Is this recipe healthy?
Yes, this recipe is quite healthy. Brussels sprouts are low in calories and high in fiber. They contain vitamins C and K, which are good for your health. The olive oil adds healthy fats, while Parmesan cheese offers protein. Overall, it’s a balanced dish!
What can I serve with Roasted Garlic Parmesan Brussel Sprouts?
These sprouts pair well with many dishes. Try serving them with roasted chicken or steak. They also go well with quinoa or rice for a vegetarian option. A light salad can complement the meal too.It will guide you through each step with details and tips. Enjoy cooking!
In summary, we explored how to make delicious Roasted Garlic Parmesan Brussels Sprouts. I shared a full list of ingredients and options for substitutions. Fresh ingredients elevate taste and nutrition. You learned step-by-step instructions for perfect roasting, along with tips for flavor and presentation. Variations and storage tips help you customize and save leftovers. Remember to check FAQs for any lingering questions. Enjoy this simple yet tasty dish at your next meal!
. It will guide you through each step with details and tips. Enjoy cooking! In summary, we explored how to make delicious Roasted Garlic Parmesan Brussels Sprouts. I shared a full list of ingredients and options for substitutions. Fresh ingredients elevate taste and nutrition. You learned step-by-step instructions for perfect roasting, along with tips for flavor and presentation. Variations and storage tips help you customize and save leftovers. Remember to check FAQs for any lingering questions. Enjoy this simple yet tasty dish at your next meal!](https://dishtreats.com/wp-content/uploads/2025/08/f224f6d0-5adb-4fa1-b176-de066c43a5f2-3-300x300.webp)


. Start by peeling your sweet potatoes. Use a vegetable peeler for nice, even strips. Next, dice them into 1-inch cubes. This size helps them cook well. In a large bowl, toss the diced sweet potatoes with olive oil. Add smoked paprika, garlic powder, salt, and black pepper. Mix until every piece is coated. This step brings out the flavor. Preheat your oven to 400°F (200°C). This hot oven ensures crispy edges. Spread the seasoned sweet potatoes on a baking sheet. Make sure they are in a single layer for even cooking. Roast for 20-25 minutes. Stir halfway through to help with browning. The sweet potatoes should be tender and slightly caramelized when done. In a large skillet, combine the roasted sweet potatoes with black beans, corn, and diced tomatoes. Gently stir until everything is heated through. This mix creates a hearty base. Now, sprinkle the shredded cheddar cheese on top. Allow it to melt for about 3-5 minutes. Cover the skillet with a lid to speed up melting if needed. Once the cheese is melted, remove the skillet from heat. Top with jalapeños, green onions, and diced avocado. These additions add color and flavor. Finally, garnish with fresh cilantro. If you like, add a dollop of sour cream or Greek yogurt for creaminess. Serve your loaded sweet potato nacho skillet hot and enjoy the burst of flavors! For the complete cooking process, check the Full Recipe. To boost the flavor, consider adding different spices. You can use cumin or chili powder for a warm kick. A dash of cayenne pepper can also add heat. If you love fresh herbs, cilantro is perfect here. It adds a bright taste that pairs well with sweet potatoes. You can also try fresh parsley or green onions for a twist. Using a cast iron skillet can give your dish a nice crisp. It heats evenly and retains warmth well. If you prefer a non-stick pan, that works too. Just make sure your sweet potatoes do not stick. For even cooking, keep the heat steady. Stir often to prevent burning and ensure all ingredients meld nicely. For a great look, serve the skillet right at the table. This gives a rustic feel and makes sharing easy. You can add some colorful toppings, like diced avocado and sliced jalapeños. A sprinkle of cilantro adds fresh green color. For an extra crunch, serve with tortilla chips on the side. This adds texture and makes it even more fun to eat. Check out the Full Recipe for more serving ideas. {{image_4}} For a vegetarian or vegan touch, you can swap out the cheese. Try cashew cheese or nutritional yeast for a cheesy flavor without dairy. You can also pile on more plant-based toppings. Consider adding sautéed mushrooms, bell peppers, or even spinach. These ingredients add texture and boost nutrition. If you need gluten-free options, this dish is already a great choice. Sweet potatoes, beans, and veggies are naturally gluten-free. Just ensure any toppings or sauces are gluten-free too. For those who want high-protein variations, add cooked quinoa or lentils. You can also use a plant-based protein like tempeh or tofu. This way, you’ll keep the meal filling and nutritious. You can change the flavor profile by adding sweet or savory twists. Try mixing in some cinnamon or maple syrup for a sweet kick. This creates a unique balance with the savory ingredients. For international twists, consider adding spices from around the world. A sprinkle of taco seasoning gives a Mexican flair. Or, use curry powder for an Indian vibe. These simple changes can transform your loaded sweet potato nacho skillet. For the complete recipe, see [Full Recipe]. When storing your loaded sweet potato nacho skillet, let it cool first. This step helps avoid moisture buildup, which can make your dish soggy. Use an airtight container to keep it fresh. If stored properly, it lasts in the fridge for up to four days. To reheat leftovers, use a skillet for the best results. Heat on medium-low to keep the texture. Stir gently as you warm it up to avoid burning. Avoid the microwave if you can; it can make the dish soggy. If you must use it, heat in short bursts and stir often. You can freeze your loaded sweet potato nacho skillet for later use. Portion it into freezer-safe containers, leaving some space for expansion. It stays good for up to three months in the freezer. When ready to eat, thaw it in the fridge overnight before reheating. This keeps the flavors intact and the texture nice. You can use butternut squash or pumpkin. They have a similar texture and taste. Both options provide a nice sweetness. You can also try regular potatoes if you want a different flavor. Yes, you can prep some of the ingredients before. Roast the sweet potatoes a day ahead. Store them in the fridge. You can also mix the black beans, corn, and tomatoes in advance. Just heat everything up when ready to serve. To melt cheese evenly, use freshly shredded cheese. It melts better than pre-shredded cheese. Spread the cheese in an even layer on top of the skillet. Cover the skillet for a couple of minutes. This traps heat and helps the cheese melt smoothly. You can use many toppings for loaded nachos. Some popular choices include jalapeños, green onions, and diced avocado. For a twist, add pickled red onions or fresh salsa. Don't forget sour cream or Greek yogurt for creaminess. You can get creative and mix your favorite toppings! In this blog post, we explored how to create a delicious dish with sweet potatoes, black beans, and cheese. You learned about ingredient choices, measurements, and smart substitutions. I shared tips on roasting sweet potatoes and combining ingredients perfectly. We looked at variations for different diets and how to store leftovers. Remember, making this dish fun and flavorful is easy. Use the ideas provided to customize your meal, ensuring it fits your taste. Enjoy your cooking and make it a family favorite!](https://dishtreats.com/wp-content/uploads/2025/07/3c3c8a5c-337a-4892-8590-75b37c5e13f0-768x768.webp)
![To create the Roasted Beet and Goat Cheese Salad, you will need the following ingredients: - 4 medium beets, scrubbed and trimmed - 2 tablespoons extra virgin olive oil, divided - Sea salt and freshly ground black pepper to taste - 4 cups mixed greens (arugula, spinach, and kale) - 1/2 cup creamy goat cheese, crumbled - 1/4 cup walnuts, toasted and roughly chopped - 1/4 cup dried cranberries - 2 tablespoons balsamic vinegar - 1 tablespoon pure honey - Fresh herbs (basil or parsley) for garnish Each ingredient adds not just flavor, but also nutrition. Beets are rich in vitamins and minerals. They help boost your energy levels. Goat cheese brings a creamy texture and a tangy taste. It pairs well with the sweetness of beets and cranberries. Walnuts add crunch and healthy fats, while mixed greens provide fiber. The dressing of balsamic vinegar and honey ties all the flavors together. You can find the Full Recipe for step-by-step instructions to make this delightful salad. 1. Preheat the oven: Set your oven to 400°F (200°C). This makes sure the beets roast well. 2. Wrap the beets: Take each beet and wrap it in foil. Drizzle 1 tablespoon of olive oil on them. Add sea salt and black pepper for flavor. Seal the foil tightly. 3. Roast the beets: Place the wrapped beets on a baking sheet. Roast them in the oven for 45-60 minutes. They are done when a fork easily pierces them. 1. Peel and slice the beets: Let the beets cool a bit. Then, peel off the skin. I recommend wearing gloves to avoid stains. Cut the beets into wedges for a nice look. 2. Combine salad ingredients: In a large mixing bowl, add the mixed greens, sliced roasted beets, crumbled goat cheese, toasted walnuts, and dried cranberries. Gently mix everything together. 1. Prepare the dressing: In a small bowl, whisk together the balsamic vinegar, the last tablespoon of olive oil, and honey. Stir well until combined. Taste it and add salt and pepper as needed. 2. Dress the salad: Drizzle the dressing over the salad. Toss everything gently to coat the greens and other ingredients. 3. Serve the salad: Plate the salad right away. Garnish with fresh herbs for a pop of color and extra flavor. For the full recipe, check out the Beet the Ordinary: Roasted Beet and Goat Cheese Salad. - Choosing the right beet size for even cooking: I recommend using medium beets. They cook evenly and are easy to handle. If you use larger beets, they may take longer to roast, leading to uneven texture. Smaller beets cook too quickly and may dry out. - How to properly season the beets: Before wrapping the beets in foil, drizzle them with olive oil. Add a generous pinch of sea salt and freshly ground black pepper. This simple seasoning enhances their natural sweetness and flavor during roasting. - Creative ways to plate the salad: For a stunning presentation, use a large, flat platter. Layer mixed greens as a base. Fan out the roasted beet wedges on top and sprinkle crumbled goat cheese and walnuts over the salad. This method creates a colorful and inviting look. - Garnishing tips to elevate the dish: Fresh herbs can add color and flavor. A sprinkle of chopped basil or parsley brightens the dish. You can also use edible flowers for a special touch, making it perfect for gatherings or celebrations. - Best practices for prepping ingredients in advance: You can roast the beets a day ahead. Once cooled, wrap them in plastic to keep fresh. Store the mixed greens and other ingredients separately. This way, you can quickly assemble your salad just before serving, keeping everything crisp and tasty. For the complete recipe, see [Full Recipe]. {{image_4}} You can switch up the greens in your salad to make it special. Try using arugula for a peppery kick or romaine for a crisp bite. Each green offers a different taste and texture, giving your salad a new vibe. If you want to change the cheese, feta or blue cheese can work wonders. Feta adds a salty flavor, while blue cheese brings a bold touch. Both complement the sweetness of the beets nicely. The right dressing can elevate your salad. A citrus vinaigrette adds a bright and zesty flavor. Mix fresh lemon juice with olive oil for a quick option. If you want something creamy, a yogurt dressing is perfect. It pairs well with the tang of goat cheese and makes the salad feel lush. Don’t hesitate to experiment with different dressings to find your favorite. Add protein to make your salad more filling. Grilled chicken is a great choice, giving the salad a hearty feel. For a plant-based option, chickpeas work well. They add protein and texture. You can also sprinkle seeds, like pumpkin or sunflower seeds, for some crunch. Fresh fruit, such as sliced pears or apples, can add a sweet note. Each add-in brings its own charm to the dish, making it unique every time. Don’t forget to check out the Full Recipe for more inspiration! To keep your roasted beet and goat cheese salad fresh, store it in an airtight container. Place any leftovers in the fridge. The salad will stay good for about three days. Make sure to keep the dressing separate until you are ready to eat. This helps keep the greens crisp and fresh. If you want to store beets for longer, you can freeze them. First, roast the beets as in the Full Recipe. Let them cool, then peel and slice them. Place the slices in a freezer-safe bag, removing as much air as possible. Beets can last up to six months in the freezer. However, I do not recommend freezing the prepared salad. The greens won't hold up well after thawing. When it's time to eat your stored salad, you can reheat the beets if you like. Just warm them in the microwave for about 30 seconds. Toss the salad again after reheating. This helps mix the flavors back together. If you stored the salad dressed, consider adding a bit more dressing before serving. This keeps everything tasty and vibrant. How long do roasted beets last in the fridge? Roasted beets can last up to five days in your fridge. Store them in an airtight container. This way, they stay fresh and tasty for your salads. Can I use pre-cooked beets for this recipe? Yes, you can use pre-cooked beets. They are a great time-saver. Just cut them into wedges and add them to your salad. They will still taste delicious! What type of goat cheese is best for salads? A creamy goat cheese works best for this salad. It adds a nice richness and tang. Look for soft, crumbled varieties for easy mixing. Can I substitute goat cheese with a dairy-free option? Absolutely! You can use a dairy-free cheese made from nuts. Look for a creamy cashew cheese or tofu-based option. Both will provide a nice flavor. What are the health benefits of beet and goat cheese salad? This salad is packed with nutrients. Beets are high in fiber and antioxidants. Goat cheese adds protein and calcium. Together, they support heart health and digestion. How many calories are in a serving of this salad? One serving of this salad has about 300 calories. This includes the beets, goat cheese, nuts, and dressing. It’s a great balance of flavors and nutrients without too many calories. For the complete recipe, check out the Full Recipe. This salad combines roasted beets, fresh greens, and tangy goat cheese. You learned how to roast beets and mix vibrant ingredients for a delicious dish. Remember to choose the right beet size and season well for great texture. Don't hesitate to try different greens or dressings to make it your own. Salad prep can be easy, helping you save time. Enjoy this healthy meal that packs flavor and nutrients. Make it today and impress yourself with your cooking skills!](https://dishtreats.com/wp-content/uploads/2025/06/a3a0567a-1f00-4857-8ef4-d1e9b38b024f-768x768.webp)