Roasted Garlic Hummus Creamy and Flavorful Dip

If you love smooth, rich dips, then my Roasted Garlic Hummus is a must-try! This creamy treat is full of flavor and easy to make at home. Packed with healthy ingredients like chickpeas and roasted garlic, it’s perfect for any occasion. Get ready to impress your friends and family with a dip that’s both tasty and good for you. Let’s dive into the simple steps to create this delicious hummus!
Why I Love This Recipe
- Rich Flavor Profile: The combination of roasted garlic, tahini, and cumin creates a depth of flavor that is both unique and satisfying.
- Easy Preparation: With just a few simple steps, this hummus can be whipped up in no time, making it perfect for a quick snack or appetizer.
- Versatile Dish: This hummus pairs wonderfully with a variety of dippers, from vegetables to pita bread, making it a great addition to any gathering.
- Healthy Indulgence: Packed with protein and healthy fats, this creamy hummus is a guilt-free treat that doesn’t compromise on flavor.
Ingredients
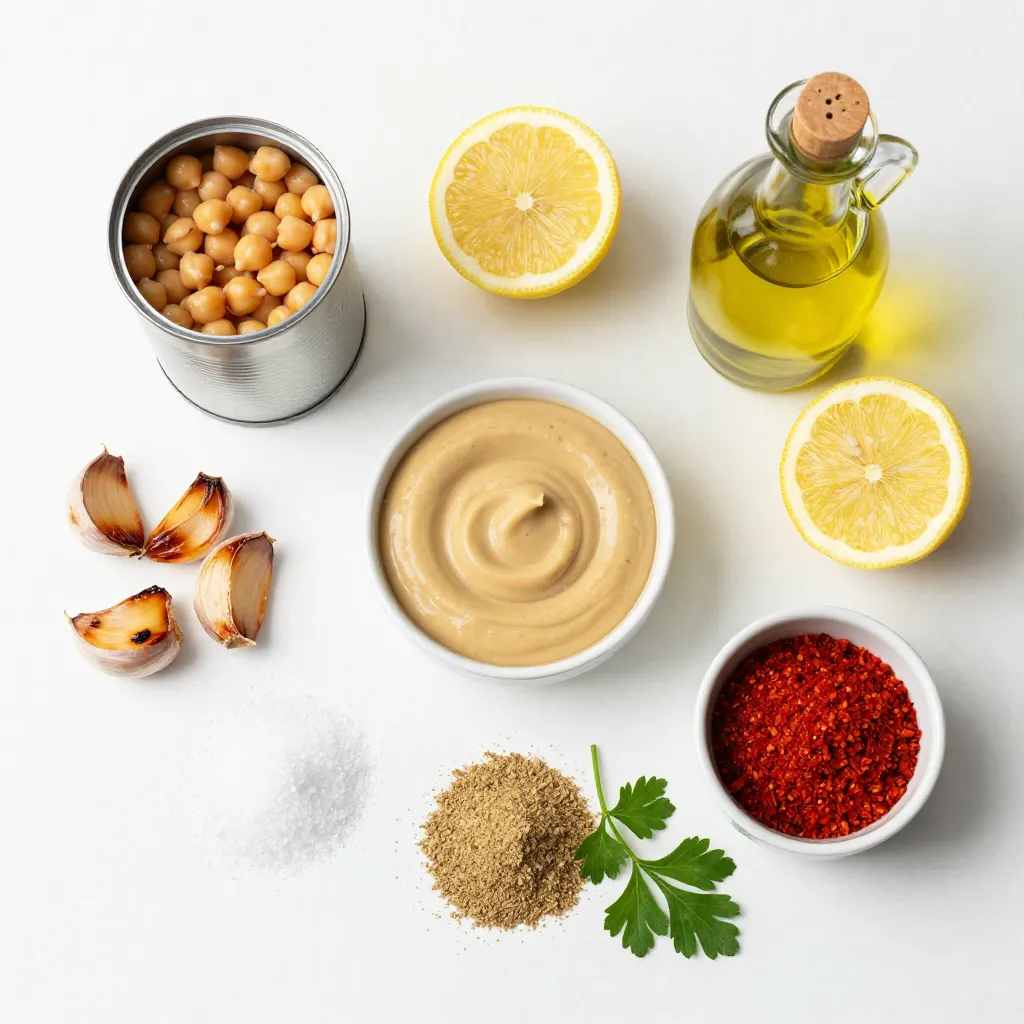
To make a rich and creamy roasted garlic hummus, you’ll need a few simple ingredients. Here’s the list:
- 1 can (15 oz) chickpeas, drained and rinsed
- 1/4 cup creamy tahini
- 3 cloves roasted garlic
- 2 tablespoons freshly squeezed lemon juice
- 2 tablespoons extra-virgin olive oil, plus more for drizzling
- 1/2 teaspoon ground cumin
- Sea salt, to taste
- Water, as needed for desired consistency
- Smoked paprika and finely chopped fresh parsley for garnish
Each ingredient plays a special role in making this dip smooth and flavorful. The chickpeas form the base, while tahini adds creaminess. Roasted garlic gives a rich, sweet taste. Lemon juice brightens the flavor, and olive oil adds a nice finish. Ground cumin brings a warm note, while sea salt enhances all the flavors. You can adjust the water for a thicker or thinner dip. Finally, garnishes like smoked paprika and parsley add color and flair.

Step-by-Step Instructions
Preheat the Oven
Start by preheating your oven to 400°F (200°C). This step gets the oven ready for roasting garlic.
Roast the Garlic
Take a whole bulb of garlic. Slice off the top to show the cloves. Drizzle a bit of olive oil over the cut cloves. Wrap the bulb tightly in aluminum foil. Place it in the oven and roast for about 30-35 minutes. The garlic should become soft and fragrant. Once done, remove it and let it cool a bit.
Blend the Ingredients
In a high-powered blender or food processor, add the drained chickpeas, tahini, and roasted garlic cloves. Squeeze the garlic out of their skins directly into the blender. Also, add lemon juice, olive oil, cumin, and a pinch of sea salt.
Achieve the Perfect Consistency
Blend everything until it is very smooth. If the hummus is thick, add water slowly. Use one tablespoon at a time and blend after each addition. Keep going until you get that creamy texture you want.
Taste and Adjust
After blending, taste your hummus. If it needs more flavor, add more salt or lemon juice. Mix again to make sure the flavors blend well.
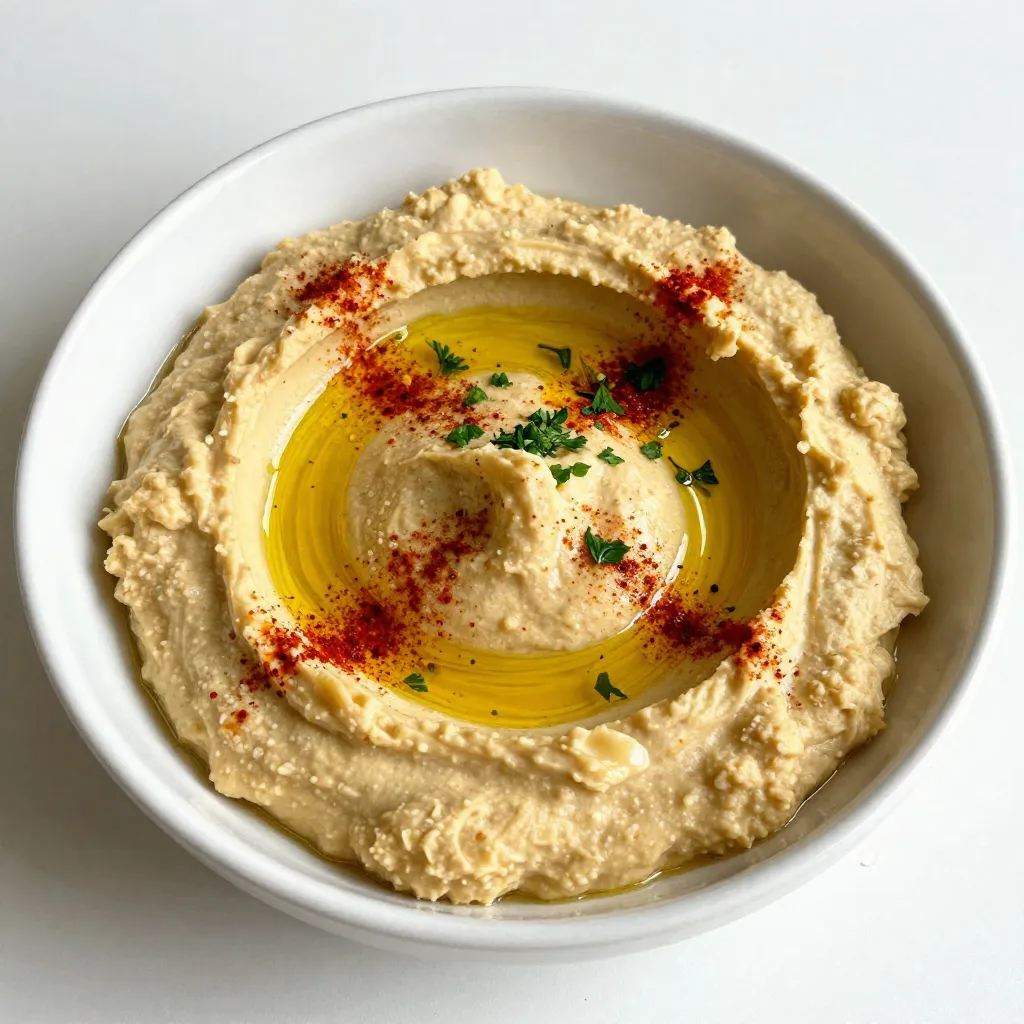
Serve and Garnish
Spoon the smooth hummus into a nice bowl. Use the back of a spoon to make a swirl on top. This gives it a lovely look. Drizzle some olive oil over the surface. Then, sprinkle a bit of smoked paprika and fresh chopped parsley for color and taste.
For a fun touch, serve the hummus with colorful vegetable sticks or warm pita bread for dipping.
Tips & Tricks
Tips for Roasting Garlic
Roasting garlic is easy and gives a sweet taste. Here’s how to do it right:
- Choose fresh bulbs: Look for firm bulbs with no soft spots.
- Slice the top: Cut off just the top to expose the cloves.
- Drizzle olive oil: A small amount keeps the garlic moist.
- Wrap in foil: This traps steam and helps it cook evenly.
- Watch the time: Roast for 30-35 minutes at 400°F. It should be soft and golden.
How to Get Creamy Hummus
Creamy hummus is all about the blend. Here’s what I recommend:
- Use canned chickpeas: They save time and are great for smoothness.
- Add tahini: This gives richness and a nutty flavor.
- Blend well: Mix until smooth. Stop to scrape down the sides as needed.
- Adjust with water: If it’s too thick, add water a tablespoon at a time.
- Taste as you go: Adjust salt or lemon juice for the best flavor.
Presentation Tips
A beautiful dish makes a big impact. Try these ideas:
- Use a nice bowl: Choose one that contrasts with the hummus color.
- Swirl the top: Use a spoon to create a lovely design.
- Garnish well: Drizzle olive oil and add smoked paprika and parsley.
- Serve with colors: Pair with vibrant veggie sticks and warm pita.
Pro Tips
- Use Fresh Ingredients: For the best flavor, opt for fresh lemon juice and high-quality olive oil. Freshness makes a significant difference in taste.
- Experiment with Flavors: Feel free to customize your hummus by adding herbs like basil or spices like cayenne pepper for a kick. This can elevate your dip to a new level.
- Chill Before Serving: For an even creamier texture, refrigerate the hummus for at least an hour before serving. It allows the flavors to meld beautifully.
- Store Properly: Keep any leftovers in an airtight container in the fridge. It can last up to a week, making it a perfect meal prep option.
Variations of Roasted Garlic Hummus
Spicy Roasted Garlic Hummus
To add some heat, you can make spicy roasted garlic hummus. Simply mix in chili powder or cayenne pepper when blending. Start with a small amount, then taste and add more heat as you like. You can also add chopped jalapeños for a fresh kick. This brings a whole new level of flavor.
Herb-Infused Variants
Herbs can make your hummus sing. Try adding fresh herbs like basil, cilantro, or dill. Just toss in a handful while blending. You can also use dried herbs like oregano or thyme. These will bring a fresh and vibrant taste to your dip. Each herb changes the flavor profile, so experiment with what you love.
Flavor Add-ins (like Roasted Red Peppers or Olive Tapenade)
Want to change things up? Add roasted red peppers or olive tapenade. Simply blend these ingredients in with your main mix. Roasted red peppers give a sweet and smoky flavor. Olive tapenade adds a salty, briny taste. Both options make your hummus more unique and delicious. Don’t hesitate to try different add-ins based on your taste!
Health Benefits of Roasted Garlic
Nutritional Value
Roasted garlic adds great taste and health perks to hummus. It is low in calories and high in nutrients. A single clove offers vitamins B6 and C, manganese, and antioxidants. These help fight free radicals in the body. Chickpeas, the base of hummus, are rich in protein and fiber. Together, they create a filling dip that fuels your body.
Boosting Immunity
Roasted garlic is a natural immune booster. It contains allicin, which helps the body fight infections. Eating garlic regularly can lower the chance of getting sick. Pairing it with chickpeas adds extra protein, which supports your immune health. This dip is perfect for keeping you strong, especially during cold months.
Cardiovascular Health Benefits
Roasted garlic also promotes heart health. Studies show it can lower blood pressure and cholesterol levels. Garlic helps improve blood circulation, which is vital for heart function. The healthy fats in olive oil further support your heart. Enjoying this hummus can be a tasty step toward a healthier heart.
FAQs about Roasted Garlic Hummus
How long does roasted garlic hummus last?
Roasted garlic hummus can last about five days in the fridge. Store it in an airtight container. If you see any change in color or smell, it’s best to throw it away. Freezing is an option too! Just keep it in a freezer-safe container for up to three months.
Can I use raw garlic instead of roasted?
You can use raw garlic, but it will change the taste. Raw garlic is much stronger and can be spicy. Roasting garlic makes it sweet and soft. If you like bold flavors, try using one clove of raw garlic first. Then, taste and decide if you need more.
Where can I buy pre-made roasted garlic hummus?
You can find pre-made roasted garlic hummus at many grocery stores. Look in the deli or refrigerated section. Brands like Sabra and Tribe often have it. You can also check local markets or specialty stores.
What can I serve with roasted garlic hummus?
Roasted garlic hummus pairs well with many dippable items. Here are some great options:
- Fresh vegetable sticks (carrots, cucumbers, bell peppers)
- Warm pita bread or pita chips
- Crackers or breadsticks
- Grilled chicken or shrimp for a heartier option
This dip is also great as a spread on sandwiches or wraps.
In this post, we explored how to make roasted garlic hummus using simple ingredients like chickpeas and tahini. I provided step-by-step instructions to ensure perfect results. You learned tips for roasting garlic and creating a creamy texture. We also discussed fun flavor variations and the health benefits of roasted garlic.
Roasted garlic hummus is tasty and good for you. It’s a great addition to any meal or snack. Enjoy making it, sharing it, and feeling good about what you ea

Creamy Roasted Garlic Hummus Bliss
Ingredients
- 1 can (15 oz) chickpeas, drained and rinsed
- 1/4 cup creamy tahini
- 3 cloves roasted garlic
- 2 tablespoons freshly squeezed lemon juice
- 2 tablespoons extra-virgin olive oil, plus more for drizzling
- 1/2 teaspoon ground cumin
- to taste sea salt
- as needed water for desired consistency
- smoked paprika for garnish
- finely chopped fresh parsley for garnish
Instructions
- Preheat your oven to 400°F (200°C) in preparation for roasting the garlic.
- Take a whole bulb of garlic and slice off the top to expose the cloves. Drizzle a little olive oil over the exposed cloves, then wrap the bulb tightly in aluminum foil. Place it in the oven and roast for about 30-35 minutes, or until the cloves are soft, fragrant, and caramelized. Remove from the oven and allow to cool slightly.
- In a high-powered blender or food processor, combine the drained chickpeas, creamy tahini, roasted garlic cloves (squeezed out of their skins), lemon juice, 2 tablespoons of olive oil, ground cumin, and a pinch of sea salt.
- Blend the mixture until it is luxuriously smooth. If the hummus is too thick, gradually add water, one tablespoon at a time, blending in between, until you reach the perfect creamy consistency you desire.
- Once blended, taste your hummus and adjust the seasoning. Add more salt or lemon juice if you'd like a bolder flavor.
- Spoon the smooth hummus into a decorative serving bowl. Using the back of a spoon, create a lovely swirl on the surface to add visual appeal.
- Drizzle a little extra-virgin olive oil on top of the hummus, and then sprinkle with a dash of smoked paprika and a sprinkle of fresh chopped parsley to enhance both flavor and aesthetics.


. - Ensure even space on the baking sheet for optimal roasting. - Toss halfway through cooking for uniform caramelization. Roasting carrots and chickpeas makes them sweet and crunchy. When you spread them out, they cook evenly. If they touch, they steam instead of roast. This can make them soggy and less tasty. Tossing the mixture halfway is key. It helps to brown all sides well. This step adds more flavor and a lovely texture. - Experiment with different citrus juices like lime or orange. - Substitute tahini with Greek yogurt for a creamy dressing. The dressing can change the whole dish. Use lime juice for a zesty twist. Orange juice gives a sweet touch. Both add freshness and brightness. If you want a creamy option, use Greek yogurt instead of tahini. It makes the dressing rich and smooth. This swap gives a fun flavor change too. - Serve in individual bowls for a refined presentation. - Add a lemon wedge for guests to use. Presenting this salad in bowls looks nice. It makes each serving feel special. Guests can enjoy their own portion. Adding a lemon wedge on the side is a great idea. It lets everyone add a splash of fresh juice. This brightens the salad even more. For the full recipe, check the details above. Enjoy your cooking! {{image_4}} You can make this salad even better. Try adding other roasted veggies. Bell peppers bring sweetness. Sweet potatoes add creaminess. Both enhance flavor and texture. You can also toss in nuts or seeds. Almonds or sunflower seeds add a nice crunch. They make the salad more filling and fun. If you want more protein, try grilled chicken or tofu. Both options work well with roasted carrots and chickpeas. Grilled chicken adds a savory touch, while tofu keeps it plant-based. You can also use canned tuna. It gives the salad a different flavor and makes it heartier. Want to boost flavor? Experiment with fresh herbs. Cilantro or mint can brighten the taste. They add freshness that complements the roasted veggies. You can also spice it up with hot sauce. Just a dash gives the salad a nice kick. It’s a fun way to change the flavor profile. For the complete recipe, check out the Full Recipe section above. Store leftovers in an airtight container in the fridge. They are best consumed within 2-3 days. After that, the carrots may lose their crunch, and the flavors fade. Freezing this salad is not recommended. The dressing may separate when frozen. This can change the texture and taste of your salad. You can enjoy this salad cold or at room temperature. If you prefer, reheat in the oven. This helps retain the texture of the roasted carrots and chickpeas. Yes, use maple syrup instead of honey and omit the feta cheese. This keeps the flavors rich and plant-based. You won’t miss the cheese, trust me. The roasted carrots and chickpeas bring enough taste and texture to satisfy everyone. You can use black beans or white beans as alternatives. Both options provide protein and fiber. They also add a nice twist to the taste. Black beans bring a bit of earthiness, while white beans offer a creamier texture. Serve the dressing on the side to keep the greens crisp until serving. This way, they stay fresh and crunchy. Drizzle the dressing just before you eat for the best taste and texture. Spinach, arugula, or chopped kale work well for base greens. Each option adds a different flavor. Spinach is mild, arugula is peppery, and kale adds a hearty bite. Choose what you like best! This blog post shares a tasty recipe featuring roasted carrots and chickpeas on fresh greens. It walks through each step, from prep to assembly, and includes tips for perfect results. You can even tweak the dressing and add your favorite proteins. Don’t hesitate to make this salad your own. Experimenting with flavors makes cooking fun! Enjoy your healthy, vibrant salad that brings flavor and nutrition to your table.](https://dishtreats.com/wp-content/uploads/2025/07/15b40619-46f3-4baf-96e6-94c974b2a42a-768x768.webp)
![- 1 can (15 oz) of chickpeas - 2 tablespoons extra virgin olive oil - Spice seasoning options: smoked paprika, garlic powder, ground cumin Crispy air fryer chickpeas need just a few simple ingredients. First, grab a can of chickpeas. They provide protein and fiber. Next, use extra virgin olive oil for richness. This oil helps the spices stick and adds flavor. For seasoning, I love smoked paprika, garlic powder, and ground cumin. These spices add depth and warmth to the dish. - Chopped fresh parsley or cilantro for garnishing - Alternative spices for flavor enhancement You can add fresh herbs like parsley or cilantro to make it pop. They add a burst of color and freshness. Feel free to play with spices. Try cayenne for heat or even cinnamon for a sweet twist. The options are endless! If you want to see the full recipe, check it out [Full Recipe]. - Preheat air fryer to 400°F (200°C). - Rinse and dry chickpeas thoroughly. Start by preheating your air fryer. Set it to 400°F (200°C) and let it heat for about five minutes. While it warms up, rinse the chickpeas well. It’s key to remove all the canning liquid. After rinsing, spread the chickpeas on a kitchen towel. Pat them dry gently. This step helps them get that perfect crisp. - Mix chickpeas with olive oil and spices. - Transfer to air fryer basket. In a large bowl, add the dried chickpeas. Pour in two tablespoons of olive oil. Sprinkle in smoked paprika, garlic powder, ground cumin, sea salt, and black pepper. Mix well so every chickpea gets coated. Next, transfer the seasoned chickpeas to the air fryer basket. Make sure they are in a single layer. Crowding the basket can lead to uneven cooking. - Set cooking time for 15–20 minutes. - Shake basket every 7 minutes for even cooking. Set the timer for 15 to 20 minutes. It’s important to shake the basket every seven minutes. This ensures all sides get crispy. Look for a nice golden-brown color and a satisfying crunch. When they’re done, let them cool for a few minutes. They will crisp up even more as they cool. If you like, garnish with chopped parsley or cilantro for a fresh touch before serving. To get the best crunch, drying chickpeas is key. Start by rinsing them well. Then, spread them on a clean kitchen towel and gently pat them dry. This step removes excess moisture, which helps them crisp up nicely in the air fryer. Next, set your air fryer to 400°F (200°C). Preheat it for about 5 minutes. This heat is crucial for achieving that perfect texture. When you place the chickpeas in the basket, make sure they are in a single layer. Overcrowding can lead to soggy chickpeas. Crispy chickpeas pair well with many dips. Hummus and tzatziki are two of my favorites. They add creaminess that balances the crunch. You can also toss them into salads for an extra crunch or use them to top soups. If you want to get creative, try using crispy chickpeas as a snack on their own. They make a great addition to trail mixes or can be sprinkled on popcorn for a fun twist. Chickpeas are not just tasty; they're nutritious too. They are high in protein and fiber. This makes them a filling snack that can help you feel satisfied. Air frying reduces the amount of oil needed, so you get a low-calorie snack option without sacrificing flavor. These crispy chickpeas are a great way to enjoy a healthy snack without the guilt. You can feel good about munching on them anytime! For the full recipe, check the section above. {{image_4}} You can change the flavor of your crispy air fryer chickpeas. One fun option is to add spice. Try cayenne or chili powder for a spicy kick. Just mix in a little with your other spices before cooking. If you prefer sweet snacks, go for cinnamon and sugar. This will give your chickpeas a unique twist that's fun and tasty. These chickpeas are healthy and fit many diets. They are naturally gluten-free and vegan-friendly. This means everyone can enjoy them! For those watching their salt intake, you can lower the sodium. Simply reduce or skip the sea salt in the recipe for a low-sodium version. If you're hosting a party, you might want more chickpeas. To increase the batch size, just double or triple the ingredients. The cooking time may stay the same, but keep an eye on them. You can also swap chickpeas for other legumes like black beans or lentils. They will work well in the air fryer and offer different flavors. Each option can give you a fun new snack! Check out the [Full Recipe](#) for detailed steps on making these crispy delights! To store your crispy chickpeas, use an airtight container. This will help them stay crunchy. A glass jar or a plastic container with a tight lid works well. Make sure to let them cool completely before sealing. This step prevents moisture buildup. You can easily reheat chickpeas in an air fryer. Set it to 350°F (175°C) and heat for about 5 minutes. This method keeps them crispy. If you prefer the oven, place them on a baking sheet at the same temperature. Check often to avoid sogginess. Crispy chickpeas last for about 3 days at room temperature. If you store them in the fridge, they may last a bit longer, but they can lose some crispiness. For best results, enjoy them fresh! To make air fryer chickpeas crispy, first dry them well. After rinsing, spread them on a clean towel and pat them dry. Removing moisture is key for that perfect crunch. Next, toss the chickpeas with olive oil and spices. The oil helps them crisp up in the air fryer. Set your air fryer to 400°F (200°C). Cook them for 15 to 20 minutes, shaking the basket every 7 minutes. This ensures even cooking and a nice, golden-brown color. Keep an ear out for a satisfying crunch as they cook. Let them cool for a few minutes after frying. They will get even crunchier as they cool. Yes, you can use dried chickpeas, but they require more prep. Start by soaking the dried chickpeas overnight. This softens them and reduces cooking time. After soaking, rinse and boil them until tender, about 1 to 2 hours. Once cooked, follow the same steps to dry and season them. Air frying time may be longer, as dried chickpeas need to lose more moisture. Pay close attention to their texture for that perfect crunch. Crispy chickpeas pair well with many dips. Try hummus for a classic touch. Tzatziki offers a cool contrast. You can also serve them with guacamole for a creamy twist. For a spicy kick, mix them with a sriracha mayo. These dips enhance the flavors of the chickpeas. They make for a fun and tasty snack or appetizer. Enjoy exploring different combinations to find your favorite! For the full recipe, check out the [Full Recipe]. Crispy air fryer chickpeas are easy and fun to make. We covered the main ingredients, like chickpeas and olive oil, and talked about spices for extra flavor. You learned preparation steps, tips for crispiness, and fun ways to enjoy this snack. Try different spices or dips to keep it exciting. Crispy chickpeas are a tasty, healthy option for any event. Enjoy your cooking and happy snacking!](https://dishtreats.com/wp-content/uploads/2025/07/61bc6060-fad3-40a7-be2f-ccc6788a1d37-768x768.webp)

![To make a tasty and healthy crispy chickpea salad, you need these main ingredients: - 1 can (15 oz) chickpeas, drained and rinsed - 2 tablespoons olive oil - 1 teaspoon smoked paprika - 1/2 teaspoon garlic powder - 1/2 teaspoon ground cumin - Salt and freshly ground pepper to taste - 4 cups mixed greens (spinach, arugula, and lettuce blend) - 1 cup cherry tomatoes, halved - 1/2 cucumber, diced - 1/4 red onion, thinly sliced Add some optional ingredients to enhance the flavor and texture of your salad: - 1/4 cup feta cheese, crumbled (optional) - A handful of fresh parsley, chopped (for garnish) You will also need a few kitchen tools to make this salad: - A medium-sized mixing bowl for the chickpeas - A large bowl for the salad - A baking sheet lined with parchment paper - A whisk for the dressing - A separate small bowl for mixing the tahini dressing Using these ingredients and tools, you can create a delicious crispy chickpea salad. Try the full recipe for a step-by-step guide! First, preheat your oven to 400°F (200°C). This makes sure the chickpeas get crispy. Line a baking sheet with parchment paper. This helps with easy cleanup later. In a bowl, mix the drained chickpeas with olive oil. Add smoked paprika, garlic powder, ground cumin, salt, and pepper. Make sure each chickpea is well coated. This blend gives them a tasty kick. Spread the seasoned chickpeas evenly on the baking sheet. Don’t crowd them; they need space to get crispy. Bake for 25-30 minutes. Shake the pan halfway through to help them cook evenly. They should turn golden and crunchy. While the chickpeas bake, prepare the salad base. In a large bowl, toss together mixed greens, halved cherry tomatoes, diced cucumber, and thinly sliced red onion. Mixing them now lets the flavors combine as you assemble. In a small bowl, whisk tahini, fresh lemon juice, and a pinch of salt and pepper. If you want a thinner dressing, add a splash of water. This dressing ties the salad together, adding a rich flavor. Once the chickpeas are crispy, take them out and let them cool for a minute. Top your salad with these warm chickpeas. Drizzle the tahini dressing over everything. Add crumbled feta cheese for creaminess, if you like. Finish with fresh parsley for color. Enjoy your Crispy Chickpea Delight Salad! For the complete recipe, check the [Full Recipe]. To make your chickpeas extra crispy, dry them well before cooking. Drain and rinse the canned chickpeas, then lay them on a paper towel. Pat them gently to remove excess moisture. The drier the chickpeas, the crunchier they will be. Toss them with olive oil and spices right before baking. Spread them out on your baking sheet. Avoid crowding them; it helps with airflow and crispiness. Bake at 400°F for 25 to 30 minutes, shaking the pan halfway through. This step ensures even cooking and crispiness. If you have leftovers, store the salad and chickpeas separately. Place the salad in an airtight container in the fridge. Keep the chickpeas in another container. This will help prevent sogginess. When you want to eat the leftovers, reheat the chickpeas in the oven for a few minutes. This will revive their crisp texture. The salad will stay fresh for about two days in the fridge. For the best taste, serve the salad immediately after assembling. The warm chickpeas add a nice contrast to the cool greens. Drizzle the tahini dressing right before serving. This way, it coats the ingredients nicely. You can also sprinkle some feta cheese on top for extra creaminess. Fresh herbs like parsley can brighten the dish. Try adding avocado for creaminess or nuts for crunch. Each addition enhances the flavor and texture of your salad. Enjoy experimenting! {{image_4}} You can swap out greens to change the salad's taste. Try using kale for a hearty crunch. Baby spinach offers a soft, mild flavor. You can even mix in some crunchy cabbage for more texture. Each option adds its unique twist while still pairing well with crispy chickpeas. If you want to make the salad more filling, add protein. Grilled chicken works great with the chickpeas. You can also try adding sliced hard-boiled eggs for richness. For a vegetarian option, toss in some quinoa or black beans. These choices will help boost the meal's nutrients. While tahini dressing is fantastic, don’t be afraid to experiment. A lemon vinaigrette adds a bright zing. You could also try a yogurt-based dressing for creaminess. If you like a kick, a spicy harissa dressing works wonders too. Each dressing brings a new flavor that can change your salad experience. For the full recipe, check out the Crispy Chickpea Delight Salad 🥗. To store leftover salad, first, let it cool down. Place it in an airtight container. This keeps the salad fresh. Add the crispy chickpeas on top only when serving. This way, they stay crunchy. If you mix them in, they can get soggy. If you have leftover crispy chickpeas, you can reheat them. Preheat your oven to 350°F (175°C). Spread the chickpeas on a baking sheet. Bake them for about 10 minutes. This brings back their crunch. You can also use an air fryer for a quicker option. The salad can last up to three days in the fridge. Chickpeas stay good for about a week if stored well. Fresh veggies have a shorter shelf life. Use them within three to five days. Always check for freshness before eating. For a detailed recipe, refer to the Full Recipe. Yes, you can use dried chickpeas. They need soaking and cooking first. To prepare, soak them overnight in water. Cook them until they are tender. This can take about 1 to 2 hours. Then, follow the same steps as with canned chickpeas in the recipe. This salad is packed with nutrients. Chickpeas provide protein and fiber. Mixed greens bring vitamins A and C. Tomatoes offer antioxidants, while cucumbers add hydration. Olive oil is a healthy fat. Feta cheese, if used, adds calcium. Overall, it is a well-balanced meal. To make this salad vegan, skip the feta cheese. The rest of the ingredients are already plant-based. You can also add more veggies or nuts for extra flavor and nutrition. Try adding avocado for creaminess or nuts for crunch. Yes, you can prep it ahead of time. Store the crispy chickpeas in an airtight container. Keep the salad ingredients separate until you are ready to eat. This keeps everything fresh and crispy. Just assemble when you want to enjoy your meal. This salad pairs well with many dishes. Serve it alongside grilled chicken or fish for protein. It also goes great with a warm pita or flatbread. If you want a lighter meal, enjoy it as a stand-alone dish. You can find the Full Recipe for more details. In summary, this blog post covered how to make a crispy chickpea salad. We explored the main ingredients and added options to boost flavor. I shared step-by-step cooking instructions and tips for the perfect crunch. You learned about storage methods and how to customize the dish. Enjoy this salad any time for a tasty and healthy meal. With its simple steps, you can make it again and again!](https://dishtreats.com/wp-content/uploads/2025/06/a0161600-1d29-449f-a743-39fb8b2e717a-768x768.webp)

