Looking for a fresh and colorful snack that’s as fun to make as it is to eat? Rainbow Veggie Spring Rolls are your answer! Bursting with vibrant veggies and flavors, they’re perfect for any occasion. In this guide, I’ll walk you through simple steps to make these delightful rolls and share tips for the best results. Get ready to impress your friends and family with this tasty treat!
Ingredients
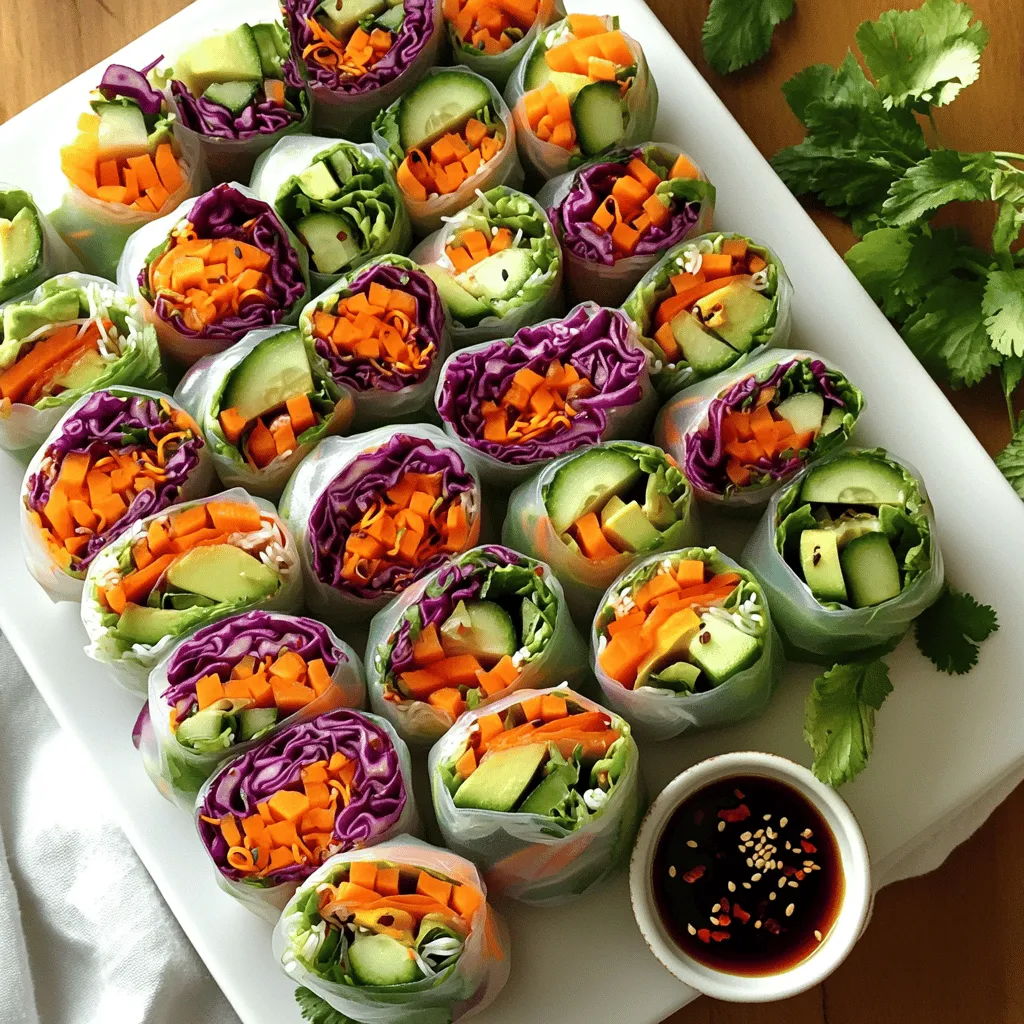
Essential Ingredients for Rainbow Veggie Spring Rolls
To make the Rainbow Veggie Spring Rolls, you need a few key items. Here’s what you should gather:
– 10 rice paper wrappers
– 1 cup finely shredded red cabbage
– 1 cup carrots, julienned
– 1 cup cucumber, peeled and julienned
– 1 bell pepper (any vibrant color), julienned
– 1 ripe avocado, sliced into thin wedges
– 1/2 cup fresh mint leaves, chopped
– 1/2 cup fresh cilantro leaves, chopped
– 1 cup cooked vermicelli noodles (optional for added texture)
These fresh ingredients bring color and crunch. Each bite is a burst of flavor.
Optional Add-ins for Extra Flavor
Want to jazz up your spring rolls? Here are some tasty add-ins:
– Thinly sliced radishes for a peppery kick
– Sliced jalapeños for heat
– Cooked chicken or shrimp for protein
– Chopped peanuts for crunch
– Sliced scallions for a fresh bite
Feel free to mix and match these options. They can make your rolls even more exciting.
Suggested Dipping Sauce Ingredients
A great dipping sauce makes these rolls shine. Here’s a simple recipe:
– 1/4 cup soy sauce
– 1 tablespoon sesame oil
– Red pepper flakes (optional, for a spicy kick)
This sauce is quick to make. It adds a salty and nutty flavor that pairs perfectly with the fresh veggies.Enjoy your cooking!
Step-by-Step Instructions
Preparing the Rice Paper Wrappers
To start, you need a large, shallow bowl. Fill it with warm water. Take one rice paper wrapper and dip it in the water. Let it soak for about 10-15 seconds. The wrapper should feel soft but not too mushy. Lift it out gently and place it flat on your work surface.
Layering the Colorful Fillings
Now it’s time to add your fillings! In the center of the soft rice paper, begin with a handful of shredded red cabbage. Next, add your colorful veggies: julienned carrots, cucumber, and bell pepper. Place a few slices of avocado on top. For freshness, sprinkle chopped mint and cilantro. If you want extra texture, add some cooked vermicelli noodles.
Rolling the Spring Rolls
It’s rolling time! First, fold the sides of the rice paper inwards. Then, starting from the edge closest to you, roll the wrapper away from you. Tuck in the fillings as you roll. Keep it tight but gentle. Continue until the spring roll is fully sealed. Place it seam-side down on a plate. Repeat this process with the rest of the wrappers and fillings until you have a colorful display of spring rolls.
After you roll each one, you can make a simple dipping sauce. Just mix soy sauce with a splash of sesame oil. If you like spice, add some red pepper flakes.
Enjoy your fresh and colorful snack!
Tips & Tricks
Perfecting the Rolling Technique
To roll spring rolls like a pro, start with a soft rice paper wrapper. Dip it in warm water for about 10-15 seconds. Once soft, lay it down on a clean surface.
– Filling Placement: Place the fillings in the center, leaving space on the sides.
– Fold Sides: Gently fold the sides over the filling.
– Roll Tightly: Start rolling from the edge closest to you. Tuck in the filling as you roll. Keep it tight but not too tight.
Practice makes perfect, so keep trying until you feel comfortable.
Presentation Ideas for Serving
An appealing presentation makes your spring rolls shine. Here are some fun ideas:
– Colorful Platter: Arrange the rolls in a circle or line.
– Dipping Bowls: Serve with small bowls of soy sauce and sesame oil.
– Garnish: Add fresh mint leaves or edible flowers for a pop of color.
Make it look as good as it tastes!
How to Store Leftover Spring Rolls
If you have leftovers, storing them right is key. Wrap the spring rolls in damp paper towels. Then, place them in an airtight container.
– Short-Term Storage: Keep in the fridge for 1-2 days.
– Avoid Freezing: Freezing can make the rice paper tough.
Enjoy them cold or let them sit at room temperature for a while before eating. They taste best fresh!

Variations
Vegetarian vs. Vegan Options
You can easily make these spring rolls vegetarian or vegan. For a vegetarian option, include cheese or eggs. If you want a vegan version, skip any dairy and stick to veggies.This way, you can enjoy a fresh, colorful snack without any animal products.
Adding Proteins like Shrimp or Tofu
If you like protein, consider adding shrimp or tofu to your spring rolls. Shrimp adds a nice, sweet flavor. Simply cook the shrimp until they turn pink and tender. For tofu, use firm tofu and pan-fry it until golden. Slice it into thin strips and add it to your rolls. Both options will make the rolls more filling and tasty.
Alternative Sauces for Dipping
While soy sauce is a great dip, you can try many others. Peanut sauce is a popular choice. It adds a rich, nutty flavor. Another option is sweet chili sauce, which gives a nice balance of sweet and spicy. You can even mix soy sauce with lime juice for a zesty kick. Feel free to experiment and find your favorite dipping sauce!Start by soaking each wrapper in warm water. This makes them soft and easy to roll. After soaking, lay the wrapper flat on a clean surface.
Next, layer your fillings in the center. Use a mix of colors. I love adding red cabbage, carrots, cucumber, and bell pepper. Don’t forget slices of ripe avocado for creaminess. For added taste, sprinkle fresh mint and cilantro on top. If you like noodles, add a bit of cooked vermicelli.
Now, it’s time to roll. Fold in the sides of the wrapper first. Then, roll it tightly away from you. Make sure to keep the fillings tucked inside. Once sealed, place the roll seam-side down. Repeat this for all your spring rolls.
For dipping sauce, mix soy sauce with sesame oil. If you want some spice, add red pepper flakes. Serve the rolls with this sauce for a delightful snack.
Nutritional Information and Benefits
Rainbow veggie spring rolls are not only tasty but also good for you. They are low in calories and packed with vitamins. Fresh vegetables give you fiber, which helps your digestion.
Here’s a quick look at the benefits:
– Red cabbage adds antioxidants.
– Carrots are great for your eyes.
– Cucumbers keep you hydrated.
– Bell peppers provide vitamin C.
– Avocado has healthy fats.
This colorful snack is a smart choice for anyone looking to eat well.
Serving Suggestions for Various Occasions
Rainbow veggie spring rolls fit many occasions. They can be a light snack for a movie night or a fresh appetizer for a party.
For a casual gathering, serve them on a big platter. Add small bowls of dipping sauce on the side. If you have kids, let them help with the rolling. It’s a fun activity!
For a more formal event, try arranging the rolls neatly with a garnish of mint leaves. This adds a nice touch and makes the dish pop. Whether it’s a picnic or a dinner party, these spring rolls will impress your guests.
FAQs
How do I make spring rolls not stick together?
To prevent your spring rolls from sticking, keep them moist. After rolling each one, place it on a plate lined with parchment paper. You can also lightly drizzle a little sesame oil between layers. Avoid crowding the plate, as space allows air to circulate and keeps them from sticking.
Can I prepare these spring rolls in advance?
Yes, you can make spring rolls ahead of time. Just roll them and store them in an airtight container. Place a damp paper towel between layers to keep them moist. This way, they stay fresh for a day or two in the fridge.
What vegetables work best in spring rolls?
You can use many vegetables for spring rolls. Here are my favorites:
– Red cabbage for crunch
– Carrots for sweetness
– Cucumbers for freshness
– Bell peppers for color
– Avocado for creaminess
Feel free to mix and match based on what you like. You can even add cooked vermicelli noodles for extra texture. The goal is to make it colorful and fun!
Rainbow veggie spring rolls are a fun and tasty dish. We covered all the essentials: key ingredients, step-by-step instructions, and helpful tips. You can customize these rolls to fit your taste, whether vegetarian or vegan. Don’t forget to explore different dipping sauces to enhance the flavor. With a little practice, you’ll master rolling and impress friends at any event. Enjoy making and sharing these colorful rolls. They are perfect for any occasion or as a snack. Get creative, have fun, and savor every bite.


