Rainbow Asian Noodle Salad Fresh and Flavorful Recipe

Are you ready to impress your taste buds? This Rainbow Asian Noodle Salad is a burst of colors and flavors that will brighten up your meal. Packed with fresh veggies, rice noodles, and a zesty dressing, it’s easy to make and even easier to enjoy. In this article, I’ll guide you step-by-step on creating this vibrant dish, plus tips for storage and tasty variations. Let’s dive in!
Ingredients
Main Ingredients
- 8 oz rice noodles or your preferred noodle choice
- 1 cup red cabbage, finely shredded
- 1 cup carrots, julienned into thin strips
- 1 cup mixed bell peppers, sliced into thin strips
- 1 cup sugar snap peas, trimmed of any strings
- 1 cucumber, julienned for added crunch
- 1 cup edamame, shelled and ready to eat
- ¼ cup fresh cilantro, coarsely chopped
- ¼ cup green onions, thinly sliced
- ¼ cup peanuts, crushed (optional garnish)
Dressing Ingredients
- 3 tablespoons soy sauce (or tamari for gluten-free option)
- 2 tablespoons sesame oil for a nutty flavor
- 1 tablespoon rice vinegar, adding acidity
- 1 tablespoon honey (or maple syrup for a vegan alternative)
- 1 teaspoon fresh ginger, grated for warmth
- 1 clove garlic, finely minced for depth
- 1 teaspoon chili paste (adjust based on your heat preference)
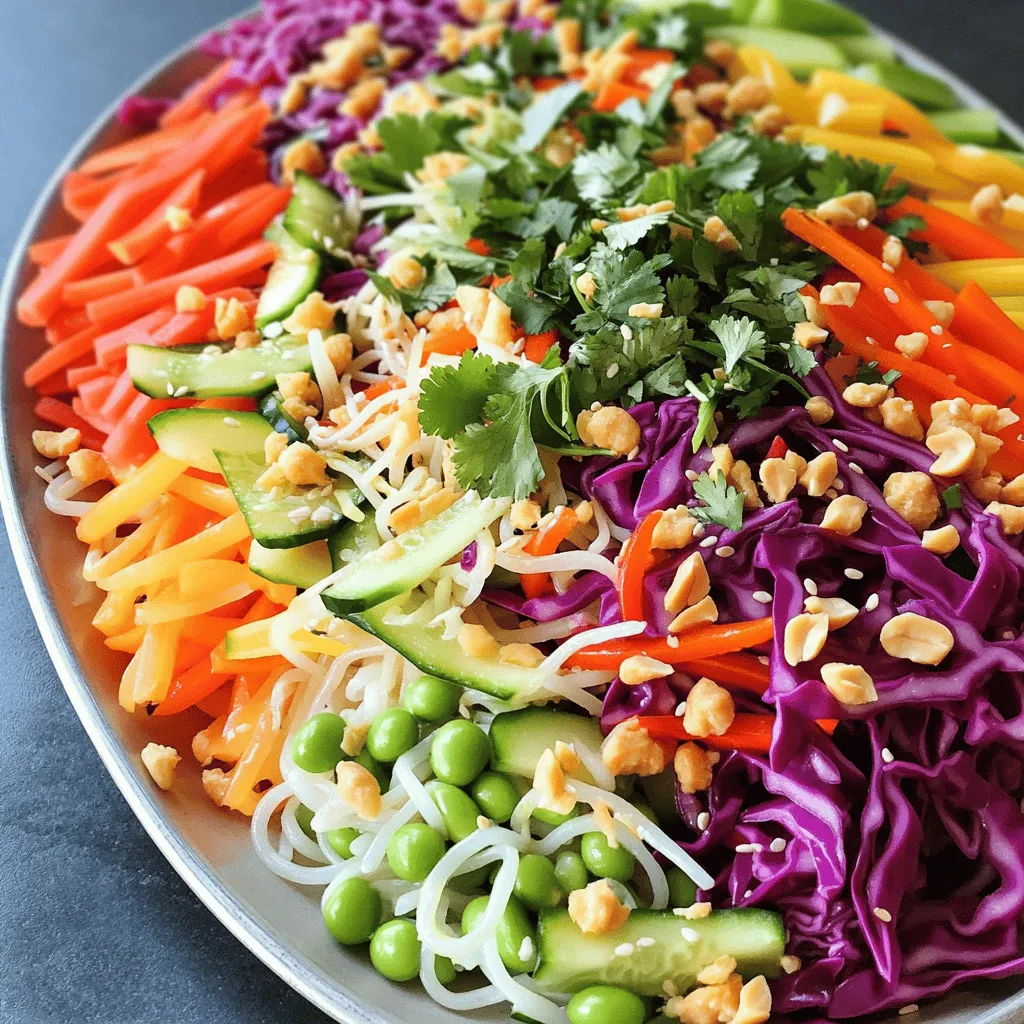
This rainbow Asian noodle salad bursts with fresh flavors. Each ingredient brings a unique taste. The rice noodles serve as a light base. Fresh veggies add crunch and color. Red cabbage gives a slight sweetness and a pop of purple. Carrots and bell peppers bring more vibrant colors and sweetness. Sugar snap peas add a nice snap. Cucumber offers a refreshing crunch, while edamame adds protein. For garnishes, cilantro and green onions enhance the flavors. Crushed peanuts give a wonderful crunch on top.
For the dressing, soy sauce and sesame oil create a rich base. Rice vinegar adds a bright acidity. Honey or maple syrup brings a touch of sweetness. Fresh ginger and garlic deepen the flavor. Chili paste adds heat, but you can adjust it to fit your taste.
These ingredients make this salad not only colorful but also full of nutrition.
Step-by-Step Instructions
Cooking the Noodles
1. Start by bringing a large pot of water to a boil.
2. Add 8 oz of rice noodles to the boiling water.
3. Cook the noodles according to the package instructions until they are al dente.
4. Once cooked, drain the noodles in a colander.
5. Rinse the noodles under cold water to stop the cooking process. Set them aside in a large bowl.
Preparing the Vegetables
1. Take your fresh vegetables: 1 cup of finely shredded red cabbage, 1 cup of julienned carrots, 1 cup of sliced bell peppers, 1 cup of trimmed sugar snap peas, 1 julienned cucumber, 1 cup of shelled edamame, ¼ cup of chopped cilantro, and ¼ cup of sliced green onions.
2. Shred and julienne the vegetables into thin strips for a nice texture.
3. Combine all the prepared vegetables in a spacious mixing bowl. Toss gently to mix them well.
Making the Dressing
1. In a small bowl, whisk together the dressing ingredients: 3 tablespoons of soy sauce, 2 tablespoons of sesame oil, 1 tablespoon of rice vinegar, 1 tablespoon of honey, 1 teaspoon of grated fresh ginger, 1 finely minced clove of garlic, and 1 teaspoon of chili paste.
2. Make sure all the ingredients blend well and the dressing has a smooth consistency.
Combining Ingredients
1. Add the drained noodles to the bowl with the mixed vegetables.
2. Pour your freshly made dressing over the top.
3. Toss everything together gently until the noodles and vegetables are evenly coated with the dressing.
Adjusting Flavors
1. Take a moment to taste the salad. It should burst with flavor.
2. If you like it sweeter, drizzle in more honey.
3. For extra heat, add more chili paste. Mix thoroughly and adjust to your taste.
Serving Suggestions
1. Transfer the colorful salad to a large serving bowl or platter.
2. Garnish with crushed peanuts and extra cilantro for a delightful crunch and pop of color.Enjoy your Rainbow Asian Noodle Salad!
Tips & Tricks
Cooking Tips
To cook noodles to al dente, bring a large pot of water to a boil. Add your rice noodles and cook them according to the package instructions. Keep an eye on the time. Al dente noodles should be firm yet tender. Once cooked, drain the noodles in a colander. Rinse them under cold running water. This stops the cooking and keeps them from getting sticky.
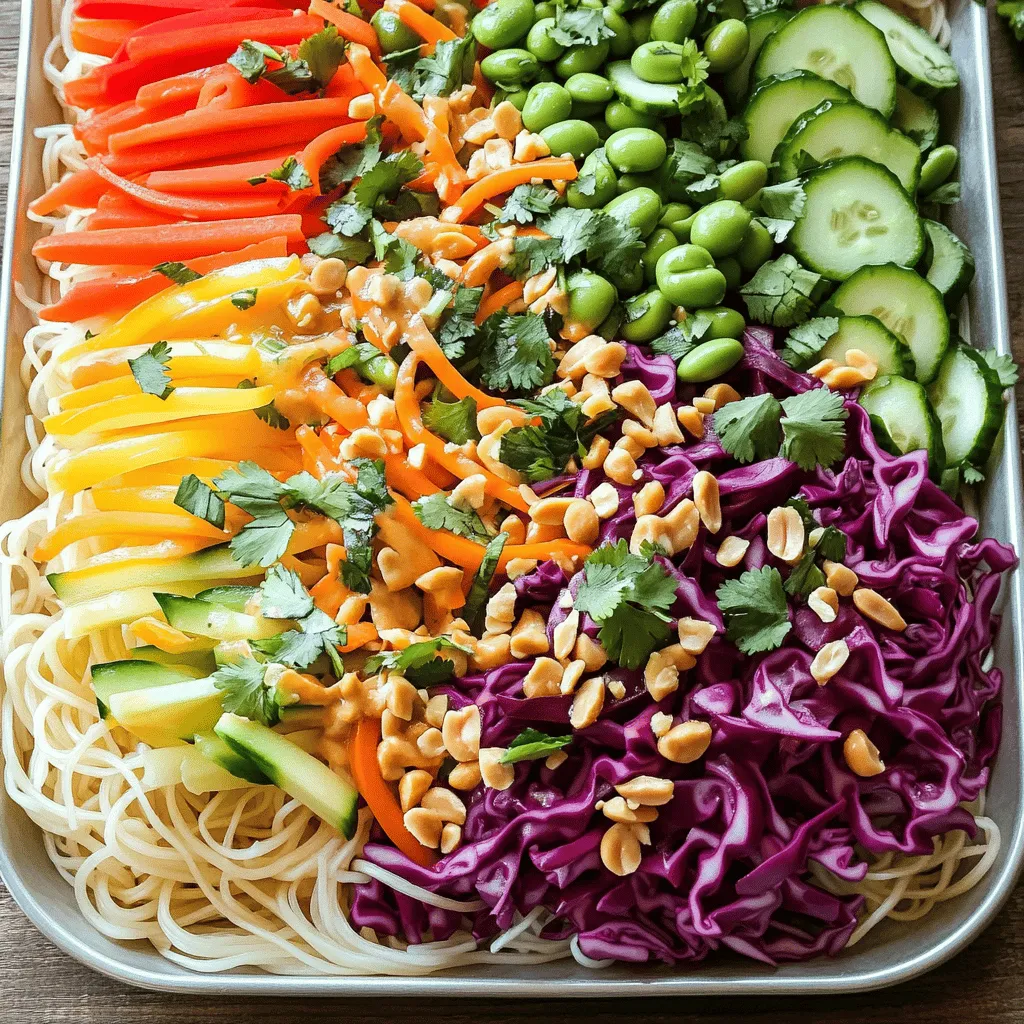
Presentation Ideas
For a beautiful salad, arrange your ingredients in layers. Start with the colorful vegetables at the bottom. Add the noodles on top. This method shows off the rainbow colors. Use vibrant bowls or platters for serving. Bright colors attract the eye and make your dish more appealing.
Flavor Adjustment Tips
To balance sweetness, heat, and acidity, taste your salad as you go. If it is too sweet, add more soy sauce. For heat, mix in extra chili paste. If your salad lacks acidity, a splash of rice vinegar can help. Adjust these flavors to suit your taste. This way, you create a dish that is truly yours.

Variations
Protein Additions
You can add protein to your Rainbow Asian Noodle Salad for a hearty boost. Tofu, chicken, and shrimp work great here.
- Tofu: Use firm tofu for the best texture. Cube it and pan-fry until golden brown.
- Chicken: Grill or sauté chicken breasts, then slice them into strips.
- Shrimp: Cook shrimp in a hot skillet until pink and firm. Toss them in just before serving.
These additions can make the salad a complete meal. Each protein adds its own taste and texture.
Dietary Modifications
If you follow a specific diet, you can still enjoy this salad. There are easy swaps to make it work.
- Gluten-Free: Substitute regular noodles with rice noodles or gluten-free noodles. Use tamari instead of soy sauce in the dressing.
- Vegan Adjustments: Replace honey with maple syrup. Ensure the noodles and other ingredients are vegan-friendly.
These changes keep the salad delicious while meeting your dietary needs.
Vegetable Alternatives
Feel free to swap out veggies in this salad based on what’s fresh or in season.
- Seasonal Substitutions: Use zucchini, radishes, or snap peas when they are ripe.
- Creative Additions: Try adding avocado for creaminess or nuts for crunch. Sliced almonds or cashews can add a nice texture.
Mixing vegetables lets you customize flavors and keep the salad exciting every time you make it.
Storage Info
Short-Term Storage
To keep your Rainbow Asian Noodle Salad fresh, store any leftovers in the fridge. Place the salad in an airtight container. This will help prevent moisture loss and keep the flavors intact. I recommend storing the dressing separately. This way, your veggies stay crisp, and the noodles don’t become soggy.
Freezing Options
You might wonder, can the salad be frozen? It’s not the best option. Freezing can change the texture of the vegetables. If you do want to freeze it, use a freezer-safe container. Make sure to remove as much air as possible. When you’re ready to eat, thaw it in the fridge overnight. Then, serve it cold.
Shelf Life
How long does the salad and dressing last in the fridge? The salad will stay good for about 3 days. The dressing can last about a week. Always check for any signs of spoilage before eating. Enjoy your fresh flavors while they last!
FAQs
What are the key flavors in Rainbow Asian Noodle Salad?
The Rainbow Asian Noodle Salad bursts with vibrant flavors. You taste the crunch of fresh veggies like bell peppers and carrots. The soy sauce gives it a savory depth. Sesame oil adds a nutty touch, while rice vinegar brings a tangy twist. Ginger and garlic enhance the overall flavor. Chili paste can add heat if you want it spicy. Together, these flavors create a delicious balance that makes each bite exciting.
Can I make this salad ahead of time?
Yes, you can make this salad ahead of time. Prepare the noodles and chop the veggies a day before. Keep the dressing in a separate container. When you’re ready to eat, mix everything together. This way, your salad stays fresh and crunchy. Just be sure to toss well before serving to coat the noodles and veggies evenly.
How do I make the salad spicier?
To make the salad spicier, add more chili paste to the dressing. You can also mix in sliced jalapeños or red pepper flakes for extra heat. If you enjoy heat, try adding fresh chopped chili peppers right into the salad. Adjust the spice level to match your taste buds. Just remember, a little heat goes a long way!
Are there gluten-free noodle options available?
Yes, there are great gluten-free noodle options. You can use rice noodles, which are light and chewy. Another choice is quinoa noodles, which add a nutty flavor. If you prefer a different texture, try zucchini noodles. They are fresh and low in carbs. Always check the label to ensure they are gluten-free.
How can I make it a full meal?
To turn this salad into a full meal, add protein like grilled chicken, shrimp, or tofu. You could also mix in some cooked edamame for extra protein. Adding nuts like cashews or almonds can give it a nice crunch. Serve it with a side of fresh fruit for a balanced meal. These additions make the salad hearty and satisfying.
This blog post covered how to make a tasty Rainbow Asian Noodle Salad. We discussed key ingredients like rice noodles, fresh veggies, and a zesty dressing. I shared step-by-step instructions for cooking and combining, plus tips for flavor adjustments and presentation. You can customize this dish with proteins or seasonal veggies. Remember to store leftovers properly for freshness. This vibrant salad is not just a side dish; it can be a full meal too. Enjoy making it your own!


![- 1 lb boneless, skinless chicken breasts, cut into bite-sized pieces - 1 cup dill pickle juice - 1 cup all-purpose flour - 1 teaspoon onion powder - 1 teaspoon garlic powder - 1 teaspoon paprika - 1 teaspoon black pepper - 1/2 teaspoon salt - 2 large eggs, beaten - 1 cup breadcrumbs (use panko for added crunch) - 1/2 cup ranch dressing - Fresh dill, for garnish (optional) These ingredients create a tasty flavor mix. The chicken gets a nice tang from the dill pickle juice. The spices add warmth and depth. The ranch dressing gives a creamy finish. You will need some basic tools for the best results. Here’s what I suggest: - Mixing bowls for marinating and breading - A whisk for beating the eggs - A baking sheet lined with parchment paper or greased - Measuring cups and spoons for accuracy These tools help streamline your cooking process. They ensure that each step flows smoothly and efficiently. If you want to change things up, here are some easy swaps: - Use chicken thighs instead of breasts for more flavor. - Swap out ranch dressing for blue cheese dressing for a bolder taste. - Try gluten-free flour if you need a gluten-free option. - Use crushed cornflakes instead of breadcrumbs for extra crunch. These substitutions can make the recipe your own. You can keep it fun and exciting while still enjoying the core flavors. For the complete recipe, check the [Full Recipe]. To start, grab a mixing bowl. Place the bite-sized chicken pieces into it. Pour in the dill pickle juice, making sure the chicken is fully submerged. Cover the bowl with plastic wrap or a lid. Now, let it chill in the fridge. For best results, marinate for at least one hour. If you have time, overnight is even better. This step adds so much flavor to the chicken! Next, let’s set up a breading station. You will need three bowls. In the first bowl, mix the all-purpose flour with onion powder, garlic powder, paprika, black pepper, and salt. Stir well until everything is combined. In the second bowl, pour in the beaten eggs. Whisk them until they are smooth. In the third bowl, fill it with breadcrumbs, preferably panko. Panko gives a nice crunch to the bites. After marinating, take the chicken out of the fridge. Gently pat the chicken pieces dry with paper towels. Start by dredging each piece in the flour mix. Make sure to shake off any extra flour. Next, dip the chicken into the beaten eggs. Finally, coat the chicken well with the breadcrumbs. Now, preheat your oven to 400°F (200°C). Prepare a baking sheet by lining it with parchment paper or greasing it lightly. Arrange the breaded chicken bites in a single layer. Bake for 15-20 minutes. They should turn golden brown and crispy. Check that the internal temperature reaches 165°F (75°C). Once cooked, move the chicken bites to a serving platter. Drizzle ranch dressing on top and sprinkle with fresh dill if you like. This adds a lovely touch! For the full recipe, be sure to check the details. To get crispy chicken bites, follow a few key steps. First, make sure to marinate the chicken in dill pickle juice. This adds flavor and helps keep the meat moist. Next, dry the chicken pieces well before breading. Excess moisture can lead to soggy bites. When coating, use seasoned flour first, then dip in egg, and finally cover with breadcrumbs. I recommend using panko breadcrumbs for extra crunch. Bake at 400°F (200°C) until golden brown and fully cooked. Avoid common mistakes for the best results. Do not rush the marination process; it is crucial for flavor. Skipping the drying step can lead to less crispy bites. Also, ensure you do not overcrowd the baking sheet. Leave space between each piece to allow hot air to circulate. Lastly, check the internal temperature. Chicken should reach 165°F (75°C) to be safely eaten. For tailgating or parties, serve these bites with extra ranch dressing for dipping. This adds a nice creamy touch. You can also pair them with fresh pickle slices for added crunch. For a fun twist, consider setting up a dipping station. Include various sauces, like buffalo sauce or honey mustard. This lets guests customize their bites. {{image_4}} Want some heat? Add hot sauce to the marinade. This gives your chicken bites a spicy kick. You can also mix cayenne pepper into the flour. Adjust the amount to your taste. This adds flavor without overwhelming the pickle taste. If you enjoy heat, this variation is for you! Looking for a lighter option? Use an air fryer to cook your chicken bites. This method cuts down on oil and keeps them crisp. Preheat your air fryer to 400°F (200°C). Place the breaded chicken in a single layer. Cook for about 12-15 minutes. Check that they reach an internal temperature of 165°F (75°C). You get a crunchy texture without deep frying! Want a veggie twist? Try using cauliflower instead of chicken. Cut cauliflower into bite-sized florets. Marinate them in the dill pickle juice for the same time. Follow the same breading and cooking steps. Bake or air fry until golden and crispy. This gives you a tasty, plant-based snack that everyone will love. You can find the full recipe for Pickle Ranch Chicken Bites and try these fun variations! To keep your leftover chicken bites fresh, place them in an airtight container. Make sure they cool down to room temperature before sealing. This method helps prevent moisture, which can make them soggy. Store the container in the fridge for up to three days. When you're ready to enjoy your chicken bites again, reheating properly is key. I recommend using an oven or an air fryer for the best results. Preheat the oven to 375°F (190°C). Place the chicken bites on a baking sheet and heat for about 10-15 minutes. This method helps restore their crispy texture. If using an air fryer, set it to 350°F (175°C) and heat for about 5-7 minutes. If you want to save some chicken bites for later, freezing is a great option. First, let them cool completely. Then, arrange the bites in a single layer on a baking sheet and freeze for about an hour. Once frozen, transfer them to a freezer-safe bag or container. They can last up to three months in the freezer. When you're ready to eat, just reheat them from frozen, following the tips above for that perfect crunch. For the full recipe, check out the details above. The best way to marinate chicken is to use a flavorful liquid. For Pickle Ranch Chicken Bites, you will soak the chicken in dill pickle juice. This juice adds a zesty kick and keeps the meat juicy. Place the cut chicken in a bowl and cover it with the pickle juice. Make sure all pieces are fully submerged. Cover the bowl and refrigerate for at least an hour. For even better flavor, let it marinate overnight. This method works well for any chicken dish. Yes, you can use frozen chicken for this recipe. However, it is best to thaw the chicken first. Place it in the fridge overnight or submerge it in cold water for quicker thawing. Once thawed, cut the chicken into bite-sized pieces. After that, follow the marination steps as usual. Using frozen chicken may change the texture slightly, but it will still taste great. To make a low-carb version of Pickle Ranch Chicken Bites, you can skip the breadcrumbs. Instead, coat the chicken pieces in crushed pork rinds or almond flour. Both options give a nice crunch without the carbs. You can also use a low-carb ranch dressing for dipping. This way, you keep the flavor and texture while making it suitable for a low-carb diet. Enjoy your tasty bites without the guilt! In this post, we explored how to make Pickle Ranch Chicken Bites. We discussed key ingredients, cooking essentials, and helpful substitutions. I shared step-by-step instructions for marinating, breading, and baking. You learned tips for crispy bites and common mistakes to avoid. We covered variations like spicy bites and vegetarian options. Finally, I provided storage tips and answered FAQs. Try these bites for your next gathering. They’re fun, easy, and full of flavor! Enjoy your cooking adventure!](https://dishtreats.com/wp-content/uploads/2025/07/7f7f749c-ecc1-4920-b674-4460a511463b-768x768.webp)


![To make this dish, you will need: - 1 lb Brussels sprouts, trimmed and halved - 3 tablespoons extra virgin olive oil - 1/4 cup pure maple syrup - 1 tablespoon balsamic vinegar - 1 teaspoon garlic powder - Salt and freshly ground black pepper to taste These ingredients come together to create a sweet and savory glaze. The maple syrup adds sweetness, while the balsamic vinegar gives tanginess. The olive oil helps with roasting, making the sprouts tender and tasty. You can add these optional ingredients for extra flavor and texture: - 1/4 cup chopped walnuts - Fresh thyme leaves for garnish Walnuts add a nice crunch, while thyme gives a fresh aroma. Both options enhance the dish without overpowering it. This dish is not just tasty; it’s also good for you. Here’s a quick look at the nutrition per serving: - Calories: About 180 - Protein: 3g - Carbohydrates: 25g - Fat: 8g - Fiber: 4g Brussels sprouts are rich in vitamins C and K. The maple syrup provides natural sugars, making this dish a healthy choice. You get great flavors and health benefits in one meal. For the complete recipe, check the Full Recipe section above! First, we need to preheat the oven to 400°F (200°C). This heat is perfect for roasting. A hot oven ensures crispy edges and tender centers for your Brussels sprouts. Next, gather your ingredients. You will need: - 1 lb Brussels sprouts, trimmed and halved - 3 tablespoons extra virgin olive oil - 1/4 cup pure maple syrup - 1 tablespoon balsamic vinegar - 1 teaspoon garlic powder - Salt and freshly ground black pepper to taste - 1/4 cup chopped walnuts (optional for crunch) - Fresh thyme leaves for garnish (optional for aroma and color) In a large bowl, mix the halved Brussels sprouts with olive oil, maple syrup, balsamic vinegar, garlic powder, salt, and pepper. Toss everything well. Make sure every sprout gets coated in the sweet and savory sauce. This step is key for flavor. Prepare your baking sheet by lining it with parchment paper. This makes cleaning easy and helps prevent sticking. Spread the Brussels sprouts in a single layer on the sheet. Give them space to roast well. Now, place the baking sheet in the hot oven. Roast the sprouts for 25 minutes. Halfway through, stir them to promote even cooking. You want them to get tender and brown. If you add walnuts, toss them on the sheet during the last 5 minutes. This will give them a nice toast and extra crunch. Once done, take the Brussels sprouts out and let them cool for a minute. Transfer them to a serving dish. For a finishing touch, sprinkle fresh thyme leaves on top. This adds a nice pop of color and aroma to your dish. Enjoy this full recipe for a delicious treat! To get that perfect glaze, start with good maple syrup. Use pure maple syrup for the best flavor. Mix it well with olive oil and balsamic vinegar; this combo really shines. Make sure to coat the Brussels sprouts evenly. This helps each piece get that sweet, sticky glaze. Toss them well in the bowl before roasting. Roasting Brussels sprouts needs some care. First, preheat your oven to 400°F (200°C). This hot oven helps them caramelize. Spread the sprouts on a baking sheet in a single layer. If they are crowded, they won't brown well. Stir them halfway through cooking to ensure even roasting. You want them golden brown and tender, about 25 minutes in the oven. When ready to serve, think about how to make them look nice. Place the roasted sprouts on a large platter. You can arrange them in a circle for a pretty look. If you added walnuts, sprinkle them on top for crunch. Fresh thyme leaves also add color and smell great. This makes the dish not just tasty but beautiful too. For the full recipe, check out the details above. {{image_4}} You can switch up the sweetener for a twist. Try honey or agave syrup. These will add their own unique flavors. You can also use coconut sugar for a richer taste. If you like a kick, add some chili flakes for heat. A dash of orange juice can also brighten up the sweetness. This recipe is already vegetarian. To make it vegan, ensure the maple syrup is pure. You can also use almond oil instead of olive oil for a different flavor. For creaminess, add a dollop of vegan sour cream on top before serving. This adds a lovely tang that pairs well with the sweetness. Seasonal swaps can make this dish even better. In spring, add fresh peas for color and sweetness. During fall, toss in some diced apples for a sweet crunch. In winter, try adding roasted chestnuts for a nutty flavor. These changes keep the dish fresh and exciting every time you make it. For the full recipe, you can refer back to the detailed instructions provided. After enjoying your maple glazed Brussels sprouts, store any leftovers in an airtight container. This keeps them fresh and prevents odors. Let them cool first before sealing. Place the container in the fridge. They stay good for about 3 to 5 days. If you want to keep them longer, consider freezing. Reheating your Brussels sprouts can be quick and easy. You can use the oven or stovetop. If you use the oven, preheat it to 350°F (175°C). Spread the sprouts on a baking sheet and heat for about 10-15 minutes. Stir halfway through to ensure even warming. If you prefer the stovetop, heat a pan over medium heat. Add a bit of olive oil and toss the sprouts until warmed through. Freezing Brussels sprouts is a smart way to save them for later. First, blanch them in boiling water for 3 minutes. Then, cool them in ice water. This keeps their bright color and flavor. Drain and dry the sprouts, then place them in a freezer bag. Remove as much air as you can before sealing. They can last up to 6 months in the freezer. When you're ready to use them, just thaw and reheat! Enjoy your deliciously roasted maple glazed Brussels sprouts from [Full Recipe] and savor every bite! Yes, you can prep Brussels sprouts in advance. Trim and halve them a day before. Store them in an airtight container in the fridge. When you're ready, mix them with the other ingredients from the Full Recipe. This helps save time and makes cooking easier. Maple glazed Brussels sprouts pair well with many dishes. Here are some great options: - Roast chicken for a savory touch. - Grilled salmon for a healthy protein. - Quinoa salad for a hearty side. - Mashed potatoes for comfort food lovers. These options balance the sweet and savory flavors of the sprouts. To make this dish vegan, swap out the maple syrup for agave nectar. This keeps the sweetness intact. You can also use vegetable oil instead of olive oil if you prefer. Follow the Full Recipe as is, making those simple swaps. Enjoy the same great taste with a vegan twist! In this blog post, we covered how to make maple glazed Brussels sprouts. We discussed the key ingredients and provided step-by-step instructions. Tips helped you achieve the perfect glaze and roasting method. You also learned about variations, storage, and common questions. Now, you have all the tools to enjoy this dish. Experiment with flavors and enjoy your cooking!](https://dishtreats.com/wp-content/uploads/2025/06/8ccc11bb-56ad-4722-8e0d-cbebb28a9ca5-768x768.webp)