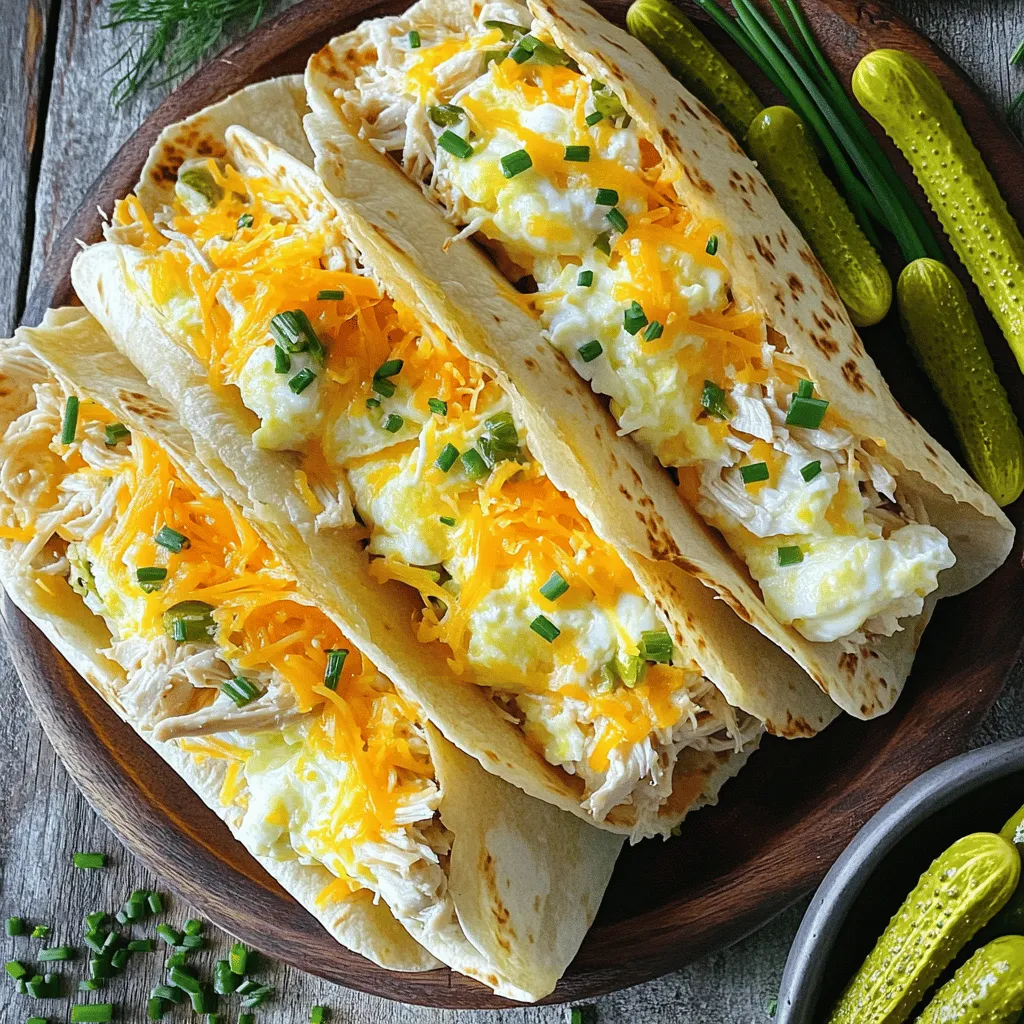
Pickle Ranch Chicken Breakfast Burritos Delight
![- 2 cups cooked chicken, shredded - 1/2 cup dill pickles, finely chopped - 1/2 cup ranch dressing - 4 large eggs - 1/4 cup milk - 1 cup shredded cheddar cheese - 4 large flour tortillas - 1/2 teaspoon garlic powder - 1/2 teaspoon onion powder - Salt and pepper to taste - Fresh chives, chopped (for garnish) The main ingredients bring the best flavors to our burritos. First, we use cooked chicken. You can use leftovers from dinner or rotisserie chicken for ease. Shredded chicken mixes well with the tangy dill pickles. You get a nice crunch and zest. The ranch dressing adds creaminess and ties everything together. Next, we add eggs for protein. They make the burritos filling and tasty. Mixing them with milk keeps them soft and fluffy. Garlic and onion powders give the eggs extra flavor. Don’t forget salt and pepper! They enhance all the other tastes. The additional ingredients round out the meal. Cheddar cheese melts beautifully, adding richness. Flour tortillas wrap it all up nicely. Chives make the dish look fresh and bright. You can find the complete recipe in the [Full Recipe] section. With these ingredients, your Pickle Ranch Chicken Breakfast Burritos will be a hit! To start, grab a medium mixing bowl. Combine 2 cups of shredded chicken, 1/2 cup of finely chopped dill pickles, and 1/2 cup of ranch dressing in the bowl. Stir this mixture well until the chicken is coated with the ranch. This flavorful filling is key to our burrito. Set it aside for later use. Next, we need to make our scrambled eggs. In a separate bowl, crack 4 large eggs. Add 1/4 cup of milk, 1/2 teaspoon of garlic powder, 1/2 teaspoon of onion powder, and some salt and pepper. Whisk everything until smooth. Heat a non-stick skillet over medium heat and gently pour the egg mixture into the hot skillet. Stir the eggs softly with a spatula until they are creamy and just set. Remove the skillet from heat once they look perfect. Now, let’s put the burritos together! Lay out 4 large flour tortillas on a clean surface. In the center of each tortilla, place a generous amount of the chicken and pickle mixture. Top this with a scoop of the fluffy scrambled eggs and a sprinkle of 1 cup of shredded cheddar cheese. To form the burritos, fold the sides of each tortilla inward, and then roll them up tightly from the bottom. Make sure the filling stays secure. Return the same skillet to medium heat. Place the rolled burritos seam-side down in the skillet. Cook them for 2-3 minutes on each side until they are golden brown and crispy. After cooking, let the burritos cool a bit before slicing them in half for easier serving. You can find the Full Recipe for more details! - Use low heat for creamy eggs. - Stir gently for fluffy texture. When making scrambled eggs, low heat is key. High heat can make eggs dry. Cooking slowly helps keep them soft and creamy. Stirring gently lets air in, making them light and fluffy. - Ensure an even fill to secure the burritos. - Tuck in sides to prevent spillage. Rolling burritos can be tricky, but practice makes perfect. Start with an even fill of chicken and eggs in the center. This helps secure the filling. Tuck in the sides before rolling. This way, you keep everything snug inside. - Use fresh chives for a pop of color. - Serve with extra pickles or hot sauce for added flavor. A great garnish makes your dish shine. Fresh chives add color and a mild flavor. Extra pickles bring crunch and tang. If you like spice, drizzle hot sauce on top. It adds a kick everyone will love. For the full recipe, check out the Pickle Ranch Chicken Breakfast Burritos. {{image_4}} You can switch the chicken for shredded turkey if you like. Turkey gives a nice flavor too. If you want a vegetarian option, use tofu instead. Tofu absorbs spices well and will keep your burrito filling tasty. Want to spice things up? Add diced jalapeños to the filling. They give a nice kick without being too hot. You can also change the cheese. Try pepper jack for a creamy heat or feta for a tangy twist. Both options will make your burritos even more delicious. Tortillas are not just for flour. You can use whole wheat or corn tortillas for a healthier choice. If you want color, try spinach or tomato-based tortillas. These will add a fun look to your dish. You can mix and match to find your favorite combination. For the full recipe, check out the complete guide. Refrigerate leftover burritos for up to 3 days. Place them in an airtight container. This keeps them fresh and tasty. When you are ready to eat, enjoy them cold or reheated. You can freeze uncooked burritos for up to 1 month. Wrap each burrito tightly in plastic wrap. Then place them in a freezer bag to prevent freezer burn. When you want to eat them, you can reheat them directly from the freezer or thaw them in the fridge overnight. To keep the texture nice, use an oven or skillet. For the oven, preheat it to 350°F (175°C). Place the burritos on a baking sheet and heat for about 15-20 minutes. For the skillet, warm it over medium heat. Cook the burritos for about 3-4 minutes on each side until they are hot and crispy. Yes, you can prepare and refrigerate the filling or entire burritos to save time. I often make the filling a day in advance. This lets the flavors meld together. You can store it in an airtight container. If you want to make the whole burrito, wrap them well in foil or plastic wrap before refrigerating. When you’re ready to eat, just heat them up in the skillet or microwave. Add hot sauce to the chicken mixture or include spicy pickles. I love using pickles with a kick for extra flavor. You can also mix in some diced jalapeños. This gives a nice heat that pairs well with the ranch dressing. Just remember to taste as you go. You want the spice to enhance, not overpower. Pair with fresh fruit, a side salad, or crispy potato wedges for a complete meal. I enjoy adding a fruit salad for a sweet touch. A simple green salad with a light dressing also works well. Crispy potato wedges bring a satisfying crunch. You can even sprinkle some extra chives on top for a fresh finish. If you like, serve with your favorite hot sauce for dipping. These Pickle Ranch Chicken Breakfast Burritos pack flavor in every bite. We combined shredded chicken, dill pickles, and ranch for a tasty filling. Scrambled eggs bring creaminess, while tips for soft eggs and proper rolling help achieve perfect burritos. You can even switch ingredients to fit your taste. Whether you pick turkey or a spicy twist, the options are endless. With proper storage, you can enjoy them later, too. Don't hesitate to try this fun, delicious recipe that makes mornings brighter!](https://dishtreats.com/wp-content/uploads/2025/07/caeedbb3-1f25-4c27-bd1d-713cf7cd2d52.webp)
Get ready to start your day the tasty way with Pickle Ranch Chicken Breakfast Burritos! Combining savory chicken, zesty dill pickles, and creamy ranch dressing, these burritos are a morning game changer. In just a few steps, you can whip up this quick breakfast that’s packed with flavor and fun. Read on to learn how to make this delicious dish that everyone will love!
Ingredients
Main Ingredients for Pickle Ranch Chicken Breakfast Burritos
- 2 cups cooked chicken, shredded
- 1/2 cup dill pickles, finely chopped
- 1/2 cup ranch dressing
- 4 large eggs
- 1/4 cup milk
Additional Ingredients
- 1 cup shredded cheddar cheese
- 4 large flour tortillas
- 1/2 teaspoon garlic powder
- 1/2 teaspoon onion powder
- Salt and pepper to taste
- Fresh chives, chopped (for garnish)
The main ingredients bring the best flavors to our burritos. First, we use cooked chicken. You can use leftovers from dinner or rotisserie chicken for ease. Shredded chicken mixes well with the tangy dill pickles. You get a nice crunch and zest. The ranch dressing adds creaminess and ties everything together.
Next, we add eggs for protein. They make the burritos filling and tasty. Mixing them with milk keeps them soft and fluffy. Garlic and onion powders give the eggs extra flavor. Don’t forget salt and pepper! They enhance all the other tastes.
The additional ingredients round out the meal. Cheddar cheese melts beautifully, adding richness. Flour tortillas wrap it all up nicely. Chives make the dish look fresh and bright.
With these ingredients, your Pickle Ranch Chicken Breakfast Burritos will be a hit!
Step-by-Step Instructions
Preparing the Chicken and Pickle Mixture
To start, grab a medium mixing bowl. Combine 2 cups of shredded chicken, 1/2 cup of finely chopped dill pickles, and 1/2 cup of ranch dressing in the bowl. Stir this mixture well until the chicken is coated with the ranch. This flavorful filling is key to our burrito. Set it aside for later use.
Making the Scrambled Eggs
Next, we need to make our scrambled eggs. In a separate bowl, crack 4 large eggs. Add 1/4 cup of milk, 1/2 teaspoon of garlic powder, 1/2 teaspoon of onion powder, and some salt and pepper. Whisk everything until smooth. Heat a non-stick skillet over medium heat and gently pour the egg mixture into the hot skillet. Stir the eggs softly with a spatula until they are creamy and just set. Remove the skillet from heat once they look perfect.
Assembling and Cooking the Burritos
Now, let’s put the burritos together! Lay out 4 large flour tortillas on a clean surface. In the center of each tortilla, place a generous amount of the chicken and pickle mixture. Top this with a scoop of the fluffy scrambled eggs and a sprinkle of 1 cup of shredded cheddar cheese. To form the burritos, fold the sides of each tortilla inward, and then roll them up tightly from the bottom. Make sure the filling stays secure.
Return the same skillet to medium heat. Place the rolled burritos seam-side down in the skillet. Cook them for 2-3 minutes on each side until they are golden brown and crispy. After cooking, let the burritos cool a bit before slicing them in half for easier serving.
Tips & Tricks
Tips for Perfecting Scrambled Eggs
- Use low heat for creamy eggs.
- Stir gently for fluffy texture.
When making scrambled eggs, low heat is key. High heat can make eggs dry. Cooking slowly helps keep them soft and creamy. Stirring gently lets air in, making them light and fluffy.
Burrito Rolling Technique
- Ensure an even fill to secure the burritos.
- Tuck in sides to prevent spillage.
Rolling burritos can be tricky, but practice makes perfect. Start with an even fill of chicken and eggs in the center. This helps secure the filling. Tuck in the sides before rolling. This way, you keep everything snug inside.
Garnishing Ideas
- Use fresh chives for a pop of color.
- Serve with extra pickles or hot sauce for added flavor.
A great garnish makes your dish shine. Fresh chives add color and a mild flavor. Extra pickles bring crunch and tang. If you like spice, drizzle hot sauce on top. It adds a kick everyone will love.
Variations
Chicken Alternatives
You can switch the chicken for shredded turkey if you like. Turkey gives a nice flavor too. If you want a vegetarian option, use tofu instead. Tofu absorbs spices well and will keep your burrito filling tasty.
Flavor Enhancements
Want to spice things up? Add diced jalapeños to the filling. They give a nice kick without being too hot. You can also change the cheese. Try pepper jack for a creamy heat or feta for a tangy twist. Both options will make your burritos even more delicious.
Different Tortilla Options
Tortillas are not just for flour. You can use whole wheat or corn tortillas for a healthier choice. If you want color, try spinach or tomato-based tortillas. These will add a fun look to your dish. You can mix and match to find your favorite combination.
Storage Info
Short-Term Storage
Refrigerate leftover burritos for up to 3 days. Place them in an airtight container. This keeps them fresh and tasty. When you are ready to eat, enjoy them cold or reheated.
Freezing Options
You can freeze uncooked burritos for up to 1 month. Wrap each burrito tightly in plastic wrap. Then place them in a freezer bag to prevent freezer burn. When you want to eat them, you can reheat them directly from the freezer or thaw them in the fridge overnight.
Reheating Tips
To keep the texture nice, use an oven or skillet. For the oven, preheat it to 350°F (175°C). Place the burritos on a baking sheet and heat for about 15-20 minutes. For the skillet, warm it over medium heat. Cook the burritos for about 3-4 minutes on each side until they are hot and crispy.
FAQs
Can I make Pickle Ranch Chicken Breakfast Burritos ahead of time?
Yes, you can prepare and refrigerate the filling or entire burritos to save time. I often make the filling a day in advance. This lets the flavors meld together. You can store it in an airtight container. If you want to make the whole burrito, wrap them well in foil or plastic wrap before refrigerating. When you’re ready to eat, just heat them up in the skillet or microwave.
How do I make these burritos spicier?
Add hot sauce to the chicken mixture or include spicy pickles. I love using pickles with a kick for extra flavor. You can also mix in some diced jalapeños. This gives a nice heat that pairs well with the ranch dressing. Just remember to taste as you go. You want the spice to enhance, not overpower.
What can I serve with these burritos?
Pair with fresh fruit, a side salad, or crispy potato wedges for a complete meal. I enjoy adding a fruit salad for a sweet touch. A simple green salad with a light dressing also works well. Crispy potato wedges bring a satisfying crunch. You can even sprinkle some extra chives on top for a fresh finish. If you like, serve with your favorite hot sauce for dipping.
These Pickle Ranch Chicken Breakfast Burritos pack flavor in every bite. We combined shredded chicken, dill pickles, and ranch for a tasty filling. Scrambled eggs bring creaminess, while tips for soft eggs and proper rolling help achieve perfect burritos.
You can even switch ingredients to fit your taste. Whether you pick turkey or a spicy twist, the options are endless. With proper storage, you can enjoy them later, too. Don’t hesitate to try this fun, delicious recipe that makes mornings brighter!
![- 2 cups cooked chicken, shredded - 1/2 cup dill pickles, finely chopped - 1/2 cup ranch dressing - 4 large eggs - 1/4 cup milk - 1 cup shredded cheddar cheese - 4 large flour tortillas - 1/2 teaspoon garlic powder - 1/2 teaspoon onion powder - Salt and pepper to taste - Fresh chives, chopped (for garnish) The main ingredients bring the best flavors to our burritos. First, we use cooked chicken. You can use leftovers from dinner or rotisserie chicken for ease. Shredded chicken mixes well with the tangy dill pickles. You get a nice crunch and zest. The ranch dressing adds creaminess and ties everything together. Next, we add eggs for protein. They make the burritos filling and tasty. Mixing them with milk keeps them soft and fluffy. Garlic and onion powders give the eggs extra flavor. Don’t forget salt and pepper! They enhance all the other tastes. The additional ingredients round out the meal. Cheddar cheese melts beautifully, adding richness. Flour tortillas wrap it all up nicely. Chives make the dish look fresh and bright. You can find the complete recipe in the [Full Recipe] section. With these ingredients, your Pickle Ranch Chicken Breakfast Burritos will be a hit! To start, grab a medium mixing bowl. Combine 2 cups of shredded chicken, 1/2 cup of finely chopped dill pickles, and 1/2 cup of ranch dressing in the bowl. Stir this mixture well until the chicken is coated with the ranch. This flavorful filling is key to our burrito. Set it aside for later use. Next, we need to make our scrambled eggs. In a separate bowl, crack 4 large eggs. Add 1/4 cup of milk, 1/2 teaspoon of garlic powder, 1/2 teaspoon of onion powder, and some salt and pepper. Whisk everything until smooth. Heat a non-stick skillet over medium heat and gently pour the egg mixture into the hot skillet. Stir the eggs softly with a spatula until they are creamy and just set. Remove the skillet from heat once they look perfect. Now, let’s put the burritos together! Lay out 4 large flour tortillas on a clean surface. In the center of each tortilla, place a generous amount of the chicken and pickle mixture. Top this with a scoop of the fluffy scrambled eggs and a sprinkle of 1 cup of shredded cheddar cheese. To form the burritos, fold the sides of each tortilla inward, and then roll them up tightly from the bottom. Make sure the filling stays secure. Return the same skillet to medium heat. Place the rolled burritos seam-side down in the skillet. Cook them for 2-3 minutes on each side until they are golden brown and crispy. After cooking, let the burritos cool a bit before slicing them in half for easier serving. You can find the Full Recipe for more details! - Use low heat for creamy eggs. - Stir gently for fluffy texture. When making scrambled eggs, low heat is key. High heat can make eggs dry. Cooking slowly helps keep them soft and creamy. Stirring gently lets air in, making them light and fluffy. - Ensure an even fill to secure the burritos. - Tuck in sides to prevent spillage. Rolling burritos can be tricky, but practice makes perfect. Start with an even fill of chicken and eggs in the center. This helps secure the filling. Tuck in the sides before rolling. This way, you keep everything snug inside. - Use fresh chives for a pop of color. - Serve with extra pickles or hot sauce for added flavor. A great garnish makes your dish shine. Fresh chives add color and a mild flavor. Extra pickles bring crunch and tang. If you like spice, drizzle hot sauce on top. It adds a kick everyone will love. For the full recipe, check out the Pickle Ranch Chicken Breakfast Burritos. {{image_4}} You can switch the chicken for shredded turkey if you like. Turkey gives a nice flavor too. If you want a vegetarian option, use tofu instead. Tofu absorbs spices well and will keep your burrito filling tasty. Want to spice things up? Add diced jalapeños to the filling. They give a nice kick without being too hot. You can also change the cheese. Try pepper jack for a creamy heat or feta for a tangy twist. Both options will make your burritos even more delicious. Tortillas are not just for flour. You can use whole wheat or corn tortillas for a healthier choice. If you want color, try spinach or tomato-based tortillas. These will add a fun look to your dish. You can mix and match to find your favorite combination. For the full recipe, check out the complete guide. Refrigerate leftover burritos for up to 3 days. Place them in an airtight container. This keeps them fresh and tasty. When you are ready to eat, enjoy them cold or reheated. You can freeze uncooked burritos for up to 1 month. Wrap each burrito tightly in plastic wrap. Then place them in a freezer bag to prevent freezer burn. When you want to eat them, you can reheat them directly from the freezer or thaw them in the fridge overnight. To keep the texture nice, use an oven or skillet. For the oven, preheat it to 350°F (175°C). Place the burritos on a baking sheet and heat for about 15-20 minutes. For the skillet, warm it over medium heat. Cook the burritos for about 3-4 minutes on each side until they are hot and crispy. Yes, you can prepare and refrigerate the filling or entire burritos to save time. I often make the filling a day in advance. This lets the flavors meld together. You can store it in an airtight container. If you want to make the whole burrito, wrap them well in foil or plastic wrap before refrigerating. When you’re ready to eat, just heat them up in the skillet or microwave. Add hot sauce to the chicken mixture or include spicy pickles. I love using pickles with a kick for extra flavor. You can also mix in some diced jalapeños. This gives a nice heat that pairs well with the ranch dressing. Just remember to taste as you go. You want the spice to enhance, not overpower. Pair with fresh fruit, a side salad, or crispy potato wedges for a complete meal. I enjoy adding a fruit salad for a sweet touch. A simple green salad with a light dressing also works well. Crispy potato wedges bring a satisfying crunch. You can even sprinkle some extra chives on top for a fresh finish. If you like, serve with your favorite hot sauce for dipping. These Pickle Ranch Chicken Breakfast Burritos pack flavor in every bite. We combined shredded chicken, dill pickles, and ranch for a tasty filling. Scrambled eggs bring creaminess, while tips for soft eggs and proper rolling help achieve perfect burritos. You can even switch ingredients to fit your taste. Whether you pick turkey or a spicy twist, the options are endless. With proper storage, you can enjoy them later, too. Don't hesitate to try this fun, delicious recipe that makes mornings brighter!](https://dishtreats.com/wp-content/uploads/2025/07/caeedbb3-1f25-4c27-bd1d-713cf7cd2d52-300x300.webp)

