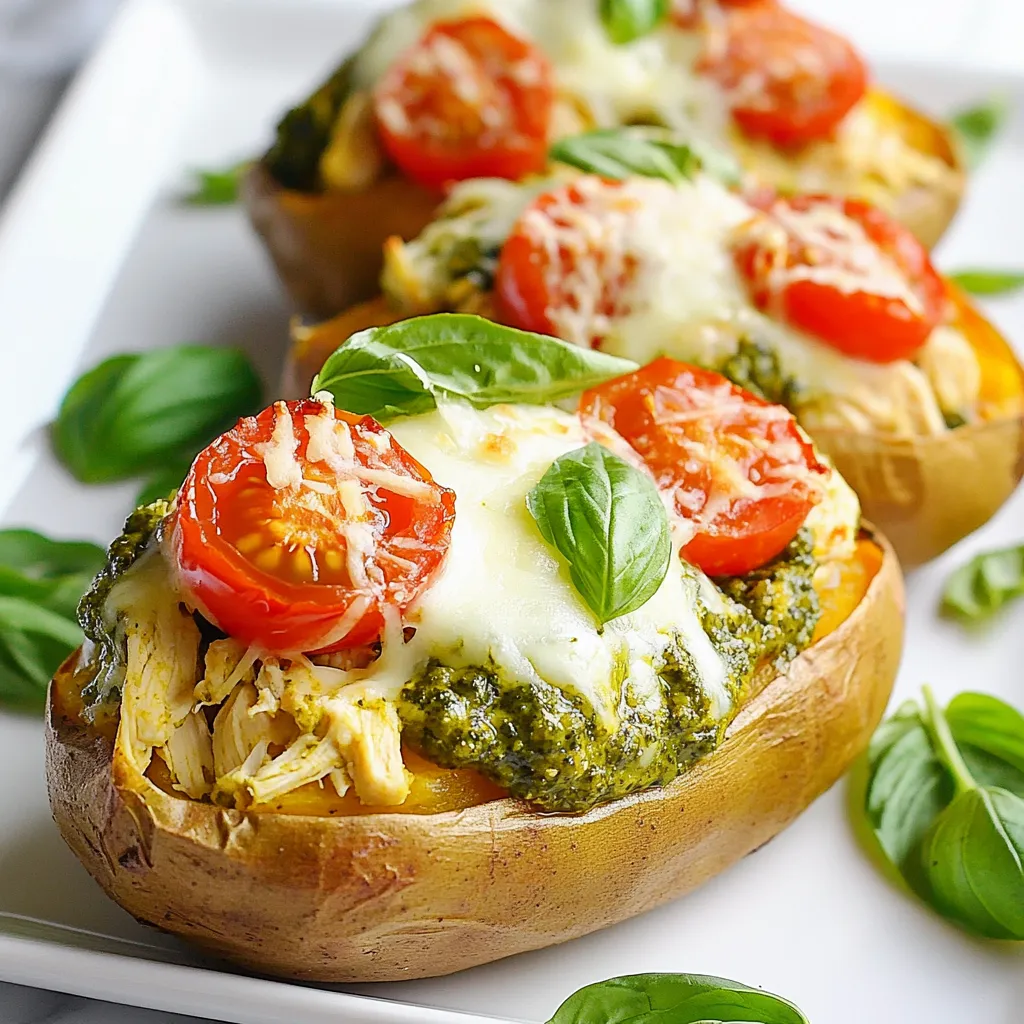
Are you ready to elevate your dinner game? These Pesto Chicken Stuffed Sweet Potatoes are packed with flavor and nutrition. Imagine tender sweet potatoes filled with juicy chicken and fresh basil pesto, topped with gooey cheese. This dish is not only easy to make, but it’s also perfect for a family meal or meal prep. Let’s dive into the delicious details and get cooking!
Why I Love This Recipe
- Healthy and Nutritious: This dish combines the natural sweetness of sweet potatoes with lean protein from chicken, making it a wholesome meal option.
- Flavorful and Satisfying: The basil pesto adds a burst of flavor, complemented by the melted cheese, creating a deliciously satisfying filling.
- Easy to Prepare: With simple steps and minimal prep time, this recipe is perfect for busy weeknights or meal prep.
- Customizable: You can easily modify the filling with different proteins or vegetables, allowing for creativity and variety in your meals.
Ingredients
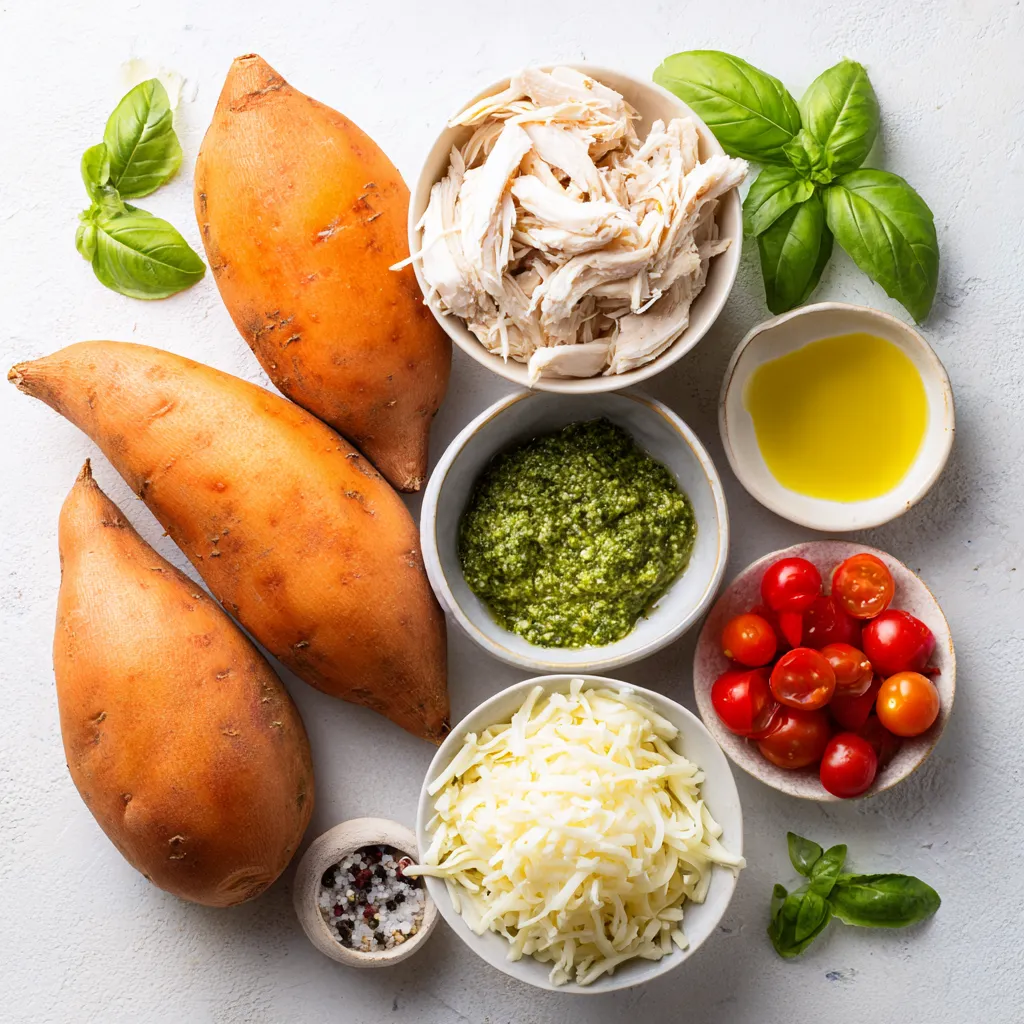
List of Main Ingredients
– Medium sweet potatoes
– Cooked shredded chicken
– Basil pesto (store-bought or homemade)
– Cherry tomatoes
– Mozzarella cheese
– Grated Parmesan cheese
– Olive oil
– Salt and pepper
– Fresh basil leaves for garnish
Sweet potatoes are the star here. They add a natural sweetness and a creamy texture. When you bake them, they get soft and delicious. I love using medium sweet potatoes because they are easy to handle and pack a lot of flavor.
Next, cooked shredded chicken brings protein to the dish. You can use leftover chicken or rotisserie chicken to save time. The chicken blends well with the pesto, making each bite tasty.
Basil pesto is the magic ingredient. It gives a fresh, herbaceous taste that pairs perfectly with the sweet potatoes. You can buy it or make it at home. If you make it, use fresh basil, nuts, olive oil, and Parmesan cheese.
Cherry tomatoes add a pop of color and juicy flavor. I prefer halving them for a nice bite. Mozzarella cheese brings that gooey melt, while grated Parmesan adds a nutty finish.
Don’t forget olive oil! It helps with roasting and adds richness. Season with salt and pepper for balance. Fresh basil leaves as garnish give a bright look and flavor.
Nutritional Information
– Caloric content per serving: About 400 calories
– Macronutrient breakdown: 30g carbs, 25g protein, 15g fat
– Health benefits of sweet potatoes and pesto: Sweet potatoes are full of fiber and vitamins. They help with digestion and keep you full. Pesto brings healthy fats, thanks to olive oil and nuts. This combo makes a balanced, tasty meal.
Step-by-Step Instructions
Preparing the Sweet Potatoes
1. Preheat your oven to 400°F (200°C). This makes sure the sweet potatoes bake well.
2. Rinse the sweet potatoes in cold water to clean them. Then, prick each potato all over with a fork. This lets steam escape while they cook.
3. Drizzle olive oil over the sweet potatoes and sprinkle them with salt. This adds flavor to the skin.
Making the Pesto Chicken Filling
1. In a mixing bowl, combine the shredded chicken and basil pesto. This gives the chicken a fresh, herby taste.
2. Add the halved cherry tomatoes and a pinch of salt and pepper. This adds a pop of color and flavor to the mix.
Assembling and Baking
1. After the sweet potatoes are done, take them out and let them cool.
2. Slice each sweet potato down the middle, creating a pocket. Use a fork to fluff the inside.
3. Spoon the chicken mixture into each potato, packing it in gently.
4. Top each potato with shredded mozzarella and grated Parmesan cheese. This creates a delicious cheesy topping.
5. Return the stuffed potatoes to the oven for 10 to 15 minutes. Bake until the cheese melts and bubbles.
6. Once done, let them cool a bit before serving. Garnish with fresh basil for a tasty finish.
Tips & Tricks
Cooking Tips
To ensure even baking of sweet potatoes, start by preheating your oven to 400°F (200°C). This helps them cook perfectly. Rinse the sweet potatoes well. Pricking them with a fork helps steam escape. Place them on a baking sheet, drizzle with olive oil, and sprinkle salt. Bake for 45 to 60 minutes. They should feel soft when you poke them with a fork.
If you want to adjust ingredient quantities for taste, consider your preferences. You might like more cheese or extra pesto. It’s simple to add more if you want a richer flavor. Just remember to keep a balance so you don’t overpower the sweet potatoes.
Presentation Suggestions
For creative plating ideas, try serving the stuffed sweet potatoes on a large platter. Arrange them in a circle for a fun look. This makes each one easy to grab. You can also use smaller plates for individual servings.
To enhance visual appeal, garnish each sweet potato with fresh basil leaves. This not only adds color but also a fresh aroma. You could also sprinkle some extra cheese on top right before serving.
Time-Saving Tips
Using pre-cooked chicken can really save time. You can find it at the store or use leftovers from a meal. This makes the filling come together quickly.
If you’re short on time, there are shortcut pesto recipes available. You can mix basil, nuts, oil, and cheese in a blender for a fresh taste. Or, buy store-bought pesto for convenience. Both options work well in this recipe, so choose what fits your schedule best.
Pro Tips
- Choose the Right Sweet Potatoes: Opt for medium-sized sweet potatoes that are firm and have smooth skin for even baking and a delicious texture.
- Enhance the Pesto Flavor: Consider adding a squeeze of fresh lemon juice to the pesto mixture for a bright and zesty flavor that complements the chicken.
- Experiment with Toppings: Feel free to add other toppings such as chopped walnuts or pine nuts for an extra crunch and nutty flavor.
- Make Ahead: Prepare the stuffed sweet potatoes in advance and store them in the refrigerator. Simply reheat in the oven for a quick and easy meal.
Variations
Different Protein Options
You can switch the chicken with other proteins. Ground turkey makes a lean choice. It adds a nice flavor and keeps the dish light. If you love beef, use shredded beef for a hearty twist. For a plant-based option, try lentils or tempeh. They soak up the pesto flavor well and offer a great texture.
Flavor Enhancements
Want to spice things up? Add garlic powder or red pepper flakes for extra zing. Fresh herbs like thyme or rosemary can boost the taste, too. You can also change the cheese. Try goat cheese for a tangy kick or a sharp cheddar for more richness.
Vegetarian and Vegan Options
If you’re looking for vegetarian choices, chickpeas are a great swap for chicken. They add protein and a nice chew. For a vegan twist, use dairy-free cheese. Many brands offer tasty options that melt well. This way, everyone can enjoy these stuffed sweet potatoes!
Storage Info
How to Store Leftovers
To keep your pesto chicken stuffed sweet potatoes fresh, place them in the fridge. Use airtight containers for the best results. This keeps moisture in and air out. Make sure the sweet potatoes cool down before sealing them. They will last up to four days in the fridge.
Reheating Instructions
You can reheat stuffed sweet potatoes in the oven or microwave. The oven is best for keeping the texture. Preheat your oven to 350°F (175°C). Place the stuffed sweet potatoes on a baking sheet. Cover them with foil to avoid drying out. Heat for about 15-20 minutes.
If you choose the microwave, place a sweet potato on a microwave-safe dish. Heat for 2-3 minutes, checking every minute. The microwave is quicker but may make the sweet potatoes soft.
Freezing Options
You can freeze pesto chicken stuffed sweet potatoes for later meals. First, let them cool completely. Then, wrap each sweet potato in plastic wrap. Place the wrapped sweet potatoes in a freezer-safe bag. This helps avoid freezer burn. They can last up to three months in the freezer.
When you’re ready to eat, thaw them overnight in the fridge. For a quick option, you can use the microwave to thaw them. After thawing, reheat as mentioned above to enjoy a tasty meal!
FAQs
How long do Pesto Chicken Stuffed Sweet Potatoes last?
Pesto Chicken Stuffed Sweet Potatoes can last in the fridge for 3 to 5 days. Store them in an airtight container. If you want to keep them longer, you can freeze them. In the freezer, they can last for 2 to 3 months. Just make sure to wrap each sweet potato well in plastic wrap or foil before freezing.
Can I make this recipe ahead of time?
Yes, you can make Pesto Chicken Stuffed Sweet Potatoes ahead of time. Prepare the sweet potatoes and the filling separately. Store the sweet potatoes in the fridge after they cool. Keep the chicken mixture in a sealed container. When you’re ready to eat, stuff the sweet potatoes and bake them. This method saves time and keeps the flavors fresh.
What should I serve with stuffed sweet potatoes?
Stuffed sweet potatoes pair well with many sides. Here are some ideas:
– A simple green salad with a light vinaigrette
– Roasted vegetables for a colorful plate
– Quinoa or rice for extra carbs
– Steamed broccoli or green beans for a healthy crunch
These sides will round out your meal and add variety to your plate.
This blog post covered how to make tasty Pesto Chicken Stuffed Sweet Potatoes. We looked at key ingredients, cooking steps, and helpful tips. I shared ways to add variety, such as different proteins or flavors. You learned how to store leftovers and reheat them properly.
These sweet potatoes are nutritious and fun to make. I hope you enjoy trying out this recipe! Your kitchen can become a place of creativity and flavo


