Are you craving a sweet and easy snack that you can whip up in no time? Look no further! Peanut Butter Cookie Dough Bites are here to satisfy your sweet tooth without any fuss. These little bites are simple to make, fun to eat, and perfect for any occasion. In this blog post, I’ll share the easy steps, essential tips, and tasty variations to help you create the perfect treat! Let's get started!
Why I Love This Recipe
- Quick and Easy: This recipe takes just 15 minutes to prepare, making it a perfect snack for busy days.
- Nutritious Ingredients: With natural peanut butter, oats, and almond flour, these bites are packed with protein and healthy fats.
- Customizable: Feel free to swap in your favorite mix-ins or sweeteners to make these bites your own!
- Deliciously Satisfying: These cookie dough bites provide the perfect combination of sweet and nutty flavors, satisfying your cravings without the guilt.
Ingredients
Detailed Ingredient List
To make these tasty Peanut Butter Cookie Dough Bites, you need:
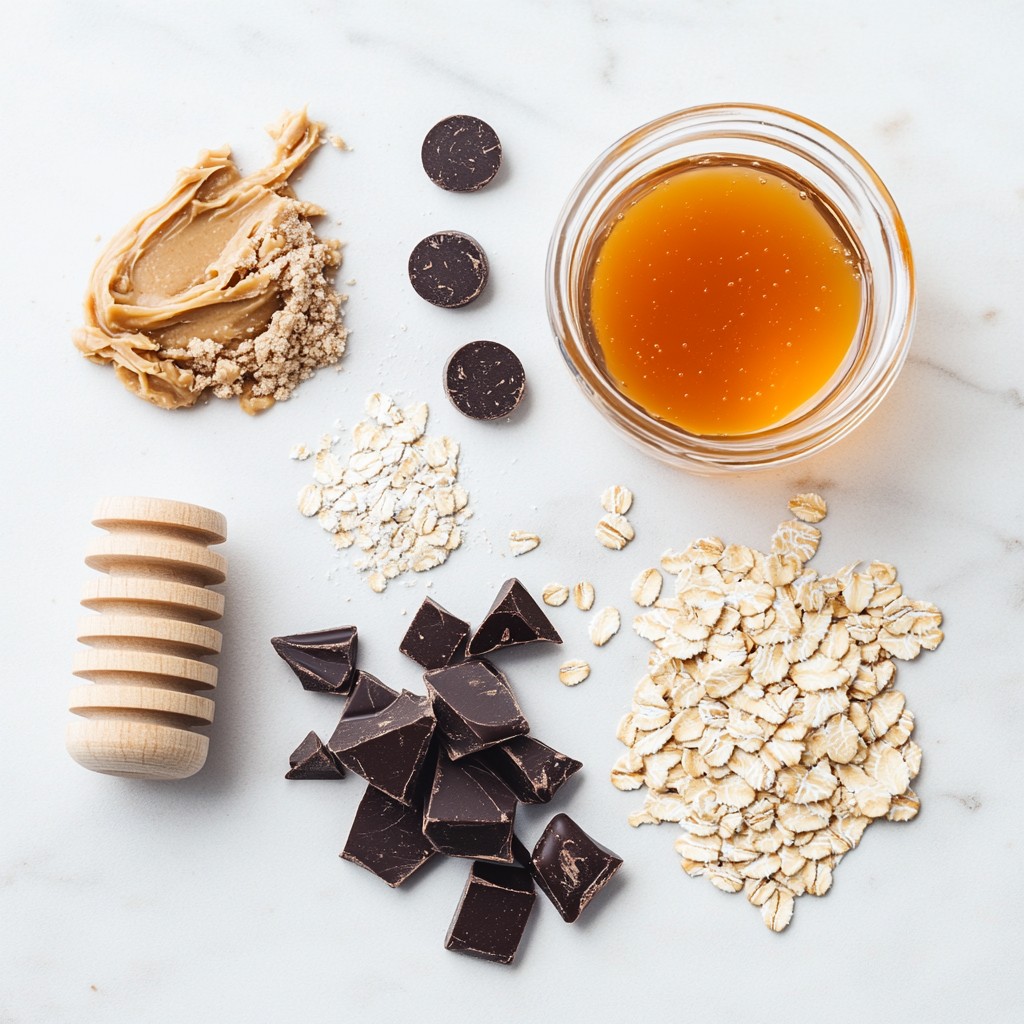
- 1 cup natural peanut butter (smooth or crunchy)
- 1/3 cup honey or maple syrup (to taste)
- 1 teaspoon pure vanilla extract
- 1 cup rolled oats
- 1/2 cup almond flour
- 1/4 cup chocolate chips (dark or milk)
- A pinch of sea salt
These ingredients blend well to create a sweet and satisfying snack.
Substitutions for Honey or Maple Syrup
If you prefer not to use honey or maple syrup, you can try agave nectar. It has a similar sweetness and works well in this recipe. You can also use brown rice syrup, though it may change the flavor a bit. Make sure to adjust the amount to match your taste.
Types of Peanut Butter to Use
I recommend using natural peanut butter. It has simple ingredients and a great taste. You can choose smooth or crunchy based on your preference. Crunchy adds a nice texture, while smooth offers a creamier bite. Avoid brands with added sugars or oils for the best results.
Step-by-Step Instructions
Preparation of the Mixture
Start by gathering your ingredients. You will need natural peanut butter, honey, and vanilla extract. In a medium mixing bowl, combine 1 cup of peanut butter, 1/3 cup of honey (or maple syrup), and 1 teaspoon of vanilla. Use a spatula to mix until smooth. This step is key for a creamy base.
Next, add 1 cup of rolled oats and 1/2 cup of almond flour. Stir until the dough is sticky and well mixed. The oats add texture, while the almond flour gives a nice nutty flavor. Finally, fold in 1/4 cup of chocolate chips and a pinch of sea salt. The salt enhances the sweet taste and makes the chocolate pop.
Forming the Cookie Dough Bites
Now it’s time to shape your dough. With clean hands, scoop out portions of the dough. Roll each portion into a ball about 1 inch in size. Place them on a parchment-lined baking sheet. Make sure to space them out so they don’t stick together. This helps them keep their shape.
Chilling and Serving Recommendations
Once all the bites are formed, it’s time to chill them. Place the baking sheet in the refrigerator for about 30 minutes. This step firms them up and makes them easier to eat. You can enjoy them straight from the fridge. If you prefer a softer texture, let them sit out for a few minutes before serving.
For a fun presentation, serve these bites on a decorative plate. You can drizzle extra peanut butter on top or sprinkle more chocolate chips around for a tasty touch. Store any leftovers in an airtight container in the fridge for up to a week.
Tips & Tricks
How to Achieve the Perfect Texture
To get the best texture, mix your peanut butter well. Use a spatula to blend it smoothly with honey or maple syrup. Make sure to stir in the rolled oats and almond flour slowly. This way, you avoid lumps and keep everything creamy. The dough should feel sticky but hold together well. If it’s too dry, add a little more honey. If it’s too wet, sprinkle in more almond flour.
Storing and Keeping Fresh
Keep your cookie dough bites in an airtight container. This helps them stay fresh for up to a week in the fridge. If you want to enjoy them later, freeze the bites instead. Just roll them into balls and place them in a freezer-safe bag. They can last for about three months in the freezer. When you're ready to eat them, let them thaw in the fridge overnight.
Common Mistakes to Avoid
Avoid using too much liquid sweetener; it can make the dough too runny. Also, don’t skip the chilling step! Chilling helps the bites firm up and makes them easier to eat. Lastly, be careful when adding chocolate chips. Mix them in gently to keep the bites from breaking apart.
Pro Tips
- Choose Your Peanut Butter Wisely: Opt for natural peanut butter without added sugars or oils for a healthier treat. The taste will be more authentic, and the texture will blend better.
- Customize Your Sweetness: Adjust the amount of honey or maple syrup according to your taste preference. Start with less and add more if desired to ensure the perfect sweetness level.
- Experiment with Mix-ins: Feel free to get creative by adding nuts, seeds, or even dried fruit to the dough for extra flavor and texture. Just make sure to balance the ratios for consistency.
- Store Properly: Keep the cookie dough bites in an airtight container in the fridge to maintain freshness. You can also freeze them for longer storage; just thaw them in the refrigerator before enjoying.
Variations
Nut-Free Option
If you're allergic to nuts, you can still enjoy these bites! Use sun butter or soy nut butter instead of peanut butter. Both options give a creamy texture and great taste. They make the bites nut-free and safe for school snacks. Just swap the peanut butter with your choice, and follow the same recipe.
Flavor Additions
Want to mix things up? Try adding spices or dried fruits! Cinnamon or nutmeg adds warmth and a cozy flavor. You can also fold in raisins or dried cranberries for a chewy twist. Both options make your bites more fun and tasty. Get creative and make them your own!
Alternative Toppings and Coatings
Toppings can change the whole look and taste of your bites. You can roll them in crushed nuts, coconut flakes, or colorful sprinkles. For a chocolatey twist, dip them in melted chocolate. This adds a sweet shell that’s hard to resist. Choose your favorite topping and have fun with it!
Storage Info
Best Ways to Store Leftovers
To keep your peanut butter cookie dough bites fresh, store them in an airtight container. This helps prevent them from drying out. Place a piece of parchment paper between layers if you stack them. This way, they won't stick together. Keep the container in the fridge for the best results.
Freezing Cookie Dough Bites
You can freeze these bites for later. First, freeze them on a baking sheet for about an hour. Once they are firm, transfer the bites to a freezer-safe bag or container. Be sure to remove any extra air. They will stay fresh for up to three months in the freezer. When you're ready to eat, let them thaw in the fridge or at room temperature.
How Long They Last in the Fridge
These cookie dough bites last about one week in the fridge. After that, they may lose their tasty flavor and texture. If you notice any changes in smell or appearance, it’s best to toss them. Always check for freshness before enjoying your snacks.
FAQs
Can I use crunchy peanut butter instead of smooth?
Yes, you can use crunchy peanut butter. The bites will have a nice texture. Crunchy peanut butter adds extra crunch to each bite. This change makes them even more fun to eat. Just keep the same amount.
How can I make these bites vegan?
To make these bites vegan, use maple syrup instead of honey. You can also use a plant-based chocolate option. Ensure your peanut butter has no added animal products. This way, you still get that creamy taste without any dairy.
What's the nutritional information for Peanut Butter Cookie Dough Bites?
Each bite has around 100 calories. They provide protein from peanut butter and healthy fats. The oats offer fiber, and the chocolate adds a small amount of sugar. You can enjoy these bites while still being mindful of your diet.
In this post, we covered how to make delicious Peanut Butter Cookie Dough Bites. You learned about ingredient choices, steps for preparation, and tips for perfect texture. We also shared variations and storage tips to keep your bites fresh. Remember, you can swap ingredients and try new flavors. Don’t be afraid to experiment! Making these bites at home can be simple and fun. Enjoy your tasty treats and impress your friends with your baking skills.