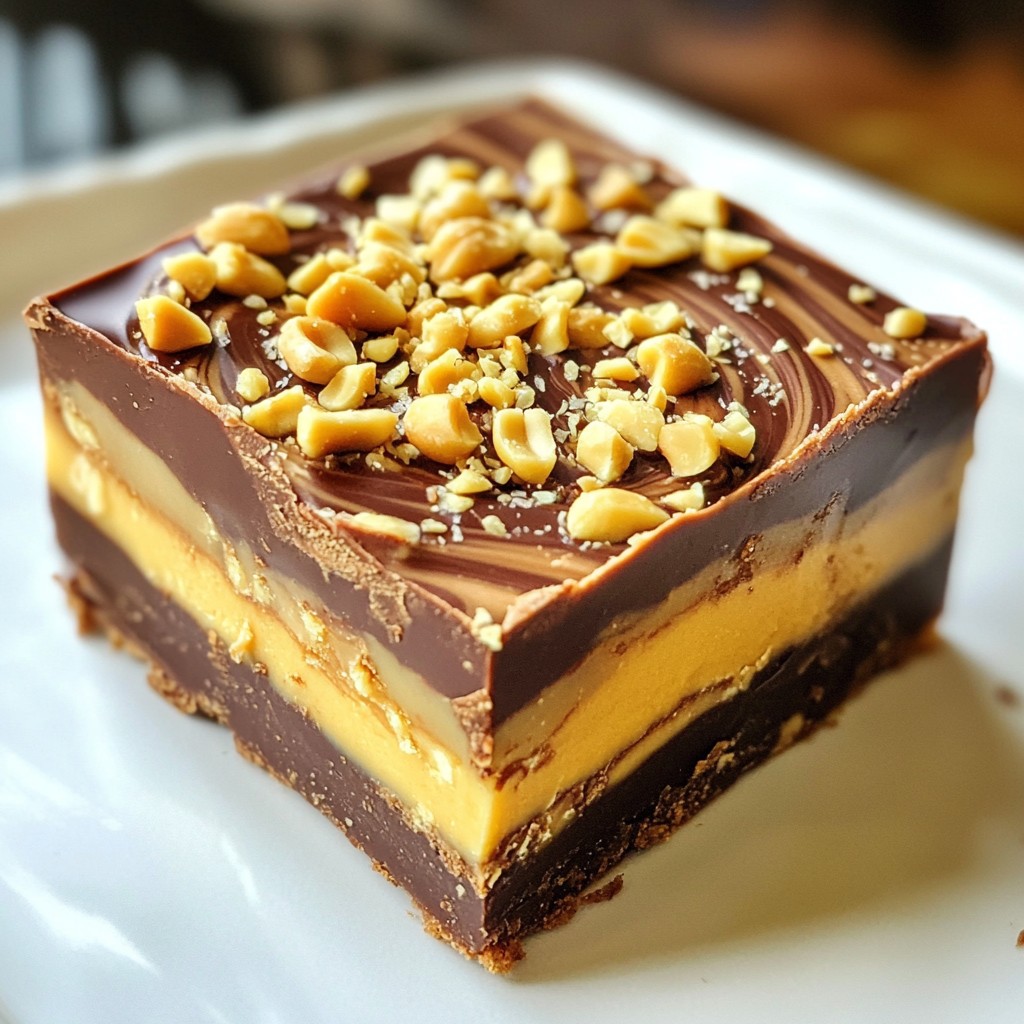
Are you ready to indulge in a sweet treat that’s both rich and creamy? This Peanut Butter Chocolate Swirl Fudge Delight Recipe is easy to make and perfect for any occasion. With just a few simple ingredients, you can create a decadent dessert that everyone will love. Follow along as I guide you through each step, and get ready for a fudge experience that will leave you wanting more!
Why I Love This Recipe
- Decadent Flavor: The combination of rich chocolate and creamy peanut butter is simply irresistible, making every bite a heavenly experience.
- Easy to Make: With just a few simple ingredients and quick steps, this fudge can be whipped up in no time, perfect for any occasion.
- Customizable: You can easily add your favorite mix-ins, like nuts or dried fruit, to make the fudge uniquely yours.
- Perfect for Sharing: Cut it into squares and share with friends and family, or keep it all for yourself—either way, it's a crowd-pleaser!
Ingredients
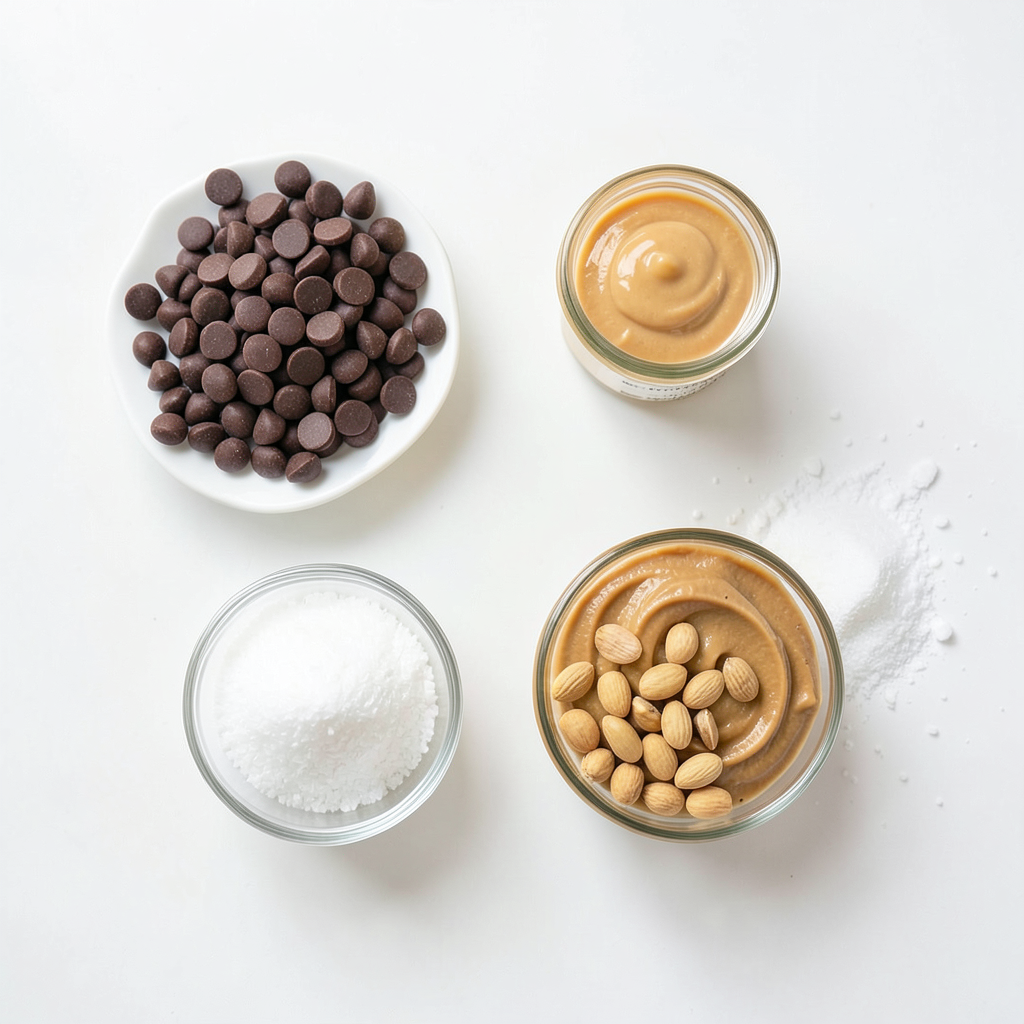
Complete List of Ingredients
- 2 cups semi-sweet chocolate chips
- 1 cup sweetened condensed milk
- ½ cup creamy peanut butter
- 1 teaspoon vanilla extract
- ½ cup chopped peanuts (optional)
- Pinch of salt
To make Peanut Butter Chocolate Swirl Fudge, gather these ingredients. The semi-sweet chocolate chips give a rich taste. Sweetened condensed milk adds creaminess. Creamy peanut butter brings a nutty flavor. Vanilla extract enhances the overall sweetness. You can sprinkle chopped peanuts on top for crunch. A pinch of salt balances the sweetness.
Using good quality chocolate chips ensures a smooth melt. Sweetened condensed milk helps the fudge set nicely. If you prefer, you can swap creamy peanut butter for crunchy. The chopped peanuts are optional but add great texture. This simple list makes it easy to gather everything you need.
Step-by-Step Instructions
Preparing the Baking Pan
Start by getting your 8x8 inch baking pan ready. Line it with parchment paper. Make sure the paper hangs over the edges. This helps you lift the fudge out later.
Melting the Chocolate Mixture
In a medium saucepan, mix two cups of semi-sweet chocolate chips with one cup of sweetened condensed milk. Place the pan over low heat. Stir constantly with a spatula. Keep an eye on it until everything melts and becomes smooth. No chocolate chips should remain.
Creating the Peanut Butter Swirl
Once your chocolate mixture is smooth, take the pan off the heat. Stir in one teaspoon of vanilla extract and a pinch of salt. Mix until it’s well blended. In a separate bowl, add half a cup of creamy peanut butter. Microwave it for about 20 seconds. This makes it warm and easy to pour.
Pour half the chocolate mixture into the pan. Spread it evenly with a spatula. Now, drop spoonfuls of the warm peanut butter on top. Use a knife or toothpick to swirl it into the chocolate. This creates a beautiful marbled effect. Pour the rest of the chocolate mixture over the peanut butter layer. Again, add more spoonfuls of peanut butter on top and swirl again.
Setting the Fudge
If you want extra crunch, sprinkle chopped peanuts on top. Place the pan in the refrigerator. Let it chill for at least three hours until it sets firm. When it’s ready, lift the fudge out using the parchment paper. Cut it into generous squares.
Tips & Tricks
How to Ensure Smooth Chocolate
To make smooth chocolate, use low heat. This keeps chocolate from burning. Stir constantly until all chips melt. Remove from heat right away when smooth. Adding a pinch of salt enhances the flavor. It also helps the chocolate taste richer.
Best Practices for Swirling
Warm the peanut butter before you swirl. This makes it easier to mix. Drop spoonfuls onto the chocolate layer. Use a knife or toothpick to create swirls. Don't overdo it; you want a marbled effect. A light touch gives the best look.
Presentation Ideas for Serving
To make your fudge look fancy, cut it into even squares. Place them on a nice platter. Drizzle melted chocolate on top for flair. You can also sprinkle chopped peanuts for crunch. A little sea salt on top can add a nice finish too.
Pro Tips
- Use High-Quality Chocolate: Opt for high-quality semi-sweet chocolate chips for a richer flavor and smoother texture in your fudge.
- Warm Peanut Butter for Swirling: Microwaving the peanut butter slightly makes it easier to swirl into the chocolate, creating a beautiful marbled effect.
- Chill Until Firm: Ensure to chill the fudge for at least 3 hours or until fully set to achieve the perfect consistency for cutting.
- Experiment with Flavors: Feel free to add different toppings like sea salt, or use dark chocolate for a richer taste that complements the peanut butter.
Variations
Adding Flavor Combinations
You can boost the flavor of your fudge. Try adding a pinch of cinnamon for warmth. A splash of almond extract can add a nutty kick. You can also mix in some coffee granules for a mocha twist. Each option brings a new taste that can surprise your guests.
Alternative Nut Butters
If you want a different nutty taste, swap out the peanut butter. Almond butter works great. Cashew butter gives a creamy texture too. Sunflower seed butter is perfect for nut-free diets. These choices let you create your own spin on the classic fudge.
Ingredient Substitutions for Dietary Needs
Got dietary needs? You can easily adapt this fudge. Use dairy-free chocolate chips for a vegan version. Swap sweetened condensed milk for coconut milk for a lighter take. For a low-sugar option, use sugar-free chocolate chips. These swaps keep the fudge tasty while meeting your needs.
Storage Info
How to Store Fudge
To store your peanut butter chocolate swirl fudge, keep it in an airtight container. Place parchment paper between layers if stacking. This helps prevent sticking. Store it in a cool, dry place away from heat and light. You can also keep it in the fridge for a longer shelf life.
Shelf Life and Freezing Tips
Your fudge can last about one week at room temperature. In the refrigerator, it may last up to two weeks. If you want to keep it longer, freeze the fudge. Cut it into squares and wrap each piece in plastic wrap. Then, place the wrapped fudge in a freezer bag. It can stay good for up to three months in the freezer.
Reheating Instructions
If you want to enjoy your fudge warm, you can microwave it. Place a square on a microwave-safe plate. Heat it for about 10 to 15 seconds. Check to make sure it’s warm but not melting. This makes the fudge soft and easy to enjoy!
FAQs
Can I use milk chocolate instead of semi-sweet?
Yes, you can use milk chocolate. It will make the fudge sweeter and creamier. Keep in mind that the flavor may be less rich compared to semi-sweet chocolate. If you love milk chocolate, go ahead and swap it in!
What if I don't have sweetened condensed milk?
If you don't have sweetened condensed milk, you can make a simple alternative. Mix one cup of whole milk with one cup of sugar. Heat it gently until the sugar dissolves. This will give you a similar texture and sweetness for your fudge.
How should I cut the fudge for uniform pieces?
To cut the fudge evenly, first chill it well. Once set, use a sharp knife. Warm the knife under hot water, then dry it. This makes cutting easier and gives cleaner edges. Aim for 16 squares for even serving sizes.
How long does it take for fudge to set?
The fudge needs at least 3 hours to set in the fridge. For best results, leave it overnight. This ensures the fudge is firm and easy to cut. Patience is key for the perfect treat!
Can I add other toppings?
Absolutely! You can add toppings like sprinkles, sea salt, or shredded coconut. Chopped nuts, like walnuts or almonds, also add great texture. Be creative and make it your own!
This blog post covered how to make delicious chocolate-peanut butter fudge. You learned about the key ingredients and step-by-step instructions for smooth results. We shared tips for perfecting the swirl and ideas for creative presentation. Plus, I provided variations to cater to different tastes and storage tips to keep your fudge fresh.
Remember, experimenting with ingredients can make it even better. Enjoy creating your fudge, and share it with friends and family!