Peach Streusel Muffins Delightful and Simple Recipe
![When making peach streusel muffins, the right ingredients make all the difference. Here’s what you need: - 1 ½ cups all-purpose flour - 1 tsp baking powder - ½ tsp baking soda - ¼ tsp salt - ½ cup granulated sugar - ¼ cup packed brown sugar - ⅓ cup unsalted butter, melted - 1 large egg - 1 tsp vanilla extract - ½ cup buttermilk - 1 ½ cups fresh peaches, peeled and diced - ⅓ cup rolled oats - 1 tsp ground cinnamon These ingredients create a lovely balance of flavors. The fresh peaches add sweetness and moisture. The streusel topping gives a nice crunch. This recipe is simple and uses common items. I love how easy it is to find these ingredients at any store. For the full recipe, check out [Full Recipe]. It's a delightful way to enjoy seasonal peaches in a warm muffin. First, preheat your oven to 375°F (190°C). This step warms the oven, helping the muffins bake evenly. Next, prepare your muffin tin. You can line it with muffin liners or grease it lightly with some non-stick spray or butter. This will keep the muffins from sticking. In a medium bowl, whisk together the dry ingredients. Combine 1 ½ cups of all-purpose flour, 1 teaspoon of baking powder, ½ teaspoon of baking soda, and ¼ teaspoon of salt. Mix well until everything is blended. Set this bowl aside for now. In a large mixing bowl, combine the sugars and melted butter. Use ½ cup of granulated sugar and ¼ cup of brown sugar. Mix them well until they blend together. Then, add 1 large egg and 1 teaspoon of vanilla extract. Beat the mixture until it looks fluffy. Next, pour in ½ cup of buttermilk and stir gently. Now, it’s time to add the dry ingredients. Gradually fold the flour mixture into the wet ingredients. Be gentle and avoid overmixing. It’s okay if the batter has a few lumps. Finally, fold in 1 ½ cups of diced peaches. Make sure they are evenly spread throughout the batter. In a small bowl, mix together ⅓ cup of rolled oats, 1 teaspoon of ground cinnamon, and a pinch of sugar for the streusel topping. This mix will add a crunchy texture to your muffins. Using a scooper or a spoon, fill each muffin liner with the batter. Aim to fill them about two-thirds full. This gives your muffins room to rise. Once filled, sprinkle a generous amount of the streusel topping over each muffin. This adds that crispy layer on top. Place the muffin tin in your preheated oven. Bake for 18 to 20 minutes. Check for doneness by inserting a toothpick into the center of a muffin. If it comes out clean, your muffins are ready. After baking, let the muffins cool in the pan for about 5 minutes. Then, transfer them to a wire rack to cool completely. For a complete recipe and detailed instructions, check out the Full Recipe. To make great muffins, avoid overmixing the batter. When you mix too much, muffins can turn tough and dry. Gently fold the dry ingredients into the wet. Leave some lumps; they are okay! The batter should feel thick but not dry. Aim for a smooth mix with small bits of flour still visible. This keeps the muffins soft and fluffy. To keep your muffins fresh, store them in an airtight container at room temperature. They will stay good for up to three days. If you want to keep them longer, freeze them. Wrap each muffin in plastic wrap, then put them in a freezer bag. When ready to eat, thaw them in the fridge overnight or microwave them for about 20 seconds. This keeps them soft and tasty. These peach streusel muffins pair well with coffee or tea. They also taste great with a glass of milk. For a nice touch, dust the muffins with powdered sugar before serving. You can also add a slice of fresh peach on the side. This extra step makes your muffins look fancy and adds more peach flavor. Enjoy the delightful mix of tastes! {{image_4}} You can switch the peaches for other fruits. Blueberries and raspberries work great! They add a nice burst of flavor. You can even mix fruits, like peaches and blueberries, for a fun twist. Remember to adjust the amount of fruit based on what you use. Keep it around 1 ½ cups to fill the muffins well. Need a gluten-free option? Use a gluten-free flour blend instead of all-purpose flour. For a dairy-free version, replace buttermilk with almond milk or coconut milk. You can also use a flax egg instead of a regular egg. Just mix 1 tablespoon of flaxseed meal with 2.5 tablespoons of water. Let it sit for a few minutes to thicken. This will keep your muffins tasty and friendly for different diets. Want to kick up the flavor? Try adding nuts like walnuts or pecans to the batter. They give a nice crunch. You can also sprinkle some cinnamon or nutmeg in the batter for warmth. For a little zing, add a splash of lemon juice or zest. These small changes can make your muffins more exciting and tasty. For the full recipe, look for the Peach Streusel Muffins instructions above! You can store Peach Streusel Muffins at room temperature. Place them in an airtight container. This helps keep them fresh and soft. They will stay tasty for up to three days. If you want to keep them longer, consider freezing. Freezing is a great way to save these muffins for later. Wrap each muffin in plastic wrap. Then, place them in a freezer bag or container. This keeps them from getting freezer burn. You can freeze them for up to three months. To enjoy them later, thaw your muffins. Take them out of the freezer and let them sit at room temperature. This usually takes about an hour. You can also warm them in the oven at low heat for a fresh-baked taste. For the best experience, try the Full Recipe to make these delightful muffins again! Yes, you can use canned peaches. Look for peaches packed in juice or water. Drain them well and pat them dry to remove excess moisture. This step helps avoid soggy muffins. Cut the peaches into small pieces, similar to fresh ones. Canned peaches can be sweeter, so reduce the sugar in the recipe by a tablespoon. This keeps your muffins balanced. If your batter is thick, add a splash of milk or buttermilk. Mix well until you reach a smooth texture. Thick batter can lead to dry muffins. You want a batter that can easily drop from a spoon but is not runny. Another tip is to gently fold in a bit more diced peaches. This adds moisture and flavor. Check for doneness by inserting a toothpick into the center of a muffin. If it comes out clean or with a few crumbs, your muffins are ready. Look for a golden-brown top and a slight spring when you touch the surface. If the muffins still look wet or jiggly, bake them a few more minutes. Yes, you can prepare the batter ahead. Store it in the fridge for up to 2 hours. Mix the wet and dry ingredients separately. Combine them just before baking. This helps keep the muffins light and fluffy. If you plan to store longer, consider freezing the batter in muffin tins. This way, you can bake fresh muffins anytime. For the full recipe, check above. These peach muffins are easy to make and full of flavor. We covered the ingredients, step-by-step instructions, and tips to improve texture and taste. From using fresh peaches to adding oats, each detail counts. You can experiment with flavors and storage methods. Enjoy these muffins fresh or store them for later. Happy baking!](https://dishtreats.com/wp-content/uploads/2025/07/b62cebd8-d26b-48c0-b1ab-fab18f37a599.webp)
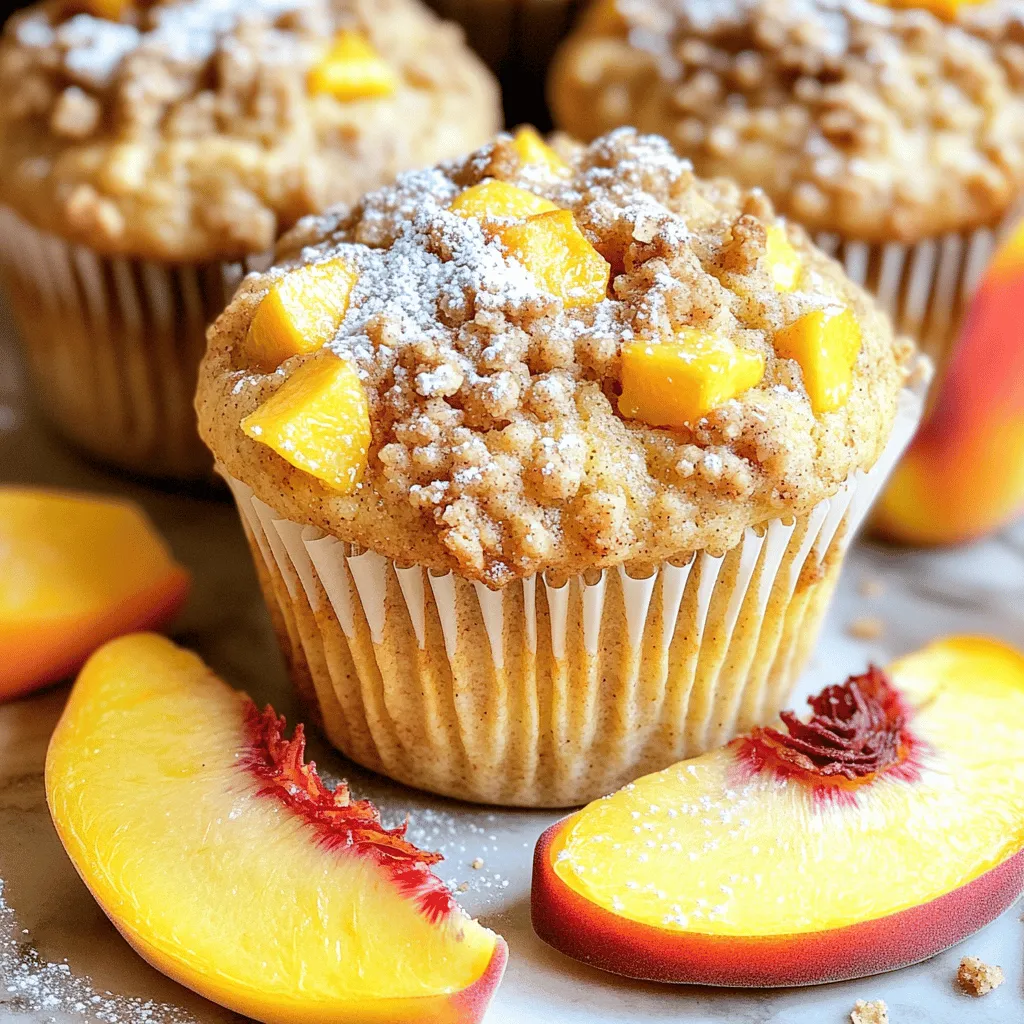
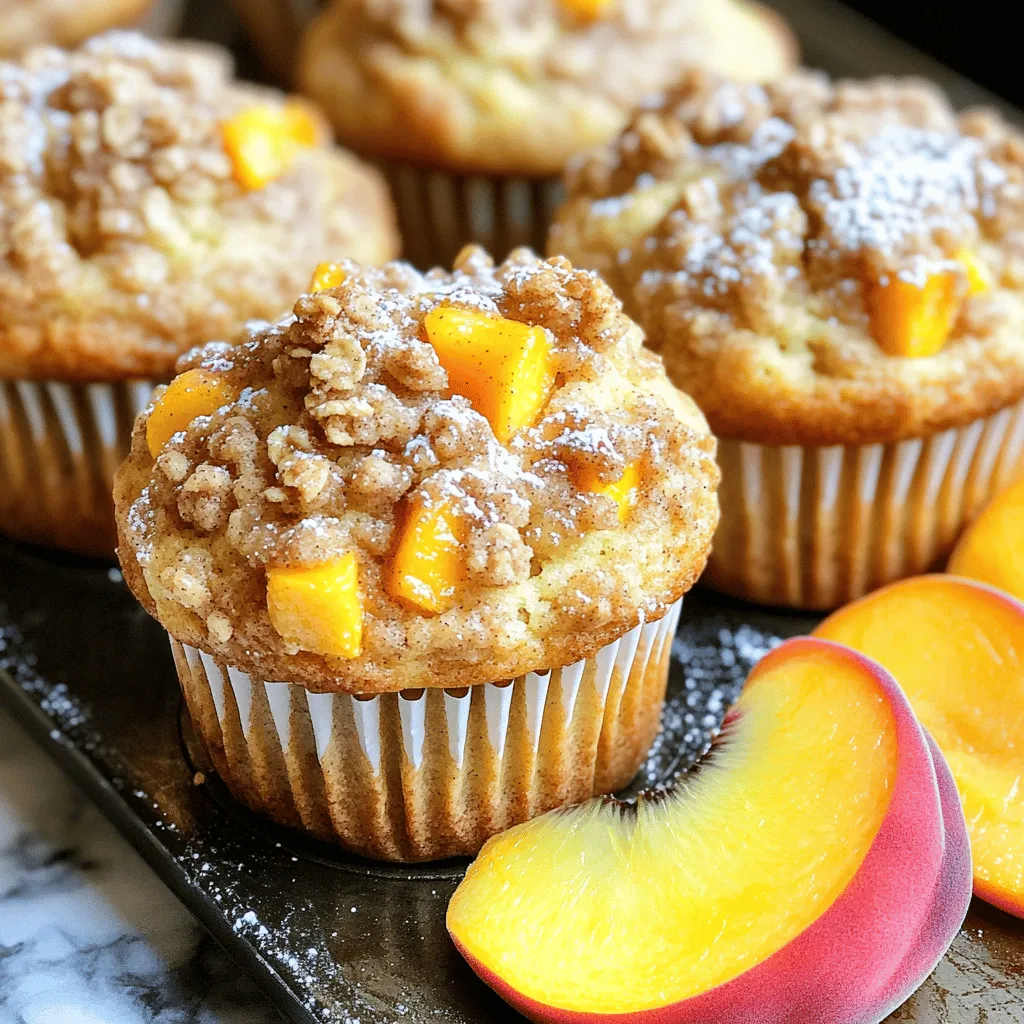
Craving a sweet treat that’s both simple and delicious? Look no further than my Peach Streusel Muffins! These muffins are packed with juicy peaches and topped with a crunchy streusel that makes every bite delightful. Whether you’re baking for breakfast or a cozy afternoon snack, this easy recipe is sure to impress. Ready to whip up something amazing? Let’s get started on this mouthwatering journey!
Ingredients
When making peach streusel muffins, the right ingredients make all the difference. Here’s what you need:
Dry Ingredients
- 1 ½ cups all-purpose flour
- 1 tsp baking powder
- ½ tsp baking soda
- ¼ tsp salt
- ½ cup granulated sugar
- ¼ cup packed brown sugar
Wet Ingredients
- ⅓ cup unsalted butter, melted
- 1 large egg
- 1 tsp vanilla extract
- ½ cup buttermilk
Mix-Ins and Toppings
- 1 ½ cups fresh peaches, peeled and diced
- ⅓ cup rolled oats
- 1 tsp ground cinnamon
These ingredients create a lovely balance of flavors. The fresh peaches add sweetness and moisture. The streusel topping gives a nice crunch. This recipe is simple and uses common items. I love how easy it is to find these ingredients at any store.It’s a delightful way to enjoy seasonal peaches in a warm muffin.
Step-by-Step Instructions
Preparing for Baking
First, preheat your oven to 375°F (190°C). This step warms the oven, helping the muffins bake evenly. Next, prepare your muffin tin. You can line it with muffin liners or grease it lightly with some non-stick spray or butter. This will keep the muffins from sticking.
Mixing Dry Ingredients
In a medium bowl, whisk together the dry ingredients. Combine 1 ½ cups of all-purpose flour, 1 teaspoon of baking powder, ½ teaspoon of baking soda, and ¼ teaspoon of salt. Mix well until everything is blended. Set this bowl aside for now.
Combining Wet Ingredients
In a large mixing bowl, combine the sugars and melted butter. Use ½ cup of granulated sugar and ¼ cup of brown sugar. Mix them well until they blend together. Then, add 1 large egg and 1 teaspoon of vanilla extract. Beat the mixture until it looks fluffy. Next, pour in ½ cup of buttermilk and stir gently.
Now, it’s time to add the dry ingredients. Gradually fold the flour mixture into the wet ingredients. Be gentle and avoid overmixing. It’s okay if the batter has a few lumps. Finally, fold in 1 ½ cups of diced peaches. Make sure they are evenly spread throughout the batter.
Making the Streusel Topping
In a small bowl, mix together ⅓ cup of rolled oats, 1 teaspoon of ground cinnamon, and a pinch of sugar for the streusel topping. This mix will add a crunchy texture to your muffins.
Filling Muffin Tins
Using a scooper or a spoon, fill each muffin liner with the batter. Aim to fill them about two-thirds full. This gives your muffins room to rise. Once filled, sprinkle a generous amount of the streusel topping over each muffin. This adds that crispy layer on top.
Baking the Muffins
Place the muffin tin in your preheated oven. Bake for 18 to 20 minutes. Check for doneness by inserting a toothpick into the center of a muffin. If it comes out clean, your muffins are ready. After baking, let the muffins cool in the pan for about 5 minutes. Then, transfer them to a wire rack to cool completely.
Tips & Tricks
Achieving the Perfect Texture
To make great muffins, avoid overmixing the batter. When you mix too much, muffins can turn tough and dry. Gently fold the dry ingredients into the wet. Leave some lumps; they are okay! The batter should feel thick but not dry. Aim for a smooth mix with small bits of flour still visible. This keeps the muffins soft and fluffy.
Storing Leftovers
To keep your muffins fresh, store them in an airtight container at room temperature. They will stay good for up to three days. If you want to keep them longer, freeze them. Wrap each muffin in plastic wrap, then put them in a freezer bag. When ready to eat, thaw them in the fridge overnight or microwave them for about 20 seconds. This keeps them soft and tasty.
Serving Suggestions
These peach streusel muffins pair well with coffee or tea. They also taste great with a glass of milk. For a nice touch, dust the muffins with powdered sugar before serving. You can also add a slice of fresh peach on the side. This extra step makes your muffins look fancy and adds more peach flavor. Enjoy the delightful mix of tastes!

Variations
Fruit Substitutes
You can switch the peaches for other fruits. Blueberries and raspberries work great! They add a nice burst of flavor. You can even mix fruits, like peaches and blueberries, for a fun twist. Remember to adjust the amount of fruit based on what you use. Keep it around 1 ½ cups to fill the muffins well.
Dietary Adjustments
Need a gluten-free option? Use a gluten-free flour blend instead of all-purpose flour. For a dairy-free version, replace buttermilk with almond milk or coconut milk. You can also use a flax egg instead of a regular egg. Just mix 1 tablespoon of flaxseed meal with 2.5 tablespoons of water. Let it sit for a few minutes to thicken. This will keep your muffins tasty and friendly for different diets.
Flavor Enhancements
Want to kick up the flavor? Try adding nuts like walnuts or pecans to the batter. They give a nice crunch. You can also sprinkle some cinnamon or nutmeg in the batter for warmth. For a little zing, add a splash of lemon juice or zest. These small changes can make your muffins more exciting and tasty.
Storage Info
Short-term Storage
You can store Peach Streusel Muffins at room temperature. Place them in an airtight container. This helps keep them fresh and soft. They will stay tasty for up to three days. If you want to keep them longer, consider freezing.
Long-term Storage
Freezing is a great way to save these muffins for later. Wrap each muffin in plastic wrap. Then, place them in a freezer bag or container. This keeps them from getting freezer burn. You can freeze them for up to three months.
To enjoy them later, thaw your muffins. Take them out of the freezer and let them sit at room temperature. This usually takes about an hour. You can also warm them in the oven at low heat for a fresh-baked taste.
FAQs
Can I use canned peaches instead of fresh?
Yes, you can use canned peaches. Look for peaches packed in juice or water. Drain them well and pat them dry to remove excess moisture. This step helps avoid soggy muffins. Cut the peaches into small pieces, similar to fresh ones. Canned peaches can be sweeter, so reduce the sugar in the recipe by a tablespoon. This keeps your muffins balanced.
What can I do if the batter is too thick?
If your batter is thick, add a splash of milk or buttermilk. Mix well until you reach a smooth texture. Thick batter can lead to dry muffins. You want a batter that can easily drop from a spoon but is not runny. Another tip is to gently fold in a bit more diced peaches. This adds moisture and flavor.
How do I know when the muffins are done?
Check for doneness by inserting a toothpick into the center of a muffin. If it comes out clean or with a few crumbs, your muffins are ready. Look for a golden-brown top and a slight spring when you touch the surface. If the muffins still look wet or jiggly, bake them a few more minutes.
Can I make the batter ahead of time?
Yes, you can prepare the batter ahead. Store it in the fridge for up to 2 hours. Mix the wet and dry ingredients separately. Combine them just before baking. This helps keep the muffins light and fluffy. If you plan to store longer, consider freezing the batter in muffin tins. This way, you can bake fresh muffins anytime.
These peach muffins are easy to make and full of flavor. We covered the ingredients, step-by-step instructions, and tips to improve texture and taste. From using fresh peaches to adding oats, each detail counts. You can experiment with flavors and storage methods. Enjoy these muffins fresh or store them for later. Happy baking!
![When making peach streusel muffins, the right ingredients make all the difference. Here’s what you need: - 1 ½ cups all-purpose flour - 1 tsp baking powder - ½ tsp baking soda - ¼ tsp salt - ½ cup granulated sugar - ¼ cup packed brown sugar - ⅓ cup unsalted butter, melted - 1 large egg - 1 tsp vanilla extract - ½ cup buttermilk - 1 ½ cups fresh peaches, peeled and diced - ⅓ cup rolled oats - 1 tsp ground cinnamon These ingredients create a lovely balance of flavors. The fresh peaches add sweetness and moisture. The streusel topping gives a nice crunch. This recipe is simple and uses common items. I love how easy it is to find these ingredients at any store. For the full recipe, check out [Full Recipe]. It's a delightful way to enjoy seasonal peaches in a warm muffin. First, preheat your oven to 375°F (190°C). This step warms the oven, helping the muffins bake evenly. Next, prepare your muffin tin. You can line it with muffin liners or grease it lightly with some non-stick spray or butter. This will keep the muffins from sticking. In a medium bowl, whisk together the dry ingredients. Combine 1 ½ cups of all-purpose flour, 1 teaspoon of baking powder, ½ teaspoon of baking soda, and ¼ teaspoon of salt. Mix well until everything is blended. Set this bowl aside for now. In a large mixing bowl, combine the sugars and melted butter. Use ½ cup of granulated sugar and ¼ cup of brown sugar. Mix them well until they blend together. Then, add 1 large egg and 1 teaspoon of vanilla extract. Beat the mixture until it looks fluffy. Next, pour in ½ cup of buttermilk and stir gently. Now, it’s time to add the dry ingredients. Gradually fold the flour mixture into the wet ingredients. Be gentle and avoid overmixing. It’s okay if the batter has a few lumps. Finally, fold in 1 ½ cups of diced peaches. Make sure they are evenly spread throughout the batter. In a small bowl, mix together ⅓ cup of rolled oats, 1 teaspoon of ground cinnamon, and a pinch of sugar for the streusel topping. This mix will add a crunchy texture to your muffins. Using a scooper or a spoon, fill each muffin liner with the batter. Aim to fill them about two-thirds full. This gives your muffins room to rise. Once filled, sprinkle a generous amount of the streusel topping over each muffin. This adds that crispy layer on top. Place the muffin tin in your preheated oven. Bake for 18 to 20 minutes. Check for doneness by inserting a toothpick into the center of a muffin. If it comes out clean, your muffins are ready. After baking, let the muffins cool in the pan for about 5 minutes. Then, transfer them to a wire rack to cool completely. For a complete recipe and detailed instructions, check out the Full Recipe. To make great muffins, avoid overmixing the batter. When you mix too much, muffins can turn tough and dry. Gently fold the dry ingredients into the wet. Leave some lumps; they are okay! The batter should feel thick but not dry. Aim for a smooth mix with small bits of flour still visible. This keeps the muffins soft and fluffy. To keep your muffins fresh, store them in an airtight container at room temperature. They will stay good for up to three days. If you want to keep them longer, freeze them. Wrap each muffin in plastic wrap, then put them in a freezer bag. When ready to eat, thaw them in the fridge overnight or microwave them for about 20 seconds. This keeps them soft and tasty. These peach streusel muffins pair well with coffee or tea. They also taste great with a glass of milk. For a nice touch, dust the muffins with powdered sugar before serving. You can also add a slice of fresh peach on the side. This extra step makes your muffins look fancy and adds more peach flavor. Enjoy the delightful mix of tastes! {{image_4}} You can switch the peaches for other fruits. Blueberries and raspberries work great! They add a nice burst of flavor. You can even mix fruits, like peaches and blueberries, for a fun twist. Remember to adjust the amount of fruit based on what you use. Keep it around 1 ½ cups to fill the muffins well. Need a gluten-free option? Use a gluten-free flour blend instead of all-purpose flour. For a dairy-free version, replace buttermilk with almond milk or coconut milk. You can also use a flax egg instead of a regular egg. Just mix 1 tablespoon of flaxseed meal with 2.5 tablespoons of water. Let it sit for a few minutes to thicken. This will keep your muffins tasty and friendly for different diets. Want to kick up the flavor? Try adding nuts like walnuts or pecans to the batter. They give a nice crunch. You can also sprinkle some cinnamon or nutmeg in the batter for warmth. For a little zing, add a splash of lemon juice or zest. These small changes can make your muffins more exciting and tasty. For the full recipe, look for the Peach Streusel Muffins instructions above! You can store Peach Streusel Muffins at room temperature. Place them in an airtight container. This helps keep them fresh and soft. They will stay tasty for up to three days. If you want to keep them longer, consider freezing. Freezing is a great way to save these muffins for later. Wrap each muffin in plastic wrap. Then, place them in a freezer bag or container. This keeps them from getting freezer burn. You can freeze them for up to three months. To enjoy them later, thaw your muffins. Take them out of the freezer and let them sit at room temperature. This usually takes about an hour. You can also warm them in the oven at low heat for a fresh-baked taste. For the best experience, try the Full Recipe to make these delightful muffins again! Yes, you can use canned peaches. Look for peaches packed in juice or water. Drain them well and pat them dry to remove excess moisture. This step helps avoid soggy muffins. Cut the peaches into small pieces, similar to fresh ones. Canned peaches can be sweeter, so reduce the sugar in the recipe by a tablespoon. This keeps your muffins balanced. If your batter is thick, add a splash of milk or buttermilk. Mix well until you reach a smooth texture. Thick batter can lead to dry muffins. You want a batter that can easily drop from a spoon but is not runny. Another tip is to gently fold in a bit more diced peaches. This adds moisture and flavor. Check for doneness by inserting a toothpick into the center of a muffin. If it comes out clean or with a few crumbs, your muffins are ready. Look for a golden-brown top and a slight spring when you touch the surface. If the muffins still look wet or jiggly, bake them a few more minutes. Yes, you can prepare the batter ahead. Store it in the fridge for up to 2 hours. Mix the wet and dry ingredients separately. Combine them just before baking. This helps keep the muffins light and fluffy. If you plan to store longer, consider freezing the batter in muffin tins. This way, you can bake fresh muffins anytime. For the full recipe, check above. These peach muffins are easy to make and full of flavor. We covered the ingredients, step-by-step instructions, and tips to improve texture and taste. From using fresh peaches to adding oats, each detail counts. You can experiment with flavors and storage methods. Enjoy these muffins fresh or store them for later. Happy baking!](https://dishtreats.com/wp-content/uploads/2025/07/b62cebd8-d26b-48c0-b1ab-fab18f37a599-300x300.webp)


![To make pumpkin spice oatmeal, gather these simple ingredients: - 1 cup rolled oats - 2 cups milk (dairy or almond) - 1/2 cup pumpkin puree - 1 teaspoon pumpkin spice blend - 1 tablespoon maple syrup or honey - 1/4 teaspoon vanilla extract - Pinch of salt - Optional add-ins: - 1/4 cup chopped walnuts - 1/4 cup dried cranberries or raisins - Fresh apple slices or banana for garnish Each ingredient plays a key role in creating a warm and comforting breakfast. The rolled oats form the base, while the pumpkin puree adds rich flavor and nutrition. Pumpkin spice blend gives that cozy fall taste, and maple syrup or honey sweetens it just right. You can customize this dish by adding walnuts for a crunchy texture or dried fruit for a hint of sweetness. Fresh fruit on top is also a great way to brighten the dish. If you follow the Full Recipe, you will have a delightful breakfast to enjoy on chilly mornings. To start, grab a medium-sized saucepan. Combine the rolled oats, milk, and a pinch of salt. Stir gently to ensure the oats mix well with the milk. Place the saucepan over medium heat. You want to bring this to a gentle simmer. Stir occasionally. This should take about five minutes until the oats soften. Once the oats are soft, it’s time to add some flavor! Carefully add the pumpkin puree, pumpkin spice blend, maple syrup, and vanilla extract to the saucepan. Stir well to combine everything. Keep cooking for another two to three minutes. This step makes the oatmeal creamy and rich. If you like some crunch, fold in chopped walnuts. For added sweetness, toss in dried cranberries or raisins if you wish. Let the oatmeal sit for one to two minutes. This resting time helps it thicken nicely before serving. Now you’re ready to enjoy your cozy pumpkin spice oatmeal! If you want the full recipe, just check the details above. To get your oatmeal just right, you can adjust its texture. If it seems too thick, add more milk. If it feels too runny, cook it a bit longer. Using fresh pumpkin spice makes a big difference in taste. The aroma and flavor become richer and more vibrant. For a lovely presentation, top your oatmeal with apple slices or banana. These fruits add sweetness and texture. You can also create decorative swirls with pumpkin puree. This not only looks nice but also adds a bit more flavor. If mornings are busy, make a large batch of oatmeal. You can easily reheat leftovers for a quick breakfast. Store it in the fridge, and it will be ready when you are. This way, you can enjoy Pumpkin Spice Oatmeal any time without the fuss. {{image_4}} You can change up the flavor of your pumpkin spice oatmeal easily. If you want a different sweetness, try using agave or brown sugar instead of maple syrup. Each sweetener brings a unique taste. For extra crunch, mix in different nuts like almonds or pecans. Seeds like chia or flax can also add a fun texture. If you follow a vegan diet, you can make this oatmeal vegan. Simply swap dairy milk for almond milk and use maple syrup for sweetness. This way, you keep all the yummy flavors while sticking to your diet. If you need a gluten-free option, just choose certified gluten-free oats. This ensures that everyone can enjoy this tasty dish. As the holidays approach, you can add cranberries or raisins for a festive twist. These fruits not only give a nice burst of sweetness but also add a pop of color. This makes your pumpkin spice oatmeal even more inviting. You can feel the warmth of the season with each bite. To explore the full potential of this recipe, check out the [Full Recipe]. Store leftovers in an airtight container for up to 3 days. This keeps your oatmeal fresh. It’s a great way to enjoy a quick breakfast later in the week. Reheat on the stovetop or in the microwave with a splash of milk. This helps restore the creamy texture. If using the stovetop, heat gently over low heat. Stir often to avoid sticking. Freeze individual servings for easy breakfasts. To enjoy, thaw overnight in the fridge. Then, reheat as usual. This method makes mornings smoother when you’re in a rush. Leftovers can be stored for up to 3 days in the fridge. Make sure to use an airtight container. This keeps the oatmeal fresh and tasty for your next breakfast. Yes, you can adjust the amount of maple syrup. You can also use an alternative sweetener if you prefer. Honey, agave, or stevia work well. Make it as sweet as you like! Simply multiply the ingredients as needed. Keep the same cooking process for best results. This way, you can feed more people or have extra for later. It is packed with fiber from oats. The pumpkin adds vitamins, making it a nourishing breakfast option. This meal supports digestion and gives you energy to start your day. Yes, it’s easy to prepare in advance. You can reheat the oatmeal quickly for busy mornings. Just store it in the fridge and warm it up when you are ready to eat. For the full recipe, check out the complete guide! This blog post explored the simple and tasty ways to make Pumpkin Spice Oatmeal. We covered the key ingredients, step-by-step cooking instructions, and helpful tips for perfecting your recipe. You can also customize it with various add-ins and flavors. This dish is not only delicious but also nutritious and great for meal prep. Enjoy a warm bowl of pumpkin spice oatmeal and kick-start your day!](https://dishtreats.com/wp-content/uploads/2025/06/a752c53c-93b7-4877-b1fd-c59ff5d6dc49-768x768.webp)


![- 1 can (15 oz) of chickpeas - 2 tablespoons extra virgin olive oil - Spice seasoning options: smoked paprika, garlic powder, ground cumin Crispy air fryer chickpeas need just a few simple ingredients. First, grab a can of chickpeas. They provide protein and fiber. Next, use extra virgin olive oil for richness. This oil helps the spices stick and adds flavor. For seasoning, I love smoked paprika, garlic powder, and ground cumin. These spices add depth and warmth to the dish. - Chopped fresh parsley or cilantro for garnishing - Alternative spices for flavor enhancement You can add fresh herbs like parsley or cilantro to make it pop. They add a burst of color and freshness. Feel free to play with spices. Try cayenne for heat or even cinnamon for a sweet twist. The options are endless! If you want to see the full recipe, check it out [Full Recipe]. - Preheat air fryer to 400°F (200°C). - Rinse and dry chickpeas thoroughly. Start by preheating your air fryer. Set it to 400°F (200°C) and let it heat for about five minutes. While it warms up, rinse the chickpeas well. It’s key to remove all the canning liquid. After rinsing, spread the chickpeas on a kitchen towel. Pat them dry gently. This step helps them get that perfect crisp. - Mix chickpeas with olive oil and spices. - Transfer to air fryer basket. In a large bowl, add the dried chickpeas. Pour in two tablespoons of olive oil. Sprinkle in smoked paprika, garlic powder, ground cumin, sea salt, and black pepper. Mix well so every chickpea gets coated. Next, transfer the seasoned chickpeas to the air fryer basket. Make sure they are in a single layer. Crowding the basket can lead to uneven cooking. - Set cooking time for 15–20 minutes. - Shake basket every 7 minutes for even cooking. Set the timer for 15 to 20 minutes. It’s important to shake the basket every seven minutes. This ensures all sides get crispy. Look for a nice golden-brown color and a satisfying crunch. When they’re done, let them cool for a few minutes. They will crisp up even more as they cool. If you like, garnish with chopped parsley or cilantro for a fresh touch before serving. To get the best crunch, drying chickpeas is key. Start by rinsing them well. Then, spread them on a clean kitchen towel and gently pat them dry. This step removes excess moisture, which helps them crisp up nicely in the air fryer. Next, set your air fryer to 400°F (200°C). Preheat it for about 5 minutes. This heat is crucial for achieving that perfect texture. When you place the chickpeas in the basket, make sure they are in a single layer. Overcrowding can lead to soggy chickpeas. Crispy chickpeas pair well with many dips. Hummus and tzatziki are two of my favorites. They add creaminess that balances the crunch. You can also toss them into salads for an extra crunch or use them to top soups. If you want to get creative, try using crispy chickpeas as a snack on their own. They make a great addition to trail mixes or can be sprinkled on popcorn for a fun twist. Chickpeas are not just tasty; they're nutritious too. They are high in protein and fiber. This makes them a filling snack that can help you feel satisfied. Air frying reduces the amount of oil needed, so you get a low-calorie snack option without sacrificing flavor. These crispy chickpeas are a great way to enjoy a healthy snack without the guilt. You can feel good about munching on them anytime! For the full recipe, check the section above. {{image_4}} You can change the flavor of your crispy air fryer chickpeas. One fun option is to add spice. Try cayenne or chili powder for a spicy kick. Just mix in a little with your other spices before cooking. If you prefer sweet snacks, go for cinnamon and sugar. This will give your chickpeas a unique twist that's fun and tasty. These chickpeas are healthy and fit many diets. They are naturally gluten-free and vegan-friendly. This means everyone can enjoy them! For those watching their salt intake, you can lower the sodium. Simply reduce or skip the sea salt in the recipe for a low-sodium version. If you're hosting a party, you might want more chickpeas. To increase the batch size, just double or triple the ingredients. The cooking time may stay the same, but keep an eye on them. You can also swap chickpeas for other legumes like black beans or lentils. They will work well in the air fryer and offer different flavors. Each option can give you a fun new snack! Check out the [Full Recipe](#) for detailed steps on making these crispy delights! To store your crispy chickpeas, use an airtight container. This will help them stay crunchy. A glass jar or a plastic container with a tight lid works well. Make sure to let them cool completely before sealing. This step prevents moisture buildup. You can easily reheat chickpeas in an air fryer. Set it to 350°F (175°C) and heat for about 5 minutes. This method keeps them crispy. If you prefer the oven, place them on a baking sheet at the same temperature. Check often to avoid sogginess. Crispy chickpeas last for about 3 days at room temperature. If you store them in the fridge, they may last a bit longer, but they can lose some crispiness. For best results, enjoy them fresh! To make air fryer chickpeas crispy, first dry them well. After rinsing, spread them on a clean towel and pat them dry. Removing moisture is key for that perfect crunch. Next, toss the chickpeas with olive oil and spices. The oil helps them crisp up in the air fryer. Set your air fryer to 400°F (200°C). Cook them for 15 to 20 minutes, shaking the basket every 7 minutes. This ensures even cooking and a nice, golden-brown color. Keep an ear out for a satisfying crunch as they cook. Let them cool for a few minutes after frying. They will get even crunchier as they cool. Yes, you can use dried chickpeas, but they require more prep. Start by soaking the dried chickpeas overnight. This softens them and reduces cooking time. After soaking, rinse and boil them until tender, about 1 to 2 hours. Once cooked, follow the same steps to dry and season them. Air frying time may be longer, as dried chickpeas need to lose more moisture. Pay close attention to their texture for that perfect crunch. Crispy chickpeas pair well with many dips. Try hummus for a classic touch. Tzatziki offers a cool contrast. You can also serve them with guacamole for a creamy twist. For a spicy kick, mix them with a sriracha mayo. These dips enhance the flavors of the chickpeas. They make for a fun and tasty snack or appetizer. Enjoy exploring different combinations to find your favorite! For the full recipe, check out the [Full Recipe]. Crispy air fryer chickpeas are easy and fun to make. We covered the main ingredients, like chickpeas and olive oil, and talked about spices for extra flavor. You learned preparation steps, tips for crispiness, and fun ways to enjoy this snack. Try different spices or dips to keep it exciting. Crispy chickpeas are a tasty, healthy option for any event. Enjoy your cooking and happy snacking!](https://dishtreats.com/wp-content/uploads/2025/07/61bc6060-fad3-40a7-be2f-ccc6788a1d37-768x768.webp)
![- Shrimp: Use 1 pound of large shrimp. Fresh shrimp works best. Look for shrimp that is pink and firm. Avoid shrimp that smells strong or has a slimy texture. - Honey: Use pure honey for the best flavor. Clover honey or wildflower honey both work well. They add the right sweetness without being too strong. - Lime Juice: Fresh lime juice is best. It gives a bright, zesty flavor. If you use bottled lime juice, choose one with no added sugars for a true taste. - Soy Sauce: Use low-sodium soy sauce. This keeps the dish from being too salty. It adds depth without overpowering other flavors. - Fresh Cilantro: This herb adds a fresh taste. If you don’t like cilantro, try parsley as a mild substitute. - Lime Wedges: Serving lime wedges with the dish boosts the flavor. Squeezing fresh lime juice on the shrimp adds a nice zing. For the full recipe, check the details above. Start by whisking together the marinade ingredients in a bowl. This mixture includes honey, lime juice, soy sauce, minced garlic, minced ginger, and crushed red pepper flakes. Blending these ingredients well is key. It helps the flavors combine and coat the shrimp evenly. The honey adds sweetness, while lime juice gives a zesty kick. Soy sauce brings depth, and garlic and ginger add warmth. This blend will make your shrimp burst with flavor. Once you have the marinade ready, add the peeled and deveined shrimp. Make sure each shrimp gets a good coat of the marinade. Cover the bowl with plastic wrap and let it sit. The best time for marinating is 15 to 20 minutes at room temperature. This allows the shrimp to soak up the flavors. If you let it sit too long, the acid from the lime juice can change the shrimp's texture. Now it's time to cook! Heat olive oil in a large skillet over medium-high heat. Wait until the oil shimmers before adding the shrimp. This heat ensures a good sear. Add the marinated shrimp to the skillet, but remember to save any leftover marinade. Cook the shrimp for about 2 to 3 minutes without stirring. You want one side to turn pink and opaque. Flip the shrimp and cook for another 2 minutes until done. To finish, pour the reserved marinade into the skillet and let it cook for one more minute. This step helps the flavors come together. Remove the skillet from heat and season with salt and pepper. Your spicy honey lime shrimp is now ready to serve. Enjoy it warm, garnished with fresh cilantro and lime wedges. For the full recipe, refer back to the beginning! To cook shrimp just right, avoid overcooking. Shrimp turns pink and opaque when done. Look for a firm texture. If it curls tightly, it may be overcooked. Using a meat thermometer helps ensure perfect shrimp. The ideal internal temperature is 120°F. This temperature keeps your shrimp juicy and tender. To spice things up, adjust the heat levels to your liking. If you enjoy more heat, add extra crushed red pepper flakes. Start with a little and add more if needed. Consider adding aromatics for extra flavor. Garlic and ginger bring warmth. You can also try adding cumin or smoked paprika for a new twist. Use your creativity to enhance flavors you love. {{image_4}} You can try different proteins for this dish. Chicken works well if you prefer it. Tofu is a great choice for a plant-based option, absorbing flavors nicely. Just cut them into bite-sized pieces and follow the same cooking steps. For sweeteners, honey is fantastic, but maple syrup can add a nice twist. Agave syrup is another option to consider. Both alternatives will still give you that sweet touch without losing flavor. Want to switch up the citrus? You can use lemon or orange juice for a fresh taste. Both add a unique zing that pairs well with shrimp. Adjusting the spice level is easy too. If you want more heat, add extra crushed red pepper flakes. For less spice, reduce the amount or leave it out. This way, you can make the dish just how you like it! For the full recipe, check [Full Recipe]. To keep your Spicy Honey Lime Shrimp fresh, follow these tips. - Refrigerator Storage: Place leftovers in an airtight container. Use glass or plastic containers that seal well. Store the shrimp in the fridge for up to three days. Make sure they cool down before sealing to avoid moisture buildup. - Freezing Options: If you want to save shrimp for later, freezing is a great choice. Lay the shrimp flat in a single layer on a baking sheet. Freeze until solid, then transfer to a freezer-safe bag. This method prevents clumping and keeps shrimp fresh for up to three months. Reheating shrimp can be tricky. Here’s how to do it right. - Best Methods: The microwave is quick but can make shrimp rubbery. Instead, use a skillet for better results. Heat a little oil in the skillet over medium heat. Add the shrimp and cook until warmed through. - Maintaining Texture: To avoid rubbery shrimp, don’t overheat them. Just warm until they are hot but still tender. Stir gently to keep them from sticking to the pan. Enjoy your shrimp like they were just cooked! For the full recipe, check out the [Full Recipe]. You can tell shrimp is done by its color and texture. Cooked shrimp turns pink and becomes firm. They should look opaque, not translucent. The safe internal temperature for shrimp is 120°F (49°C). Use a meat thermometer for the best results. Yes, you can prep this dish ahead. Marinate the shrimp and store it in the fridge. This can last for up to 2 hours. If you want to keep it longer, freeze the marinated shrimp. Thaw in the fridge before cooking. Pair this shrimp with rice or a fresh salad. Here are some great options: - Steamed jasmine rice - Quinoa salad - Grilled vegetables - Avocado slices These sides balance the shrimp's spice and sweetness. You can also serve warm tortillas for a fun twist. Check the Full Recipe for more details! You learned how to make Spicy Honey Lime Shrimp with fresh ingredients and easy steps. We talked about the best shrimp, types of honey, and the importance of lime juice. I shared tips on marinating and cooking to get shrimp just right. Remember to check for doneness and how to store leftovers. You can also try new flavors by changing ingredients. Enjoy your dish, share it, and impress your friends. Simple cooking can lead to big smiles!](https://dishtreats.com/wp-content/uploads/2025/07/32f525eb-631f-4155-a120-c5a025aaa712-768x768.webp)