
Looking for a tasty snack that won’t ruin your diet? Parmesan Crusted Zucchini Fries are crispy, salty, and truly tempting! This recipe transforms boring zucchini into a delicious treat that your kids—and you—will love. I’ll share tips for perfecting them, plus ways to customize your fries. Ready to make your kitchen smell amazing? Let’s dive into this quick and easy recipe!
Why I Love This Recipe
- Deliciously Crispy: The combination of Parmesan cheese and breadcrumbs creates a crunchy exterior that contrasts beautifully with the tender zucchini inside.
- Healthy Alternative: These fries are a fantastic way to enjoy a healthier version of traditional fries, packed with nutrients and flavor without the guilt.
- Easy to Make: With just a few simple ingredients and steps, this recipe comes together quickly, making it a perfect snack or side dish for any occasion.
- Versatile Dipping Options: These zucchini fries pair well with a variety of dips, allowing you to customize your snacking experience based on your mood.
Ingredients
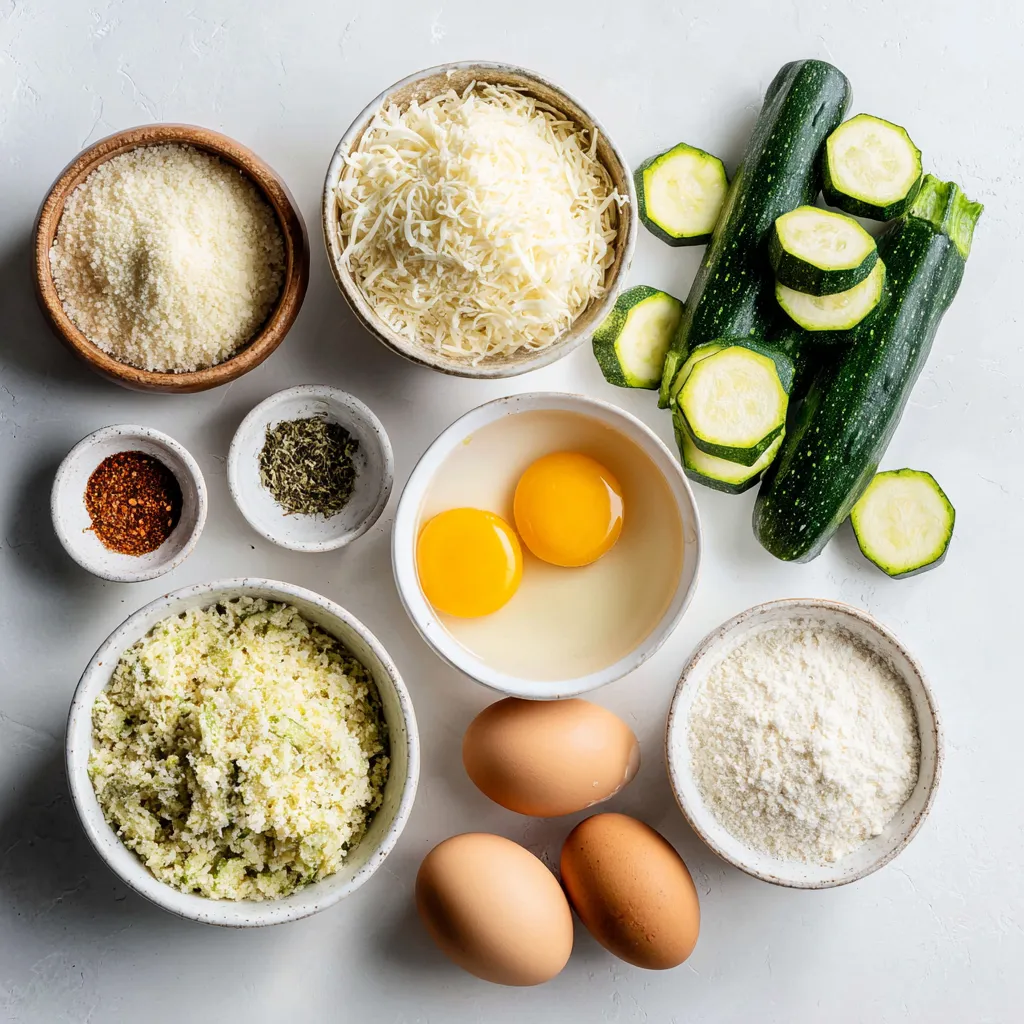
List of Ingredients
To make Parmesan crusted zucchini fries, you will need:
– 2 medium zucchinis, trimmed and cut into fry-shaped strips
– 1 cup freshly grated Parmesan cheese
– 1 cup seasoned breadcrumbs (panko for added crunch)
– 2 large eggs, beaten until frothy
– 1 teaspoon garlic powder
– 1 teaspoon dried oregano
– 1/2 teaspoon smoked paprika
– Salt and freshly ground black pepper to taste
– Olive oil spray for cooking
Ingredient Substitutions
If you are missing any ingredients, don’t worry! Here are some swaps you can try:
– Zucchini: Use eggplant or yellow squash for a different taste.
– Parmesan cheese: Grated Pecorino Romano gives a nice flavor kick.
– Breadcrumbs: Crushed crackers or cornmeal can work in a pinch.
– Eggs: Flaxseed meal mixed with water can act as a binder for a vegan option.
– Spices: You can add Italian seasoning or chili powder for a twist.
Nutritional Information
Here’s a quick look at the nutrition for one serving of Parmesan crusted zucchini fries (based on four servings):
– Calories: 250
– Protein: 12g
– Carbohydrates: 20g
– Dietary Fiber: 2g
– Sugars: 3g
– Total Fat: 12g
– Saturated Fat: 5g
These fries offer a tasty way to enjoy your veggies while still being crispy and satisfying!
Step-by-Step Instructions
Prepping the Zucchini
To start, grab two medium zucchinis. Wash them well and trim off the ends. Cut each zucchini into fry-shaped strips. Aim for about 1/4 inch thick. This size helps them cook evenly. Place the strips on a clean towel to dry. This step is key to getting crispy fries.
Coating the Zucchini Fries
Next, prepare your coating. In a shallow bowl, mix the fresh Parmesan cheese, seasoned breadcrumbs, garlic powder, oregano, smoked paprika, salt, and black pepper. Stir these until they blend well. In another bowl, beat the two large eggs until frothy. Take each zucchini strip, dip it in the egg, and let the excess drip off. Then roll it in the Parmesan-breadcrumb mix. Press gently to make sure it sticks. The more coating, the crunchier the fry!
Baking Techniques for Optimal Crispiness
Now, let’s get baking! Preheat your oven to 425°F (220°C). Line a baking sheet with parchment paper to stop the fries from sticking. Arrange the coated zucchini fries on the sheet in a single layer. Make sure they aren’t touching, so they cook evenly. Lightly spray the tops with olive oil. This helps them become golden and crispy. Bake for 20-25 minutes. Flip the fries halfway through to get an even brown. When they are golden and crispy, take them out. Let them cool for a bit before serving. Enjoy your tasty zucchini fries!
Tips & Tricks
How to Achieve Extra Crispy Texture
To make your zucchini fries extra crispy, use panko breadcrumbs. They add great crunch. You can also spray them lightly with olive oil before baking. This helps them brown well. Flip the fries halfway through baking. This ensures even crispiness on both sides.
Common Mistakes to Avoid
One mistake is crowding the baking sheet. Keep space between each fry. This lets hot air circulate. Another mistake is skipping the egg wash. The egg helps the coating stick. Lastly, don’t skip preheating the oven. A hot oven gives the best texture.
Serving Suggestions and Pairings
Serve your zucchini fries in a small basket or on a plate. They look great with a sprinkle of fresh parsley. For dipping, marinara sauce works well. You might also enjoy a creamy garlic aioli. Both options enhance the flavor of the fries.
Pro Tips
- Choose Firm Zucchini: Select firm, fresh zucchinis for the best texture. Avoid soft or overripe ones to ensure the fries hold their shape while baking.
- Experiment with Spices: Feel free to customize the seasoning. Add crushed red pepper for heat or Italian seasoning for a more herbaceous flavor.
- Use a Wire Rack: For extra crispiness, place the zucchini fries on a wire rack set over the baking sheet. This allows air to circulate around all sides.
- Don’t Overcrowd the Baking Sheet: Make sure to leave space between each fry. Overcrowding can lead to steaming instead of crisping.
Variations
Alternative Seasonings
You can change the flavor by using different seasonings. Try adding some chili powder for heat. A pinch of Italian herbs adds a nice touch too. You can also use lemon zest for a fresh twist. Just mix your chosen spices into the breadcrumb mixture. This keeps the flavor exciting and new each time!
Vegetarian and Gluten-Free Options
For a vegetarian twist, use plant-based cheese instead of Parmesan. This keeps the dish meat-free and still tasty. To make it gluten-free, swap regular breadcrumbs for gluten-free panko. You can find these options in most grocery stores. This way, everyone can enjoy these crispy treats without worry!
Serving with Different Dips
Dips can really enhance your zucchini fries. Marinara sauce works well for a classic touch. If you like creaminess, try garlic aioli or ranch dressing. You can even mix yogurt with herbs for a light dip. Experiment with flavors to find your favorite combination. Dips make every bite even more fun!
Storage Info
How to Store Leftover Zucchini Fries
To store leftover zucchini fries, let them cool completely. Place them in an airtight container. You can keep them in the fridge for up to three days. If you want to enjoy them later, this method works great for keeping their flavors fresh.
Reheating Instructions
When you’re ready to eat, preheat your oven to 400°F (200°C). Spread the zucchini fries on a baking sheet. Bake them for about 10 minutes. This helps to restore their crispiness. You can also use an air fryer for about 5 minutes at the same temperature for a quicker option.
Freezing Tips for Future Use
If you want to freeze your zucchini fries, first freeze them in a single layer on a baking sheet. Once frozen, transfer them to a freezer bag. They can stay in the freezer for up to three months. To cook, no need to thaw. Just bake straight from the freezer at 425°F (220°C) for about 25-30 minutes. Enjoy!
FAQs
Can I make these ahead of time?
Yes, you can make these zucchini fries ahead of time. You can prepare them and keep them in the fridge for about one hour. This helps the coating stick better. You can also coat them, then freeze them for later. Just bake them straight from the freezer when you’re ready.
How do I prevent sogginess?
To prevent sogginess, ensure you coat the zucchini fries well. Use the egg wash fully to help the breadcrumbs stick. Leave space between the fries on the baking sheet. This allows hot air to circulate and keeps them crispy. Finally, spray them with olive oil before baking for extra crunch.
What can I serve with Parmesan crusted zucchini fries?
These fries pair well with many dips. I recommend marinara sauce for a classic touch. You can also try creamy garlic aioli for a rich flavor. For a fresh twist, serve them with a yogurt-based dip. Add a side salad or a light pasta dish to make it a full meal.
In this blog post, we explored how to make crispy zucchini fries. We covered key ingredients, substitutions, and nutritional facts. Next, I detailed easy steps for prepping and baking. I also shared tips for achieving perfect crispiness and avoiding common mistakes. You can personalize these fries with various seasonings and dips. Proper storage ensures they stay fresh for later. By following these steps, you’ll enjoy tasty zucchini fries anytime. I hope you’ll find joy in making this healthier snac


