One Pot Spicy Tomato Basil Gnocchi Easy and Fast Recipe

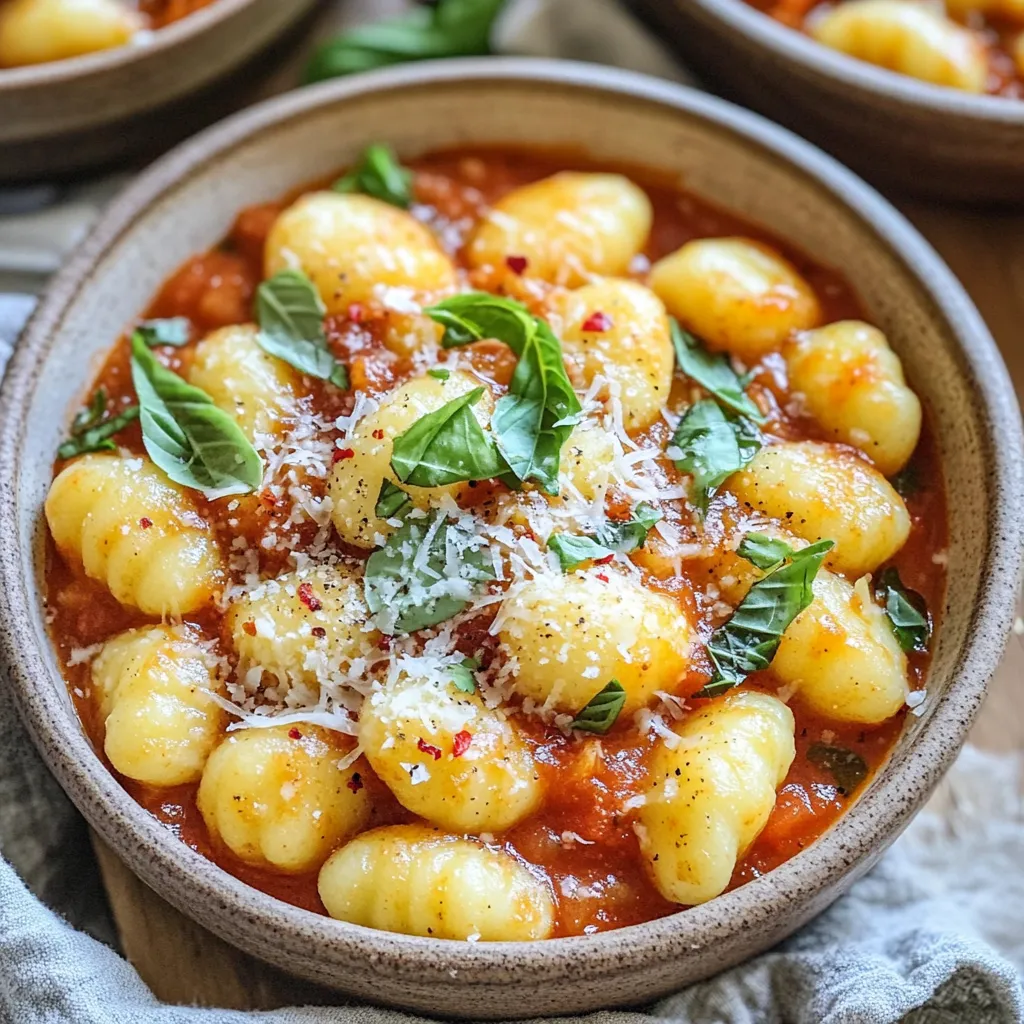
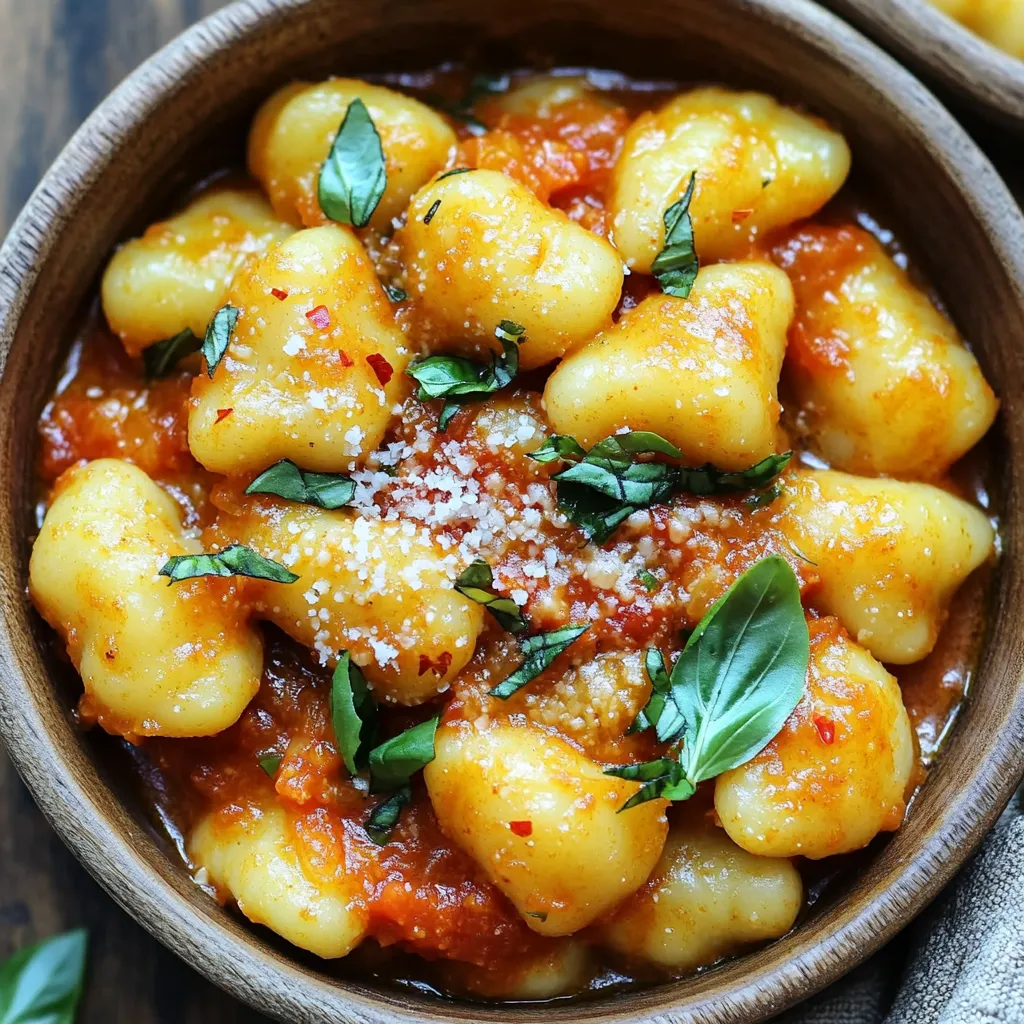
Are you ready for a quick meal that bursts with flavor? This One Pot Spicy Tomato Basil Gnocchi recipe is your answer! With just a few simple ingredients, you can create a hearty dish that’s perfect for any night. You’ll love how easy it is to whip up this tasty meal in under 30 minutes. Let’s dive into the details and get cooking!
Ingredients
Main Ingredients
- 1 package (16 oz) potato gnocchi
- 2 tablespoons extra virgin olive oil
- 4 cloves garlic, finely minced
- 1 teaspoon red pepper flakes
Additional Components
- 1 can (14 oz) crushed tomatoes
- 1 cup vegetable broth
- 1 teaspoon granulated sugar
- 1 teaspoon dried oregano
Seasoning and Garnishes
- Salt and freshly ground black pepper
- 1 cup fresh basil leaves, roughly chopped
- ½ cup grated Parmesan cheese (optional, for garnish)
For this One Pot Spicy Tomato Basil Gnocchi, you’ll need a few basic items. Potato gnocchi is the star. It cooks quickly and soaks up the sauce well. Extra virgin olive oil helps to start the flavor. Minced garlic adds a nice punch. Red pepper flakes bring the heat, but adjust it to your taste.
Next, you’ll want crushed tomatoes for the sauce base. Vegetable broth adds depth to your dish. Granulated sugar balances the acidity of the tomatoes. Dried oregano gives it an Italian flair.
Finally, season with salt and black pepper. Fresh basil adds brightness and aroma. If you like, top with grated Parmesan cheese for a creamy finish. These ingredients combine to make a hearty, flavorful meal in one pot.
Step-by-Step Instructions
Preparing the Base
1. Heat olive oil: In a large pot, pour in 2 tablespoons of extra virgin olive oil. Heat it over medium heat until warm.
2. Sauté garlic and red pepper flakes: Add 4 finely minced cloves of garlic and 1 teaspoon of red pepper flakes. Stir for about 30 seconds. Keep an eye on the garlic; we want it fragrant, not burnt.
3. Add crushed tomatoes and broth: Pour in 1 can of crushed tomatoes and 1 cup of vegetable broth. Stir well to mix everything together.
Developing the Flavor
1. Season the sauce: Mix in 1 teaspoon of granulated sugar, 1 teaspoon of dried oregano, and a good pinch of salt and black pepper.
2. Simmer: Bring the mixture to a gentle simmer. This step helps the flavors come together and develop.
Cooking the Gnocchi
1. Add the gnocchi: Carefully add 1 package (16 oz) of potato gnocchi into the pot. Gently stir to coat the gnocchi in the sauce.
2. Cover and cook: Place a lid on the pot. Cook for 2 to 3 minutes or until the gnocchi float to the top. This means they are done.
3. Finish with basil: Remove the pot from the heat. Stir in 1 cup of roughly chopped fresh basil. Taste the dish and adjust the seasoning if needed.
Tips & Tricks
Adjusting Spice Levels
To change the heat, start with less red pepper flakes. You can add more later if you want it spicier. If you need a milder dish, try using smoked paprika or sweet bell pepper. Both give flavor without the heat.
Enhancing Flavor
You can boost the taste by adding more herbs like thyme or parsley. Fresh herbs bring brightness. Dried herbs work too, but they are less vibrant. A squeeze of lemon juice can also lift the flavors. It adds freshness that balances the dish.
Troubleshooting Common Issues
If your sauce gets too thick, add a splash of vegetable broth or water. This will loosen it up. If your gnocchi are undercooked, just keep cooking them a bit longer. They should float when done. Check often to avoid overcooking.

Variations
Custom Ingredient Swaps
You can easily swap out the gnocchi for other pasta types. Penne or fusilli works well too. If you want more protein, you can add diced chicken or shrimp. Cook them in the pot before adding the tomatoes. This keeps the dish tasty and filling.
Different Flavor Profiles
Feel free to add more vegetables to your dish. Spinach and bell peppers add great color and flavor. You can also experiment with different cheeses. Try mozzarella for a gooey texture or feta for a salty kick.
Dietary Considerations
For vegan options, use plant-based cheese or skip the cheese entirely. You can also make this dish gluten-free. Just replace regular gnocchi with gluten-free gnocchi. If you’re looking for low-carb choices, use cauliflower gnocchi instead. It gives you the same fun texture with fewer carbs.
Storage Info
Storing Leftovers
To store your One Pot Spicy Tomato Basil Gnocchi, let it cool first. Then, place the leftovers in an airtight container. You can keep it in the fridge for up to three days. If you want to keep it longer, freezing is a great option.
Reheating Instructions
When you reheat, I recommend using the stovetop. This keeps the gnocchi’s texture nice. Just add a splash of water or broth to the pot while heating. Stir occasionally. If you use the microwave, heat in short bursts. Stir in between to avoid hot spots.
Freezing for Later
To freeze, let the dish cool completely. Then, scoop portions into freezer-safe bags. Make sure to remove as much air as possible. This helps prevent freezer burn. When you’re ready to eat, thaw it in the fridge overnight. Reheat it on the stovetop for the best results.
FAQs
Can I use frozen gnocchi?
Yes, you can use frozen gnocchi. Frozen gnocchi cooks a bit longer than fresh. Add an extra two to three minutes to the cooking time. The flavor remains great, but the texture may change slightly. Keep an eye on them as they cook.
How do I know if my gnocchi is cooked?
You’ll know gnocchi is cooked when they float. This means they are ready to eat. If they stay at the bottom, wait a minute and check again. Floating gnocchi should be soft and tender, not mushy.
Can I make this dish ahead of time?
Yes, you can make this dish ahead of time. Cook it fully and let it cool. Store it in the fridge for up to three days. To reheat, add a splash of water and warm it on the stove. This will keep the gnocchi from drying out.
What can I serve with One Pot Spicy Tomato Basil Gnocchi?
You can serve this dish with a simple green salad. Garlic bread pairs well too. For a heartier meal, add grilled chicken or shrimp. Enjoy with a glass of red wine to enhance the flavors.
Is it possible to make this recipe gluten-free?
Yes, you can make this recipe gluten-free. Use gluten-free gnocchi, which is available at most stores. Just check the label to ensure it’s gluten-free. The sauce remains the same, so your meal will still be delicious!
This blog post covered how to whip up One Pot Spicy Tomato Basil Gnocchi. We explored key ingredients like gnocchi, tomatoes, and fresh herbs. I shared useful tips for adjusting spice levels and enhancing flavors. You learned how to store and reheat leftovers properly.
In conclusion, this dish is flexible and forgiving. You can swap ingredients and adjust spice to your taste. Get creative! Enjoy making this meal that is both delicious and easy. Happy cooking!


![To make tasty chicken gyros, you need fresh and simple ingredients. Here’s what you will need: - 500g chicken breast, thinly sliced - 2 tablespoons olive oil - 1 tablespoon dried oregano - 1 teaspoon garlic powder - 1 teaspoon onion powder - 1 teaspoon smoked paprika - Salt and freshly ground black pepper, to taste - 4 pita breads - 1 cup Greek yogurt - 1 tablespoon fresh lemon juice - 1 cucumber, finely diced - 1 ripe tomato, finely diced - 1 small red onion, thinly sliced - Fresh parsley, chopped, for garnish These ingredients work together to create a rich flavor for your gyros. The chicken pairs well with the spices. The tzatziki adds a creamy texture that balances the dish. Feel free to add more flavors to your gyros. Here are some optional ingredients: - Feta cheese, crumbled - Bell peppers, thinly sliced - Hot sauce or chili flakes for spice These extras can personalize your gyros. They can boost the taste and make your meal even more exciting. Garnishes make your gyros look pretty and add flavor. Here are some great ideas: - Extra tzatziki sauce on the side - Sliced olives for a briny kick - Fresh mint or dill for added freshness Serve your gyros with a side of simple salad or roasted potatoes. This adds to the fun and makes a complete meal. For the full recipe, check the earlier section! To start, you need to make the chicken marinade. In a big bowl, mix the chicken breast with olive oil, dried oregano, garlic powder, onion powder, smoked paprika, salt, and pepper. Ensure every piece is coated well. Cover the bowl with plastic wrap or a lid. Let it sit in the fridge for at least 30 minutes. You can even marinate it for up to 2 hours. This step helps the chicken soak up all the flavors. Next, heat your grill or skillet over medium-high heat. When it's hot, add the marinated chicken slices. Cook them for about 6 to 8 minutes. Make sure to turn them occasionally. You want them golden brown and fully cooked. Use a meat thermometer to check the chicken's internal temperature. It should reach 75°C (165°F) to be safe to eat. While the chicken cooks, prepare the tzatziki sauce. In a medium bowl, mix Greek yogurt, fresh lemon juice, finely diced cucumber, salt, and pepper. Stir it well and set it aside. Letting it sit helps the flavors blend together nicely. This sauce adds a cool taste to your gyros. It's a perfect match for the warm chicken. For the full recipe including all ingredients and steps, see [Full Recipe]. When making chicken gyros, many people make simple errors. Here are some to watch for: - Not marinating long enough: Marinate your chicken for at least 30 minutes. Longer gives better flavor. - Overcrowding the grill: Give each piece space. This helps the chicken cook evenly. - Skipping the meat thermometer: Always check if chicken is at 75°C (165°F). This keeps it safe to eat. You can easily change the recipe to fit your needs. Here are some ideas: - Gluten-free: Use gluten-free pita or lettuce wraps instead of pita bread. - Dairy-free: Swap Greek yogurt with a non-dairy yogurt for the tzatziki sauce. - Low-carb: Serve the chicken on a salad instead of using pita bread. Grilling chicken gyros can be easy with a few tips: - Heat control: Make sure your grill is hot before adding chicken. This gives nice grill marks. - Avoid pressing down: Don’t press the chicken with a spatula. This releases juices and dries it out. - Let it rest: Always let the chicken rest after cooking. This keeps it juicy when you slice it. Using these tips will help you craft great homemade chicken gyros. For the complete recipe, check out the Full Recipe section. {{image_4}} You can swap chicken with other meats. Try beef, lamb, or pork. Each protein brings its own taste. Marinate them the same way as chicken. This gives you tasty options for your gyros. For example, beef adds a rich flavor. Lamb has a unique zest. Pork is juicy and tender. All these variations keep your meals exciting. If you prefer plant-based meals, there are great choices. Use marinated mushrooms or eggplant as your base. Grilled zucchini or bell peppers work well too. For protein, try chickpeas or lentils. These options are filling and tasty. You can still make a delicious tzatziki sauce with vegan yogurt. This lets everyone join in on the fun. Want to change up the flavor? Add spices like cumin or coriander to the marinade. This gives your gyros a warm, earthy taste. You can also try different herbs, like mint or dill. They add a fresh twist. For a kick, include hot sauce or chili flakes. Each tweak can create a new flavor experience. Enjoy creating your own unique version of homemade chicken gyros. For the full recipe, check the earlier section. To keep your leftover gyros fresh, wrap them tightly. I recommend using plastic wrap or aluminum foil. This helps prevent air from getting in and keeps the flavors locked in. Place the wrapped gyros in an airtight container or a resealable bag. Store them in the fridge for up to three days. If you notice any extra moisture, you can add a paper towel inside to absorb it. Reheating gyros can be easy. To maintain their taste and texture, use a skillet or grill. Heat it over medium heat. Place the gyros in the skillet for about 3-4 minutes. Turn them halfway through so they warm evenly. If you prefer, you can also use a microwave. Just remember to wrap them in a damp paper towel. This keeps them from drying out. Heat for 30 seconds, then check. If they need more time, heat in 10-second bursts. If you want to save gyros for later, freezing is a great option. Start by letting the cooked chicken cool completely. Then, wrap the chicken in plastic wrap. Place it in a freezer-safe bag or container. You can freeze the chicken for up to three months. When you are ready to eat, thaw it in the fridge overnight. Reheat it as mentioned earlier. You can also freeze the tzatziki sauce separately. Just remember to stir it well after thawing. To make tzatziki sauce, mix Greek yogurt, fresh lemon juice, and diced cucumber. Add salt and pepper for taste. This sauce adds a cool, creamy touch to your gyros. It’s simple and fresh. Let it sit for a few minutes to blend the flavors. Yes, you can use store-bought pita bread. It saves time and works well. Just warm the pita on the grill or in a skillet. This makes it soft and ready to hold your tasty filling. Homemade pita is great, but store-bought is quick and easy. Serve chicken gyros with a side of Greek salad or roasted veggies. You can also add extra tzatziki for dipping. For drinks, try a refreshing lemonade or some iced tea. These sides enhance your meal and bring more flavor to the table. For the full recipe, check out the complete guide on making Homemade Chicken Gyros. Homemade chicken gyros are easy and fun to make. We covered key ingredients, cooking steps, and tips to avoid mistakes. You can add your own twist by using different proteins or flavors. Storing leftovers or prepping meals ahead keeps dinner simple. With all this info, you can create a tasty meal your whole family will love. Enjoy making gyros that bring great joy to your table!](https://dishtreats.com/wp-content/uploads/2025/06/a33d49ac-ff2d-4809-8657-a37e258bd1fd-768x768.webp)


![- 4 boneless, skinless chicken thighs - 1 cup teriyaki sauce - 1/2 fresh pineapple, sliced into 1/2-inch rings - 2 tablespoons soy sauce - 1 tablespoon brown sugar - 1 teaspoon freshly grated ginger - 2 cloves garlic, finely minced - 1 tablespoon sesame oil - 1 tablespoon rice vinegar - 2 green onions, finely chopped - Sesame seeds Gathering the right ingredients is key for Grilled Pineapple Teriyaki Chicken. Start with fresh chicken thighs. They stay juicy and tender when grilled. You can use store-bought or homemade teriyaki sauce. I often prefer making my own, as it gives a fresh taste. Next, you want ripe pineapple. Choose one that feels heavy and smells sweet. The sweetness will balance the salty teriyaki sauce. For the marinade, you need a few simple items. Soy sauce adds saltiness, while brown sugar gives a nice caramel note. Ginger and garlic bring warmth and depth. Sesame oil adds a nutty flavor, and rice vinegar gives a bit of tang. Finally, for garnishing, chop green onions for color and freshness. A sprinkle of sesame seeds adds a nice crunch. These ingredients come together to create a vibrant, tasty dish. For the full recipe, check the provided link. First, gather your ingredients for the marinade. In a bowl, mix teriyaki sauce, soy sauce, brown sugar, grated ginger, minced garlic, sesame oil, and rice vinegar. Whisk these together until smooth. Add the chicken thighs and coat them well with the marinade. Cover the bowl with plastic wrap and put it in the fridge. Let the chicken marinate for at least 30 minutes. For more flavor, let it marinate for up to 2 hours. While the chicken marinates, preheat your grill to medium-high heat. If you’re using charcoal, wait for the coals to glow red. This will ensure even grilling and great flavor in your chicken. Now it's time to grill the pineapple. Take your pineapple rings and brush both sides with teriyaki sauce. Once the grill is hot, place the pineapple on it. Grill for about 3-4 minutes on each side. You want to see nice grill marks and a caramelized look. When done, set the grilled pineapple aside on a plate. Next, take the chicken thighs out of the fridge. Let any extra marinade drip off. Place the chicken on the hot grill. Cook for about 5-7 minutes per side. Aim for an internal temperature of 165°F (75°C). In the last few minutes, brush on more marinade for added flavor. When the chicken is cooked, take it off the grill. Let it rest for a few minutes. This helps keep the juices inside. To serve, place a grilled pineapple ring on each plate. Top it with a grilled chicken thigh. For a beautiful touch, sprinkle chopped green onions and sesame seeds on top. Enjoy your meal! For the full recipe, check out [Full Recipe]. For juicy chicken, preheat your grill to medium-high heat. This temperature helps create a nice sear on the chicken. A hot grill also locks in moisture, making the meat tender. If using charcoal, wait until the coals glow red and spread evenly for the best result. The marinade is key to great flavor. I suggest marinating the chicken for at least 30 minutes. This time allows the flavors to soak in. For an even richer taste, let it marinate for up to 2 hours. Just remember, don’t go over 2 hours, or the chicken might turn mushy. When picking a pineapple, look for one that feels heavy for its size. The skin should be golden and slightly soft at the base. A ripe pineapple smells sweet at the bottom. Avoid ones that are too green or have brown spots. A good pineapple adds the perfect touch to your grilled chicken. For more details and to try the dish, check out the Full Recipe. {{image_4}} You can easily swap chicken for other proteins. Try pork tenderloin or shrimp for a tasty twist. Tofu is a great choice for a vegetarian option. Just make sure to press the tofu to remove extra moisture. This helps it absorb the marinade better. No matter what protein you choose, aim for similar cooking times for best results. Want to kick up the flavor? Add red pepper flakes for heat or lime juice for zest. You can also mix in a dash of sesame seeds or a splash of orange juice for sweetness. Experimenting with spices like smoked paprika or five-spice powder can add depth. This way, you can create a unique flavor profile each time. Pair your grilled pineapple teriyaki chicken with steamed rice or a fresh salad. Jasmine rice complements the dish's sweetness well. For salads, consider a mix of greens with a light vinaigrette. You can also serve it with grilled vegetables for added color and nutrition. These options enhance your meal and make it more satisfying. For the full recipe, check out the details above. Store your Grilled Pineapple Teriyaki Chicken in an airtight container. This keeps it fresh and prevents odors from mixing. The chicken and pineapple can last in the fridge for about 3 to 4 days. Always let the chicken cool down before sealing it. This helps avoid condensation inside the container. To freeze your grilled chicken and pineapple, first, let them cool completely. Wrap each piece tightly in plastic wrap. Then place them in a freezer bag or a container. This keeps air out and prevents freezer burn. You can freeze it for up to 3 months. Label the bags with the date for easy tracking. To reheat your chicken, use the oven or stovetop. Preheat your oven to 350°F (175°C). Place the chicken in a baking dish and add a splash of water or broth. Cover it with foil. Heat for about 15-20 minutes until warm. For stovetop, use a skillet over medium heat. Add a bit of oil and warm the chicken gently. Avoid high heat to keep it juicy. You can make teriyaki sauce easily at home. Here’s how: - 1 cup soy sauce - 1/2 cup brown sugar - 1/4 cup rice vinegar - 2 tablespoons sesame oil - 1 teaspoon grated ginger - 2 cloves minced garlic Combine all these ingredients in a saucepan. Heat over medium until the sugar dissolves. Stir it well, and let it simmer for a few minutes. Your homemade teriyaki sauce is ready to use! Yes, you can use chicken breasts. They are leaner but may dry out faster than thighs. To prevent this, marinate them longer. Chicken thighs stay juicy and tender. If you prefer breasts, just keep an eye on cooking time. Many sides pair well with this dish. Here are some ideas: - Steamed jasmine rice - Grilled vegetables - Asian slaw - Quinoa salad These sides will complement the sweet and savory flavors of the chicken. Marinate the chicken for at least 30 minutes. For the best flavor, aim for 2 hours. The longer it sits, the more flavor it absorbs. Just don’t marinate too long, or the texture may change. Yes, you can grill indoors! Use a grill pan on your stovetop. Another option is to use a broiler in your oven. Both methods will give you a nice char and keep the flavor intact. This blog post covered how to make Grilled Pineapple Teriyaki Chicken. We explored key ingredients, marinade tips, and grilling steps. I shared variations and storage info to help you enjoy this dish longer. Always remember to adjust the marinade and experiment with flavors. Whether serving to friends or family, this dish is sure to impress. With these tips, you'll cook with confidence and skill. Enjoy the process and the delicious outcome!](https://dishtreats.com/wp-content/uploads/2025/06/0924d723-9b8a-4a49-9695-7d965ac302d4-768x768.webp)