One-Pan Lemon Rosemary Chicken Gnocchi Recipe Delight

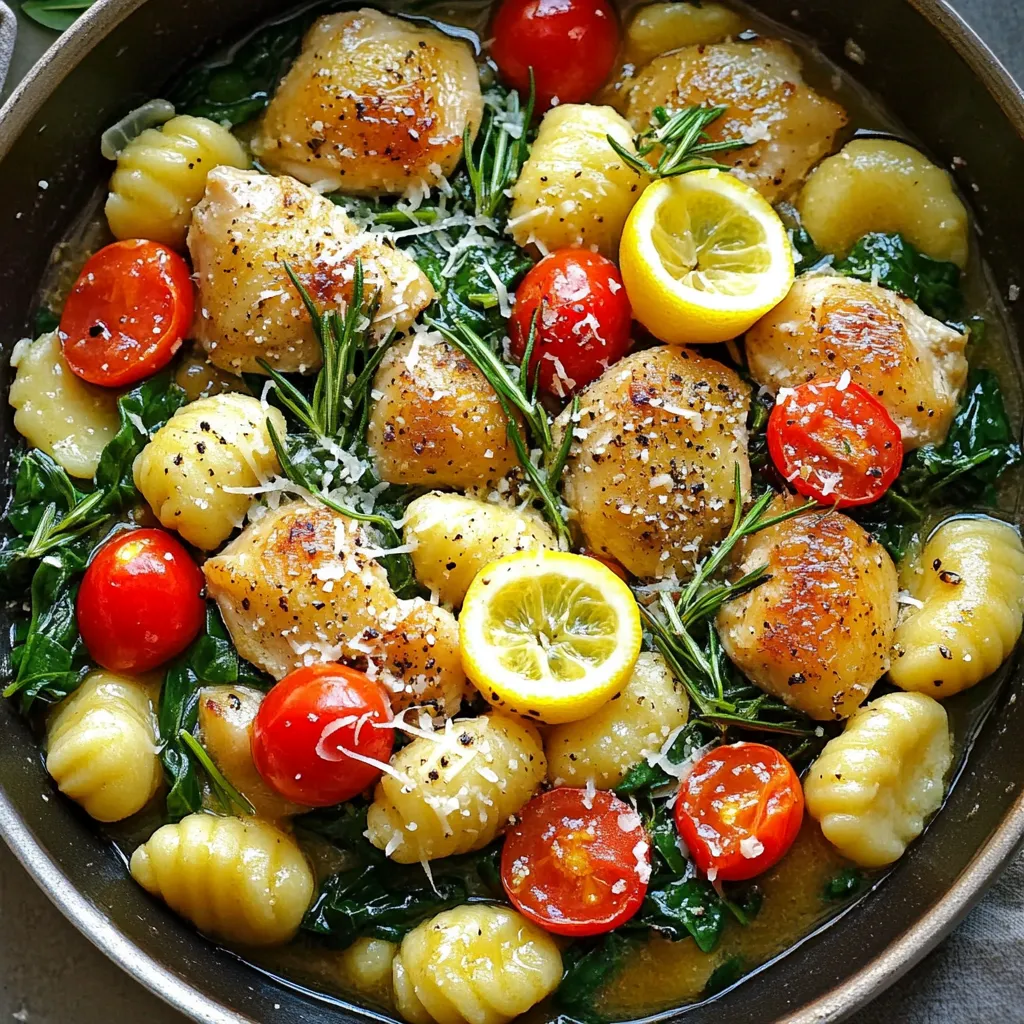
If you’re looking for a quick and tasty weeknight meal, you’ve found it! My One-Pan Lemon Rosemary Chicken Gnocchi is simple but bursting with flavor. This dish combines tender chicken, fluffy gnocchi, and fresh spinach in one easy pan. Not only will you save time on cleanup, but your taste buds will thank you. Let’s dive into this delicious recipe that will impress everyone at your dinner table!
Ingredients
Complete List of Ingredients
Here are the key ingredients for One-Pan Lemon Rosemary Chicken Gnocchi:
- 1 pound boneless, skinless chicken thighs, cut into bite-sized pieces
- 1 pound gnocchi (your choice of store-bought or homemade)
- 2 tablespoons olive oil
- 4 cloves garlic, minced
- 1 lemon, zested and juiced
- 1 tablespoon fresh rosemary, chopped (or 1 teaspoon dried rosemary)
- 1 cup cherry tomatoes, halved
- 2 cups fresh spinach
- Salt and pepper, to taste
- Grated Parmesan cheese, for serving (optional)
Ingredient Substitutions
You can switch some ingredients if you need to:
- Chicken thighs: Use chicken breasts, but they may dry out faster.
- Gnocchi: Try pasta, like fusilli or penne, if gnocchi is not available.
- Olive oil: You can use avocado oil for a different taste.
- Fresh rosemary: Dried thyme or oregano works well too.
- Cherry tomatoes: Substitute with diced bell peppers for a sweeter flavor.
- Spinach: Kale or arugula can also add a nice touch.
Tips for Selecting Fresh Ingredients
Choosing fresh ingredients makes a big difference in taste. Here are my tips:
- Chicken: Look for bright pink color, no off-smell, and firm texture.
- Gnocchi: If buying pre-made, check the package date for freshness.
- Herbs: Choose bright green leaves; avoid yellow or wilting herbs.
- Tomatoes: Pick firm tomatoes with smooth skin. They should smell sweet.
- Spinach: Look for vibrant, crisp leaves without brown spots.
These tips will help you create a dish that bursts with flavor and freshness.
Step-by-Step Instructions
Preparation of Chicken and Initial Sauté
Start by heating olive oil in a large skillet over medium heat. Once the oil shimmers, add 1 pound of chicken thighs. These should be cut into bite-sized pieces. Season the chicken with salt and pepper. Sauté the chicken for about 5-7 minutes. You want it nicely browned on all sides.
Incorporating Flavors with Garlic and Lemon
Next, add 4 cloves of minced garlic to the skillet. Stir it into the chicken. Cook for 1-2 minutes until the garlic smells nice and turns golden. Be careful not to burn it. Then, pour in the juice of 1 lemon. Add the zest and 1 tablespoon of chopped rosemary. Stir everything together. Let it simmer for about 1 minute. This helps the flavors blend well.
Cooking Gnocchi and Adding Spinach
Gently fold in 1 pound of gnocchi and 1 cup of halved cherry tomatoes. Pour in ½ cup of water or chicken broth for extra flavor. Stir to combine. Cover the skillet with a lid and let it simmer for 5-7 minutes. This cooks the gnocchi and makes it tender. Stir occasionally to stop it from sticking.
Once the gnocchi is soft, remove the lid. Fold in 2 cups of fresh spinach. Stir until it wilts. Taste the dish and adjust with more salt and pepper as needed. Serve hot, adding grated Parmesan cheese if you like. Enjoy your meal!
Tips & Tricks
How to Cook Gnocchi Perfectly
To cook gnocchi just right, start with a pot of salted water. Bring it to a boil. Add the gnocchi and watch closely. They will float when done. This takes about two to three minutes. Drain the gnocchi and set them aside. This helps keep them soft and fluffy. If you want a crispy texture, sauté them in the skillet after cooking.
Enhancing Flavor with Additional Herbs
Adding more herbs can boost the taste. Thyme, basil, or parsley work well with lemon and chicken. Use fresh herbs whenever possible. They bring out brighter flavors. For a stronger taste, add herbs during cooking. You can also sprinkle some fresh herbs over the dish before serving. This adds color and flavor.
Timing for Perfectly Cooked Chicken
Cooking chicken thighs takes time for safety and flavor. Cook them until golden brown, about five to seven minutes. Use a meat thermometer for safety. The chicken should reach 165°F (75°C). Let it rest for a few minutes after cooking. This keeps the juices in, making it tender and juicy. Cooking chicken with the gnocchi allows flavors to blend beautifully.

Variations
Customized Ingredients for Dietary Preferences
You can easily adjust this recipe. If you want a lighter meal, use chicken breast instead of thighs. For a vegetarian option, swap the chicken for mushrooms or tofu. You can also use gluten-free gnocchi if you need a gluten-free dish. Try adding some nuts for crunch or seeds for protein. You can replace spinach with kale for a different taste and texture.
Alternative Cooking Methods (Oven-Based)
Instead of using a skillet, you can bake this dish. Preheat your oven to 400°F (200°C). In a baking pan, mix the chicken, garlic, lemon juice, and zest, along with the olive oil and seasoning. Add the gnocchi and tomatoes next, stirring to combine. Cover the pan with foil and bake for about 20 minutes. Remove the foil, add spinach, and bake for another 5 minutes. This method gives a nice roasted flavor.
Adding Different Vegetables
Feel free to mix in other veggies too! Zucchini, bell peppers, or asparagus work great. Add them when you sauté the chicken for a lively dish. If you want a heartier meal, add carrots or peas. You can even toss in some broccoli or cauliflower for extra nutrients. Just remember to adjust cooking times for any firmer vegetables.
Storage Info
How to Store Leftovers
To store your leftover One-Pan Lemon Rosemary Chicken Gnocchi, first let it cool. Then, place it in an airtight container. It keeps well in the fridge for up to three days. Make sure to seal the container tightly to prevent moisture loss. This helps the dish stay fresh and tasty.
Reheating Instructions for Best Results
When you are ready to enjoy your leftovers, reheating is key. You can use a skillet for the best results. Heat a small amount of olive oil in the skillet over medium heat. Add the chicken and gnocchi mixture. Stir it gently for about five minutes. This helps keep the gnocchi soft and the chicken tender. You can also add a splash of water or broth to keep it moist.
Freezing Tips for Long-Term Storage
If you want to save some for later, freezing is a great option. Allow the dish to cool completely before freezing. Use a freezer-safe container or bag. Make sure to remove excess air to avoid freezer burn. It can last up to three months in the freezer. When you are ready to eat it, thaw it in the fridge overnight. Reheat as noted above for a delicious meal.
FAQs
Can I use frozen gnocchi for this recipe?
Yes, you can use frozen gnocchi for this recipe. Just add them to the skillet straight from the freezer. Cook them as directed in the recipe. They will soften and cook well in the sauce. This makes it easy and saves time.
What other herbs pair well with lemon and chicken?
Many herbs work well with lemon and chicken. Here are some great options:
- Thyme: Adds a warm flavor.
- Oregano: Gives a nice, earthy taste.
- Basil: Adds a fresh, sweet touch.
- Sage: Provides a strong, savory note.
Try mixing and matching these herbs to find your favorite flavor combo.
How can I make this dish spicier?
To spice up your dish, you can add red pepper flakes or cayenne pepper. Start with a small amount, then taste and adjust. Another option is to use spicy sausage instead of chicken. You can also add sliced jalapeños for heat. Enjoy the kick!
This blog post covered the key ingredients, how to cook them, and tips for success. I shared ways to customize the dish to fit your taste and dietary needs. Remember, selecting fresh ingredients can make a big difference in flavor. Use the methods and tips I provided to perfect your dish each time. With these steps in mind, you can confidently create a delicious meal that suits your palate. Cooking should be fun and rewarding, so don’t hesitate to experiment!


![To make Honey Mustard Chicken Thighs, you need simple, fresh ingredients. Here’s what you will need: - 4 bone-in chicken thighs, skin-on - 1/4 cup honey - 1/4 cup Dijon mustard - 2 tablespoons olive oil - 3 cloves garlic, minced - 1 teaspoon dried thyme - 1 teaspoon paprika - Salt and black pepper to taste - Fresh parsley for garnish These ingredients bring great flavor to your meal. The honey adds sweetness, while the Dijon mustard gives it a nice tang. Olive oil keeps the chicken juicy, and garlic boosts the taste. Dried thyme and paprika add depth, making every bite delicious. Don’t forget the parsley! It makes your dish look pretty and fresh. This recipe is quick and easy, perfect for any night. For the full instructions, check the Full Recipe. First, preheat your oven to 400°F (200°C). This heat will cook your chicken just right. In a small bowl, whisk together these ingredients: - 1/4 cup honey - 1/4 cup Dijon mustard - 2 tablespoons olive oil - 3 cloves garlic, minced - 1 teaspoon dried thyme - 1 teaspoon paprika - Salt and black pepper to taste Make sure to mix well. This creates a smooth and tasty marinade. Next, take your chicken thighs and place them in a large bowl or a resealable bag. Pour the marinade over the chicken. Ensure each piece is coated well. For the best flavor, let it marinate for at least 30 minutes. If you have more time, refrigerating it overnight works wonders. Now, heat a large oven-safe skillet over medium-high heat. Once hot, add the marinated chicken thighs, skin-side down. Sear them for about 5-7 minutes until the skin is golden brown. This step gives the chicken a nice crisp. After that, flip the thighs using tongs. Transfer the skillet to your preheated oven. Bake for 25-30 minutes. Check that the internal temperature reaches 165°F (75°C). If the juices run clear, the chicken is done. Once cooked, take the skillet from the oven and let the chicken rest for 5 minutes. This helps keep it juicy. Before serving, sprinkle some fresh parsley on top for a lovely finish. For the complete recipe, don't forget to check the [Full Recipe]. To get the best flavor, marinate the chicken thighs well. Use a large bowl or a resealable plastic bag for this. After mixing the marinade, pour it over the chicken. Make sure each piece is coated. For great results, let the chicken sit in the marinade for at least 30 minutes. You can also refrigerate it overnight. This extra time helps the flavors soak in deep. Cooking chicken thighs at the right temperature is key. Preheat your oven to 400°F (200°C). This hot oven cooks the chicken evenly and keeps it juicy. After searing the chicken for 5-7 minutes on the stovetop, transfer it to the oven. Bake for 25-30 minutes. Check the chicken's internal temperature. It should reach 165°F (75°C) for safe eating. Let it rest for 5 minutes before serving, which helps keep it moist. When serving, presentation matters. Place the chicken thighs on a white platter or a wooden board. Drizzle any leftover marinade over the top for added flavor. Garnish with fresh parsley for a pop of color. This simple touch makes the dish look more inviting. You can pair the chicken with roasted veggies or a fresh salad. These sides complement the sweet and tangy flavors of the honey mustard. For the full recipe, check out the details above. {{image_4}} You can change the sauce to fit your taste. Try using maple syrup instead of honey. This gives a unique sweetness. You can also mix in some soy sauce for a savory twist. If you like heat, add a dash of hot sauce or cayenne pepper. For a tangy flavor, consider apple cider vinegar. Each option adds a new layer to the dish. While chicken thighs are great, you can also use chicken breasts. They cook faster but stay moist if cooked right. Drumsticks are another option. They have lots of flavor and a nice crisp skin. You can even use a whole chicken, just adjust cooking time. Each cut brings its own charm to the recipe. For a full meal, add vegetables. Root veggies like carrots and potatoes roast well. Toss them in the marinade for extra flavor. You can also use green beans or broccoli. Place them in the skillet with the chicken. They will soak up the sauce and cook perfectly. This way, you have a tasty one-pan meal that's easy to serve. For the full recipe, check out the previous section. After cooking, let the chicken cool down. Place the chicken thighs in an airtight container. Store them in the fridge for up to three days. Make sure the temperature stays below 40°F (4°C). This keeps your chicken safe and tasty. If you want to store the chicken longer, freezing is a great option. Wrap each thigh tightly in plastic wrap. Then put them in a freezer-safe bag. You can freeze them for up to three months. Remember to label the bag with the date. When you are ready to enjoy leftovers, preheat your oven to 350°F (175°C). Place the chicken in a baking dish. Cover it with foil to keep it moist. Heat for about 20-25 minutes. You can also use a microwave, but it may dry the chicken out. For the best taste, the oven is the way to go. Enjoy your meal again! You should marinate honey mustard chicken thighs for at least 30 minutes. This allows the flavors to soak into the meat. If you have time, marinating overnight works even better. It deepens the taste and makes the chicken more tender. Yes, you can use boneless chicken thighs. They cook faster than bone-in thighs. Adjust the cooking time to about 20-25 minutes in the oven. Always check that the internal temperature reaches 165°F (75°C) for safety. Honey mustard chicken thighs pair well with many sides. Here are some ideas: - Steamed vegetables: Broccoli or green beans add color. - Rice or quinoa: Both soak up the sauce nicely. - Salad: A fresh green salad balances the meal. - Mashed potatoes: Creamy potatoes are a great comfort food option. You can find the full recipe to help you create this delicious meal. In this post, I shared ingredients and steps for making honey mustard chicken thighs. I provided tips for marinating and cooking this dish to enhance its flavor. You learned about variations and how to store leftovers properly. Remember, simple changes can make a big impact on taste. I encourage you to try these ideas for yourself. Enjoy cooking and delight in every bite!](https://dishtreats.com/wp-content/uploads/2025/06/0b4fb8df-5400-4b6b-9acb-490ad2d6fca7-768x768.webp)


![- 2 cups cooked chicken, shredded - 1 can (10 oz) red enchilada sauce - 1 can (15 oz) black beans, rinsed and drained - 1 cup corn kernels (fresh, frozen, or canned) - 1 small onion, finely chopped - 2 cloves garlic, minced - 2 cups shredded Mexican cheese blend - 8 small corn tortillas, cut into quarters - 1 teaspoon ground cumin - 1 teaspoon chili powder - ½ teaspoon salt - ¼ teaspoon black pepper - 1 cup sour cream (for serving) - Fresh cilantro, chopped (for garnish) When I make Chicken Enchilada Casserole, I love using fresh, simple ingredients. Each item adds flavor and texture. You can use rotisserie chicken for a quick option. It saves time and keeps the dish tasty. The red enchilada sauce gives it that signature kick. I prefer black beans for added protein. They blend well with the other flavors. Corn adds sweetness and a nice crunch. I often choose fresh corn when it's in season, but frozen works great too. Onions and garlic bring an aromatic base. They make the kitchen smell amazing while cooking. The cheese is essential. I like a Mexican cheese blend because it melts beautifully. Corn tortillas are the heart of this dish, creating layers of goodness. The spices, like cumin and chili powder, enhance the flavors without overwhelming them. Finally, a dollop of sour cream and fresh cilantro on top makes it perfect. This combination of ingredients creates a hearty meal your family will love. For the complete recipe, check the Full Recipe section. 1. Preheat the oven to 350°F (175°C). This helps cook the casserole just right. 2. In a large skillet, heat a little oil over medium heat. Add the chopped onion. Sauté for 3-4 minutes. Wait until the onion turns soft and clear. 3. Next, add minced garlic to the skillet. Cook for 1 more minute. This will fill your kitchen with a lovely smell. 4. Stir in the shredded chicken and red enchilada sauce. Add the rinsed black beans, corn, cumin, chili powder, salt, and pepper. Mix well and cook for 5-7 minutes. Make sure everything is hot and well combined. 1. Grease a 9x13 inch baking dish with a little oil or butter. This prevents sticking. 2. Take half of the tortilla quarters and place them at the bottom of the dish. Overlap them slightly to cover the bottom. 3. Spoon half of the chicken mixture over the tortillas. Spread it out evenly. Then, sprinkle 1 cup of shredded cheese on top. 4. Repeat with the remaining tortilla quarters and chicken mixture. Top with the rest of the cheese for a cheesy crust. 1. Cover the casserole tightly with aluminum foil. Bake for 20 minutes. This allows the flavors to mix well. 2. After 20 minutes, remove the foil. Bake uncovered for an extra 10-15 minutes. Wait until the cheese is bubbly and golden. 3. When done, take the casserole out of the oven. Let it cool for about 5 minutes before serving. This makes it easier to cut and serve. Enjoy this savory chicken enchilada casserole with your family! For the full recipe, check out the details above. - Use rotisserie chicken for time-saving: Rotisserie chicken is great for busy days. It saves time and adds flavor. Just shred it and mix it into your casserole. You get tasty results without a lot of work. - How to properly layer for even cooking: Start with tortilla quarters at the bottom. This helps soak up the sauce and keeps the bottom from getting soggy. Spread the chicken mixture evenly over the tortillas. Repeat this process. Finish with cheese on top for a bubbly crust. - Adjusting spice levels: If you like heat, add more chili powder or some diced jalapeños. For milder flavors, reduce the chili powder. Taste as you go to find your perfect balance. - Additional toppings and garnishes ideas: Try adding sliced avocado, diced tomatoes, or pickled red onions. These bright toppings add color and flavor. A sprinkle of fresh cilantro also makes your dish pop! - Best side dishes to serve with casserole: Serve with a simple green salad or Mexican rice. These sides add freshness and balance the rich casserole. You can also offer tortilla chips for crunch. - How to present for a family meal: Cut the casserole into squares for easy serving. Use a large spoon to add a dollop of sour cream on top. Finish with a sprinkle of cilantro for a beautiful presentation. Enjoy this meal around the table! {{image_4}} You can easily swap ingredients in your Chicken Enchilada Casserole. If you want a different meat, use turkey or beef instead of chicken. Both options taste great and keep the dish hearty. For a vegetarian version, try using black beans and colorful veggies like bell peppers or zucchini. These swaps keep the casserole flavorful and filling. If you need gluten-free options, use corn tortillas instead of flour ones. They work perfectly in this casserole and add a nice flavor. For those who want a dairy-free meal, look for plant-based cheese and sour cream. These substitutes will still give you the creamy texture you love without the dairy. To change the flavor profile, add some spice! For a Mexican-inspired twist, mix in jalapeños or your favorite salsa. This will add a kick and extra layers of flavor. If you prefer a Southwestern style, try adding more spices like smoked paprika or cayenne pepper. This will give the casserole a warm, smoky taste that everyone will enjoy. For the full recipe, check out [Full Recipe]. Store leftover Chicken Enchilada Casserole in an airtight container. This keeps it fresh. Make sure it cools down before sealing. It lasts about 3-4 days in the fridge. If you notice any odd smell or color, it's best to toss it. You can freeze the casserole both before and after baking. If you freeze it before baking, wrap it tightly in plastic wrap. Bake it straight from the freezer. This usually takes about 45-60 minutes at 350°F. If you freeze it after baking, let it cool first. Cover it with foil or plastic wrap. To reheat, bake at 350°F for about 30 minutes, or until hot. You can make this casserole ahead for busy weeknights. Simply prepare it a day in advance and store it in the fridge. Portion it into individual servings for quick meals. This way, you can just grab and heat it when needed. It makes weeknight dinners simple and stress-free. Can I make Chicken Enchilada Casserole in advance? Yes, you can make this dish ahead of time. Prepare it up to the baking step. Cover it and store it in the fridge. When ready, bake it straight from the fridge. This saves time on busy nights. What can I substitute for black beans? You can use pinto beans, kidney beans, or chickpeas. Each option adds a unique flavor. Just rinse and drain them before adding. How do I reheat leftovers without drying out the dish? To reheat, cover the casserole with foil. Heat it in a 350°F oven for about 20 minutes. This keeps it moist and warm. You can also microwave individual portions with a damp paper towel. What size baking dish should I use? I recommend a 9x13 inch baking dish. This size holds all the layers well. It helps the casserole cook evenly. How do I know when the casserole is completely done? The casserole is done when the cheese is golden and bubbly. Insert a knife in the center; it should be hot. The layers should look set and not runny. Can I adjust the spice level of the casserole? Yes, you can make it spicier or milder. Add more chili powder for heat. For milder flavor, reduce the spices or choose mild enchilada sauce. What are the best toppings to add for extra flavor? You can add sliced jalapeños, diced avocado, or fresh lime juice. Chopped green onions and extra cilantro also give a nice touch. These toppings enhance the dish's taste and look. This Chicken Enchilada Casserole is easy and fun to make, with great flavors. You learned about ingredients, step-by-step instructions, and tips for better cooking. Don’t forget to try different variations, depending on your taste or needs. Storing leftovers is simple, making this dish great for meal prep. This recipe is perfect for family meals or gatherings. Enjoy the warmth and comfort it brings to your table. Now, grab your ingredients and start cooking!](https://dishtreats.com/wp-content/uploads/2025/07/f6c231a9-1b86-4c94-be4f-d7e13d8c3061-768x768.webp)
