No-Bake Tiramisu Cups Delightful and Easy Dessert

If you’re craving a delicious dessert that requires no baking, you’ve come to the right place! These No-Bake Tiramisu Cups are easy to make and packed with rich flavors. With layers of creamy mascarpone, sweet coffee, and soft ladyfingers, you’ll impress everyone in no time. Join me as we explore how to create this delightful treat that’s perfect for any occasion. Let’s dive into the ingredients and steps to make your dessert dreams come true!
Ingredients
List of Required Ingredients
- 1 cup strong brewed coffee, cooled
- 2 tablespoons cocoa powder, plus extra for dusting
- 8 ounces mascarpone cheese, softened at room temperature
- 1 cup heavy whipping cream
- ½ cup powdered sugar
- 1 teaspoon vanilla extract
- 12 ladyfinger cookies
- Dark chocolate shavings for garnish
Ingredient Substitutions
- For a lighter option, use cream cheese instead of mascarpone.
- For dairy-free, try using coconut cream or tofu.
- You can use honey or maple syrup as sweeteners instead of powdered sugar.
Gather these ingredients to make your no-bake tiramisu cups shine. Each item plays a key role in building flavor and texture. The strong brewed coffee gives a rich base. Mascarpone cheese adds creaminess. Heavy whipping cream creates a light feel.
If you want to adapt the recipe, there are great swaps. If you cannot find mascarpone, cream cheese works well. For those avoiding dairy, coconut cream is a fantastic choice. You can switch powdered sugar with honey or maple syrup if you prefer.
Feel free to get creative with these ingredients. This dessert can be yours with just a few tweaks!
Step-by-Step Instructions
Preparing the Coffee
To start, brew a strong cup of coffee. Use your favorite brand for the best flavor. I like to use dark roast for a bold taste. Let the coffee cool at room temperature. You can also place it in the fridge for faster cooling. This cooling step is key. It keeps the coffee from soaking the ladyfingers too much.
Mixing the Cocoa and Coffee
Next, mix cocoa powder and coffee in a shallow dish. Blend them well to ensure even flavor. This step matters because it impacts the whole dessert. If you want to switch it up, try adding a splash of coffee liqueur. You can also use flavored syrups for a twist.
Whipping the Cream
Now, let’s whip the cream. Pour the heavy cream into a mixing bowl. Add powdered sugar and vanilla extract. Use an electric mixer on medium-high speed. Whip until you reach stiff peaks. Be careful not to over-whip, or it might turn grainy.
Incorporating Mascarpone
Once the cream is whipped, gently add the mascarpone cheese. Use a spatula to fold it in slowly. This technique keeps the texture light and airy. If you mix too hard, you’ll lose that fluffy texture we want.
Dipping the Ladyfingers
Grab your ladyfinger cookies. Dip each one quickly into the coffee mixture. Make sure to soak them but not for too long. A quick dip is best. This keeps the cookies soft but not soggy. Adjust the dip time for your taste—some like them softer!
Layering the Cups
Now it’s time to layer. Use serving cups or jars. Start with a layer of soaked ladyfingers at the bottom. Next, spread a layer of the mascarpone mixture over the ladyfingers. Repeat this process. Aim for at least two layers, finishing with mascarpone on top.
Final Touches
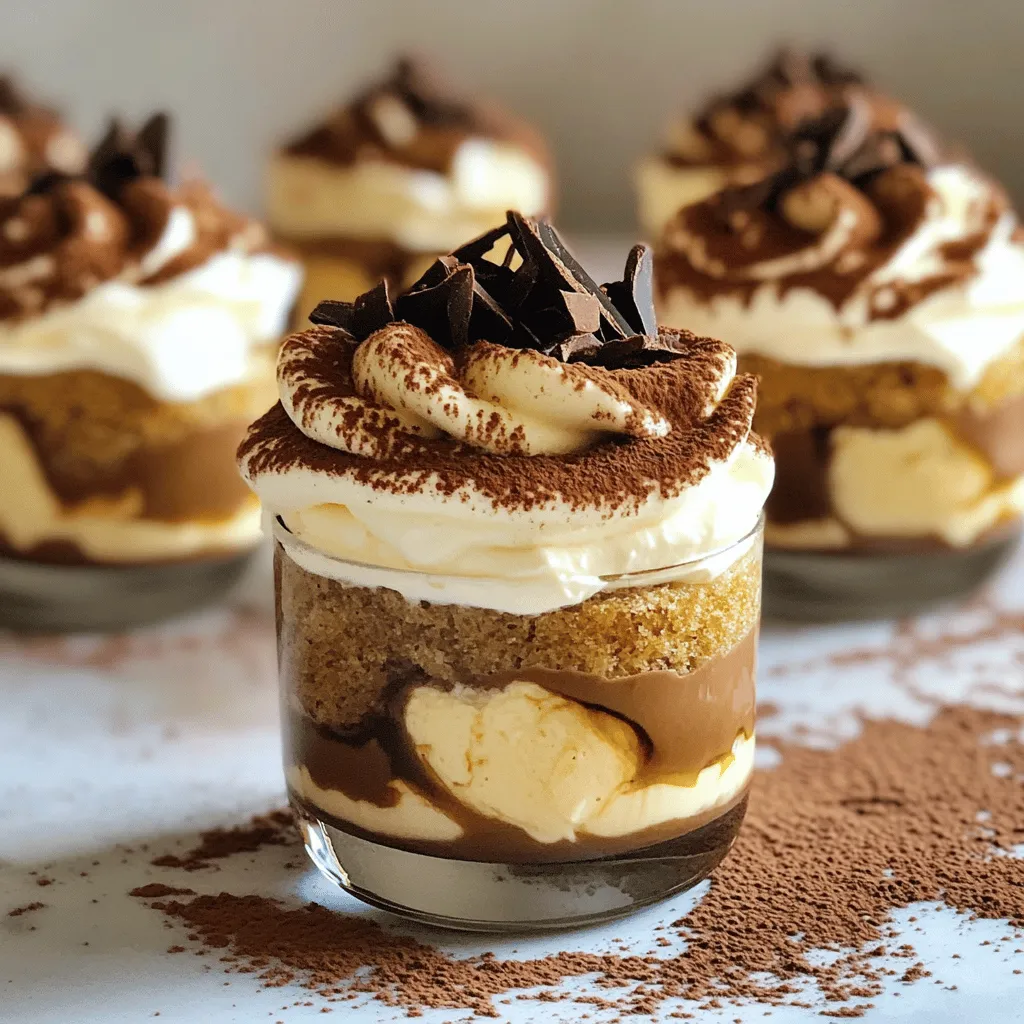
For the final touch, take the remaining cocoa powder. Sift it over the top layer of mascarpone. This adds a beautiful look and a rich flavor. Just before serving, sprinkle dark chocolate shavings on top. This extra step makes your dessert look fancy and delicious!
Tips & Tricks
Achieving the Perfect Texture
To get the best texture in your no-bake tiramisu cups, balance the cream and mascarpone well. Use equal parts of whipped cream and mascarpone for a light and airy dessert. When folding, be gentle! You want to keep that fluffiness alive. Avoid overmixing, as this can make your dessert dense.
Next, let’s talk about sogginess. Soaking the ladyfingers is key, but don’t soak them too long. A quick dip in the coffee mixture is all you need. This keeps them soft but not mushy. If you leave them too long, they can lose their shape.
Enhancing Flavor Profiles
You can enhance your tiramisu with liqueurs or extracts. Adding a splash of coffee liqueur can deepen the flavor. Vanilla extract adds sweetness and richness, so don’t skip it! You might also explore other flavors like almond or hazelnut extract.
Infusion ideas can take your dessert to the next level. Consider using flavored coffee or even adding a bit of orange zest to the mascarpone. This adds a unique twist that will wow your guests.
Presentation Tips
When it comes to serving, be creative! Use small mason jars or elegant glasses for a fun look. This makes each cup feel special and adds to the experience. You can also layer the tiramisu in clear cups to show off those beautiful layers.
Lastly, don’t forget the finishing touches. A sprinkle of cocoa and dark chocolate shavings on top adds a nice visual appeal. It makes each cup look inviting and ready to eat!
Variations
Flavor Variants
You can play with flavors in your no-bake tiramisu cups. One fun option is chocolate tiramisu cups. To make this, simply add melted dark chocolate to the mascarpone mixture. This creates a rich and decadent dessert. You can also top with chocolate shavings for extra flair.
Another exciting choice is the frutti di bosco version. For this, swap the coffee for berry puree. Use mixed berries like strawberries, raspberries, and blueberries. Layer the berry mixture with mascarpone and crushed ladyfingers for a fruity twist. This variation is fresh and perfect for summer.
Dietary Adaptations
If you want a vegan no-bake tiramisu, there are easy swaps. Use coconut cream instead of mascarpone. For the whipped cream, try whipped coconut milk. You can also use maple syrup or agave for sweetness. Soak ladyfingers in almond milk mixed with coffee for a tasty vegan treat.
For gluten-free options, look for gluten-free ladyfingers. You can also use gluten-free cookies or sponge cake. The rest of the ingredients remain the same. This way, everyone can enjoy this delightful dessert.
Mini Tiramisu Bites
You can make bite-sized versions of tiramisu cups for parties. Use mini cups or shot glasses for fun servings. Cut ladyfingers to fit snugly in the bottom. Layer the soaked ladyfingers and mascarpone just like the full-sized cups. This makes them easy to enjoy in one bite!
For serving suggestions, arrange mini tiramisu bites on a platter. You can garnish with cocoa powder or chocolate shavings. These mini treats are sure to impress your guests and add a sweet touch to any gathering.
Storage Info
Storing Tiramisu Cups
Store your tiramisu cups in the fridge. Use an airtight container to keep them fresh. They taste best when chilled. You can enjoy them for up to three days. After that, they may lose their creamy texture.
Freezing Options
You can freeze the tiramisu cups if you want to keep them longer. Use a freezer-safe container. Make sure to layer parchment paper between cups to avoid sticking. They last for about one month in the freezer.
To thaw, move them to the fridge overnight. Avoid thawing at room temperature. This keeps the texture smooth and creamy.
Reheating Tips
Reheating is not needed for tiramisu cups. They are best served cold. If you want to warm them, do so carefully. Use a microwave on low power for a few seconds. Check often to avoid melting the layers.
FAQs
Can I make tiramisu cups in advance?
Yes, you can make tiramisu cups ahead of time. I suggest preparing them the day before you plan to serve. This gives the flavors more time to blend. Just remember to cover them well in the fridge. This keeps them fresh and tasty.
What is the best coffee to use?
For the best taste, use strong brewed coffee. I recommend a dark roast. Brands like Lavazza or Illy work great. They add rich flavor to your tiramisu. You can also use espresso for an extra kick.
How do I prevent soggy ladyfingers?
To prevent soggy ladyfingers, dip them quickly in coffee. A quick soak is key. If you leave them too long, they will get too soft. Aim for a quick dip, just enough to soak the outside. This keeps them firm and delicious.
Can I customize the sweetness?
Yes, you can adjust the sweetness to your liking. If you prefer a sweeter dessert, add more powdered sugar. For a less sweet version, use less sugar. Taste as you mix to find the perfect balance for you.
Is it possible to omit the alcohol?
Absolutely! You can make this dessert without alcohol. Simply skip any liqueurs. For added flavor, try using flavored extracts like almond or hazelnut. This keeps your tiramisu rich and tasty without the alcohol.
This blog post covers how to create delicious tiramisu cups. You learned about the key ingredients, tips for perfect texture, and variations to try. I shared steps for preparation, mixing, and layering to build flavor and texture. Effective storage methods help keep your dessert fresh. Finally, remember that customization is key. Adjust the recipe to match your taste. Enjoy making your tiramisu cups, and let your creativity shine!





![- 1 cup rolled oats - 1 cup coconut milk - 1 ripe mango, diced - 1 tablespoon chia seeds - 1 tablespoon honey or maple syrup - 1/4 cup unsweetened shredded coconut - 1/2 teaspoon vanilla extract - A pinch of salt - Fresh mint leaves for garnish You need one cup of rolled oats for a hearty base. The coconut milk adds creaminess, so use one cup. A ripe mango gives a sweet touch, diced into small cubes. Add one tablespoon of chia seeds for thickness. If you want more sweetness, include one tablespoon of honey or maple syrup. The shredded coconut adds flavor and texture—use a quarter cup. Vanilla extract, half a teaspoon, gives a nice aroma. Lastly, a pinch of salt enhances all flavors. You can customize this recipe to suit your taste. Here are some fun ideas: - Add berries for a burst of flavor. - Include nuts for a crunchy texture. - A dash of cinnamon can add warmth. - Try using flavored yogurt for extra creaminess. These add-ins can make your mango coconut overnight oats even more delicious! You’ll find the Full Recipe linked here for all the details. Making mango coconut overnight oats is simple. You need just a few steps. Gather your ingredients and tools first. Get a medium bowl and two airtight containers. This will make your prep easy and quick. 1. Combine the Base: In your bowl, mix the rolled oats, coconut milk, chia seeds, honey or maple syrup, vanilla extract, and a pinch of salt. Stir well until everything is smooth. 2. Add Mango and Coconut: Next, gently fold in the diced mango. Add half of the shredded coconut into the mix. This adds flavor and texture. 3. Portion It Out: Divide the mixture into two containers. Make sure each one has equal amounts. This helps with serving later. 4. Chill Overnight: Seal your containers tightly. Place them in the fridge for at least 4-6 hours, or overnight. This allows the oats to soak up the liquid. 5. Stir and Serve: The next morning, take the oats out. Stir them well to mix the flavors again. 6. Garnish: Top each serving with the rest of the shredded coconut. Add more diced mango if you like. This makes the dish look fresh and inviting. 7. Add Mint: For a final touch, place a mint leaf on top. This adds color and a hint of flavor. When serving, use clear glass jars. This lets the bright mango and white coconut shine. The layers look beautiful, and the mint adds a pop of green. Your mango coconut overnight oats are now ready to enjoy! For the complete recipe, check the [Full Recipe]. To make the best overnight oats, start with quality rolled oats. They absorb liquid well and create a creamy texture. Use coconut milk for a delightful taste. You can choose canned coconut milk for a rich flavor or carton milk for a lighter option. Add a pinch of salt to enhance the sweetness of the mango. Mix the ingredients well to ensure all oats soak evenly. Make sure to let them chill overnight. This allows the flavors to blend beautifully. You can change the recipe based on your taste. Instead of honey, try maple syrup for a different sweetness. If you want an extra crunch, add nuts like almonds or walnuts. You can even swap mango for other fruits, like bananas or berries. Try adding spices like cinnamon or nutmeg for warmth. For a protein boost, consider adding a scoop of yogurt or protein powder. These swaps can make your oats even more fun and tasty. Presentation is key to a great breakfast. Serve your oats in clear jars to show off the layers. Top each jar with the remaining shredded coconut for a nice look. Add extra diced mango for color and sweetness. A sprig of fresh mint makes it pop and adds a fresh taste. You can also sprinkle some chia seeds on top for texture. A beautiful presentation makes every bite more exciting. For the complete recipe, check the Full Recipe. {{image_4}} You can swap mango for other fruits. Try bananas, berries, or peaches for new flavors. Each fruit brings its own sweetness and taste. You could use ripe bananas for creaminess. Blueberries add a nice pop of color and flavor. Chopped apples give a crunchy texture. Feel free to mix fruits for a fun twist. Nuts and seeds boost nutrition and flavor. Add chopped almonds, walnuts, or pecans for crunch. Sunflower seeds or pumpkin seeds give healthy fats and protein. You can mix in 1-2 tablespoons for extra texture. These additions make the oats more filling and satisfying. Want to jazz up your oats? Add spices like cinnamon or nutmeg for warmth. A splash of maple syrup or agave makes it sweeter. You can also try adding cocoa powder for a chocolatey treat. If you love coconut, use coconut flakes or extract for a richer flavor. These little extras can make a big difference. For the complete recipe, check out the Full Recipe section. To keep your mango coconut overnight oats fresh, use airtight containers. This helps seal in moisture and flavor. If you make a big batch, store them separately. This way, you can take one jar out at a time. Avoid adding toppings like coconut or fruit until you're ready to eat. This keeps them crunchy and fresh. These oats can stay in the fridge for about 3 to 5 days. After this time, they may lose flavor or texture. Always check for any sour smell or off taste before eating. If they look or smell strange, it's best to toss them. Remember, fresh is always best! You can freeze leftover oats for up to 3 months. To freeze, place the mixture in freezer-safe containers. Leave some space for expansion as they freeze. When you’re ready to eat, move them to the fridge overnight. You can also heat them in the microwave. Just add a splash of coconut milk for creaminess. This helps bring back their original texture. For the full recipe, check out the earlier sections! Yes, you can use other types of milk. Almond milk, oat milk, or soy milk all work well. Use what you like best. Each milk adds a different flavor and texture. Let the oats soak for at least 4-6 hours. Overnight is best for the right texture. This time helps the oats absorb the liquid and become soft. Yes, overnight oats are very healthy! They are full of fiber, vitamins, and minerals. The oats provide energy, while the mango and coconut add nutrients. Plus, they are simple to make and can fit in your busy life. People often ask if they can add nuts or seeds. You sure can! Almonds, walnuts, or pumpkin seeds add crunch and healthy fats. You can also try different fruits. To spice things up, add spices like cinnamon or nutmeg. You could also mix in some cocoa powder for a chocolate twist. Want extra sweetness? Try adding more honey or maple syrup. Get creative! You can make this recipe your own. For the full recipe, check out the earlier section. Overnight oats are easy and fun to make. You learned about the right ingredients, measurements, and optional add-ins. I shared a step-by-step guide to help you prepare and present them well. You also found tips for perfecting your oats, exploring variations, and storing them properly. Try different fruits, nuts, and flavors to keep things fresh. Remember, these oats can be a healthy and tasty breakfast option. Enjoy making your own delicious versions of overnight oats!](https://dishtreats.com/wp-content/uploads/2025/07/b0d1874a-fab9-44f3-b7bd-b826e91d7bf0-768x768.webp)