No Bake Raspberry Chocolate Tart Simple Delight

Craving a sweet treat that’s both easy and delicious? You’ve come to the right place! This No Bake Raspberry Chocolate Tart is a simple delight that combines rich dark chocolate with fresh raspberries. You don’t need to bake anything or be a pro chef. Just follow my step-by-step guide, and you’ll impress everyone with this stunning dessert. Ready to grab your ingredients? Let’s dive in!
Ingredients
Chocolate Crust
- 1 ½ cups chocolate cookie crumbs
- ½ cup unsalted butter, melted
Chocolate Filling
- 1 cup dark chocolate chips (preferably 60% cocoa)
- 1 cup heavy cream
- 1 teaspoon vanilla extract
- Pinch of sea salt
Raspberry Puree
- 1 cup fresh raspberries (plus extra for garnish)
- 2 tablespoons powdered sugar
The ingredients for this No Bake Raspberry Chocolate Tart are simple yet rich. The chocolate crust forms a great base. You can use chocolate cookie crumbs, like Oreos or digestive biscuits. Melted unsalted butter helps bind it together.
The chocolate filling is where the magic happens. Dark chocolate chips give depth to the flavor. I prefer 60% cocoa for a nice balance. Heavy cream makes it smooth and creamy, while vanilla extract adds warmth. Just a pinch of sea salt brings out the chocolate taste.
The raspberry puree adds a fresh twist. You need fresh raspberries for this. They offer a bright and tangy flavor. Mixing them with powdered sugar creates a delightful puree. The sweetness of the sugar balances the tartness of the berries perfectly.
These ingredients work together to create layers of flavor. You’ll have a rich chocolate filling combined with a fruity raspberry twist. Each bite is a burst of delight!
Step-by-Step Instructions
Prepare the Crust
First, grab a medium bowl. Combine 1 ½ cups of chocolate cookie crumbs with ½ cup of melted butter. Use a fork or a spatula to mix until every crumb is coated. This step is key for a tasty crust. Next, take a 9-inch tart pan and pour the crumb mixture inside. Press it firmly into the bottom and up the sides. Make sure it forms an even layer with no gaps. Now, chill the crust in the fridge for 10-15 minutes. This helps it set properly.
Make the Chocolate Filling
While the crust chills, let’s make the filling. In a small saucepan, heat 1 cup of heavy cream over medium heat. Watch closely as it simmers. Once it bubbles, take it off the heat. Add 1 cup of dark chocolate chips to the hot cream. Let them sit for 2-3 minutes. This softens the chocolate. Then, stir gently until the mix is smooth and shiny. Add 1 teaspoon of vanilla extract and a pinch of sea salt. Mix well to combine all the flavors.
Create the Raspberry Puree
Now, let’s make the raspberry puree. Take 1 cup of fresh raspberries and put them in a bowl. Add 2 tablespoons of powdered sugar. Use a fork to mash the raspberries gently. You want a chunky puree, so don’t overdo it. Some pieces should stay intact for texture.
Assemble the Tart
It’s time to put it all together! Carefully fold the raspberry puree into the chocolate filling. Be gentle to keep some raspberry chunks. Then, pour this mixture into the chilled crust. Use a spatula to smooth the top. This gives it a nice finish.
Chill and Set
Place the tart in the refrigerator for at least 4 hours. This helps it firm up and set completely. The wait is worth it for the perfect no-bake dessert!
Tips & Tricks
Achieving the Perfect Crust
To make the crust just right, you need to coat the crumbs well. Mix the chocolate cookie crumbs and melted butter until they feel moist. This keeps your crust from falling apart. When you press the mixture into the tart pan, do it firmly. Make sure it is even and packed tight. If it’s loose, the tart will crumble when you slice it.
Perfecting the Chocolate Filling
When you heat the heavy cream, watch it closely. You want it to simmer but not boil. After removing it from heat, add the dark chocolate chips. Let them sit for 2-3 minutes. This helps them melt without burning. Stir gently until the mix is smooth and glossy. It should look shiny and rich. Add the vanilla extract and a pinch of sea salt to enhance the flavor.
Presentation Ideas
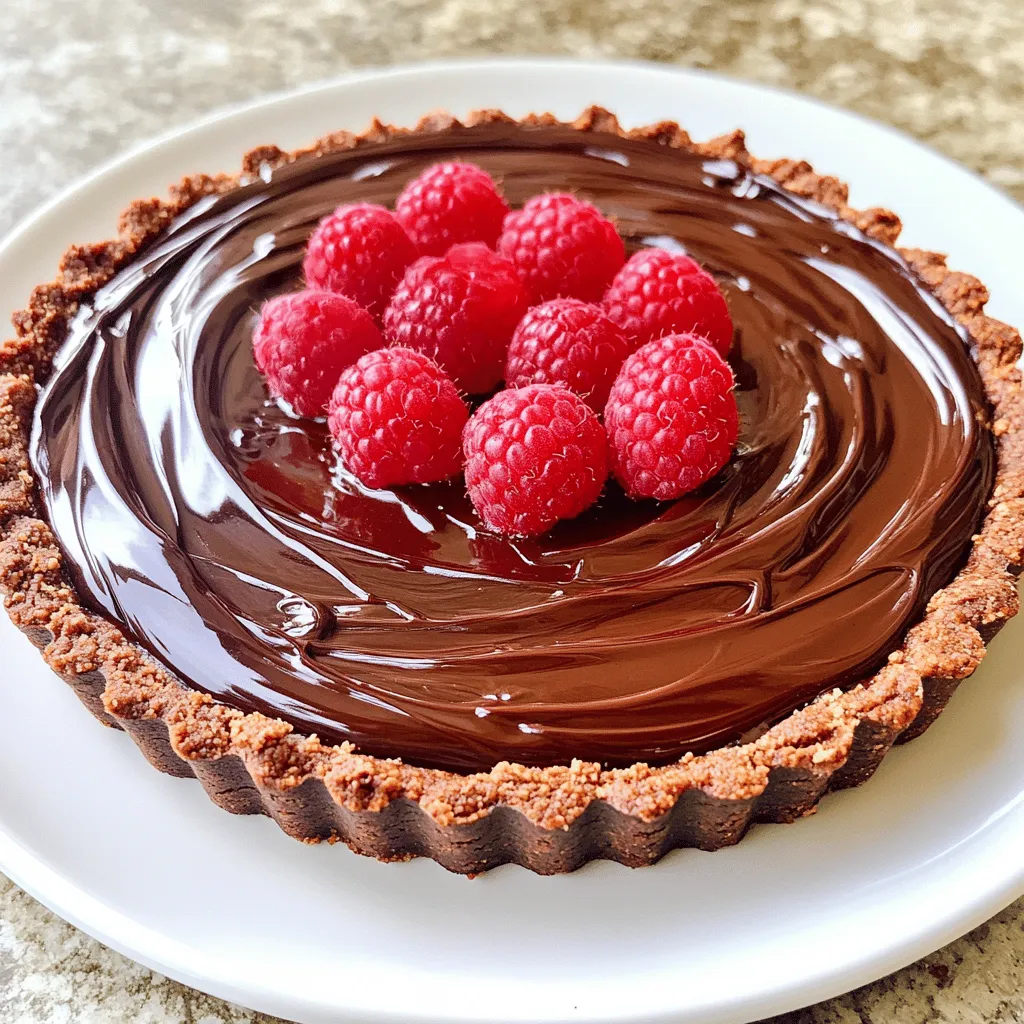
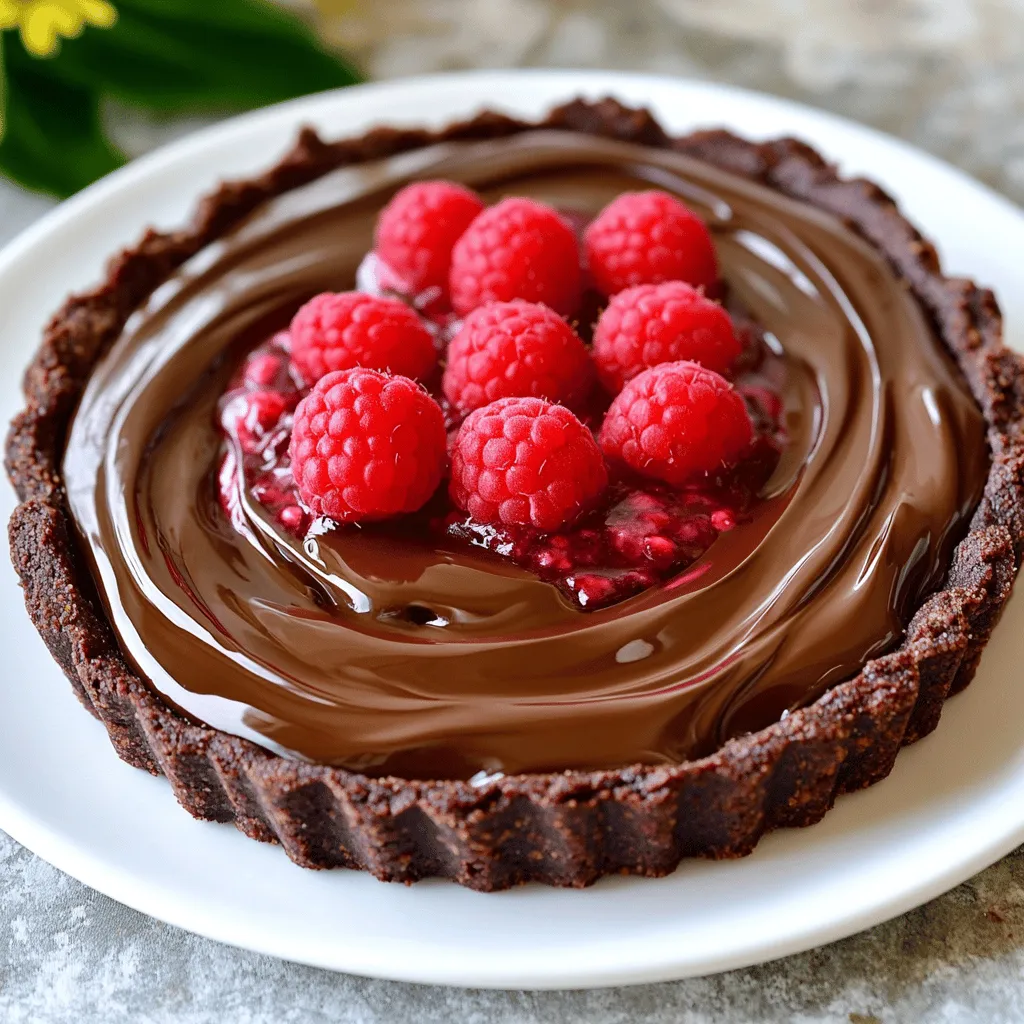
To make your tart look stunning, add fresh raspberries on top. You can also add a dollop of whipped cream. This adds a nice touch and makes the tart look fancy. A light drizzle of chocolate sauce can also elevate your dish. Enjoy the beautiful mix of red and dark brown. It makes for a delightful dessert!

Variations
Flavor Swap Options
You can change the flavor of your No Bake Raspberry Chocolate Tart easily. Try using graham cracker crumbs instead of chocolate cookie crumbs. This swap gives a nice, sweet crunch. If you want a fun twist, add almond or mint extract to the chocolate filling. Just a few drops can brighten the taste and add charm.
Additional Ingredients
Want to mix it up? Incorporate nuts like chopped hazelnuts or almonds into the filling for a bit of crunch. You can also add different berries, such as strawberries or blueberries. These options give you a new taste, while keeping the tart fresh and exciting.
Size and Serving Options
You can make mini tarts or bite-sized pieces for a fun presentation. Use small tart pans or muffin tins to shape them. These smaller portions are great for parties or gatherings. You can also serve them on a big platter, making it easy for guests to grab one. Enjoy the fun of personalizing this delightful dessert!
Storage Info
How to Store
You can store your no-bake raspberry chocolate tart in the fridge. Use an airtight container to keep it fresh. If you want to freeze it, wrap the tart tightly in plastic wrap. Then, place it in a freezer bag. This will help prevent freezer burn.
Shelf Life
The tart lasts for about 5 days in the fridge. Make sure to keep it covered. If frozen, it can last up to 2 months. Just remember to thaw it overnight in the fridge before serving.
Tips for Reheating (if applicable)
Reheating is not usually needed for this tart. It tastes best when chilled. If you want to serve it warm, let it sit at room temperature for about 10 minutes. This will soften the chocolate slightly without losing its texture.
FAQs
Can I use frozen raspberries?
Yes, you can use frozen raspberries. They work, but fresh raspberries taste better. Frozen berries may be softer after thawing. They can also add extra moisture to your tart. If you choose frozen, drain any excess water. This helps keep the tart from becoming soggy.
Is there a dairy-free option for this tart?
Absolutely! You can make this tart dairy-free. Swap the heavy cream for coconut cream. Use dairy-free chocolate chips instead of dark chocolate chips. These changes keep the taste rich and delicious. Look for brands that have no dairy. This way, you can enjoy the tart without dairy.
How can I make this tart gluten-free?
To make this tart gluten-free, choose gluten-free cookies for the crust. Look for brands that offer gluten-free chocolate cookies. You can also use crushed gluten-free graham crackers. Ensure all your ingredients are labeled gluten-free. This way, everyone can enjoy your tart without worry.
Can I make this tart ahead of time?
Yes, you can prepare the tart ahead of time. Make it a day before serving for the best taste. Keep it in the fridge to let it set. This helps the flavors blend well. When ready to serve, garnish it with fresh raspberries. It will look beautiful and taste fresh!
This blog post covered how to make a delicious chocolate raspberry tart. You learned about the key ingredients, from the chocolate crust to the raspberry puree. I shared step-by-step instructions to guide you through each part. With tips on perfecting your tart and fun variations, you can get creative and make it your own.
Remember, this tart is tasty and easy to customize. Enjoying it with friends or family will make it even better. Happy baking!


![- 1 cup all-purpose flour - 2 tablespoons granulated sugar - 2 teaspoons baking powder - ½ teaspoon baking soda - ¼ teaspoon salt - 1 cup buttermilk - 1 large egg, lightly beaten - 2 tablespoons unsalted butter, melted - 2 teaspoons pure vanilla extract - 1 tablespoon ground cinnamon - 3 tablespoons brown sugar, packed - 1 cup powdered sugar - 3 tablespoons cream cheese, softened to room temperature - 2-3 tablespoons milk (to achieve desired icing consistency) When I make these pancakes, I always start with the dry ingredients. This step is key. I mix the flour, sugar, baking powder, baking soda, and salt in a bowl. It’s important to whisk these well. This ensures even rising and sweetness. Next, I move to the wet ingredients. I pour the buttermilk into a separate bowl. Then, I add the beaten egg, melted butter, and vanilla extract. Whisk until smooth. This mixture is crucial for the pancake’s fluffiness. Now, let's talk about the cinnamon filling. In a small bowl, I combine ground cinnamon and brown sugar. This mix gives the pancakes their sweet, spicy swirl. Finally, for the icing, I beat together powdered sugar and softened cream cheese. I add milk slowly until I reach the right consistency. Drizzling this icing over the warm pancakes is pure bliss. For the full recipe, check out the complete guide. Enjoy your cooking adventure! 1. In a mixing bowl, combine the all-purpose flour, granulated sugar, baking powder, baking soda, and salt. Mix well until the dry ingredients are blended. 2. Take another bowl and whisk together the buttermilk, the lightly beaten egg, melted butter, and vanilla extract. Make sure this mixture is smooth. 1. Gradually pour the wet ingredients into the bowl with the dry ingredients. Stir gently until just combined. It’s okay if there are a few lumps; this helps keep your pancakes fluffy. 2. Be careful not to overmix. Overmixing can make the pancakes tough. 1. In a small bowl, combine the ground cinnamon and packed brown sugar. Mix them well to combine. This mixture will create a sweet swirl in your pancakes. 1. Preheat a non-stick skillet or griddle over medium heat. Pour about ¼ cup of pancake batter onto the skillet for each pancake. 2. When the batter starts bubbling on the surface (about 1-2 minutes), sprinkle about a teaspoon of the cinnamon filling mixture onto the pancake before flipping it. 3. Flip the pancake carefully and cook for another 1-2 minutes, until golden brown. Repeat this process with the remaining batter and filling. 1. In a small bowl, mix the powdered sugar, softened cream cheese, and enough milk to reach your desired icing consistency. Blend until the mixture is smooth. Now you're ready to enjoy your delicious cinnamon roll pancakes! For precise measurements and more tips, check the Full Recipe. To make fluffy pancakes, avoid overmixing the batter. When you mix too much, the pancakes can turn tough. You want a few lumps in the batter; that is okay! Use fresh baking powder and baking soda. Old leavening agents may not make your pancakes rise well. Check the expiration date on the package to be sure. Heat is key when cooking pancakes. Adjust the heat as needed to prevent burning. If your skillet is too hot, the pancakes may burn on the outside and stay raw inside. A non-stick skillet helps with easy flipping. It also allows you to use less oil. Always preheat the skillet before pouring your batter. The icing makes these pancakes special. To achieve your desired thickness, adjust the milk quantity. Start with 2 tablespoons and add more if needed. Drizzle icing over warm pancakes for best results. The warmth helps the icing melt into the pancakes, making each bite delightful. {{image_4}} Cinnamon roll pancakes are fun! You can change them up in many ways. Let’s explore some tasty options. You can add chopped walnuts or pecans to the batter. This nutty addition gives a lovely crunch. It also adds healthy fats and protein. Just mix in about ½ cup of nuts before cooking. You will love the extra texture and flavor. Want a fruity twist? Add diced apples or berries to the batter. They add sweetness and freshness. Try using about 1 cup of fruit. Blueberries or chopped strawberries work great. Apples give a nice cinnamon flavor when cooked. Your pancakes will be more colorful and tasty! Feel free to experiment with spices. Adding nutmeg or cardamom can change the taste. Start with ¼ teaspoon of each spice. You will enjoy the new flavors. These spices pair well with cinnamon and make your pancakes special. For the complete recipe, check out the [Full Recipe]. Enjoy your cooking adventure! You can store leftover cinnamon roll pancakes in an airtight container. They will stay fresh in the refrigerator for up to 3 days. This keeps them moist and ready for a quick breakfast or snack. To freeze your pancakes, lay them in a single layer on a baking sheet. Once frozen, transfer them to a freezer-safe bag. This method keeps them from sticking together. You can pull out as many as you need later. When you are ready to enjoy your pancakes again, simply microwave or toast them. If you want to make them even better, add extra icing on top while they warm up. This gives them a fresh taste and makes them feel special again. Yes, you can use whole wheat or gluten-free flour. However, this may change the texture of your pancakes. Whole wheat flour adds a nutty flavor and denser texture. Gluten-free flour can make them lighter but may need extra moisture. To make these pancakes dairy-free, swap buttermilk for almond milk. Use a dairy-free butter alternative in the recipe. This ensures you keep the great taste while avoiding dairy. Cinnamon roll pancakes are delicious on their own. However, they pair well with fresh fruits, like strawberries or bananas. Whipped cream can add a light and fluffy touch. You can also drizzle on more maple syrup for added sweetness. For the full recipe, check out the details above. Cinnamon Roll Pancakes are simple and fun to make. We combined dry and wet ingredients with cinnamon filling for a tasty treat. Use tips for fluffiness, cooking, and icing to ensure success. You can customize these pancakes by adding nuts or fruits. Remember to store leftovers well for future enjoyment. Try new variations each time for a delightful twist. These pancakes can impress anyone and become a family favorite. Enjoy your cooking adventure!](https://dishtreats.com/wp-content/uploads/2025/06/80f0c7ad-2155-4787-b1f4-2bdd3b819c66-768x768.webp)


![- 1 cup rolled oats - 2 cups almond milk (or your preferred milk) - 1 medium sweet apple, diced (suggestions: Fuji or Gala) - 1 teaspoon ground cinnamon - 2 tablespoons maple syrup (or honey if you prefer) - 1/2 teaspoon vanilla extract - 1/4 cup plain Greek yogurt (optional) - Pinch of salt - Chopped nuts for topping - Extra apple slices and cinnamon for garnish Apple cinnamon overnight oats are easy to make and full of flavor. The oats soak overnight, making them creamy and delicious. You can customize this recipe based on your taste. For the base, I use rolled oats and almond milk, but feel free to pick any milk you like. The diced apple brings sweetness and crunch. I suggest using Fuji or Gala apples since they are sweet and juicy. Ground cinnamon adds warmth and a cozy touch. Maple syrup gives the oats a natural sweetness. If you want a little creaminess, add Greek yogurt. Don’t forget the pinch of salt; it enhances all the flavors. Chopped nuts add a nice crunch on top. You can use walnuts, pecans, or any nuts you enjoy. Finally, garnish with extra apple slices and a dusting of cinnamon for a pretty finish. - Different types of milk (coconut, oat, etc.) - Sweeteners (agave syrup, stevia, etc.) - Additional fruit (berries, bananas, etc.) If you want to try something different, there are many options. Swap almond milk for coconut or oat milk if you prefer. You can change sweeteners too; agave syrup or stevia work well. Add in more fruits like berries or sliced bananas for extra flavor. This makes each serving unique and fun. The best part? You can make it just how you like it! For the full recipe, check out Apple Cinnamon Overnight Oats Delight. - Step 1: Combine rolled oats with milk and yogurt. In a large bowl, mix 1 cup of rolled oats with 2 cups of almond milk. If you like, add 1/4 cup of Greek yogurt for creaminess. Stir until mixed well. - Step 2: Add apples, cinnamon, sweetener, vanilla, and salt. Fold in 1 diced apple, 1 teaspoon of ground cinnamon, and 2 tablespoons of maple syrup. Add 1/2 teaspoon of vanilla extract and a pinch of salt. Mix until everything is evenly distributed. - Step 3: Transfer mixture into jars and refrigerate. Spoon the oat mix into jars. Make sure each jar has some apple pieces. Close the lids and place them in the fridge overnight. - Evenly distribute diced apples among jars. This ensures each jar has the same amount of apple flavor. - Layer ingredients for visual appeal. Create a pretty look by layering oats and apples. This makes your breakfast even more inviting. - Stir before serving and adjust consistency. When you take the jars out, give them a good stir. If they feel too thick, add a splash of milk. - Top with nuts and additional apple slices. Finish with a sprinkle of chopped nuts and a few apple slices for crunch. A dash of cinnamon adds warmth and flavor. For full details, check the [Full Recipe]. To get the best texture, always use rolled oats. They soak up the liquid well. Steel-cut oats take longer to soften. You might want to avoid them for overnight oats. Adjust the sweetness by adding more or less maple syrup. Taste as you mix to find your perfect balance. Make a big batch of oats for quick breakfasts. You can prepare up to five jars at once. Store them in the refrigerator for up to five days. This way, you’ll have a quick meal ready on busy mornings. Feel free to experiment with spices like nutmeg or cardamom. Just a pinch can add a warm kick. You can also add seeds like chia or flaxseed. These add fiber and make your oats even better for you. {{image_4}} You can easily make apple cinnamon overnight oats vegan. Just swap the Greek yogurt for a plant-based yogurt. Use almond, coconut, or oat milk for a creamy base. These changes keep the flavor rich and tasty while being dairy-free. If you need gluten-free options, choose certified gluten-free oats. Many brands offer oats that are safe for those with gluten sensitivities. This way, you can enjoy your oats without worry. You can mix in other fruits to change the taste. Try berries like strawberries or blueberries for a fresh twist. Bananas also work well, adding sweetness and creaminess. For toppings, nuts and seeds add crunch. Chopped almonds, walnuts, or sunflower seeds all taste great. You can also sprinkle chia seeds for extra fiber and health benefits. In fall, add pumpkin spice to your oats for a cozy taste. Just mix in a teaspoon or two for that warm, spiced flavor. It pairs perfectly with apples. In summer, think about fresh fruits like peaches or mangoes. These fruits add a bright, juicy flavor. You can mix them in or use them as a topping for a colorful and tasty breakfast. For the complete recipe, check out the [Full Recipe]. To keep your apple cinnamon overnight oats fresh, use jars or airtight containers. Glass jars work great. They seal well and let you see the yummy layers. Make sure to refrigerate them right after you prepare them. This keeps the oats safe to eat. You can freeze individual servings of overnight oats. First, pour the oats into freezer-safe containers or jars. Leave some space at the top, as they will expand. To enjoy later, thaw them in the fridge overnight. Once thawed, stir well. You might want to add a splash of milk to make them creamy again. Apple cinnamon overnight oats can stay fresh in the fridge for up to five days. Check for any signs of spoilage before eating. If the oats smell sour or have a strange color, throw them away. Always trust your nose and eyes! For the best taste, enjoy them within the first few days. Apple cinnamon overnight oats are a tasty breakfast. They combine oats, milk, apples, and cinnamon. The mixture sits in the fridge overnight. This soaking makes the oats soft and creamy. You get a nice blend of flavors. It’s a quick way to enjoy a healthy meal. Yes, you can use quick oats. However, they have a different texture. Quick oats cook faster and become mushy. If you use them, soak for less time. Rolled oats keep a firmer bite and work better for overnight oats. Overnight oats last about 5 days in the fridge. Store them in airtight jars or containers. Check for bad smells or changes in texture. If they look or smell off, toss them out. Yes, kids love apple cinnamon overnight oats! They are sweet and fun to eat. Serve in small jars for a cute look. You can also add toppings like nuts or more fruit for variety. This makes it a family-friendly dish everyone can enjoy. Apple cinnamon overnight oats offer a delightful and easy breakfast option. You can prepare them quickly with just a few simple steps. This meal not only fills you up but also lets you customize flavors to your taste. Experiment with different fruits, sweeteners, and spices to keep it fun. Remember to store your oats correctly for freshness. Enjoy this nutritious dish throughout the week! Your mornings can be bright and delicious with this recipe.](https://dishtreats.com/wp-content/uploads/2025/06/6eb7544b-1d16-4ecc-8a32-decb7f29ee21-768x768.webp)
