No-Bake Peanut Butter Cup Pie Delightful and Easy Treat

Are you ready to make a dessert that will wow your friends and family? This No-Bake Peanut Butter Cup Pie is an easy treat that combines rich peanut butter and chocolate flavors in a creamy, dreamy pie. You won’t need to heat the oven or spend hours in the kitchen. Just follow my simple steps, and you’ll serve up a sweet delight that everyone will love! Let’s dive into the recipe!
Ingredients
Complete List of Ingredients
- 1 ½ cups graham cracker crumbs
- ½ cup unsalted butter, melted
- 1 cup creamy peanut butter
- 1 cup powdered sugar
- 8 oz cream cheese, softened to room temperature
- 1 teaspoon vanilla extract
- 1 cup whipped cream (or whipped topping)
- 6-8 mini peanut butter cups, chopped (reserve some for garnish)
- Chocolate sauce for drizzling
Notes on Ingredient Substitutions
You can swap graham cracker crumbs with crushed cookies for a different crust. Use almond butter instead of peanut butter for a nut-free option. If you want a lighter pie, consider using low-fat cream cheese. For sweetness, agave syrup can replace powdered sugar.
Recommended Brands or Types of Ingredients
For the best flavor, I recommend using brands like Jif or Skippy for peanut butter. For cream cheese, Philadelphia is a great choice. Use real whipped cream for a richer taste. Choose high-quality chocolate sauce for drizzling; brands like Hershey’s or Ghirardelli work well.
Step-by-Step Instructions
Preparing the Graham Cracker Crust
To start, gather your ingredients for the crust. You will need 1 ½ cups of graham cracker crumbs and ½ cup of melted unsalted butter. In a medium bowl, mix the crumbs and butter. Stir until it looks like damp sand. Press this mixture firmly into the bottom and up the sides of a 9-inch pie plate. Make sure it is even and compact. Next, place the crust in the fridge for at least 15 minutes to set. This helps it hold its shape when you add the filling.
Making the Peanut Butter Filling
Now, let’s make the filling. In a large mixing bowl, combine 1 cup of creamy peanut butter, 1 cup of powdered sugar, 8 oz of softened cream cheese, and 1 teaspoon of vanilla extract. Use an electric mixer to beat these together until smooth and creamy. Look for a texture free of lumps. Once mixed, gently fold in 1 cup of whipped cream. Use a spatula and move slowly. This keeps the filling light and fluffy. Finally, fold in 6-8 chopped mini peanut butter cups, making sure they are evenly mixed throughout.
Assembling and Chilling the Pie
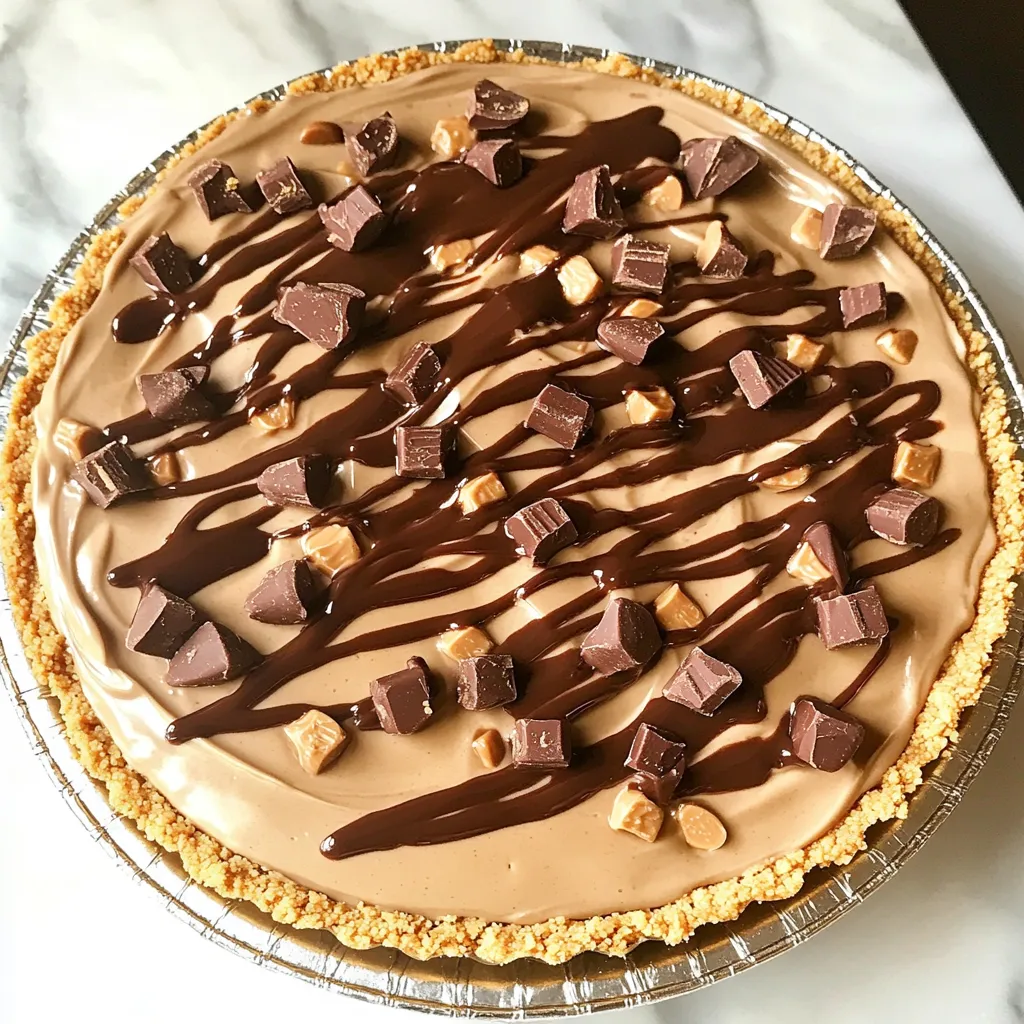
Next, it’s time to assemble the pie. Pour the creamy peanut butter filling into your chilled graham cracker crust. Use a spatula to smooth the top. This gives it a nice finish. Cover the pie with plastic wrap or a lid. Chill the pie in the fridge for at least 4 hours. If you have time, letting it sit overnight makes the flavors even better. Just before serving, drizzle chocolate sauce on top. You can also add more chopped peanut butter cups for a fun garnish. Enjoy your delicious no-bake treat!
Tips & Tricks
How to Achieve the Best Texture
To get the best texture for your No-Bake Peanut Butter Cup Pie, start with a smooth filling. Mix the peanut butter, cream cheese, and sugar until no lumps remain. Then, gently fold in the whipped cream. This keeps it light and fluffy. Make sure to chill the pie for at least four hours. Longer chilling helps the pie set firm.
Enhancing Flavor with Additional Ingredients
You can boost the flavor of your pie by adding a pinch of salt. A bit of sea salt can bring out the sweetness. You might also consider adding a touch of cocoa powder to the filling. This gives it a richer chocolate flavor. For extra fun, try mixing in a splash of coffee or espresso powder. These flavors pair well with chocolate and peanut butter.
Common Mistakes to Avoid
Avoid over-mixing the whipped cream with the filling. This can make the pie dense instead of light. Don’t skip chilling the crust before adding the filling. It helps the pie hold its shape. Also, be careful not to use too much butter in the crust. It can make it greasy and hard to cut. Lastly, remember to save some peanut butter cups for garnish; they add a nice touch!

Variations
Flavor Variations for Peanut Butter Cup Pie
You can change the flavor of your peanut butter cup pie easily. Try adding chocolate pudding to the filling for a rich twist. You can also use different nut butters, like almond or cashew, for a fun spin. Want a bit of crunch? Add chopped nuts, like peanuts or almonds, into the mixture. For a minty taste, mix in some crushed mint candies or a few drops of mint extract. The options are endless!
Alternative Crust Ideas
If you want to switch up the crust, consider using Oreo cookies or chocolate graham crackers. Crush them just like the regular graham crackers. You can also use a nut-based crust for a gluten-free option. Just mix ground nuts with melted butter and press them into the pie dish. This adds a nice nutty flavor that pairs well with the filling.
Vegan or Dairy-Free Options
Making this pie vegan or dairy-free is simple. Swap the cream cheese for a vegan cream cheese product. Use maple syrup or agave instead of powdered sugar. For the whipped cream, choose a coconut whipped cream or another dairy-free option. You can also find vegan chocolate for drizzling on top. Enjoy a creamy pie while keeping it plant-based!
Storage Info
How to Properly Store the Pie
To keep your No-Bake Peanut Butter Cup Pie fresh, store it in the fridge. Cover the pie with plastic wrap or use an airtight container. This will prevent it from drying out or absorbing other smells. Make sure to keep it chilled at all times until you are ready to serve.
Freezing Leftovers: Tips and Instructions
If you have leftovers, you can freeze them. First, slice the pie into portions. Wrap each slice tightly in plastic wrap, then place them in a freezer-safe bag. This keeps them safe from freezer burn. When you want to enjoy a slice, simply take it out and let it thaw in the fridge.
Shelf Life of the No-Bake Pie
The pie stays good in the fridge for up to five days. If you freeze it, aim to enjoy it within two months for the best taste. After that, the flavor may change, but it will still be safe to eat.
FAQs
Can I use crunchy peanut butter instead?
Yes, you can use crunchy peanut butter. It adds a nice texture to the pie. The bits of peanut will give a fun crunch. If you love a strong peanut flavor, this is a great option.
How long does the pie need to chill?
The pie needs to chill for at least 4 hours. This helps it set properly. For the best taste and texture, chill it overnight. The longer it chills, the firmer and more flavorful it becomes.
What can I serve with No-Bake Peanut Butter Cup Pie?
You can serve this pie with whipped cream or chocolate sauce. A scoop of vanilla ice cream pairs nicely too. Fresh berries add a nice touch and some color. You can also sprinkle extra chopped peanut butter cups on top for fun!
We explored the key ingredients and steps to make an amazing no-bake peanut butter pie. Remember to choose the right brands, follow my tips for texture, and avoid common mistakes. You can try fun variations, like vegan options or different crusts. Store your pie properly to keep it fresh. I hope this guide helps you create a delicious treat. Enjoy your baking and share your pie with friends!


![- 1 package (15.35 oz) Oreo cookies - 8 oz cream cheese, softened to room temperature - 1 cup semisweet chocolate chips - 1 tablespoon coconut oil (optional, for smoother melting) - Sprinkles or crushed Oreos for decoration I love using classic Oreo cookies for this recipe. They add rich flavor and crunch. The cream cheese makes the truffles creamy and smooth. When mixed with crushed Oreos, it creates a perfect dough. Next, I melt semisweet chocolate chips for coating. This chocolate is rich and adds sweetness. If you want a smoother coat, add coconut oil. It helps the chocolate melt better. Finally, I enjoy decorating the truffles. You can use colorful sprinkles or crushed Oreos. This adds a fun look and extra flavor. You can find the complete recipe [Full Recipe]. - Using flavored cream cheese (e.g., vanilla or chocolate) - Alternative chocolate types (dark chocolate, white chocolate) - Various toppings (nuts, colorful candy sprinkles) Feel free to get creative with your ingredients. Flavored cream cheese can add a twist. Imagine using chocolate cream cheese for an even richer taste. You can also play with chocolate types. Dark chocolate gives a bold flavor. White chocolate adds sweetness and a nice contrast. For toppings, you can use nuts or different sprinkles. This makes your truffles unique and fun! To start, you need to crush the Oreos. You can use a food processor for this task. Just place the cookies in and pulse until they are fine crumbs. If you want a more hands-on method, put the Oreos in a zip-lock bag. Then, use a rolling pin to crush them until they are finely broken. Either way works great! Next, mix the crushed Oreos with cream cheese. In a large bowl, add the Oreo crumbs to softened cream cheese. Use a spatula or your hands to mix it well. You want it to be uniform and dough-like. This will be the base of your truffles. Now, let’s shape the truffles. Take a tablespoon-sized portion of the Oreo mixture. Roll it into a smooth ball with your hands. Place each ball on a baking sheet lined with parchment paper. This makes it easy to lift them later. After shaping, it's time to chill them. Put the baking sheet with the truffles in the refrigerator for about 30 minutes. This step helps the truffles firm up, making them easier to dip in chocolate later. Next, let's melt the chocolate. In a microwave-safe bowl, combine semisweet chocolate chips with coconut oil if you want a smoother mix. Heat the mixture in the microwave in 30-second intervals. Stir between each interval until the chocolate is fully melted and smooth. After the chocolate is ready, it's time to dip the truffles. Take each chilled truffle and use a fork to dip it into the melted chocolate. Make sure it is fully coated. Then, gently tap the fork against the bowl to remove any extra chocolate. While the chocolate coating is still wet, you can decorate the truffles. Add some crushed Oreos or colorful sprinkles on top. This makes your truffles look festive and fun. Get creative! You can also use different toppings for special occasions. For more detailed steps, check out the Full Recipe. To make your chocolate smooth, add a tablespoon of coconut oil when melting. This small addition keeps the chocolate creamy and easy to dip. Mixing the crushed Oreos with cream cheese is key. Make sure to blend them well, so you get a nice, even dough. You want every bite to be rich and flavorful. Yes, you can prepare these truffles in advance. This makes them a great treat for parties. Once you form the truffles, chill them for about 30 minutes. After that, store them in the fridge or freezer. If you freeze them, let them sit out for a few minutes before serving. This helps bring back that perfect texture. When serving your truffles, presentation counts. Arrange them on a stylish platter or in a decorative box. You can also use colorful cupcake liners for a fun touch. Pair these treats with beverages like coffee or a glass of cold milk. The flavors blend nicely and make each bite even more enjoyable. For more ideas, check out the Full Recipe. {{image_4}} You can easily change the flavor of your truffles. Adding flavor extracts gives a nice twist. A drop of mint, vanilla, or almond extract can boost the taste. You can also try different Oreo flavors. Peanut butter or red velvet Oreos add a fun spin. Each flavor brings a new experience to your truffles. If you need gluten-free treats, use gluten-free Oreos. They work just like regular Oreos. For vegan options, switch to dairy-free cream cheese and chocolate. This way, everyone can enjoy these tasty treats without worry. Decorating can make your truffles stand out. Use white chocolate or colored melts for a fun look. You can also create themed truffles for holidays. Think about red and green for Christmas or pastel colors for Easter. The right decorations can make your truffles fit any occasion. To keep your chocolate covered Oreo truffles fresh, store them in the fridge. Place them in an airtight container. This helps to prevent them from drying out. If you plan to eat them soon, this method is best. For longer storage, you can freeze the truffles. First, place them in a single layer on a baking sheet. Freeze them for about one hour until they are firm. Then, transfer them to a freezer-safe bag or container. This will help them last longer without losing flavor. In the fridge, these truffles can last about one week. They taste best within the first few days. In the freezer, they can last up to three months. The flavor and texture stay good if stored properly. Always label your containers with the date to track how long they have been stored. To keep your truffles fresh, use airtight containers. This stops moisture from getting in. Moisture can make the chocolate lose its nice shine and texture. If you freeze your truffles, let them thaw in the fridge. This helps them regain their creamy texture. Avoid thawing them at room temperature, which can make them too soft. Once they are thawed, enjoy them cold or let them sit out for a few minutes for a softer bite. For the full recipe, check the previous section. Yes, you can use low-fat cream cheese. However, it may change the flavor and texture. Low-fat cream cheese can make truffles less rich and creamy. The truffles might be a bit drier too. For the best taste, I recommend using regular cream cheese. These truffles take about 30 minutes to set in the fridge. This chilling time helps the truffles hold their shape. After you dip them in chocolate, place them back on the baking sheet. Leave them in the fridge until the chocolate hardens. You can use store-bought truffles, but homemade ones are better. Homemade truffles taste fresher and let you pick flavors. You can customize them to your liking. Plus, making them yourself is a fun activity! You can use many cookies for truffles. Some great options include: - Chocolate chip cookies - Peanut butter cookies - Vanilla wafers - Graham crackers Feel free to mix and match flavors! This allows for fun and unique treats. For the full recipe, check out the details above. You can make delicious chocolate-covered Oreo truffles at home. This blog showed you the key ingredients and easy steps needed to prepare, shape, dip, and decorate them. Remember, the fun lies in customizing flavors and toppings to your taste. Use the tips provided for great texture and storage. These bites are perfect for parties or a sweet treat at home. Enjoy making these truffles, and delight in sharing them with friends and family!](https://dishtreats.com/wp-content/uploads/2025/07/b12a751c-54f3-4358-8f8e-2195b80955c3-768x768.webp)


