No Bake Maple Pumpkin Pie Cups Simple and Delicious

Craving a simple and tasty dessert that’ll impress? Look no further than these No Bake Maple Pumpkin Pie Cups! They’re easy to make and perfect for fall. With just a few key ingredients, you can whip up a sweet treat that satisfies. I’ll guide you through each step, share tips for the best flavor, and show you how to add fun variations. Let’s get started on this delicious journey!
Ingredients
List of Ingredients
- 1 cup pumpkin puree
- 1/2 cup Greek yogurt
- 1/4 cup pure maple syrup
- 1 teaspoon vanilla extract
- 1 teaspoon ground cinnamon
- 1/2 teaspoon ground ginger
- 1/4 teaspoon ground nutmeg
- 1/4 teaspoon salt
- 1 cup crushed graham crackers
- 1/4 cup unsalted butter, melted
- Whipped cream, for topping
- Chopped pecans or walnuts, for garnish
Measurement Details
These measurements are key to making the cups taste great. The pumpkin puree brings a rich flavor. Greek yogurt adds creaminess and protein. Maple syrup sweetens the mix, while vanilla extract enhances the taste. Ground cinnamon, ginger, and nutmeg give warmth. Salt balances all the flavors. The crust uses crushed graham crackers mixed with melted butter for a tasty base.
Optional Ingredients for Variation
You can switch things up for fun! Try using different spices like allspice or cloves for a twist. Instead of Greek yogurt, you could use cream cheese for a richer texture. For a nut-free option, skip the nuts on top. You can also use dairy-free yogurt for a lighter touch. Each change can give the pie cups a new flair!
Step-by-Step Instructions
Preparing the Crust
To start, grab a medium bowl. Combine 1 cup of crushed graham crackers with 1/4 cup of melted unsalted butter. Use your fingers or a fork to mix the crumbs. Make sure all the crumbs are coated well with the butter. This will help the crust hold together.
Next, take small dessert cups or mason jars. Spoon about 2-3 tablespoons of the graham cracker mixture into each cup. Press down firmly with the back of a spoon. This forms a solid base. Make sure it is even across the bottom.
Making the Pumpkin Filling
Now, let’s focus on the filling. In another bowl, combine 1 cup of pumpkin puree, 1/2 cup of Greek yogurt, and 1/4 cup of pure maple syrup. Add 1 teaspoon of vanilla extract, 1 teaspoon of ground cinnamon, 1/2 teaspoon of ground ginger, 1/4 teaspoon of ground nutmeg, and 1/4 teaspoon of salt. Whisk everything together until it is smooth.
Taste the filling. If you want it sweeter, add more maple syrup. It should be creamy and flavorful.
Layering and Chilling the Cups
With the crust and filling ready, it’s time to layer the cups. Spoon the pumpkin filling over the crust in each cup. Be gentle to avoid disturbing the crust. Use the back of a spoon to smooth the tops.
After layering, cover each cup with plastic wrap or a lid. Place them in the refrigerator. Chill for at least 2 hours. This lets the flavors mix and helps the filling firm up.
When you are ready to serve, remove the cups from the fridge. Add a dollop of whipped cream on top and sprinkle with chopped pecans or walnuts. Enjoy your tasty no bake maple pumpkin pie cups!
Tips & Tricks
How to Get the Perfect Texture
To get a creamy filling, use fresh pumpkin puree. It gives a rich taste. Mix the pumpkin with Greek yogurt for creaminess. Whisk until smooth. This helps blend all the flavors well. Let it chill for at least two hours. This will help the filling set nicely.
Adjusting Sweetness to Taste
Taste your filling before you spoon it into cups. If you want it sweeter, add more maple syrup. Just a tablespoon at a time works well. Remember, the graham crust adds some sweetness too. So, adjust carefully to find your perfect balance.
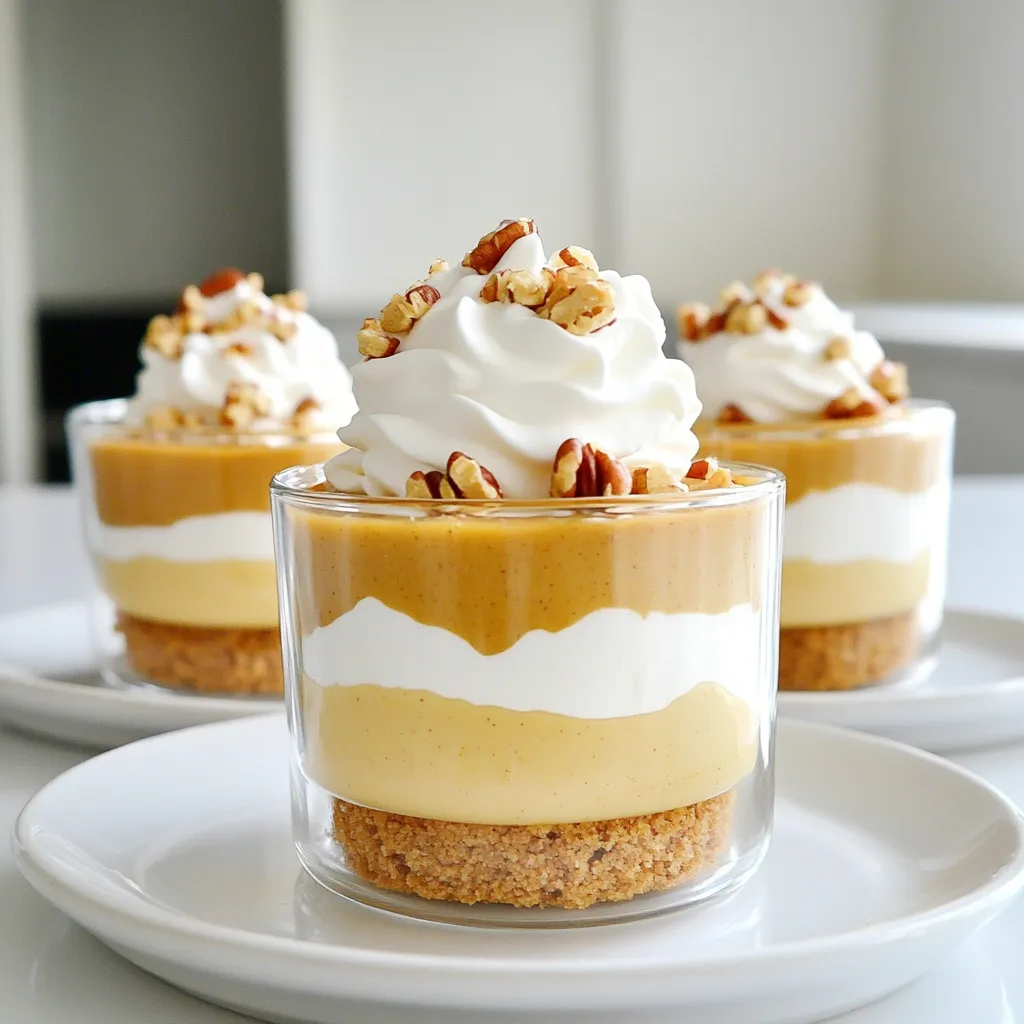
Presentation Tips for Serving
For a beautiful presentation, use clear cups or jars. It shows off the layers. Top with whipped cream for a fluffy look. Sprinkle chopped pecans or walnuts on top for crunch. Drizzle extra maple syrup for a sweet touch. A dash of cinnamon adds a nice color and flavor. Serve on a festive tray to impress your guests!

Variations
Alternative Crust Options
If you want a different crust, try using crushed cookies. Chocolate sandwich cookies or vanilla wafers work well. Simply replace the graham crackers with your choice. Mix the cookie crumbs with melted butter, just as you did before. This gives the cups a fun twist in flavor. You can also use nut-based crusts for a gluten-free option. Ground almonds or pecans mixed with coconut oil can create a rich base.
Using Different Sweeteners
Maple syrup is great, but you can switch it up. Honey or agave syrup can work well, too. If you want a sugar-free option, use a sugar substitute like stevia or monk fruit sweetener. Just keep in mind that these sweeteners can be sweeter than maple syrup. Start with less and taste as you go. This way, you find the perfect balance without making it too sweet.
Dairy-Free and Vegan Options
To make these pie cups dairy-free or vegan, swap out the Greek yogurt. Use a plant-based yogurt instead. Coconut yogurt or almond yogurt can be tasty choices. You should also ensure your sweetener is vegan, like maple syrup or agave. This way, everyone can enjoy these delicious cups. With a few simple changes, you can cater to different diets without losing flavor.
Storage Info
How to Store Leftovers
Store any leftover No Bake Maple Pumpkin Pie Cups in the fridge. Use an airtight container to keep them fresh. This helps maintain their creamy texture and flavor. I recommend putting parchment paper between layers if you stack them. This prevents sticking and keeps the whipped cream intact on top.
Freezing Instructions
You can freeze these cups too. However, I suggest not freezing the whipped cream topping. The texture changes when thawed. To freeze, cover each cup tightly with plastic wrap, then place them in a freezer-safe bag. Make sure to label the bag with the date. They can stay in the freezer for about one month.
How Long Does It Last in the Fridge?
In the fridge, these cups last for about three to five days. The flavors deepen as they chill, making them even tastier! Just remember to check for freshness before serving. If they look or smell off, it’s best to toss them.
FAQs
Can I substitute pumpkin puree with something else?
Yes, you can. You might use sweet potato puree or butternut squash puree instead. Both options work well and add a unique flavor. They have a similar texture to pumpkin. Just make sure you choose pureed options, not pie filling. This keeps the taste and texture close to the original recipe.
How can I make this recipe healthier?
To make this pie cups healthier, consider these tips:
- Swap Greek yogurt for low-fat yogurt or a dairy-free option.
- Use less maple syrup if you prefer lower sugar.
- Add chia seeds or flaxseeds for extra fiber and nutrients.
- Choose whole-grain graham crackers for added health benefits.
These small changes can boost nutrition while keeping the flavor great.
Is it possible to prepare these cups in advance?
Absolutely! You can prepare these cups a day ahead. Just follow the recipe and store them in the fridge. The chilling time helps the flavors blend. Plus, it saves you time on the day you need to serve them. Just add the whipped cream and nuts right before serving for freshness.
This blog post shared all you need to make tasty pumpkin cups. You learned about key ingredients, step-by-step instructions, and helpful tips for the best results. We explored fun variations, storage info, and answers to common questions. You can enjoy these cups in many ways while keeping them fresh and tasty. Try out your favorite twists and impress your friends. Enjoy making these pumpkin cups that are easy and delicious. You won’t be disappointed!


![To make avocado chocolate chip cookies, gather these simple items: - 1 ripe avocado, thoroughly mashed - 1/2 cup packed brown sugar - 1/4 cup granulated sugar - 1/4 cup unsalted butter, melted and slightly cooled - 1 teaspoon pure vanilla extract - 1 large egg, room temperature - 1 cup all-purpose flour - 1/2 teaspoon baking soda - 1/4 teaspoon fine sea salt - 1 cup semisweet chocolate chips These ingredients create a tasty cookie with a twist. If you don’t have some items, here are good swaps: - Avocado: Use 1/2 cup unsweetened applesauce. This keeps it moist. - Butter: Coconut oil works well. It adds a hint of flavor. - Brown Sugar: Use coconut sugar for a lower glycemic option. - All-purpose flour: Try oat flour for a gluten-free choice. These substitutes can change the flavor and texture but still taste great. These cookies are not just yummy; they also pack some nutrition. Here’s a quick look: - Calories: About 120 per cookie - Fat: 6g (mostly healthy fats from avocado) - Carbohydrates: 16g - Protein: 1g - Fiber: 1g Using avocado adds healthy fats and fiber. You can enjoy a treat without feeling guilty. For the full recipe, check out my detailed guide. 1. Preheat your oven to 350°F (175°C). This is key for even baking. 2. Line a baking sheet with parchment paper. This makes cleanup easy and prevents sticking. 3. In a large bowl, mash one ripe avocado until smooth. It should be creamy. 4. Add 1/2 cup brown sugar, 1/4 cup granulated sugar, 1/4 cup melted butter, and 1 teaspoon vanilla extract. Mix until smooth and creamy. 5. Crack one large egg into the bowl. Whisk until the mix is fluffy and well combined. 6. In another bowl, mix 1 cup flour, 1/2 teaspoon baking soda, and 1/4 teaspoon salt. This helps the cookies rise. 7. Slowly add the dry mix to the wet mix. Stir gently until combined. A few lumps are fine. 8. Fold in 1 cup of chocolate chips with a spatula. Make sure they spread evenly in the dough. 1. Use a tablespoon or cookie scoop to place rounded dough on the baking sheet. Space them about 2 inches apart. 2. Bake in the preheated oven for 10-12 minutes. Look for golden edges and soft centers. 3. Once done, take the cookies out of the oven. Let them sit on the sheet for about 5 minutes. This helps them firm up. 1. Transfer the cookies to a wire rack to cool completely. 2. Serve the cookies in a jar or on a decorative plate. 3. For a special touch, sprinkle them with sea salt before serving. This enhances the chocolate flavor. Follow the [Full Recipe] to make these tasty avocado chocolate chip cookies! - Use a ripe avocado. It should feel soft to the touch. - Measure your ingredients accurately for the best results. - Mix the wet ingredients until creamy for a smooth dough. - Don’t overmix when adding dry ingredients; a few lumps are okay. - Space cookies at least 2 inches apart on the baking sheet. - Using unripe avocados can lead to a gritty texture. - Overbaking makes cookies hard instead of soft and chewy. - Forgetting to let the melted butter cool can change the dough. - Not cooling cookies on a wire rack can make them soggy. - Store cookies in an airtight container to keep them fresh. - For longer storage, freeze the cookies in a freezer bag. - To reheat, warm cookies in the oven at 300°F (150°C) for 5-7 minutes. - Enjoy them warm for that fresh-baked taste! For the full recipe, check out the details above. {{image_4}} You can make vegan avocado chocolate chip cookies easily. Replace the egg with a flax egg. To make a flax egg, mix 1 tablespoon of ground flaxseed with 2.5 tablespoons of water. Let it sit for 5 minutes until it thickens. Use the same method as the original recipe. The cookies will still be soft and tasty. If you want gluten-free cookies, swap all-purpose flour for almond or oat flour. Both options work well. Just ensure they are finely ground. Adjust the amount slightly, as these flours absorb moisture differently. The taste will change, but the cookies will remain delicious. Get creative with your cookies! You can add nuts like walnuts or pecans for crunch. Dried fruit, like cranberries or raisins, adds a sweet touch. For a fun twist, try adding a teaspoon of instant coffee or a pinch of cinnamon. Each choice adds a unique flavor to your cookies. To keep your avocado chocolate chip cookies fresh, use an airtight container. Place parchment paper between layers to prevent sticking. Store them at room temperature for up to three days. If you want to keep them longer, consider refrigerating them. Just let them warm up to room temp before eating. You can freeze the cookie dough for later use. Scoop the dough onto a baking sheet and freeze until firm. Once solid, transfer the dough balls to a zip-top bag. They will last in the freezer for up to three months. When you’re ready to bake, just take them out and let them thaw for about 30 minutes before baking. Baked cookies can last about a week in an airtight container at room temperature. If you notice them getting hard, pop them in the microwave for a few seconds. This will soften them up again. For the best taste, try to eat them within a few days. Enjoy your delicious treats from the Full Recipe! Yes, you can use ripe avocados for this recipe. Ripe avocados add a smooth texture and rich taste. Look for avocados that yield slightly when you press them. This softness means they are ready to mash. The ripeness helps make the cookies moist and flavorful. You can also mash the avocado with a fork or a blender for a creamy mix. To know when the cookies are done, check the edges. They should be golden brown. The centers may look soft and slightly undercooked. This is perfect! They will firm up as they cool. For best results, set a timer for 10-12 minutes. Keep an eye on them to avoid burning. If your cookies turn hard, you can soften them easily. Place a slice of bread in the container with the cookies. The moisture from the bread will help them soften. You can also microwave cookies for a few seconds. This will warm them up and make them soft again. Store leftover cookies in an airtight container to keep them fresh longer. This blog post covered key ingredients, step-by-step instructions, and tips for making cookies. You learned about ingredient substitutes and nutrition too. I shared variations like vegan and gluten-free options. Storing and reheating cookies is essential to enjoy them longer. Remember the common mistakes to avoid for perfect cookies every time. Use the FAQ section for quick answers. Try these tips and recipes to create delicious cookies that everyone loves. Enjoy your baking adventure and happy eating!](https://dishtreats.com/wp-content/uploads/2025/07/2a4aa59d-42b3-40d6-b422-d0063b121310-768x768.webp)


![To make these delightful cookies, you need a few key ingredients: - 1 cup ricotta cheese - 1/2 cup unsalted butter, softened - 1 cup granulated sugar - 1 large egg - 2 teaspoons fresh lemon zest - 2 tablespoons fresh lemon juice - 2 cups all-purpose flour - 1 teaspoon baking powder - 1/2 teaspoon baking soda - 1/4 teaspoon fine sea salt - Powdered sugar for dusting These ingredients create a soft and tasty cookie that bursts with lemon flavor. For this recipe, you will need: - A large mixing bowl - An electric mixer - A medium mixing bowl - Whisk - Baking sheet - Parchment paper - Cookie scoop or spoon - Wire rack Having the right tools makes baking easy and fun. You can easily swap some ingredients if needed: - Use low-fat ricotta for a lighter option. - Replace unsalted butter with coconut oil for a dairy-free cookie. - Substitute lemon with orange for a different flavor. - Use gluten-free flour to make these cookies gluten-free. These alternatives let you customize the recipe to fit your needs. For the full recipe, check the details provided above. First, heat your oven to 350°F (175°C). This step is key for baking. Next, line a baking sheet with parchment paper. This prevents the cookies from sticking. In a large bowl, mix the ricotta cheese and softened butter. Use an electric mixer on medium speed. Beat them for about 2-3 minutes. You want a smooth and creamy mix. This will be the base of your cookies. Now, it’s time to add the sugar. Gradually sprinkle in the granulated sugar, mixing as you go. Keep beating until it’s light and fluffy. Next, crack in the egg. Add the lemon zest and lemon juice. Mix until everything is well combined. In a separate bowl, whisk together the flour, baking powder, baking soda, and sea salt. Once mixed, add the dry ingredients to the ricotta mix. Stir gently until just combined. Be careful not to overmix. This helps keep the cookies soft. Use a spoon or cookie scoop to drop rounded tablespoons of dough onto the baking sheet. Leave about 2 inches of space between each cookie. This allows them to spread while baking. Place the sheet in the oven and bake for 12-15 minutes. Look for lightly golden edges and soft centers. After baking, let the cookies cool on the sheet for about 5 minutes. Then carefully transfer them to a wire rack. Let them cool completely. Once cooled, dust lightly with powdered sugar for a sweet touch. Enjoy these delightful lemon ricotta cookies! For the complete recipe, check out the [Full Recipe]. To make your lemon ricotta cookies soft, use fresh ricotta cheese. It adds moisture and flavor. Avoid overmixing the dough. Mix just until combined. This keeps the cookies light. Let the dough chill for about 30 minutes. Chilling helps the cookies hold their shape while baking. Accurate measurements are key to great cookies. Use dry measuring cups for flour and sugar. Spoon the flour into the cup, then level it off with a knife. Do not pack it down. For liquids, use a clear liquid measuring cup. Fill it to the desired line while checking at eye level. One common mistake is not preheating the oven. Always preheat to ensure even baking. Another mistake is baking on an ungreased or unlined pan. Use parchment paper to prevent sticking. Finally, don’t skip cooling the cookies on a wire rack. This helps them set and stay soft. For the full recipe, check out the step-by-step guide. {{image_4}} You can add chocolate chips for a sweet twist. Use semi-sweet or milk chocolate chips. Just fold in one cup of chips into the dough after mixing in the dry ingredients. This change creates a fun contrast with the lemon flavor. The rich chocolate and bright lemon make each bite exciting! To make these cookies gluten-free, swap the all-purpose flour with a gluten-free blend. Look for a blend that includes xanthan gum. This ingredient helps the cookies hold their shape. Follow the same recipe steps, and you will have delicious gluten-free cookies that everyone can enjoy. You can enhance the flavor by adding herbs or spices. Try mixing in a teaspoon of fresh thyme or rosemary for a unique taste. You could also use vanilla extract for warmth. These small changes can take your lemon ricotta cookies to a whole new level. Experiment with flavors and find what you like best! To keep your lemon ricotta cookies fresh, place them in an airtight container. This will help maintain their soft texture. I recommend layering the cookies with parchment paper. This way, they won’t stick together. Store the container at room temperature for up to five days. If you live in a humid area, consider refrigerating them. Just remember to bring them to room temperature before enjoying. If you want to save some cookies for later, freezing is a great option. First, let the cookies cool completely. Then, place them in a single layer on a baking sheet. Freeze for about an hour until firm. After that, transfer the cookies to a freezer-safe bag or container. Make sure to remove as much air as possible. You can freeze them for up to three months. When you’re ready to enjoy, thaw them in the fridge overnight. Lemon ricotta cookies are best enjoyed fresh, but they can last. If stored correctly, they stay soft for about five days at room temperature. Over time, they may become a bit dry. To refresh them, you can microwave a cookie for about 10 seconds. This will bring back some of the softness. Always check for any signs of spoilage before eating. If they smell off or look strange, it’s best to toss them. Enjoy your cookies! For the full recipe, refer to the main article. Yes, you can use pre-made ricotta cheese. Just make sure it is fresh and creamy. Store-bought ricotta saves time and still brings great taste. If it's a bit watery, drain it before use. This will keep your cookies from getting too soggy. To make these cookies dairy-free, replace ricotta cheese with tofu. Use firm tofu, blend it, and add a bit of lemon juice for flavor. For butter, try coconut oil or a dairy-free spread. These swaps keep the cookies soft and delicious without dairy. The best way to glaze these cookies is with a simple lemon glaze. Mix powdered sugar with fresh lemon juice until smooth. Drizzle the glaze over cooled cookies for a sweet finish. You can also add lemon zest on top for extra flavor. You will know the cookies are done when the edges turn golden. The centers should still look soft and puffy. A toothpick inserted in the center should come out clean or with a few crumbs. Avoid over-baking for the softest texture. Yes, you can make these cookies healthier. Use whole wheat flour instead of all-purpose flour. Replace granulated sugar with coconut sugar or a sugar substitute. You can also cut down on butter by using applesauce or Greek yogurt. These changes keep cookies tasty and lower in calories. For the full recipe, check the [Full Recipe]. In this post, we covered how to make lemon ricotta cookies step by step. We explored key ingredients, baking equipment, and helpful tips. I shared ways to customize the cookies with flavors and special diets. Finally, we discussed storage methods to keep them fresh. With these insights, you can bake delicious cookies that are soft and bright in flavor. Enjoy your baking experience and share these treats with friends!](https://dishtreats.com/wp-content/uploads/2025/07/5405bae2-00aa-4997-8585-ece8a42539ac-768x768.webp)