Indulge your sweet tooth with my No Bake Chocolate Hazelnut Mousse Cups! This easy treat combines rich chocolate and creamy hazelnut flavors without the fuss of baking. Perfect for anyone craving a delicious dessert, these mousse cups are simple to whip up and look stunning on any table. Join me as I share my favorite ingredients, foolproof steps, and top tips for making this delightful dessert!
Ingredients
List of Ingredients with Measurements
– 1 cup heavy whipping cream
– 1 cup chocolate hazelnut spread (e.g., Nutella)
– 1 teaspoon pure vanilla extract
– 1 tablespoon powdered sugar
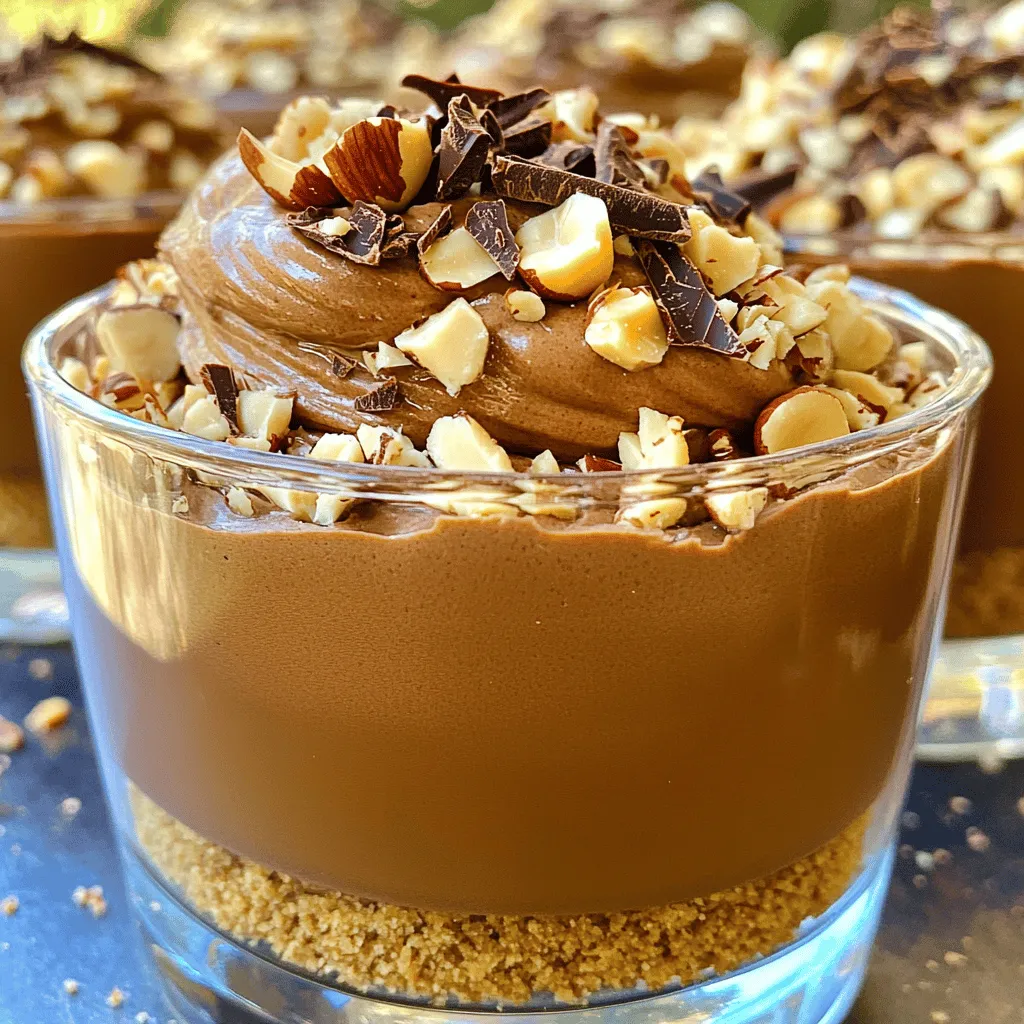
– 1/2 cup crushed hazelnuts (plus extra for garnish)
– 1 cup graham cracker crumbs
– 4 tablespoons unsalted butter, melted
– 1 oz dark chocolate, finely grated (for garnish)
Substitutions for Key Ingredients
If you want a lighter mousse, use light cream instead of heavy cream. For a nut-free option, try sunbutter or a seed spread in place of hazelnut spread. You can also swap crushed almonds or walnuts for hazelnuts if you prefer a different nut flavor. Instead of graham crackers, use crushed cookies or gluten-free crumbs for a twist.
Notes on Ingredient Quality
Using high-quality chocolate hazelnut spread makes the mousse rich and tasty. Choose a spread with real hazelnuts for the best flavor. Fresh heavy cream whips better, so buy it close to your cooking day. When picking hazelnuts, look for whole, unroasted nuts for crunch. The darker the chocolate you use for garnish, the richer the taste.
Step-by-Step Instructions
Detailed Preparation Steps
First, you need to make the base for the mousse cups. In a medium bowl, mix together 1 cup of graham cracker crumbs and 4 tablespoons of melted unsalted butter. Stir it until it looks like wet sand. Next, take 6 to 8 small cups and divide the mixture evenly among them. Press it down firmly to create a solid base. Place the cups in the fridge to chill while you prepare the mousse.
For the mousse, grab a large mixing bowl. Beat 1 cup of heavy whipping cream using a mixer. Do this on medium-high speed for about 2-3 minutes, or until you see soft peaks. In another bowl, mix 1 cup of chocolate hazelnut spread, 1 teaspoon of pure vanilla extract, and 1 tablespoon of powdered sugar. Stir this mixture until it is smooth.
Now, gently fold the whipped cream into the chocolate hazelnut mix using a spatula. Be careful not to lose the airiness of the whipped cream. Once combined, add in 1/2 cup of crushed hazelnuts and fold them in for added texture. Finally, spoon or pipe the mousse into your chilled cups over the graham cracker base. Smooth the tops with a spatula for a nice finish.
Let the mousse cups set in the fridge for at least 2 hours. Before serving, sprinkle crushed hazelnuts and grated dark chocolate on top for a lovely touch.
Tips for Whipping Cream
To whip cream perfectly, use a cold bowl and cold beaters. This helps the cream whip faster and gets more volume. Start at a low speed, then increase to medium-high. Watch closely as soft peaks form. Stop mixing when the cream looks fluffy and holds its shape. Over-mixing can turn the cream into butter, so be careful!
Tips for Layering Mousse
When layering your mousse, take your time. Start with a smooth layer of mousse over the graham cracker base. Use a piping bag for more control if you want neat layers. Tap the cups gently on the counter to remove air bubbles. This gives a nice, even look. Remember to add your toppings just before serving to keep them fresh and crunchy.
Tips & Tricks
How to Achieve the Perfect Mousse Texture
To get a great mousse texture, whip the cream well. You want soft peaks that hold shape. Use a clean bowl and cold beaters for best results. Mix the chocolate hazelnut spread with vanilla and sugar until smooth. Fold in the whipped cream gently. This keeps the mousse light and fluffy. Avoid stirring too hard; you don’t want to lose air. Finally, let the mousse chill for at least two hours. This helps it set perfectly.
Serving Tips for Presentation
Make your mousse cups look fancy with simple touches. Use clear cups to show off those pretty layers. Just before serving, sprinkle crushed hazelnuts on top. Add a bit of grated dark chocolate for a nice finish. You can also place a dollop of whipped cream on each cup. For an extra special touch, serve them on a decorative platter. This makes your dessert stand out at any gathering.
Recommended Tools and Equipment
You will need a few tools to make this dessert easier. A medium mixing bowl works well for the graham cracker base. A large mixing bowl is best for the mousse. Use a handheld mixer or stand mixer to whip the cream. A spatula is great for folding the mixtures together. You’ll also need measuring cups and spoons for accuracy. Lastly, having small serving cups makes for easy presentation. These tools will help you create the best no-bake mousse cups.

Variations
Favorite Flavor Twists
You can add new flavors to your mousse cups. A splash of coffee gives a rich taste. Just mix in one tablespoon of brewed coffee into the chocolate hazelnut spread. If you love fruit, add mashed bananas or pureed strawberries. These flavors make the mousse bright and fresh. You can also try a touch of orange zest for a citrus kick that pairs well with chocolate.
Dietary Adjustments
For those needing gluten-free options, use gluten-free graham crackers. You can find many brands that offer tasty alternatives. Also, check your chocolate hazelnut spread for gluten-free labels. If you want a dairy-free version, swap heavy cream with coconut cream. The mousse will still be creamy and rich. Just chill the coconut cream before whipping it for the best texture.
Different Types of Bases
You can switch up the base of your mousse cups, too. Instead of graham crackers, try crushed Oreos for a chocolatey twist. You could also use shortbread cookies for a buttery flavor. For a nutty base, ground almonds or hazelnuts work great. Just mix them with melted butter, and you have a delicious base that adds more flavor to your cups.
Storage Info
Best Practices for Refrigerating Mousse Cups
To keep your mousse cups fresh, store them in the fridge. Use an airtight container to protect them from odors and moisture. If you have a lot, cover each cup with plastic wrap. This helps keep their texture and flavor intact. Place them on a flat surface to avoid spills. Chill them for at least two hours before serving.
How Long Mousse Cups Last in the Fridge
No bake chocolate hazelnut mousse cups last about three days in the fridge. After this time, the mousse may lose its creamy texture. The graham cracker base can also get soggy. To enjoy the best taste and texture, eat them within this time frame. Always check for any signs of spoilage before enjoying.
Freezing Instructions
You can freeze mousse cups, but it’s best to do this without the toppings. Place the cups in the freezer for up to one month. When ready to eat, move them to the fridge overnight. This helps them thaw slowly and keeps their texture smooth. Avoid refreezing once thawed, as it can ruin the mousse.
FAQs
Can I make this dessert ahead of time?
Yes, you can prepare these mousse cups a day in advance. Just store them in the fridge. By letting them sit overnight, the flavors meld nicely. This also helps the mousse set perfectly.
How do I prevent the mousse from becoming runny?
To keep your mousse thick, use heavy whipping cream. Make sure to whip it until soft peaks form. When mixing, fold gently to keep air in. This keeps it light and fluffy.
What can I substitute for hazelnuts?
If you can’t find hazelnuts, try walnuts or almonds. Both offer a nice crunch and flavor. You can also use a nut-free chocolate spread if needed. For a twist, consider adding crushed cookies for texture.
This blog post covered how to make delicious mousse. I shared the best ingredients and important measurements. You learned about key substitutions and tips for high-quality ingredients. I explained step-by-step instructions for preparing the mousse and gave tips to get the right texture. Different flavors and dietary options let you be creative. Storage tips help keep your mousse fresh longer.
Making mousse can be fun and rewarding. Enjoy your sweet creations!


