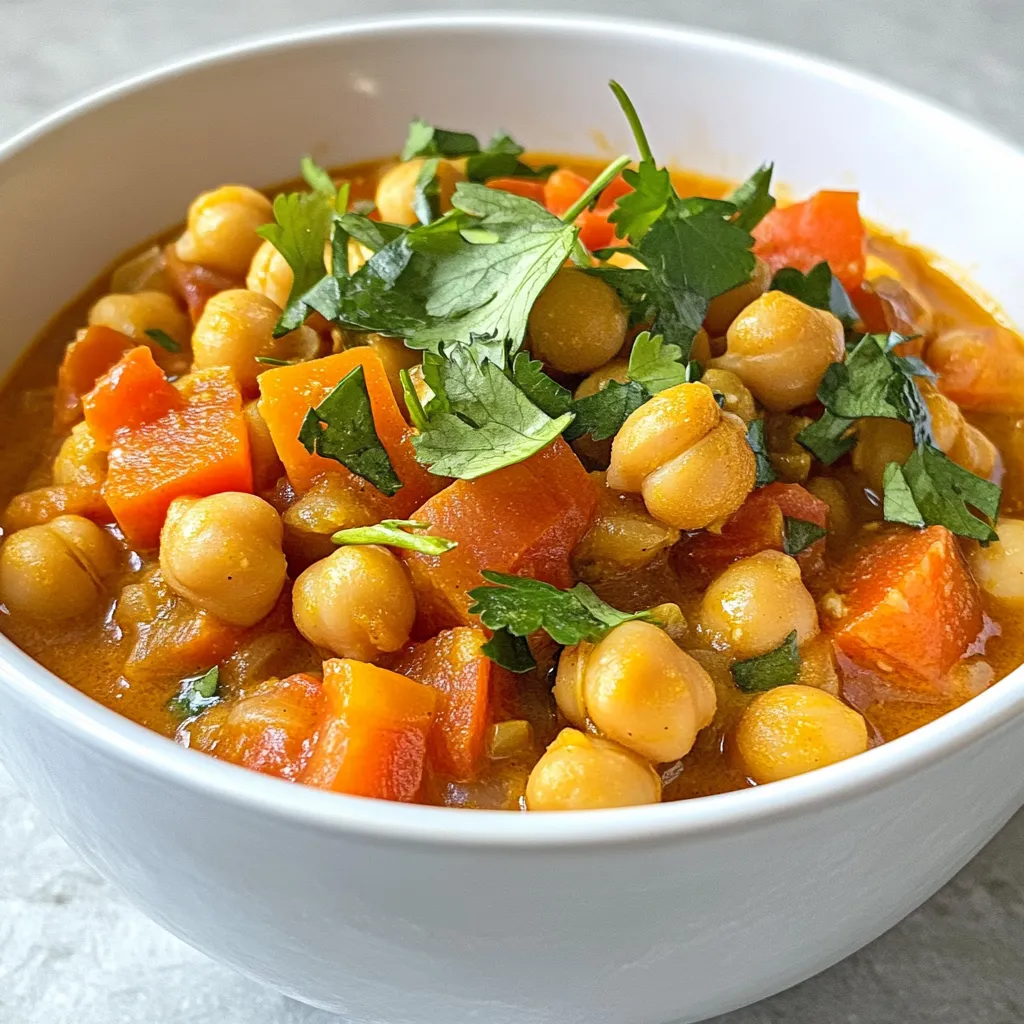
If you’re looking for a warm, healthy dish to add to your menu, Moroccan Chickpea Stew is a winner! This hearty meal is packed with flavor, nutrients, and easy-to-find ingredients. I’m excited to share my favorite recipe and tips to make this stew perfect every time. Whether you’re a seasoned cook or a beginner, this recipe is simple yet delightful. Let’s dive in and explore the vibrant tastes of Morocco together!
Why I Love This Recipe
- Bold Flavors: This Moroccan Chickpea Stew is packed with vibrant spices like cumin, coriander, and smoked paprika that create a rich and aromatic experience.
- Nutritious Ingredients: With chickpeas, vegetables, and coconut milk, this stew is not only delicious but also loaded with protein, fiber, and healthy fats.
- Easy to Make: This recipe is straightforward and requires minimal preparation, making it perfect for a weeknight dinner.
- Versatile Meal: Serve it with warm pita or couscous, and adjust the spices to your preference for a customizable and satisfying dish.
Ingredients
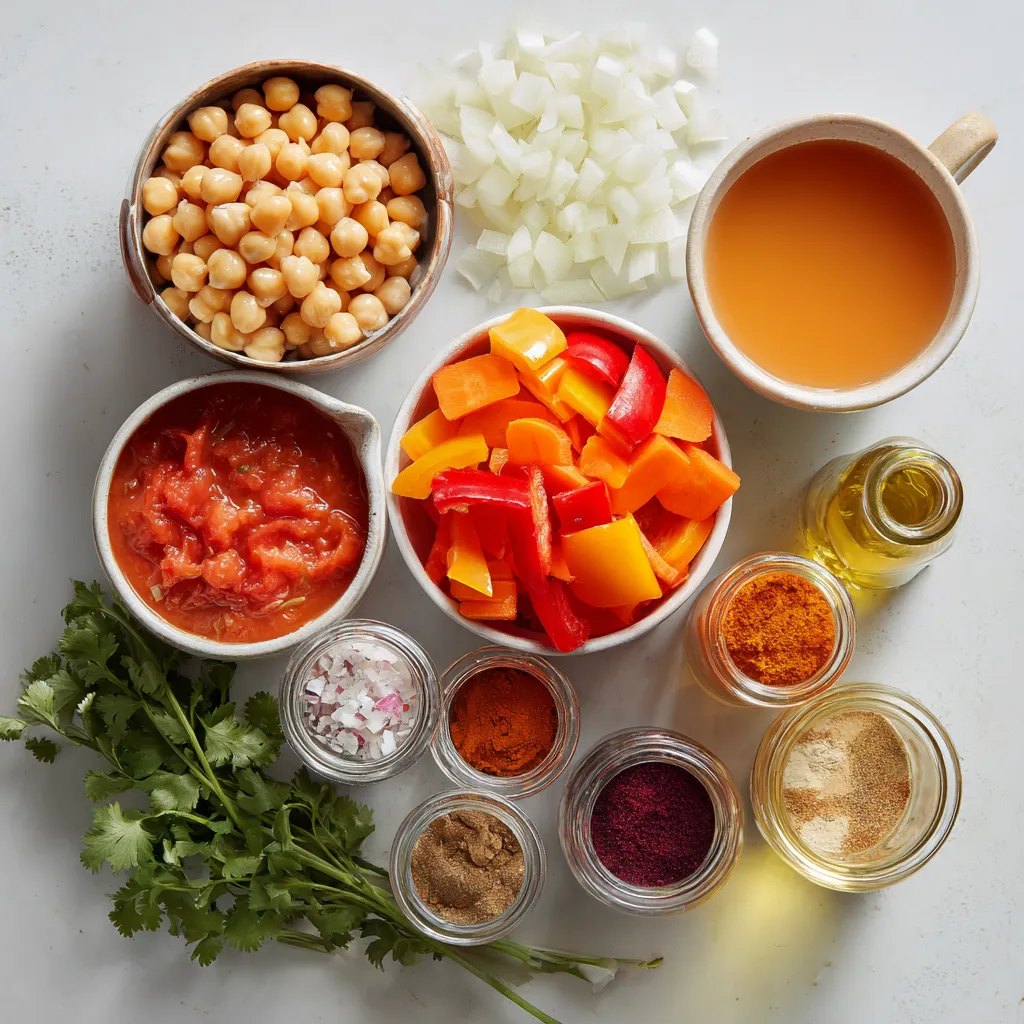
List of Ingredients
– 1 can (15 oz) chickpeas, thoroughly drained and rinsed
– 1 medium onion, finely diced
– 2 cloves garlic, minced
– 1 bell pepper of choice, diced (red, green, or yellow)
– 2 medium carrots, sliced into thin rounds
– 2 medium tomatoes, diced
– 1 cup vegetable broth (preferably low sodium)
– 1 can (14 oz) coconut milk, shaken well before opening
– 2 tablespoons tomato paste
– 1 tablespoon olive oil
– 1 teaspoon ground cumin
– 1 teaspoon ground coriander
– 1 teaspoon smoked paprika
– 1/2 teaspoon cayenne pepper (adjust according to your heat preference)
– Salt and black pepper, to taste
– Fresh cilantro, roughly chopped, for garnish
Optional Add-ins
You can make this stew even more fun by adding some extras! Consider these options:
– Spinach or kale for a nutrient boost.
– Zucchini for extra texture.
– Sweet potatoes for a sweet touch.
– A splash of lemon juice for brightness.
Substitute Ingredients
If you can’t find a specific ingredient, don’t worry! Here are some great swaps:
– Use fresh chickpeas instead of canned; just cook them first.
– Swap coconut milk for almond milk or cream for a different flavor.
– If you don’t have cumin, try using curry powder for a unique twist.
– Use any broth you have on hand, like chicken or mushroom broth.
This stew is not only filling but also packed with flavors from spices and fresh veggies. Each ingredient plays a role in making this dish rich and tasty. Enjoy your cooking!
Step-by-Step Instructions
Preparation Steps
First, gather all your ingredients. This makes cooking easier. You will need:
– 1 can (15 oz) chickpeas, thoroughly drained and rinsed
– 1 medium onion, finely diced
– 2 cloves garlic, minced
– 1 bell pepper of choice, diced
– 2 medium carrots, sliced into thin rounds
– 2 medium tomatoes, diced
– 1 cup vegetable broth
– 1 can (14 oz) coconut milk
– 2 tablespoons tomato paste
– 1 tablespoon olive oil
– 1 teaspoon ground cumin
– 1 teaspoon ground coriander
– 1 teaspoon smoked paprika
– 1/2 teaspoon cayenne pepper
– Salt and black pepper, to taste
– Fresh cilantro, roughly chopped, for garnish
Chop the onion, garlic, bell pepper, carrots, and tomatoes. This helps the stew cook evenly.
Cooking Method
In a large pot, warm the olive oil over medium heat. Add the diced onion. Sauté for about 5 minutes. The onion should be soft and fragrant.
Next, toss in the minced garlic, diced bell pepper, and sliced carrots. Cook for another 3-4 minutes. Stir the mixture often. You want the veggies to soften and blend well.
Then, add the diced tomatoes to the pot. Let them cook for about 5 minutes. This will help them break down and add rich flavor.
Now, stir in the drained chickpeas, vegetable broth, coconut milk, and tomato paste. Mix everything well.
Sprinkle in the spices: cumin, coriander, smoked paprika, and cayenne pepper. Season with salt and black pepper. Stir to combine all the flavors.
Bring the mixture to a gentle boil. Once it boils, reduce the heat to a simmer. Cover the pot and let it cook for 20-25 minutes. This simmering time will let the flavors meld together.
Final Touches
After cooking, taste the stew. Adjust the seasoning if needed. If the stew is too thick, add a splash of vegetable broth for the right consistency.
Serve the stew hot. Garnish it with fresh chopped cilantro for a pop of color and flavor. Enjoy this healthy, flavorful meal warm and hearty!
Tips & Tricks
Perfecting the Flavor
To enhance the flavor, use fresh spices. Fresh spices pack more punch than old ones. Toast the spices in the pot before adding other ingredients. This step wakes up the flavors. Adjust the cayenne pepper to match your heat level. You can always add more, but it’s hard to take it out. Don’t forget to taste as you cook. This helps you find the perfect balance. If it feels bland, add a pinch of salt or a splash of lemon juice for brightness.
Serving Suggestions
Serve the stew hot in deep bowls. A sprinkle of fresh cilantro on top adds color and flavor. Pair it with warm pita bread or fluffy couscous for a full meal. You can also serve it with a side salad for some crunch. A dollop of yogurt can add creaminess, too. If you like, drizzle olive oil on top for extra richness. The stew is great for sharing, so make it a group meal.
Meal Prep Strategies
This stew is perfect for meal prep. Make a big batch and store it in the fridge. It tastes even better the next day as flavors meld. Divide it into portions in airtight containers. You can also freeze extras for later. Just thaw overnight in the fridge before reheating. When reheating, add a bit of broth if it seems thick. This helps bring back the original texture. Enjoy your delicious meal anytime!
Pro Tips
- Enhance the Flavor: Add a squeeze of fresh lemon juice just before serving to brighten up the flavors of the stew.
- Make It Heartier: For added protein and texture, consider including diced sweet potatoes or butternut squash to the stew.
- Spice Level Adjustment: Adjust the amount of cayenne pepper based on your preference; you can also substitute it with a milder spice if desired.
- Storage Tips: This stew stores well in the refrigerator for up to 3 days and can be frozen for up to a month. Reheat gently on the stove.
Variations
Spicy Moroccan Chickpea Stew
To make your Moroccan chickpea stew spicy, add more cayenne pepper. Start with 1 teaspoon and taste as you go. You can also add chopped fresh chili peppers for extra heat. I love using jalapeños or serranos for a nice kick. This adds a wonderful layer of flavor and warmth. If you want it really hot, add a splash of hot sauce at the end.
Vegetable Variations
You can easily change up the veggies in this stew. Try adding zucchini, sweet potatoes, or spinach. Each vegetable brings its own taste and texture. For a heartier stew, toss in some diced potatoes. You can even add frozen peas or corn for a pop of color. The stew will still taste great, and you’ll enjoy different flavors every time.
Protein Add-ins
If you want to boost protein, add cooked quinoa or lentils. These options blend well with chickpeas and enhance the stew’s nutrition. You can also mix in shredded chicken or cooked sausage for a meatier dish. For a vegetarian twist, try cubes of firm tofu or tempeh. Each choice adds unique flavors and makes your stew more filling.
Storage Info
Storing Leftovers
After you enjoy your Moroccan Chickpea Stew, store leftovers in an airtight container. This helps keep the flavors fresh. Place the container in the fridge. Leftovers can last up to four days. Make sure the stew cools before sealing it up. This prevents excess moisture inside the container.
Freezing Instructions
Freezing is a great option for longer storage. Pour the cooled stew into a freezer-safe container. Leave some space at the top, as the stew will expand when frozen. You can freeze it for up to three months. Label the container with the date. This helps you remember when you made it.
Reheating Tips
When you’re ready to enjoy your stew again, take it out of the fridge or freezer. If it’s frozen, thaw it in the fridge overnight. For reheating, use a pot on the stove over low heat. Stir it often to ensure even heating. Add a splash of vegetable broth if it seems too thick. You can also use a microwave for quick reheating. Just cover the bowl and heat it in short bursts, stirring in between. Enjoy your tasty stew!
FAQs
What is Moroccan Chickpea Stew?
Moroccan Chickpea Stew is a tasty meal made with spices, veggies, and chickpeas. It’s rich and creamy, thanks to coconut milk. The mix of cumin, coriander, and paprika gives it a warm, rich taste. You can enjoy this stew with pita bread or couscous. It’s perfect for a cozy dinner.
How long does Moroccan Chickpea Stew last?
You can store Moroccan Chickpea Stew in the fridge for about 3 to 5 days. Use an airtight container to keep it fresh. If you want to save it longer, freeze it. In the freezer, it can last up to 3 months. Just make sure to let it cool before you freeze it.
Can I make Moroccan Chickpea Stew vegan?
Yes! This stew is already vegan-friendly. It uses chickpeas, veggies, and coconut milk, all of which are plant-based. If you want to add protein, consider adding more veggies or grains. This stew is versatile and can fit many diets. Enjoy it guilt-free!
Moroccan Chickpea Stew is packed with flavor and healthy ingredients. We discussed ingredients, preparation, cooking steps, and tips to enhance taste. You can customize it with different veggies or proteins. Remember to store leftovers properly and try freezing your stew for later. This dish is great for meal prep and easy to reheat. Enjoy making this stew and share it with others. Happy cookin


